Top Posts
Offline VMware Cloud Foundation 9 Depot: Your Path...
VMware Cloud Foundation 9: Simplifying Identity with a...
What’s New In VMware Cloud Foundation 9.0
Deploying & Configuring the VMware LCM Bundle Utility...
VMware Cloud Foundation: Don’t Forget About SSO Service...
VMware Explore Las Vegas 2025: Illuminating the Path...
Securing Software Updates for VMware Cloud Foundation: What...
VMware Cloud Foundation 5.2: A Guide to Simplified...
VMware Cloud Foundation 5.2: Unlocking Secure Hybrid Cloud...
VMware Cloud Foundation – Memory Tiering: Optimizing Memory...
Virtual Bytes
  • Home
  • Home Data Center 2025
  • VMware
    • Cloud
    • Datacenter & Cloud Infrastructure
      • VMware ESXi
      • VMware vCenter
      • VMware vSAN
    • Networking & Security
    • Desktop & App Virtualization
      • Omnissa Horizon
    • Troubleshooting
    • Ansible
  • Education
  • Hardware
    • Hardware Tips & Tricks
  • Events
  • About
    • About Me
    • Home Lab Archives
      • Home Lab 2020-2022
      • Home Lab 2016-2020
Tag:

cyber security

VMware NSX

Upgrading VMware NSX 4.0.1.1 to 4.1.0

by Tommy Grot March 1, 2023
written by Tommy Grot 4 minutes read

Topic of the day – How to upgrade VMware NSX 4.0.1.1 to 4.1.0, during this walkthrough, I will go through all the steps that are required, along with how the upgrade process is and any issues I encounter.

Lets Begin!

What Will You Need:

  • VMware-NSX-upgrade-bundle-4.1.0.0.0.21332672.mub
  • Successful NSX Configuration Backups on your SFTP Server
  • 1 hour!

Version I am Running:

  • VMware ESXi 8.0 Build 21203435
  • VMware vCenter Server – 8.0.0.10200

The supported upgrade paths for the NSX product versions. (More Info Here)

Adhere to the following upgrade paths for each NSX release version.

  • NSX 3.2.x > NSX 4.1.x.
  • NSX 4.0.x > NSX 4.1.x.

What’s New

Information below is from VMware’s NSX Release Notes – More Info Check out here!

NSX 4.1.0 provides a variety of new features to offer new functionalities for virtualized networking and security for private, public, and multi-clouds. Highlights include new features and enhancements in the following focus areas:

  • IPv6 support for NSX internal control and management planes communication – This release introduces support for Control-plane and Management-plane communication between Transport Nodes and NSX Managers over IPv6. In this release, the NSX manager cluster must still be deployed in dual-stack mode (IPv4 and IPv6) and will be able to communicate to Transport Nodes (ESXi hosts and Edge Nodes) either over IPv4 or IPv6. When the Transport Node is configured with dual-stack (IPv4 and IPv6), IPv6 communication will be always preferred.
  • Multi-tenancy available in UI, API and alarm framework – With this release we are extending the consumption  model of NSX by introducing multi-tenancy, hence allowing multiple users in NSX to consume their own objects, see their own alarms and monitor their VMs with traceflow.  This is made possible by the ability for the Enterprise Admin to segment the platform into Projects, giving different spaces to different users while keeping visibility and control.
  • Antrea to NSX Integration improvements – With NSX 4.1, you can create firewall rules with both K8s and NSX objects. Dynamic groups can also be created based on NSX tags and K8s labels. This improves usability and functionality of using NSX to manage Antrea clusters.
  • Online Diagnostic System provides predefined runbooks that contain debugging steps to troubleshoot a specific issue. These runbooks can be invoked by API and will trigger debugging steps using the CLI, API and Scripts. Recommended actions will be provided post debugging to fix the issue and the artifacts generated related to the debugging can be downloaded for further analysis. Online Diagnostic System helps to automate debugging and simplifies troubleshooting

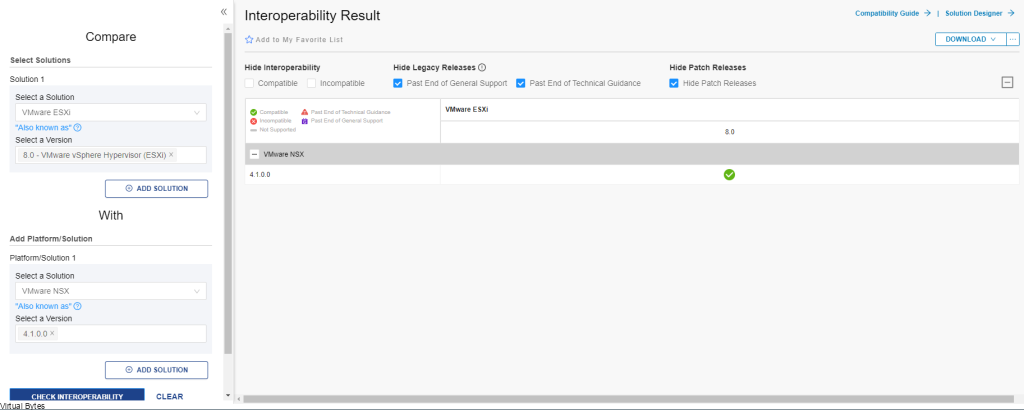
Interoperability Check for VMware vSphere 8 and NSX 4.1

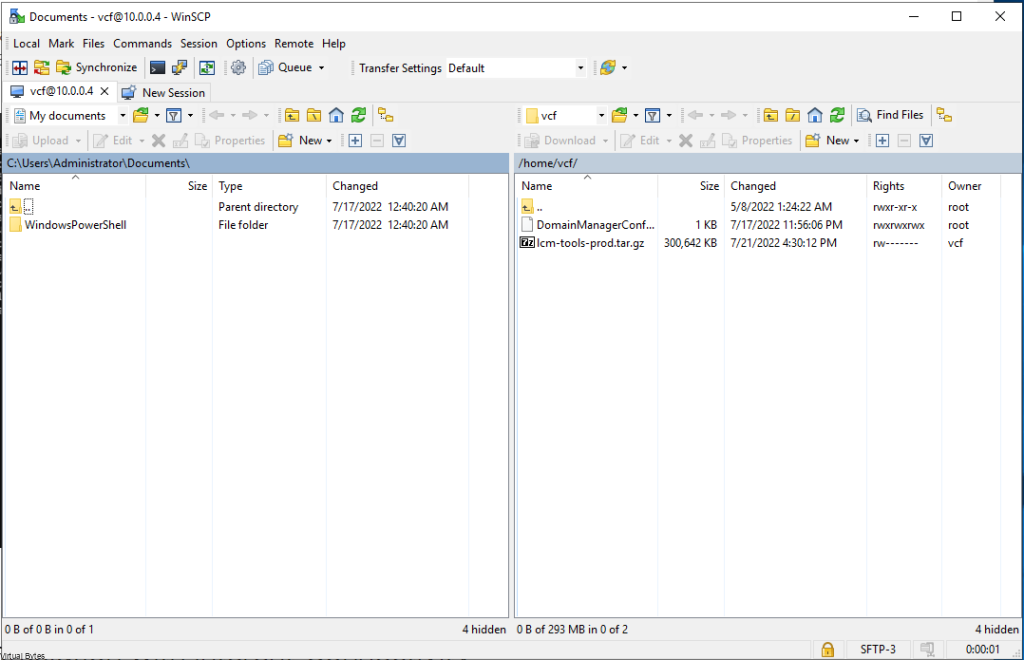
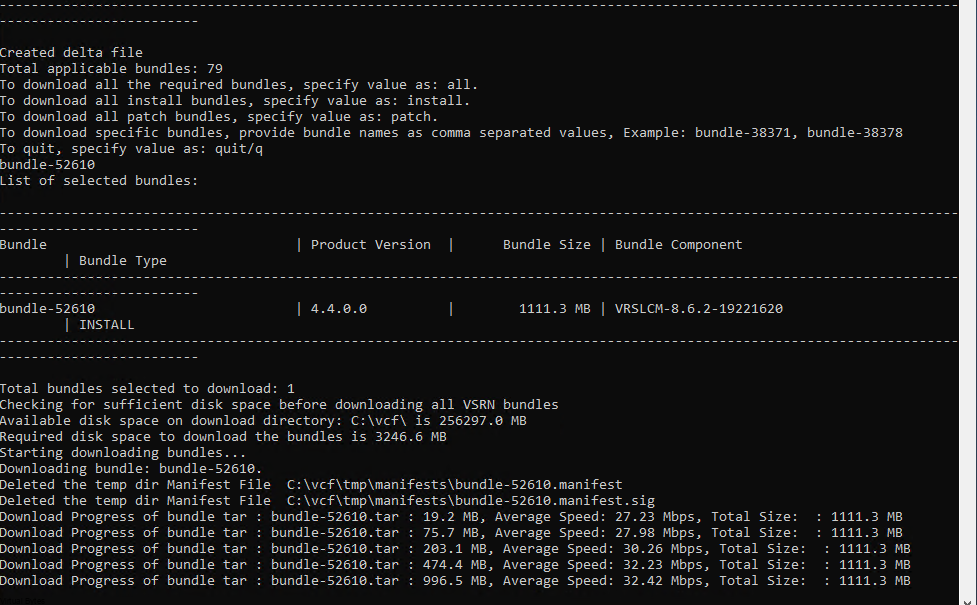
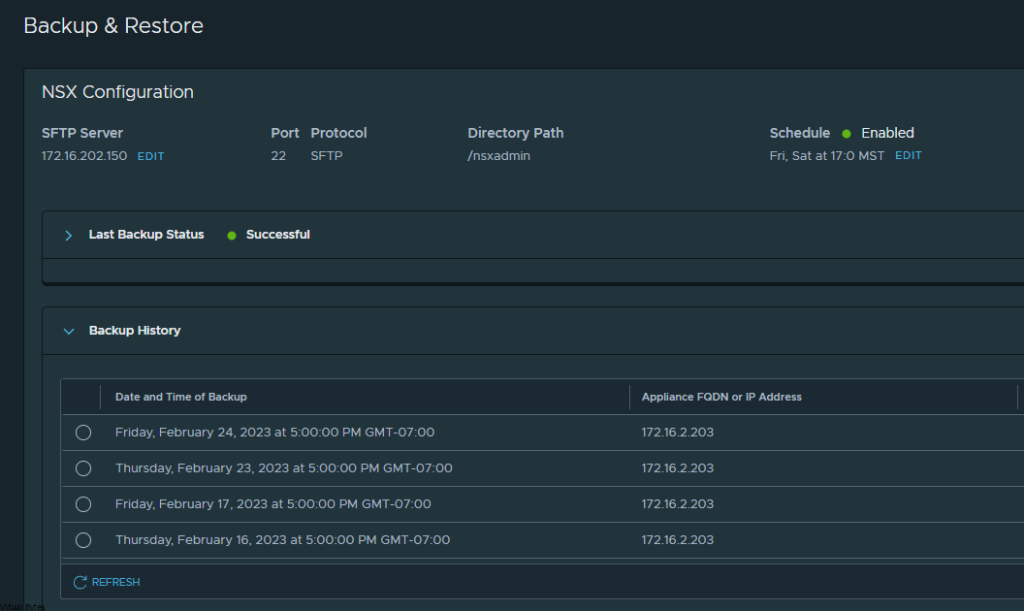
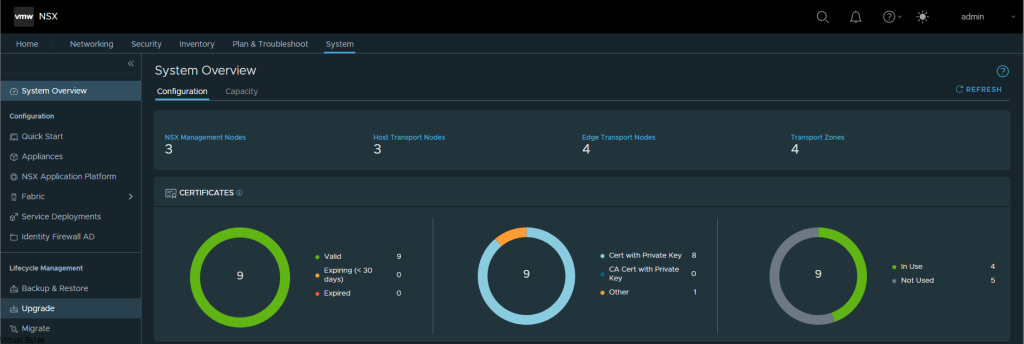
Before we start the upgrade, make sure that you have successfully backups of your current NSX Environment! For my implementation I used a SFTP Server running on Ubuntu Linux VM which is hosted on a secondary tier storage SAN,

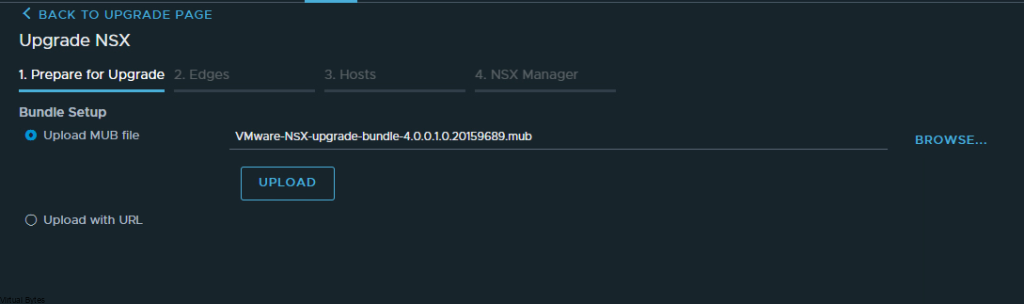
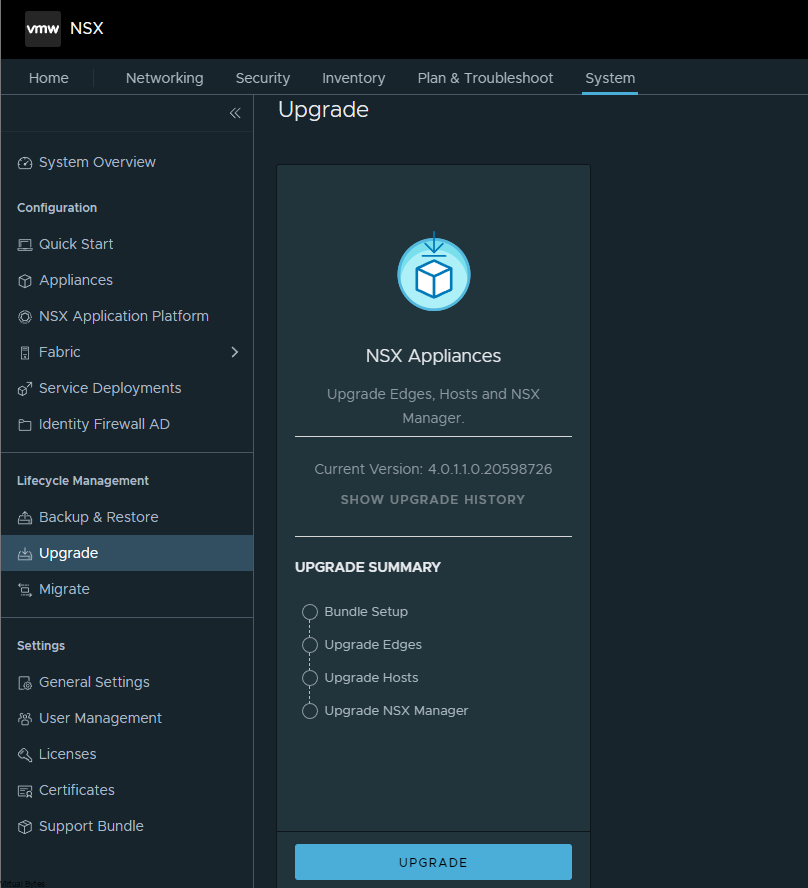
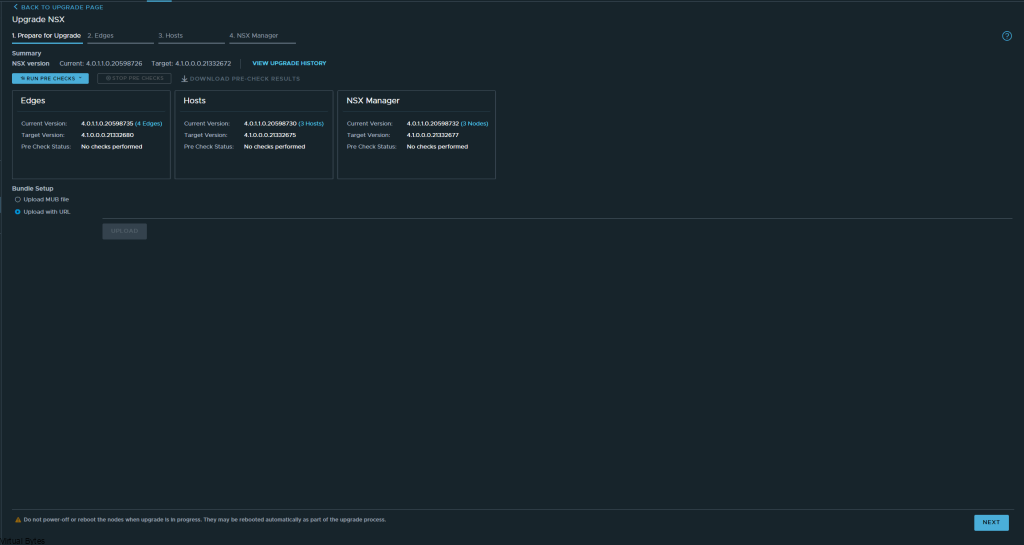
Now, that we verified our backups are good. Lets begin uploading the MUB file.

Go To Upgrade ->

Click on UPGRADE

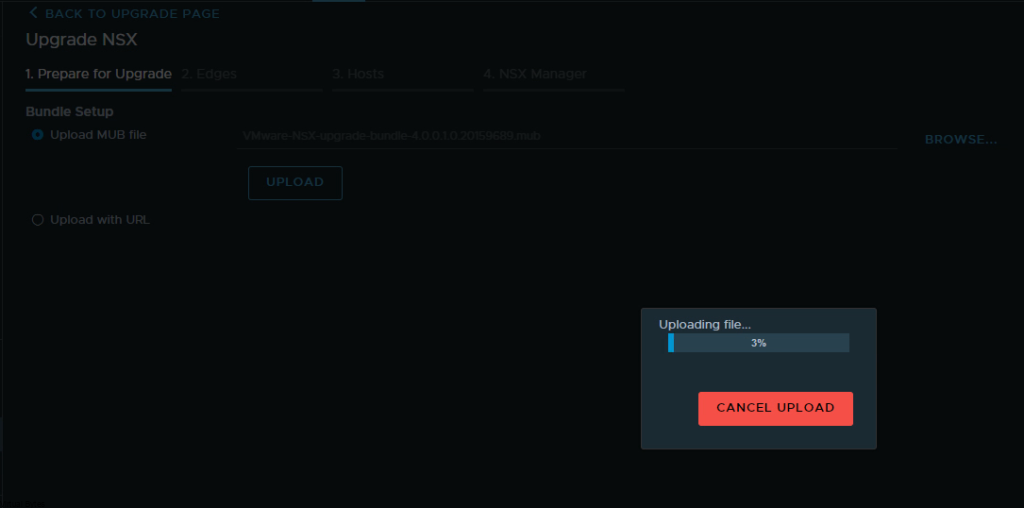
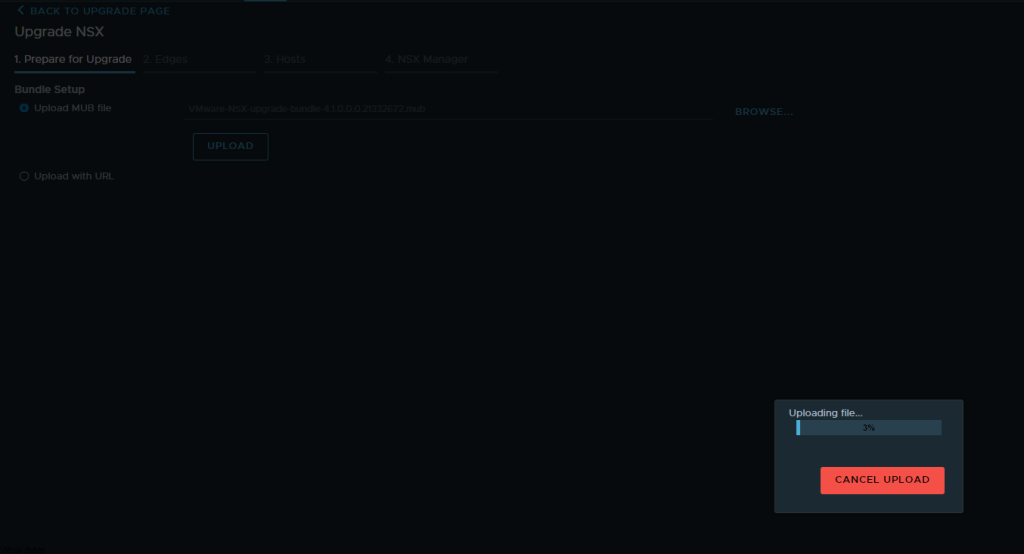
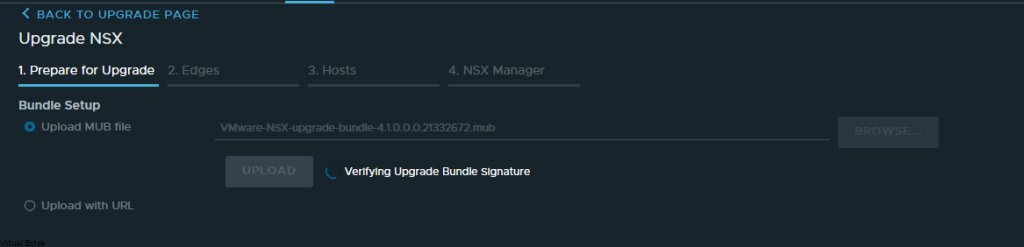
Find via Browse the VMware-NSX-upgrade-bundle-4.1.0.0.0.21332672.mub and upload it

Wait few min for the MUB to upload

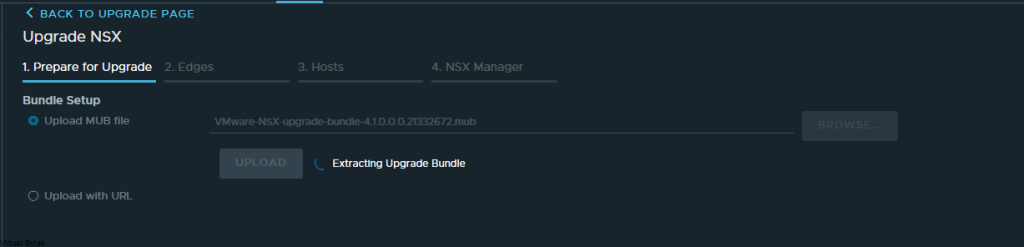
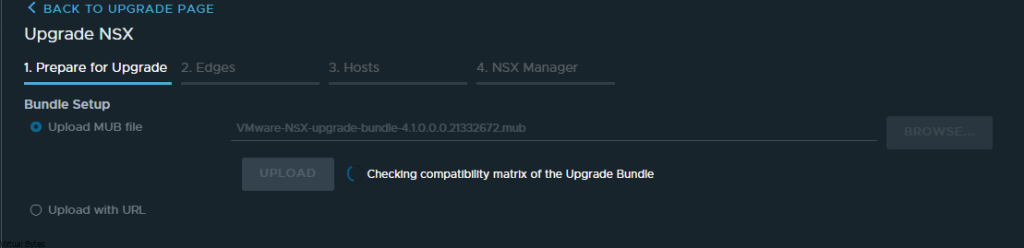
Now, the MUB has been successfully uploaded to NSX Manager appliance, now we wait and let it extract all the files.
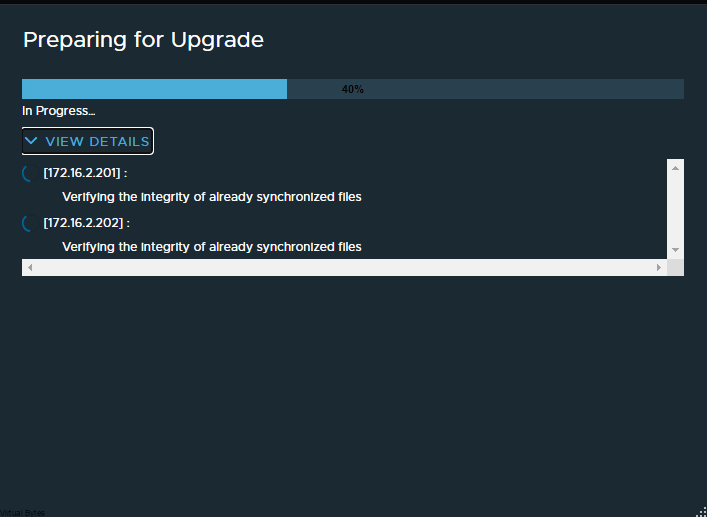
Verifying Stage

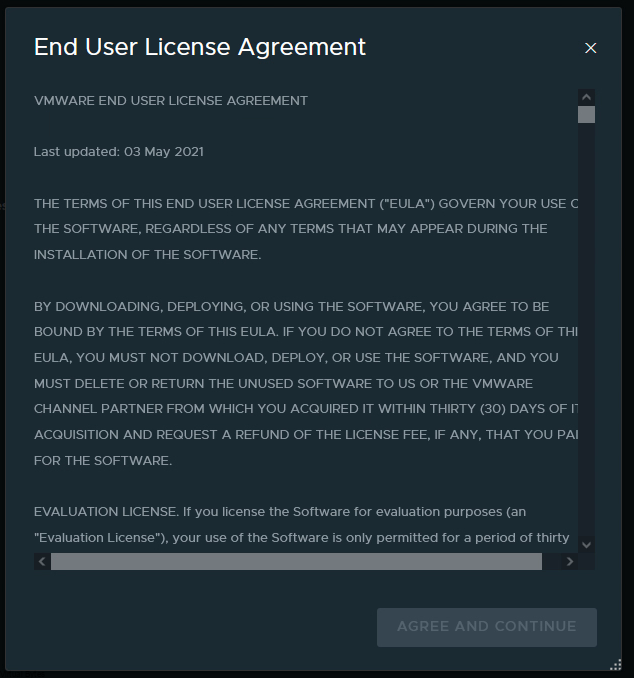
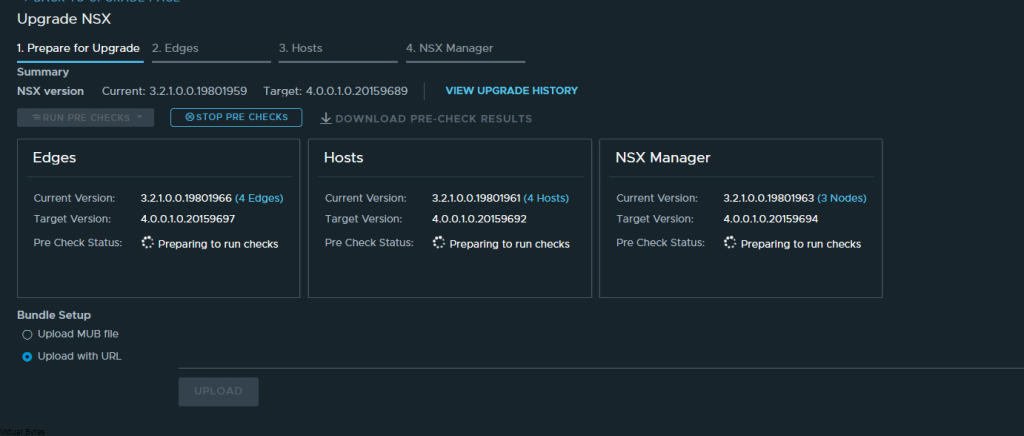
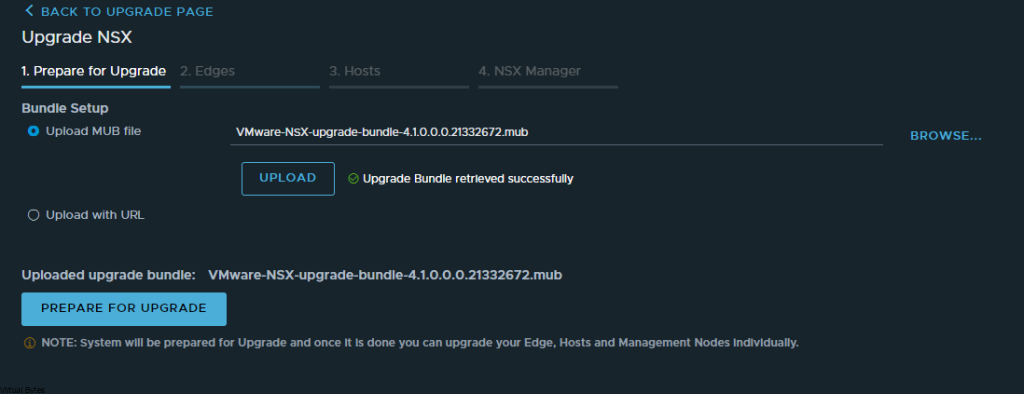
Now, we are ready to prepare for the Upgrade! (Accept the EULA at the pop up)

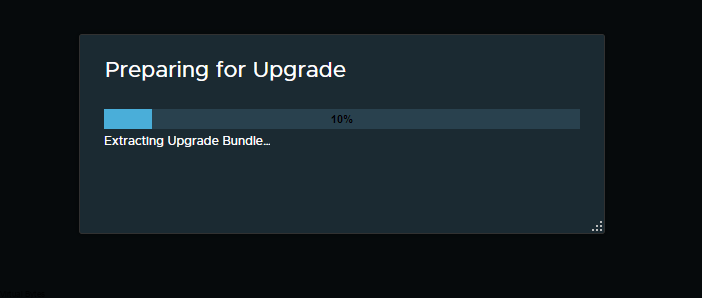
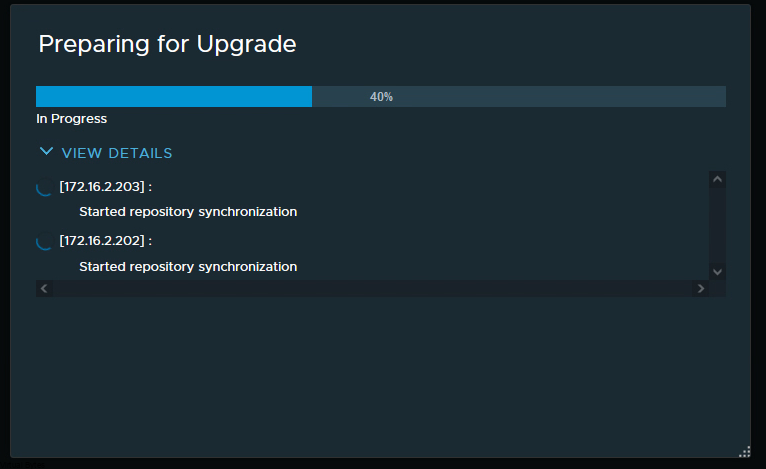
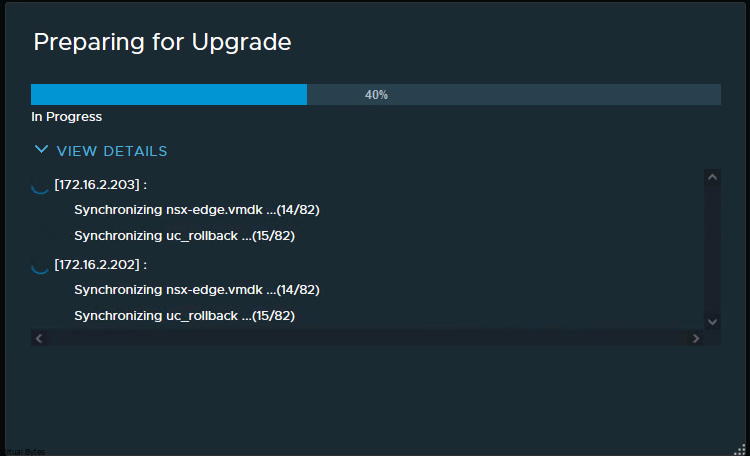
This portion of the upgrade will go through many stages within this little window, you will see once as an example: Restarting Upgrade Coordinator

Click – Run Pre-Check Before upgrading!

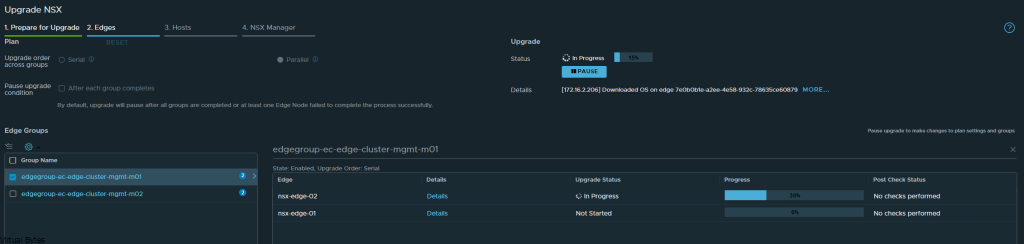
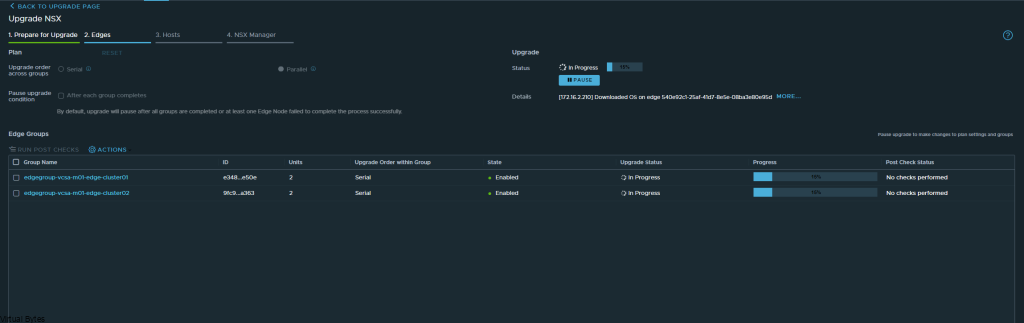
Now Let the NSX Edge Nodes upgrade, this is a pretty quick automated process!

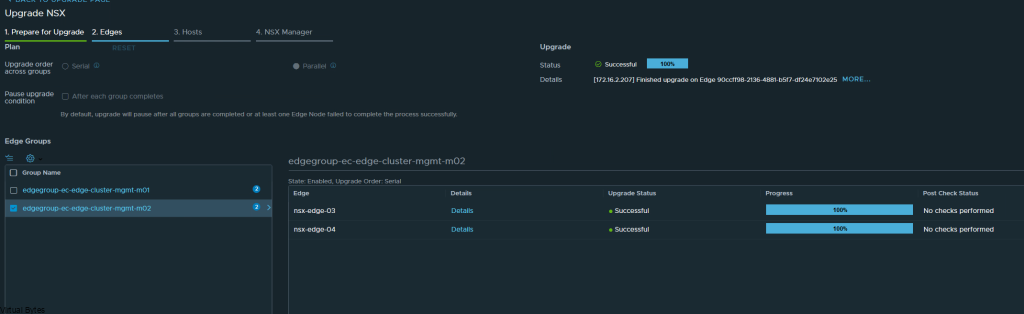
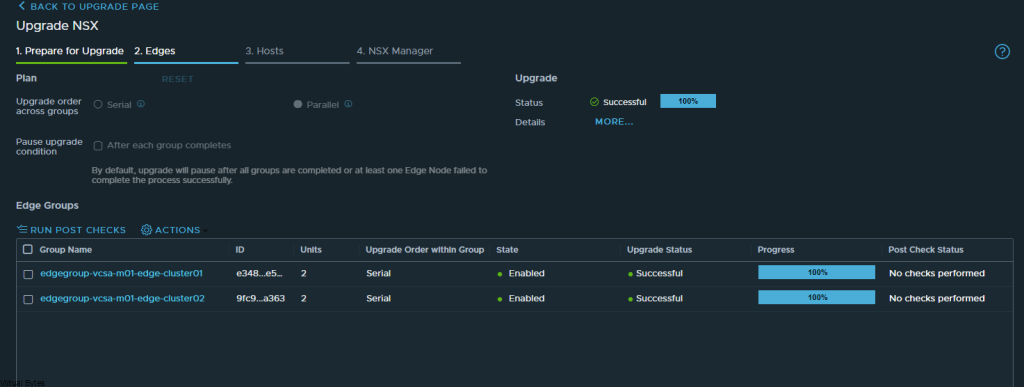
NSX Edge Nodes successfully upgraded!

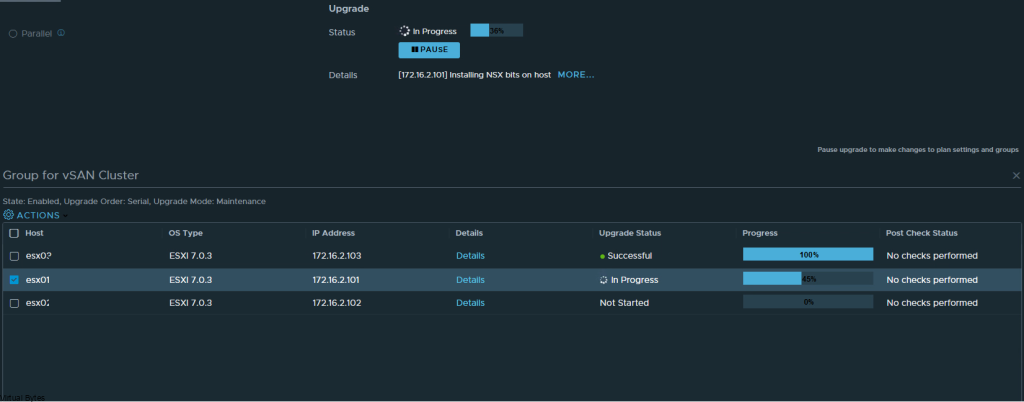
Now time to upgrade the Transport Nodes (also known as ESXi Hosts)

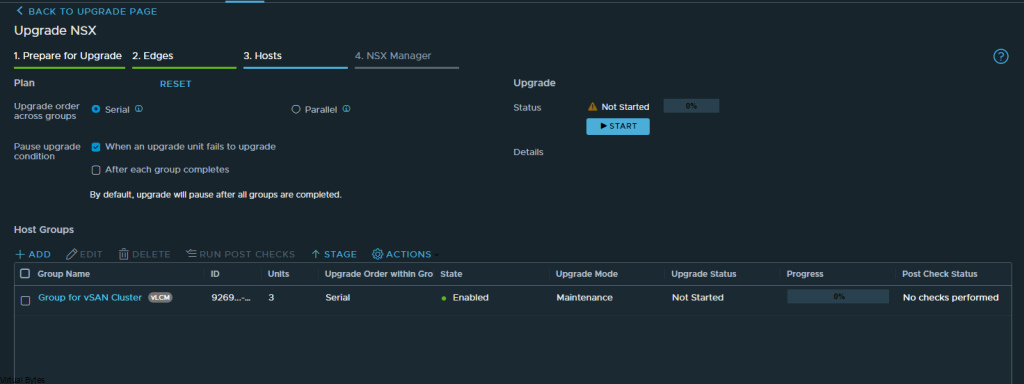
You will see the upgrade process going in vCenter Tasks. (Make sure that all VMs that are not on any kind of shared storage such as vSAN or a iSCSI LUN which is shared within the cluster, off.)

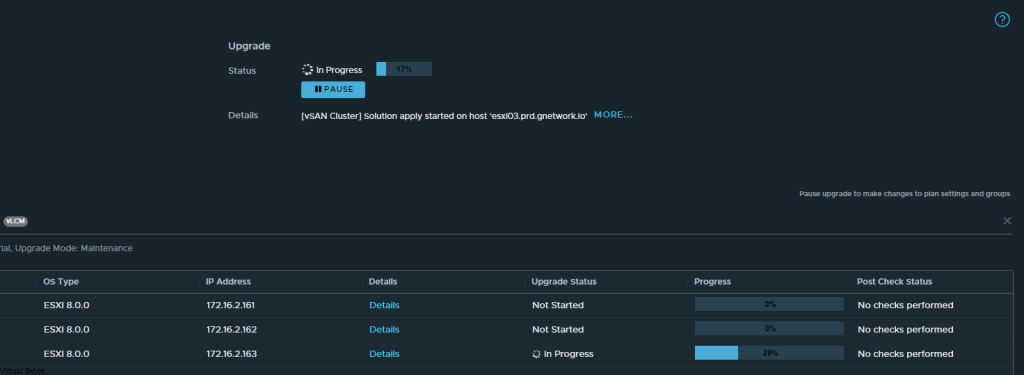
In Process upgrade for Hosts.
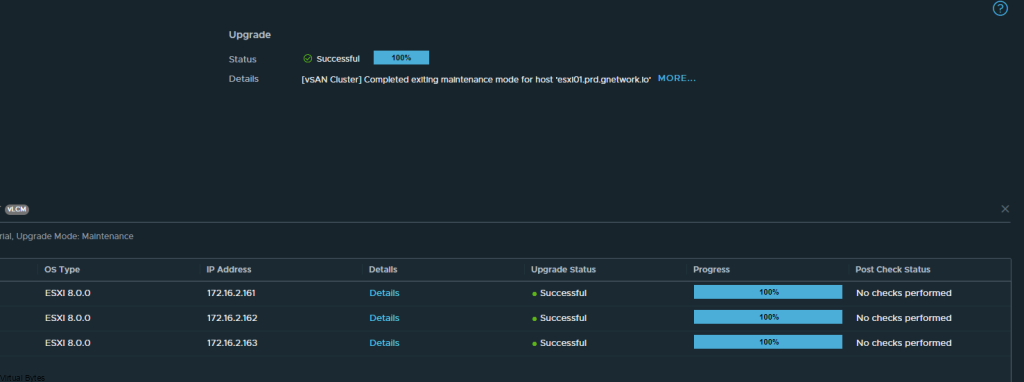
Successful Upgrade

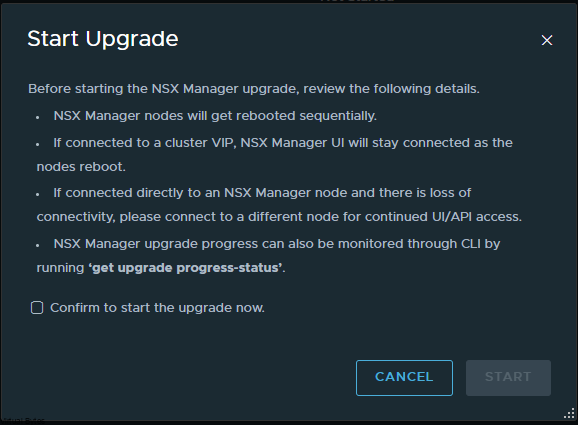
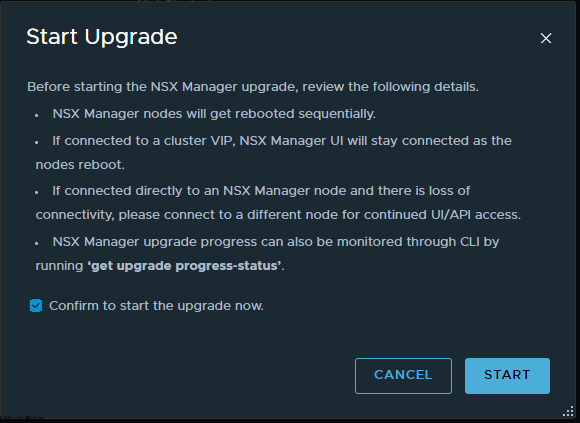
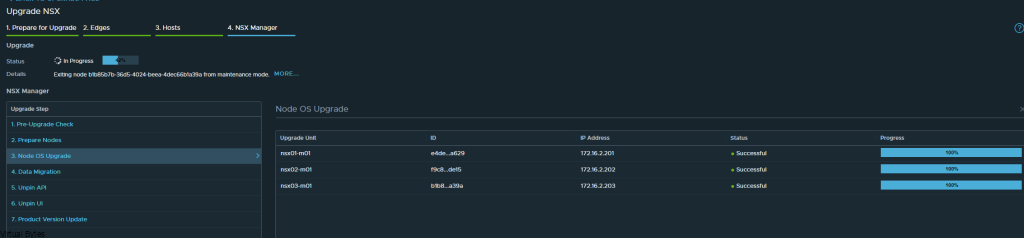
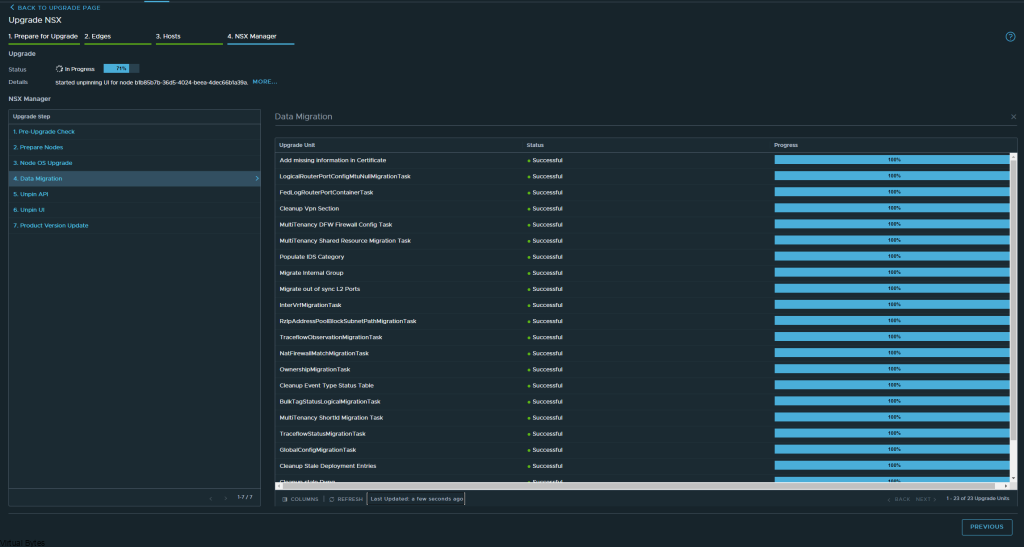
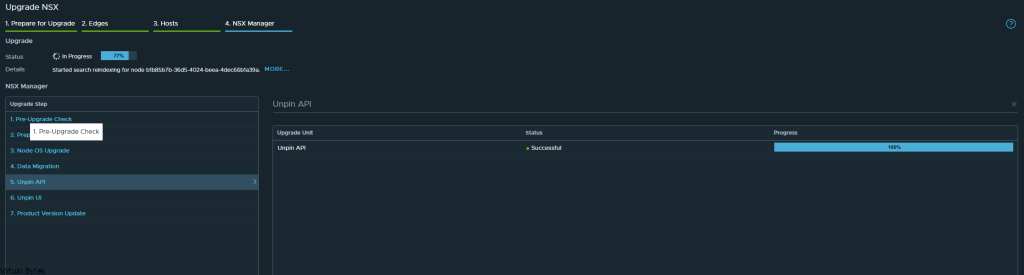
The final part, we will upgrade the NSX Managers

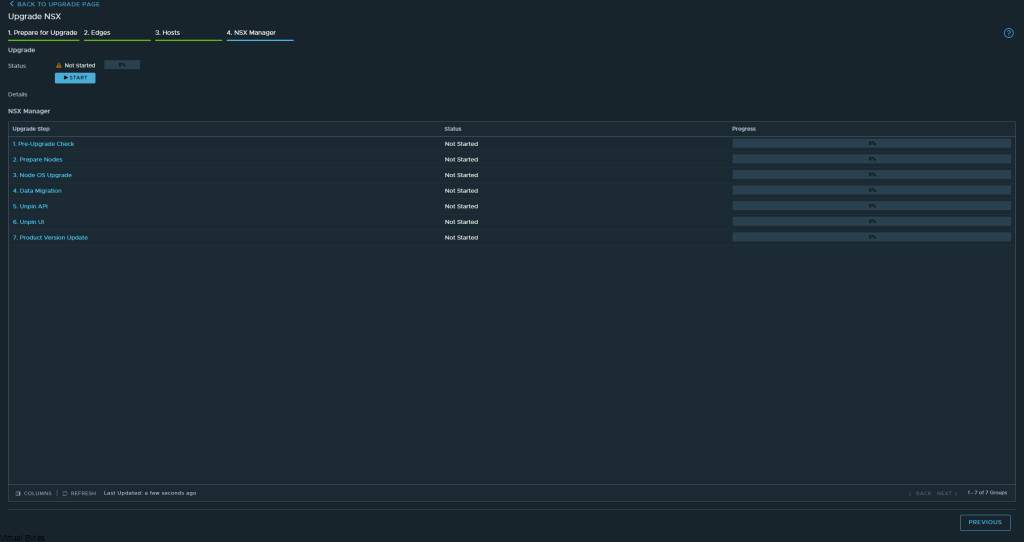
Confirm to start the upgrade

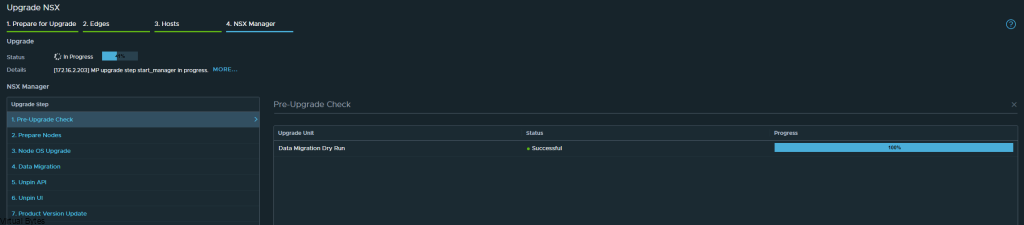
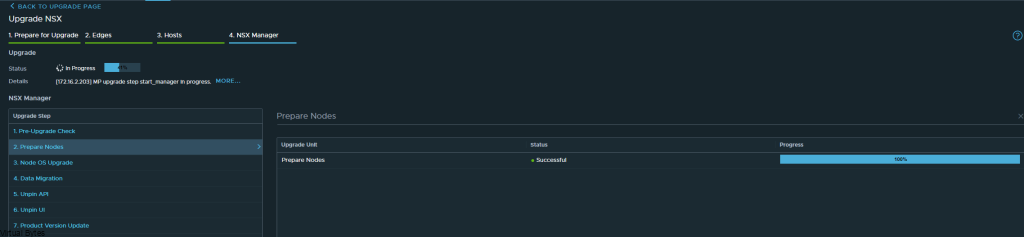
Upgrade in process for NSX Managers, it does them 1 at a time.

Data Migration upgrade process

Unpin API

Unpin UI

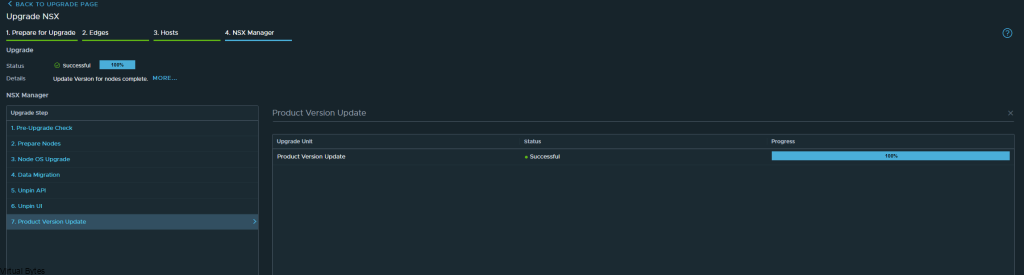
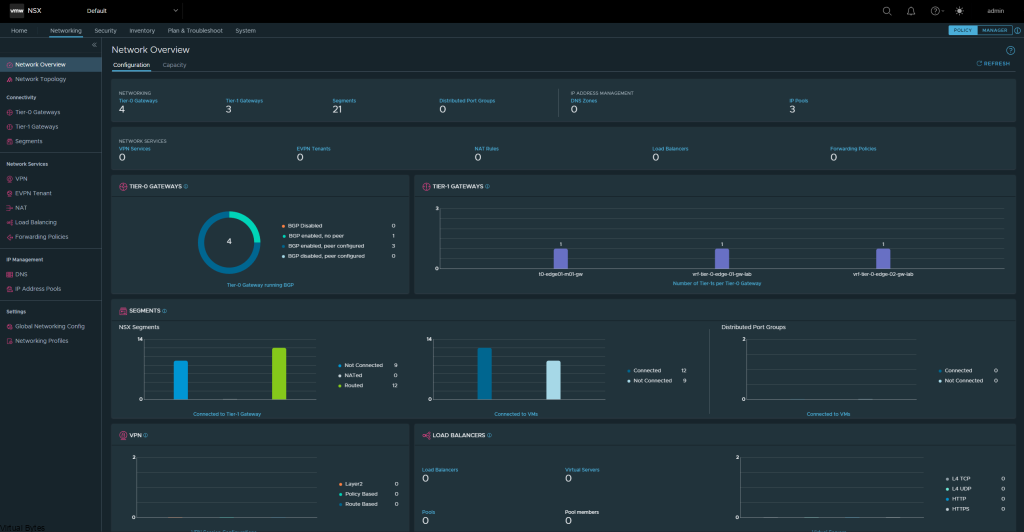
There it is! Fully upgrade to NSX 4.1.0 – Now, next blog post we will get into the new features. But Check out that new Project Tab drop down for multi-tenancy!

March 1, 2023 0 comments 4.5K views
0 FacebookTwitterLinkedinThreadsBlueskyEmail
Hardware Tips & Tricks

Palo Alto PPPoE VLAN Tagging w/ Century Link Gigabit Fiber

by Tommy Grot February 22, 2023
written by Tommy Grot 1 minutes read

Today’s topic is about Palo Alto and PPPoE interface and VLAN tagging. Currently Palo Alto does not support VLAN Tagging on an Interface with PPPoE authentication for your ISP. So, our workaround that works well but definitely need to have a Managed switch so you can Trunk and Tag an interface to make the Century Link FTTH ADTRAN know that VLAN 201 is Tagged.

Info –

Century Link Fiber Internet – Utilizes VLAN tagging to segregate out their Internet traffic, and their TV service.

What You Need:

  • PPPoE Username & Password
  • VLAN ID = 201
  • Managed Switch / Router that supports VLAN Tagging

First we will setup two ports on a managed switch, for my implementation I am using a Cisco Catalyst WS-C3750X-24P-S.

Interface Gi1/0/23 – Syntax below to copy (Just FYI, this is for Cisco)

description Trunk to CenturyLink
switchport trunk allowed vlan 201
switchport trunk encapsulation dot1q
switchport mode trunk
switchport nonegotiate
spanning-tree portfast edge

Interface Gi1/0/24 – Syntax below to copy (Just FYI, this is for Cisco)

description WAN-PAFW
switchport access vlan 201
switchport mode access

Go to Network -> Click on Ethernet1/1

Once Interface is opened up, make sure your Virtual Router and all configured, but then Go to IPv4

Click on General -> Select PPPoE -> Fill in your Username and Password for Century Link PPPoE Authentication -> Click OK

Now that your Century Link PPPoE user name and info is filled out, under advanced, you may set your Static IP address here for your WAN Interface.

Red Ethernet cable Et1/1 going to Gi1/0/24 which is the one that is Tagged as an access port on vlan 201

February 22, 2023 0 comments 1K views
0 FacebookTwitterLinkedinThreadsBlueskyEmail
Education

I passed my VCAP-DCV Deploy 2023!

by Tommy Grot January 12, 2023
written by Tommy Grot 1 minutes read

On Wednesday 11th, 2023, I took the VCAP-DCV Deploy 2023 and passed it! It was my first lab/exam of 2023. After completing this exam, I earned the VCIX – VMware Certified Implementation Expert milestone, this unlocks the next level for me to pursue my VMware Certified Data Center Expert (VCDX).

Information on Data Center Virtualization track from VMware

Information About the Exam –

  • Exam cost $450.00 – 3V0-22.21 Advanced Deploy VMware vSphere 7.x
  • There are 17 Questions/Tasks
  • The proctored lab is simular to VMware Learning Platform Hands-On-Labs (HOL)

After getting logged in the first thing I did was fire up Notepad++ I created a task list of all 17 questions, this way any step I did during the exam I would document what I did and what I configured so I can trace back what I did. Overall, I enjoyed the exam/lab. It was fun to do the tasks, I recommend getting all the easy ones first that way you can concentrate on the longer duration tasks that.

January 12, 2023 0 comments 1.5K views
2 FacebookTwitterLinkedinThreadsBlueskyEmail
CloudNetworking

Reverse Proxy & Load Balancing a Web Server with VMware NSX Advanced Load Balancer

by Tommy Grot December 16, 2022
written by Tommy Grot 3 minutes read

Want to setup a load balancer and reverse proxy with VMware NSX Advanced Load Balancer, and you want to replace your Nginx Reverse Proxy, well let’s get started!

First, we will make sure that you already have NSX ALB setup and configured within your environment, this walkthrough will only step you through on building a Virtual Service and Pools and VIPs for your multiple web servers. During this deployment you can set up many different FQDNs.

Requirements

  • Public FQDN
  • Lets Encrypt SSL Certificate (Wild Card or SAN or Single Cert)
  • NAT – Service Engine
  • Virtual IP
  • Service Pool
  • Web Server(s)

Product Versions:

  • VMware NSX ALB: 22.1.2
  • VMware NSX: 4.0.1.1.0.20598726

Steps

Login as an administrator account to NSX ALB ->

Go to Virtual Services -> Create Virtual Service

Select -> Advanced Setup

Next prompt -> Select your Cloud (For my setup I am doing everything NSX Overlay Backed)

Click Next -> Select your VRF Context (I am using a Tier 1 Gateway)

So now at this point – you should see this screen below, we will create a New Virtual Service, this will be the main ingress and egress point of your network and the external world. I have a NAT from my firewall going to this Virtual Service (VIP) Virtual IP.

  • Name: External-ParentSNI-VS (This is my naming convention, but you can choose your own)
  • Select: Enable Virtual Hosting VS
  • Virtual Hosting Type: SNI
  • VS VIP – (Create the main VIP for Ingress/Egress NAT, that is routable)
  • Application Profile: System-Secure-HTTP
  • WAF ( You can enable if you would like too, this is optional)
  • Service Port ( 80,443 – For 443 you will want to select SSL)
  • Pool – (Create a Pool, I used one of my very first web servers to start the pool)
  • SSL Certificate – Select your Cert – by default ALB will put System-Default-Cert

Click Save / Next – For this portion of the Virtual Service with Parent SNI we are done, next we will deploy the Child SNI which will be a parent to the main Ingress/Egress SNI Virtual Service.

As an example – I will use my Virtual Bytes SNI Child Virtual hosting.

Click on drop down for Pool, if you have not created a pool we will do so now.

  • Name: External-Parent-SNI-VS-Pool
  • VRF Context – Your Tier 1 Gateway
  • Default Server Port: 443

Select your first webserver, this will let you start the Virtual Service. You can do it via a IP Group or IP Address or DNS Name as well as have the capability to use a security group from NSX.

After you have created all the required services you should be able to access your web server from an internal or external (Internet) if you have NAT’d. But for the next steps we will repeat the steps for a Child SNI.

Child SNI Setup

  • Go to Virtual Services – > Click on Create Virtual Service (Advanced)
  • Name: You Web Server
  • Check – Virtual Hosting VS
  • Virtual Hosting Type: SNI
  • Virtual Hosting Parent: External-ParentSNI-VS (or your own naming)
  • Domain Name: www.yourdomain.com
  • Application Mode: System Secure-HTTP
  • Pool: Create a pool for the Virtual Machine or service you want to load balance
  • SSL Certificate: Select your Certificate

Click Next all the way till the end, and now you have successfully setup a Child SNI which now you can replicate the same steps for multiple web servers, and you no longer need to NAT anymore IPs, since your main ingress/egress is already NAT’d and everything will flow through the main Parent service.

December 16, 2022 0 comments 3.1K views
1 FacebookTwitterLinkedinThreadsBlueskyEmail
Cloud

“The Next Chapter of Cloud Management” VMware’s LAST multi-cloud briefing of 2022

by Tommy Grot December 5, 2022
written by Tommy Grot 2 minutes read

With all these organizations trying to be multi-cloud centric it is hard to set up and control all those environments. Organizations that have Amazon Web Services or Azure and they run VMware Clouds on top of those environments, well that’s a tedious job to keep control and tabs on everything. Creating dashboards and information from a high level for leadership will let them know what kind of costs and consumption they are utilizing for their workloads. Well, with VMware Aria Hub – it is now possible to keep track of everything, from cost to capacity and consumption and how they can scale back workloads without compromising the business aspect and goals!

*** Disclaimer *** – Preview information and functionality will not be available till early 2023!

Links:

  • VMware Guard Rails
  • VMware Aria Migrations
  • VMware Aria Business Insight

Check out the Video below for more details –

VMware Aria Graph is a highly scalable system but also federated which you can federate from any other third party with their solutions. You can gather data from many third-party sources and create rich data and analytics to help your business needs. With VMware Aria Graph if you already own VMware vRealize Suite then this will be even better for your organization this will allow you to gather data and create more richer business models and practices with the data you will gather about your environment.

Main Dashboard – Shows overall cost, infrastructure and security compliance, and many more features.

Application View – This lets you see the aggregate information of your application, along with resources, and cost and what relationships the application has for what kind of image was used to build this and what kind of security settings have been applied like firewall rules..

Aria Guard Rails – Policy as code, continuous police enforcement engine. This will let you know what kind of security violations that are not controlled and with guard rails there is a library with pre-built templates for bootstrapping environments, cost, security. This will let you ensure that you set the proper security policies.

Deployment Information – Resources this draws out in detail how your workloads a connected and consumed and you can click on each individual icon and get into the depth information of each workload or VM

Migrating Workloads to VMC – you can select what kind of workloads you want to move to AWS VMC; you can get very granular on what kind of VM you want to move, you can move based on VLANs or prevent moving some workloads to save cost or keep on premise.

Cost of Ownership, this allows you to preview what your workload would cost on VMC on AWS.

Migration Planning – Gives you an awesome road map to plan out your workloads and how they will migrate and what business practices you want to implement and execute before running the migration.

Step 2 of Migration

Step 4 – Scheduling your migration

December 5, 2022 0 comments 483 views
0 FacebookTwitterLinkedinThreadsBlueskyEmail
Cloud

VMware Aria – VMware Multi-Cloud Briefing December 5th, 2022

by Tommy Grot December 1, 2022
written by Tommy Grot 1 minutes read

The new and exciting annoucment that occured at VMware Explore 2022 about VMware Aria! I personally got to meet the team behind the VMware Aria and vRealize Buisness Unit team thank to our awesome VMware Senior Techinical Account Manager!

My first day at VMware Explore 2022, I got to see all the new release and information before it hit emargo, with Purnima’s Session with the Multi Cloud Journy. Overall, it was a great time to see how the product would help organizations and developers and engineers with creating new solutiuons that are multi-cloud. Many oragnizations today, are going versatile with many different clouds where many of the organizations are in a cloud chaos point in their life of their organization and they do not know or how to take control over and get their cloud infrastructures and development in line.

With that said! I am linking here some news that will be released on December 5th, 2022. So stay tuned and check this page below!

December 1, 2022 0 comments 440 views
0 FacebookTwitterLinkedinThreadsBlueskyEmail
Events

VMware Explore 2022 – My Journey!

by Tommy Grot September 14, 2022
written by Tommy Grot 2 minutes read

An early morning on August 28th, 2022, I got ready and drove toward Denver International Airport. Got there at 3AM. Then went on my way to the gate and was ready and excited to be at VMware Explore! When I was on my flight, I met two guys on my flight that were as well attending VMware Explore as they were local to Denver.

When we arrived at San Francisco it was a busy day with lots of exploration and adventures, the two guys I met on the plane we all got to explore San Francisco, Golden Gate Bridge and check out the Pier! We were all patiently waiting to get to our hotels and get our VMware Explore badges that Sunday we arrived! 
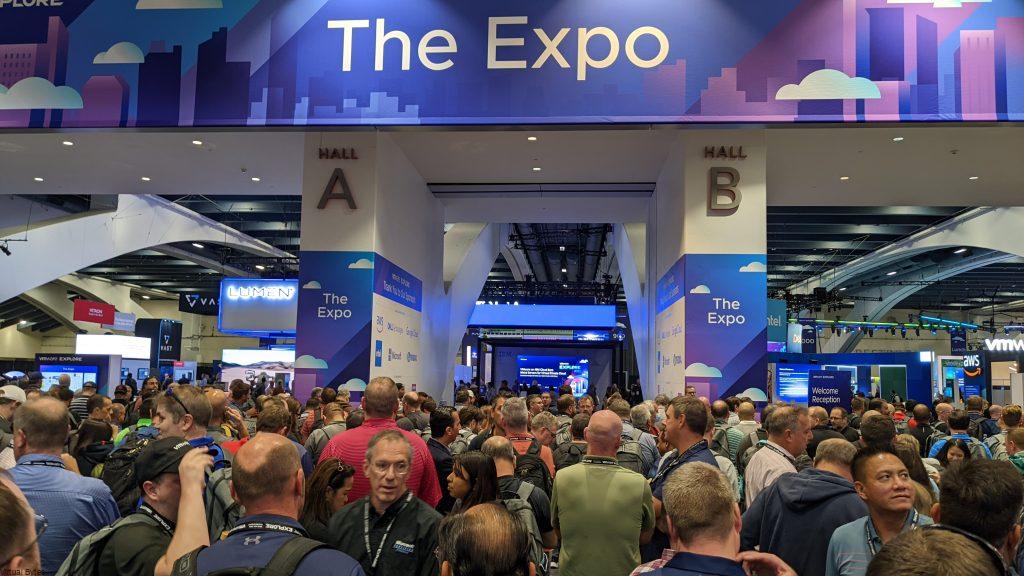
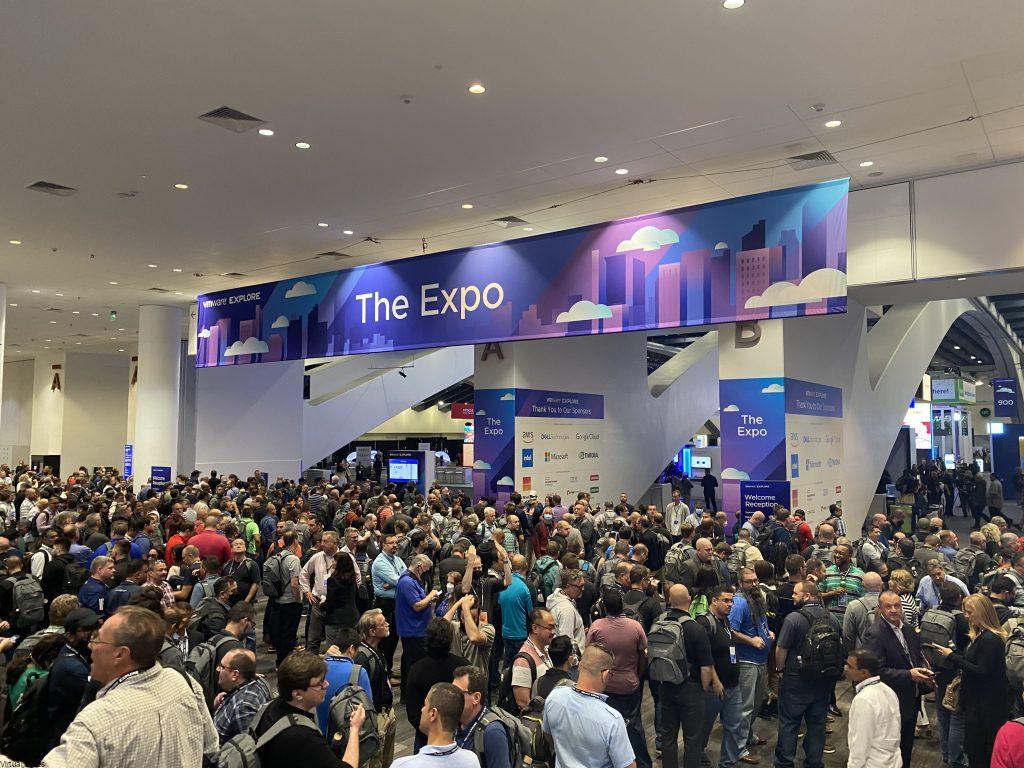
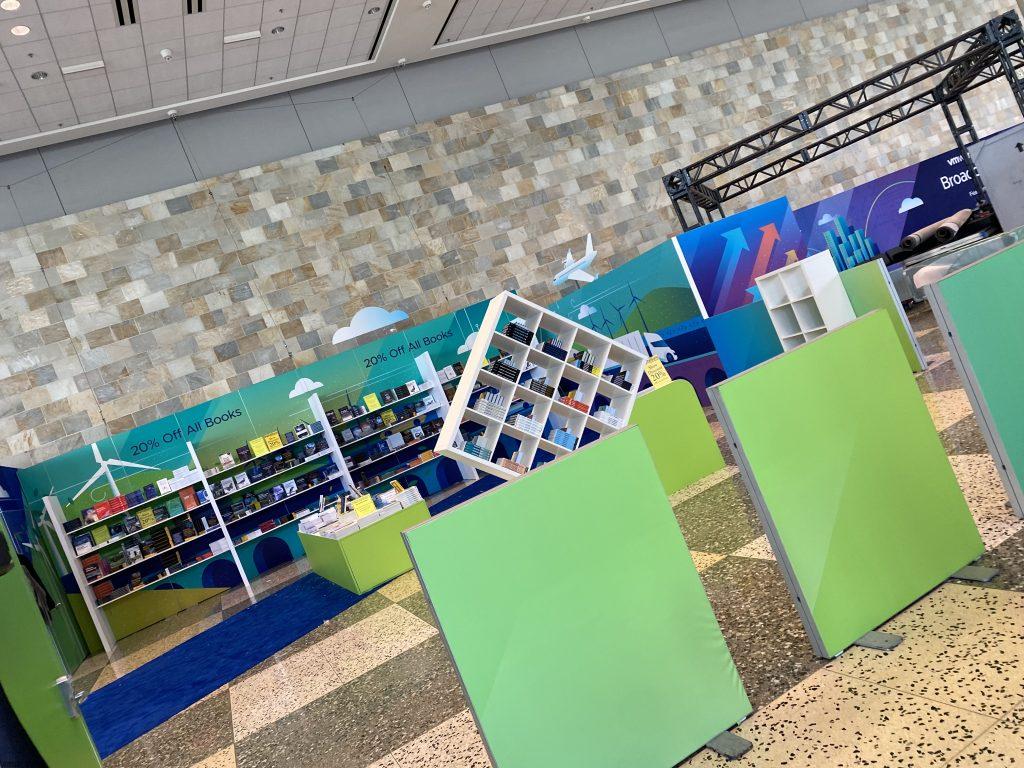
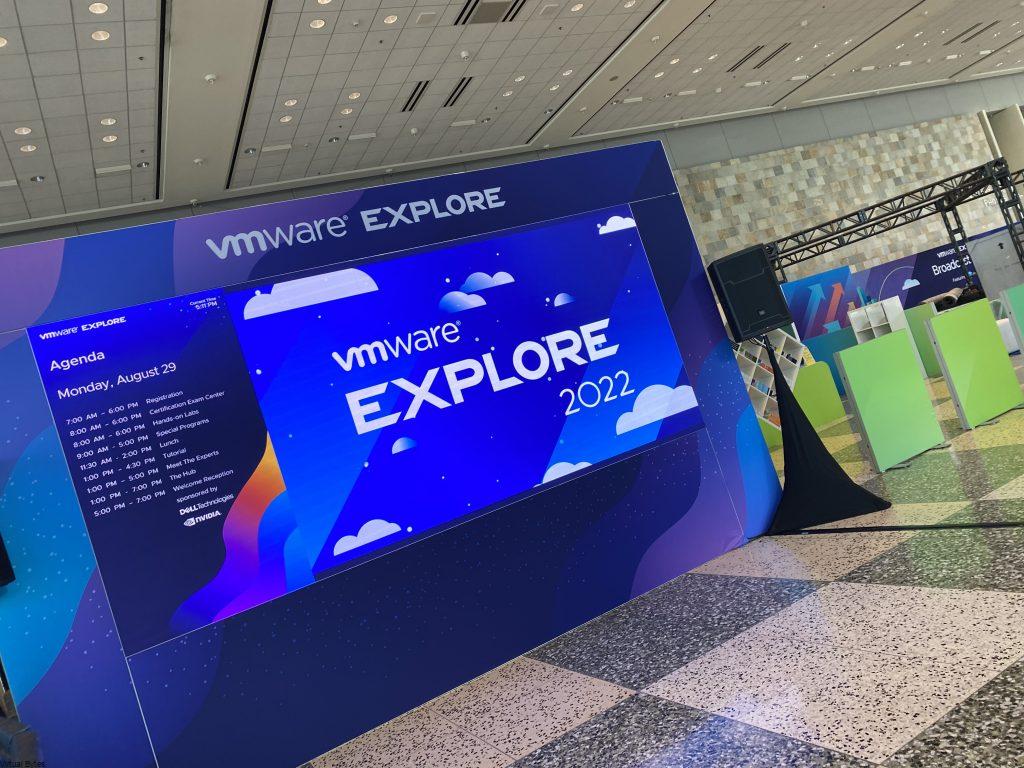
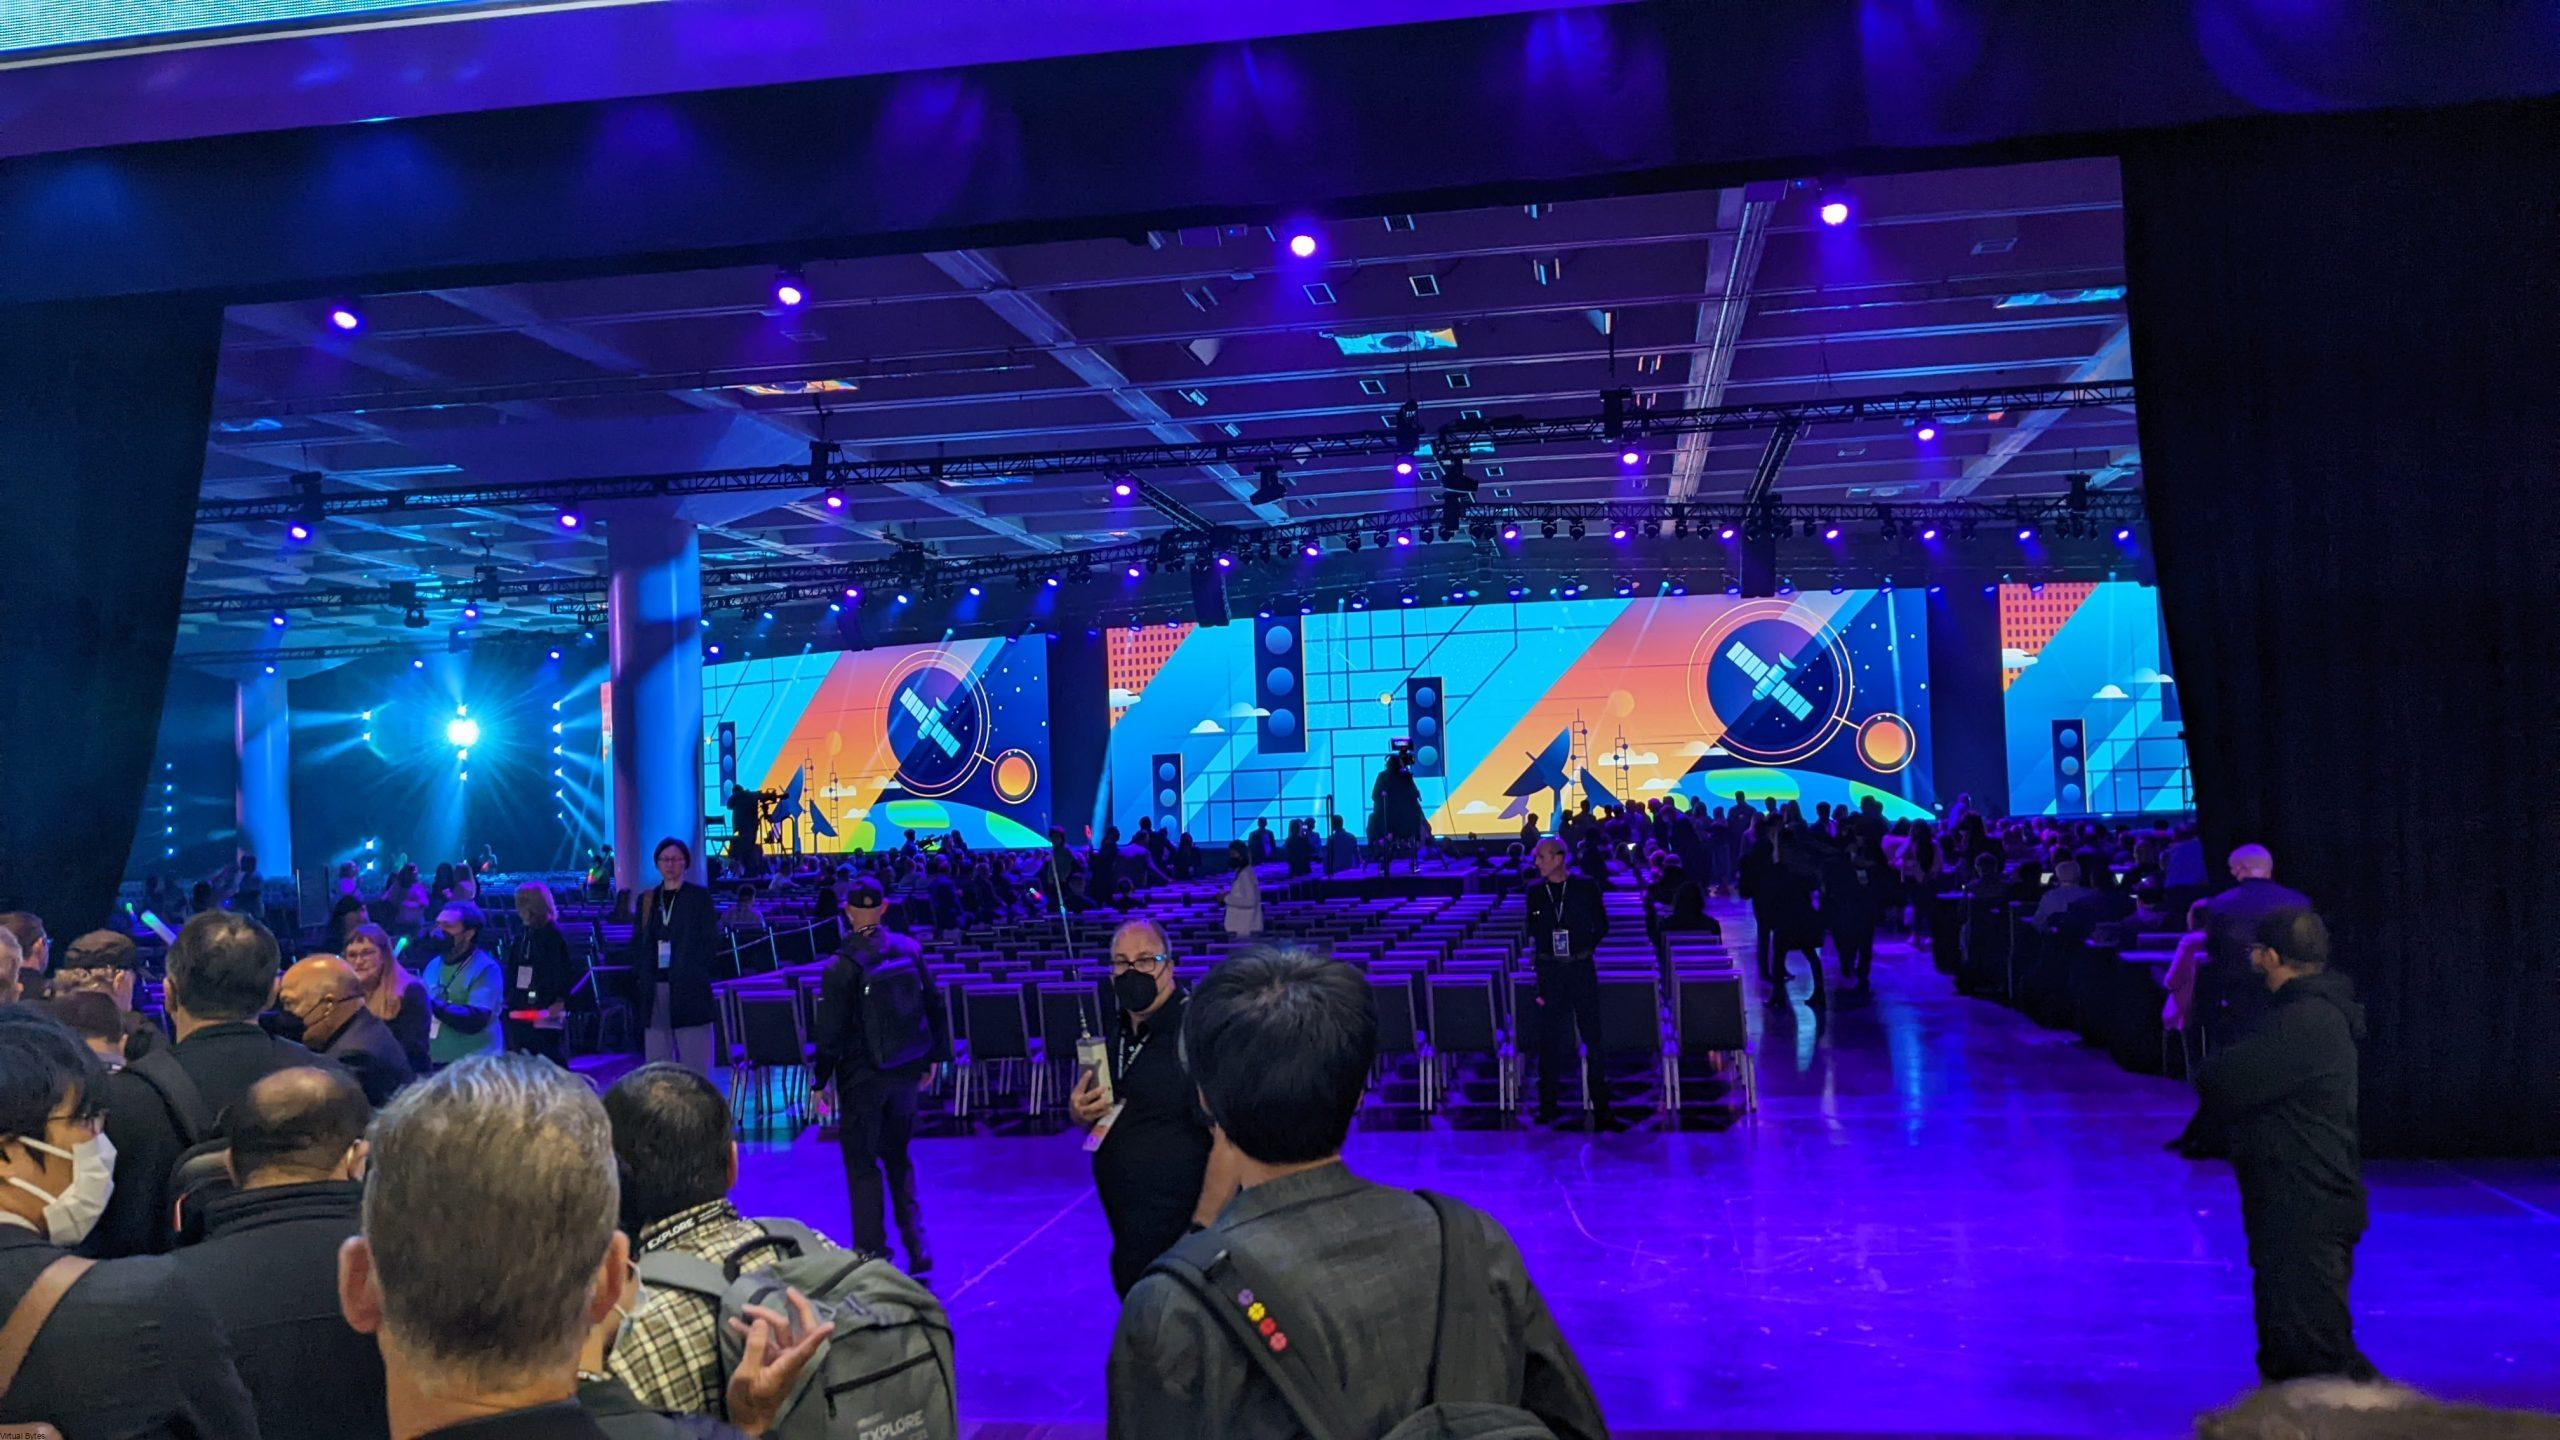
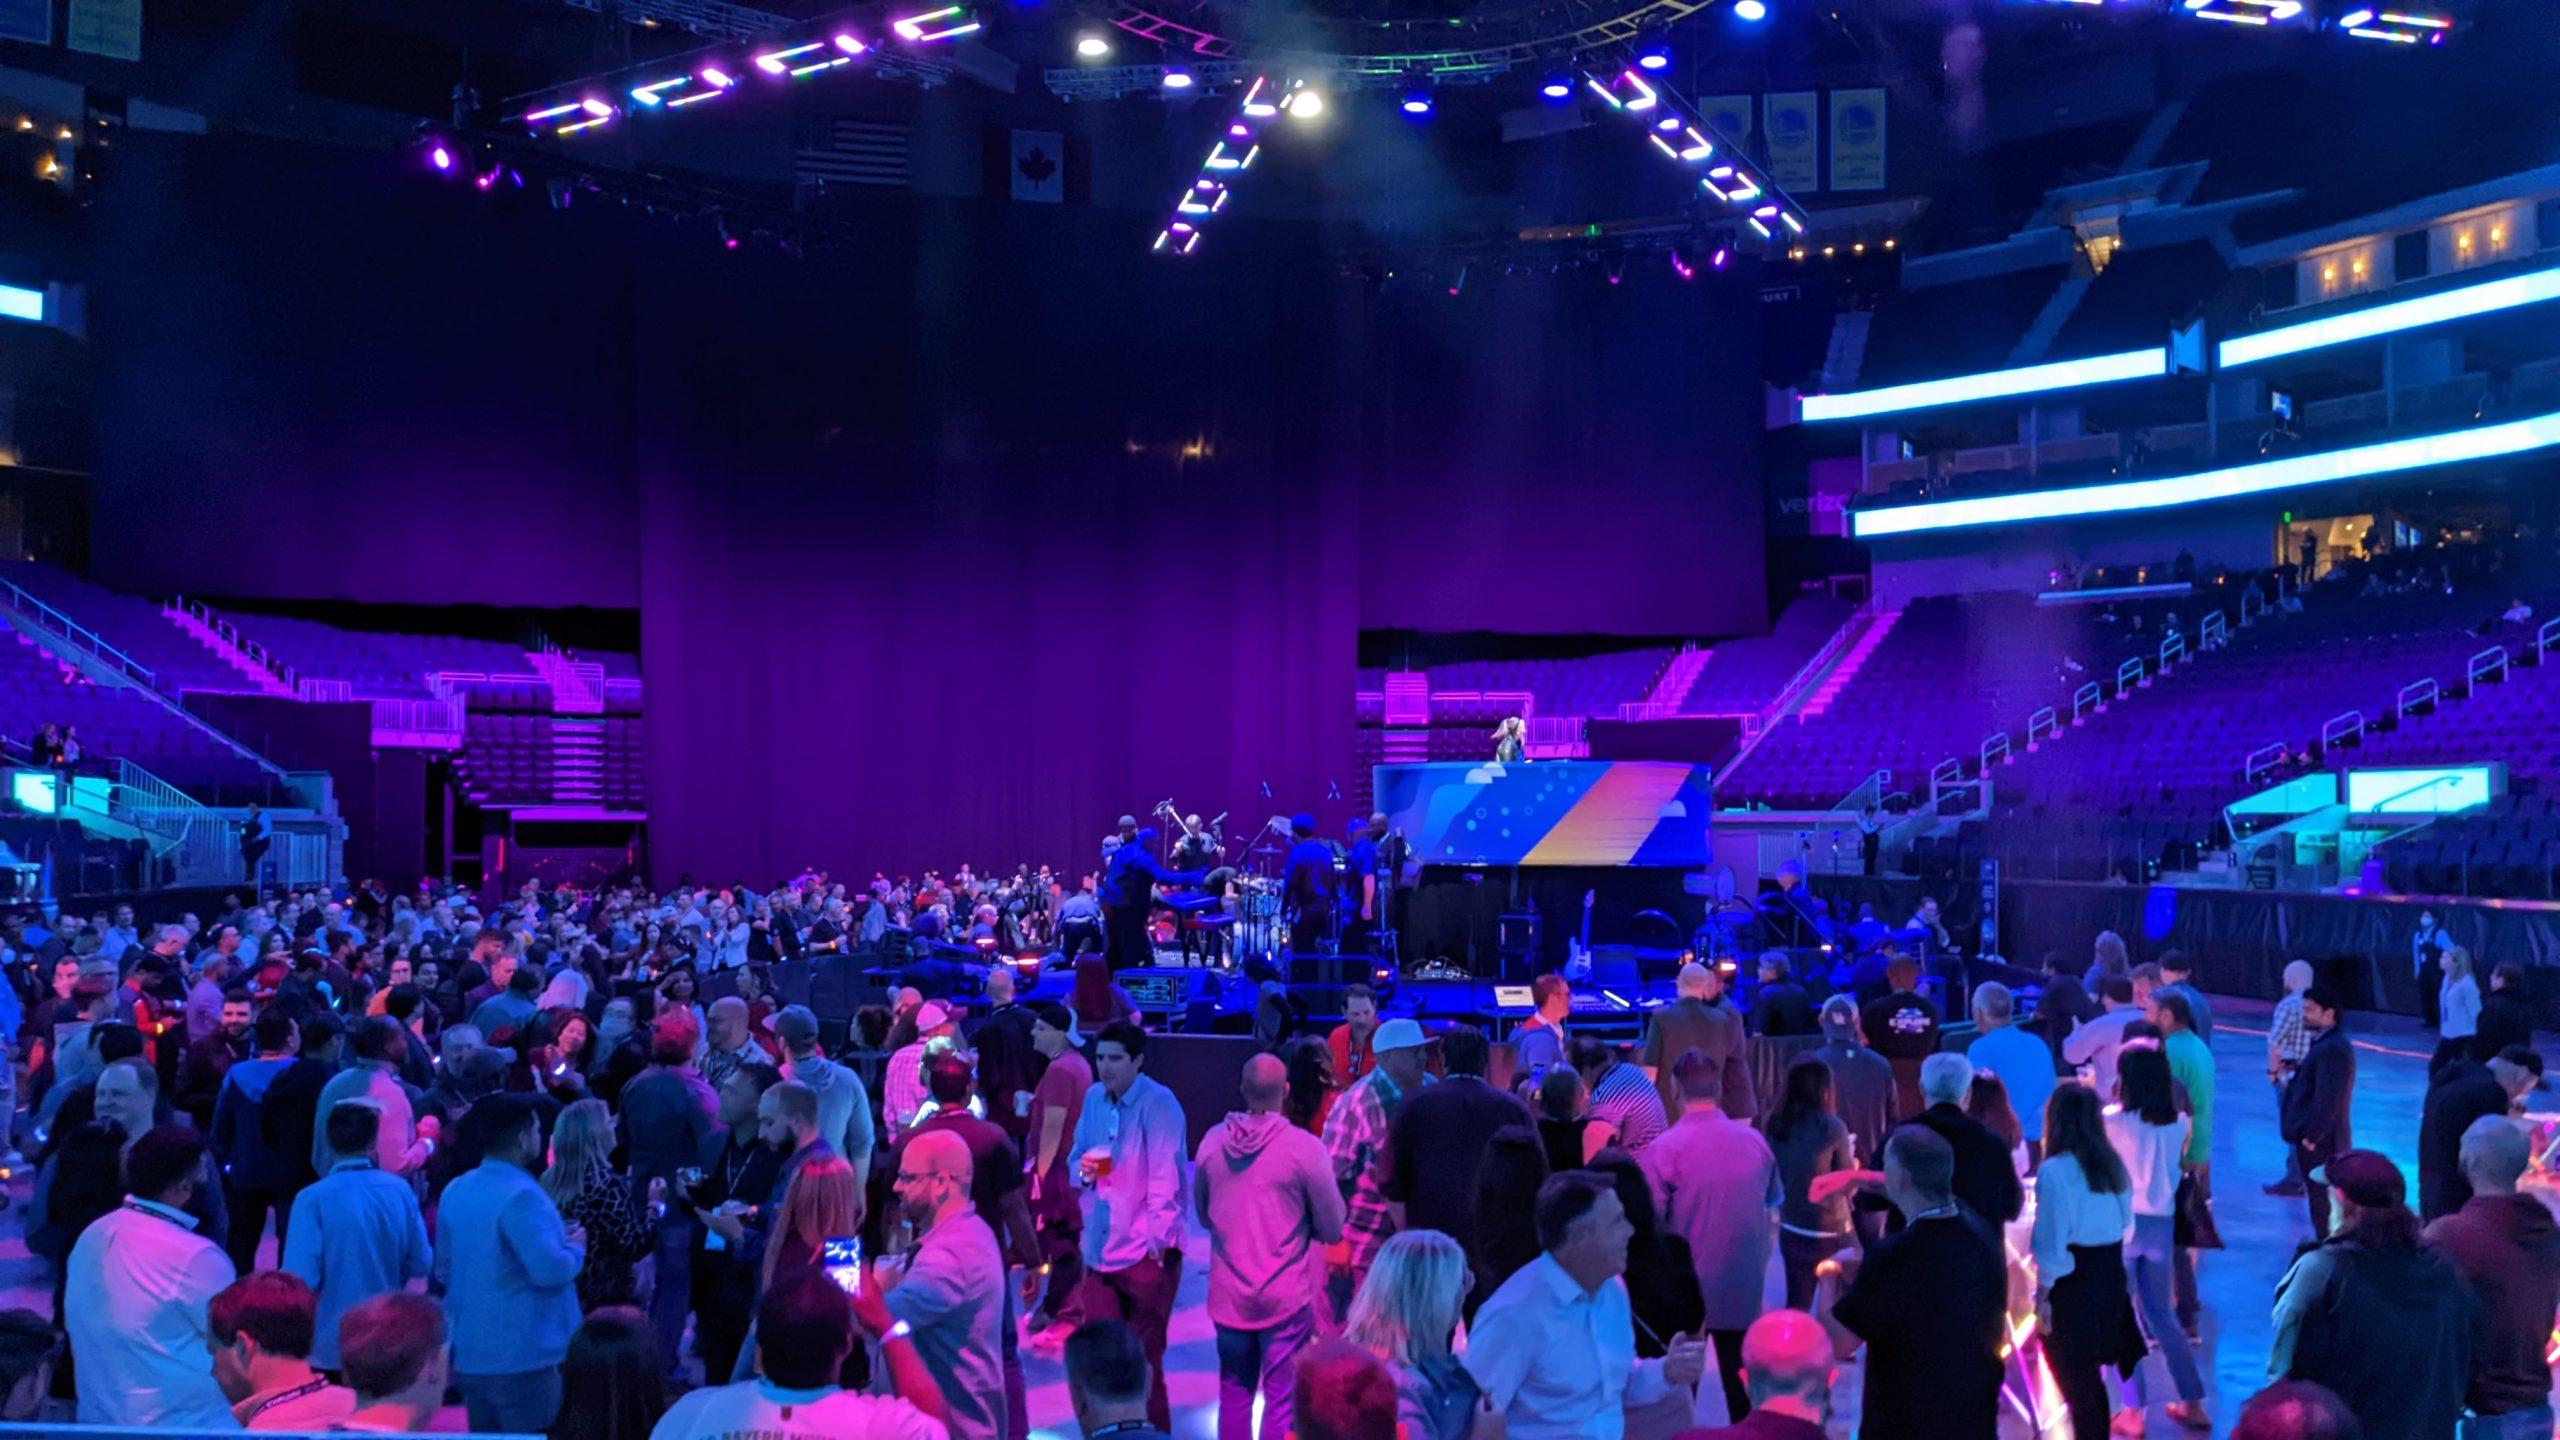
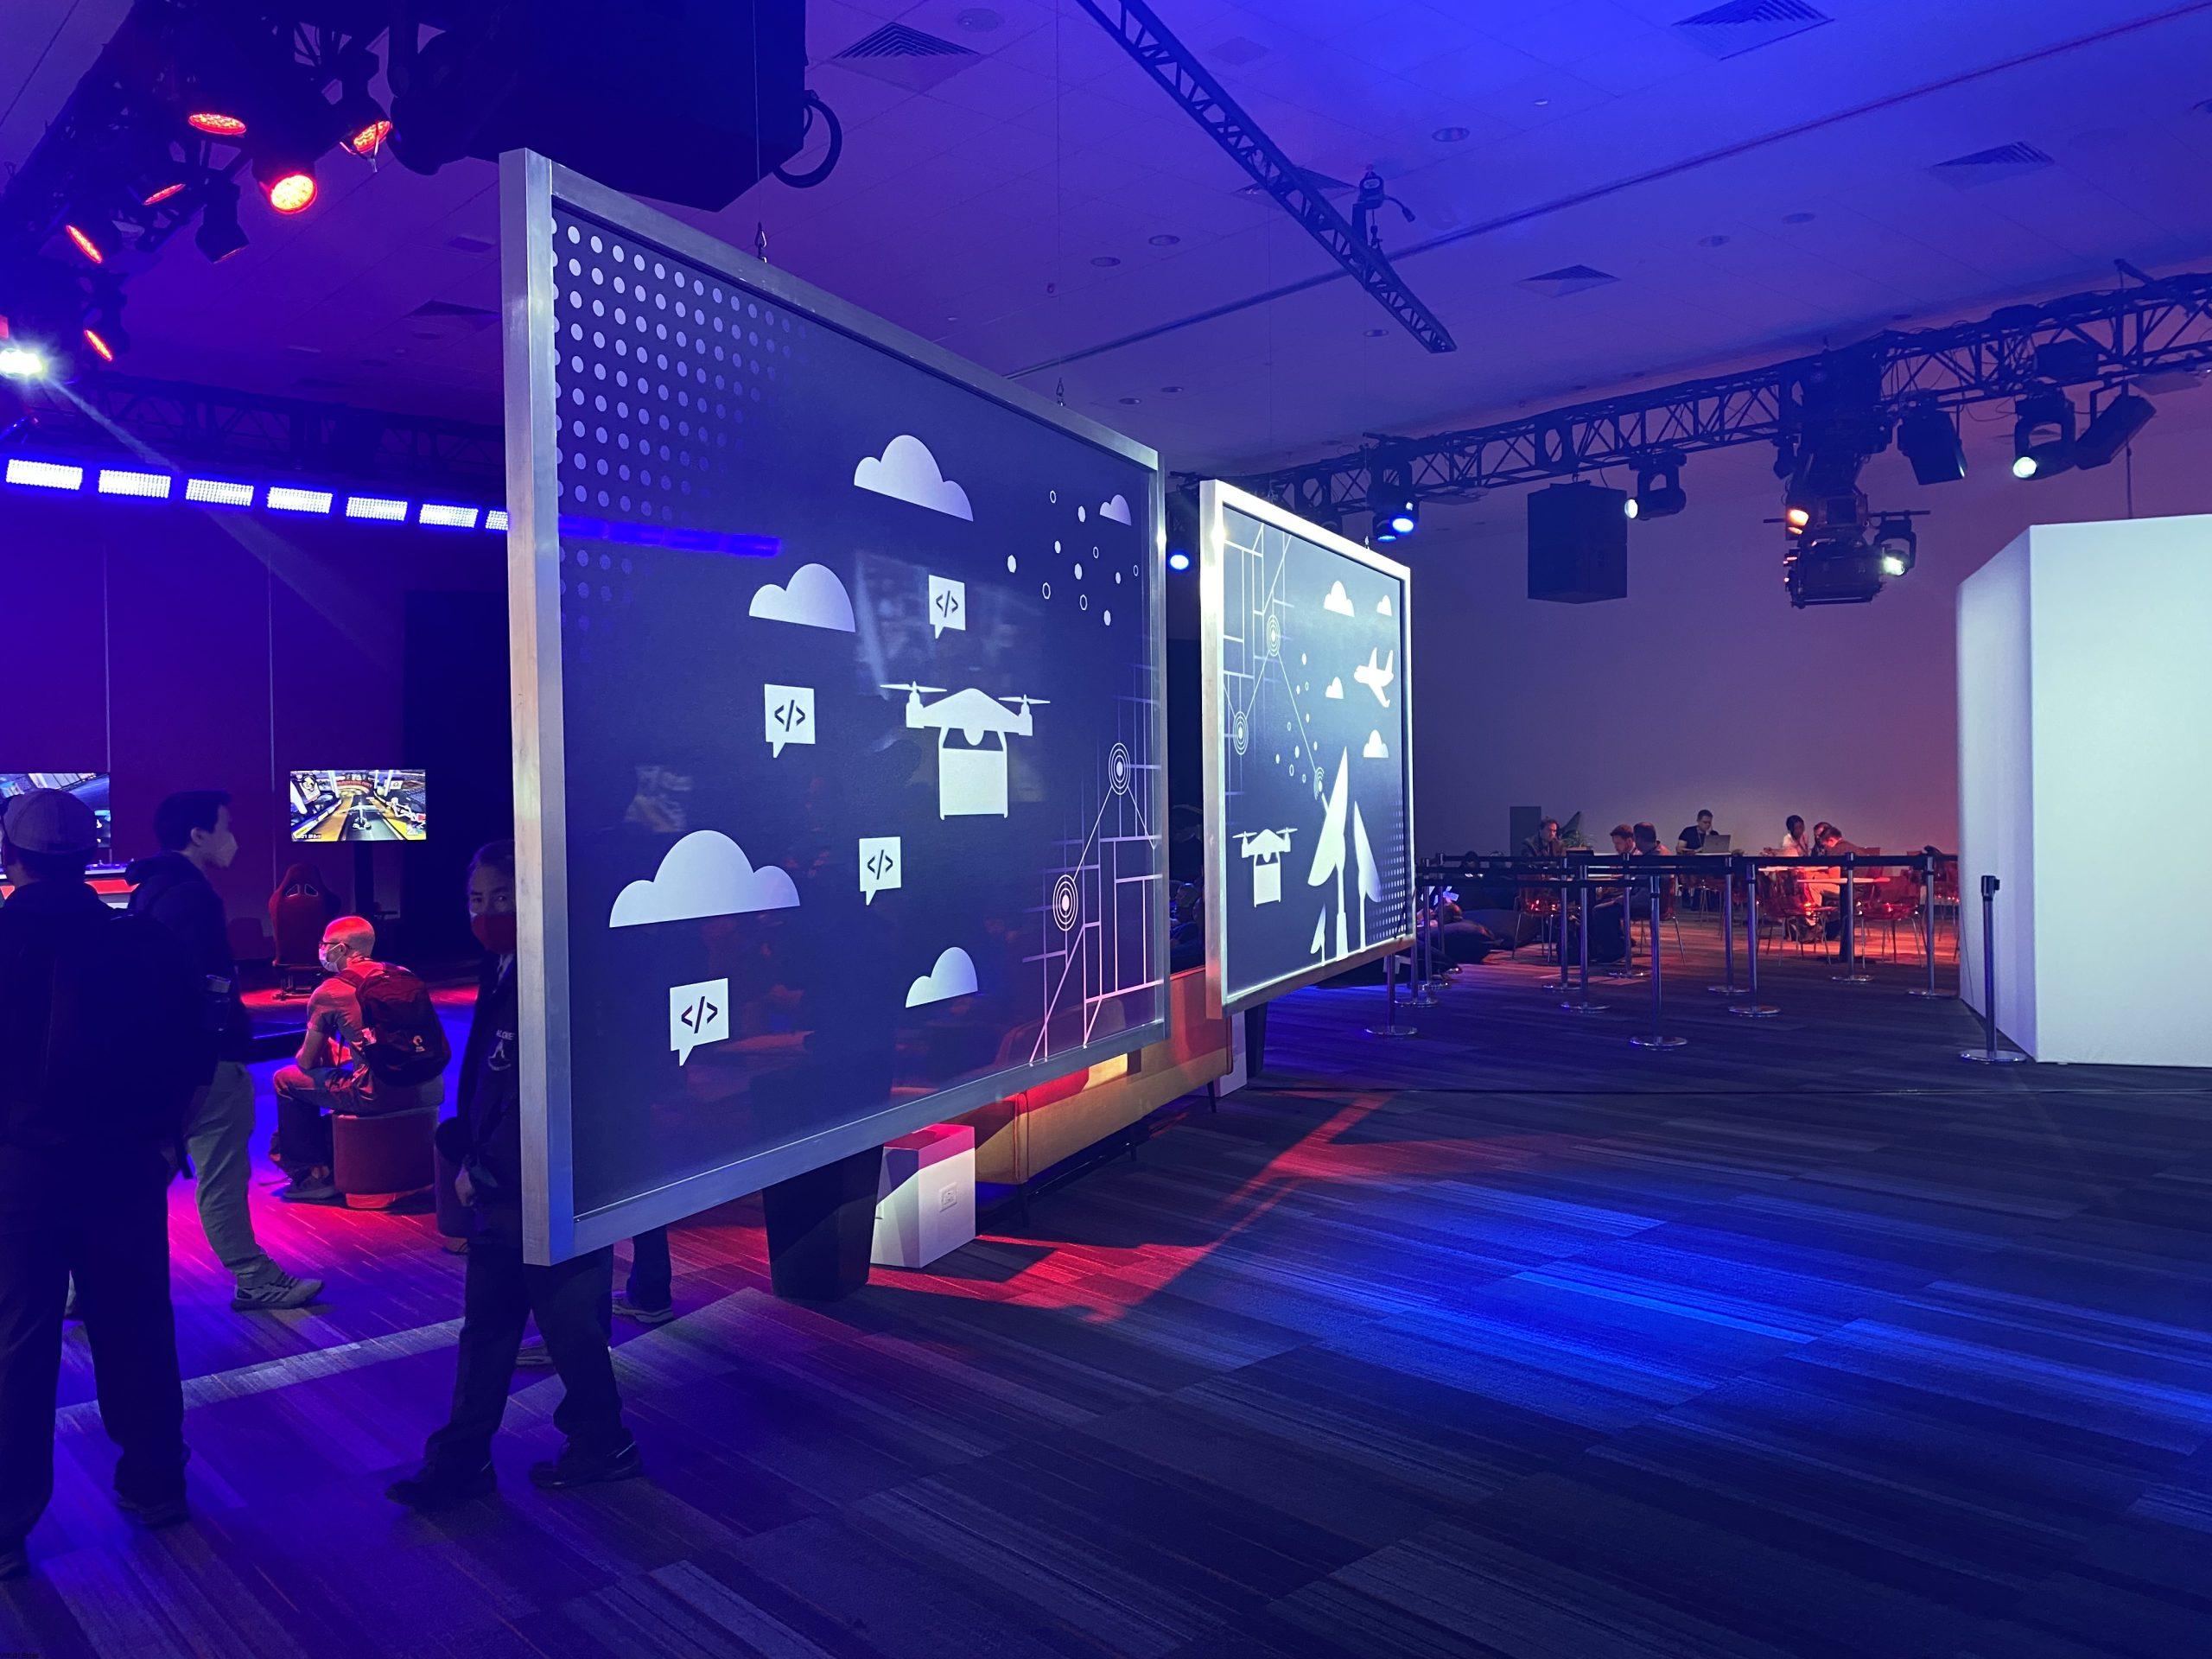
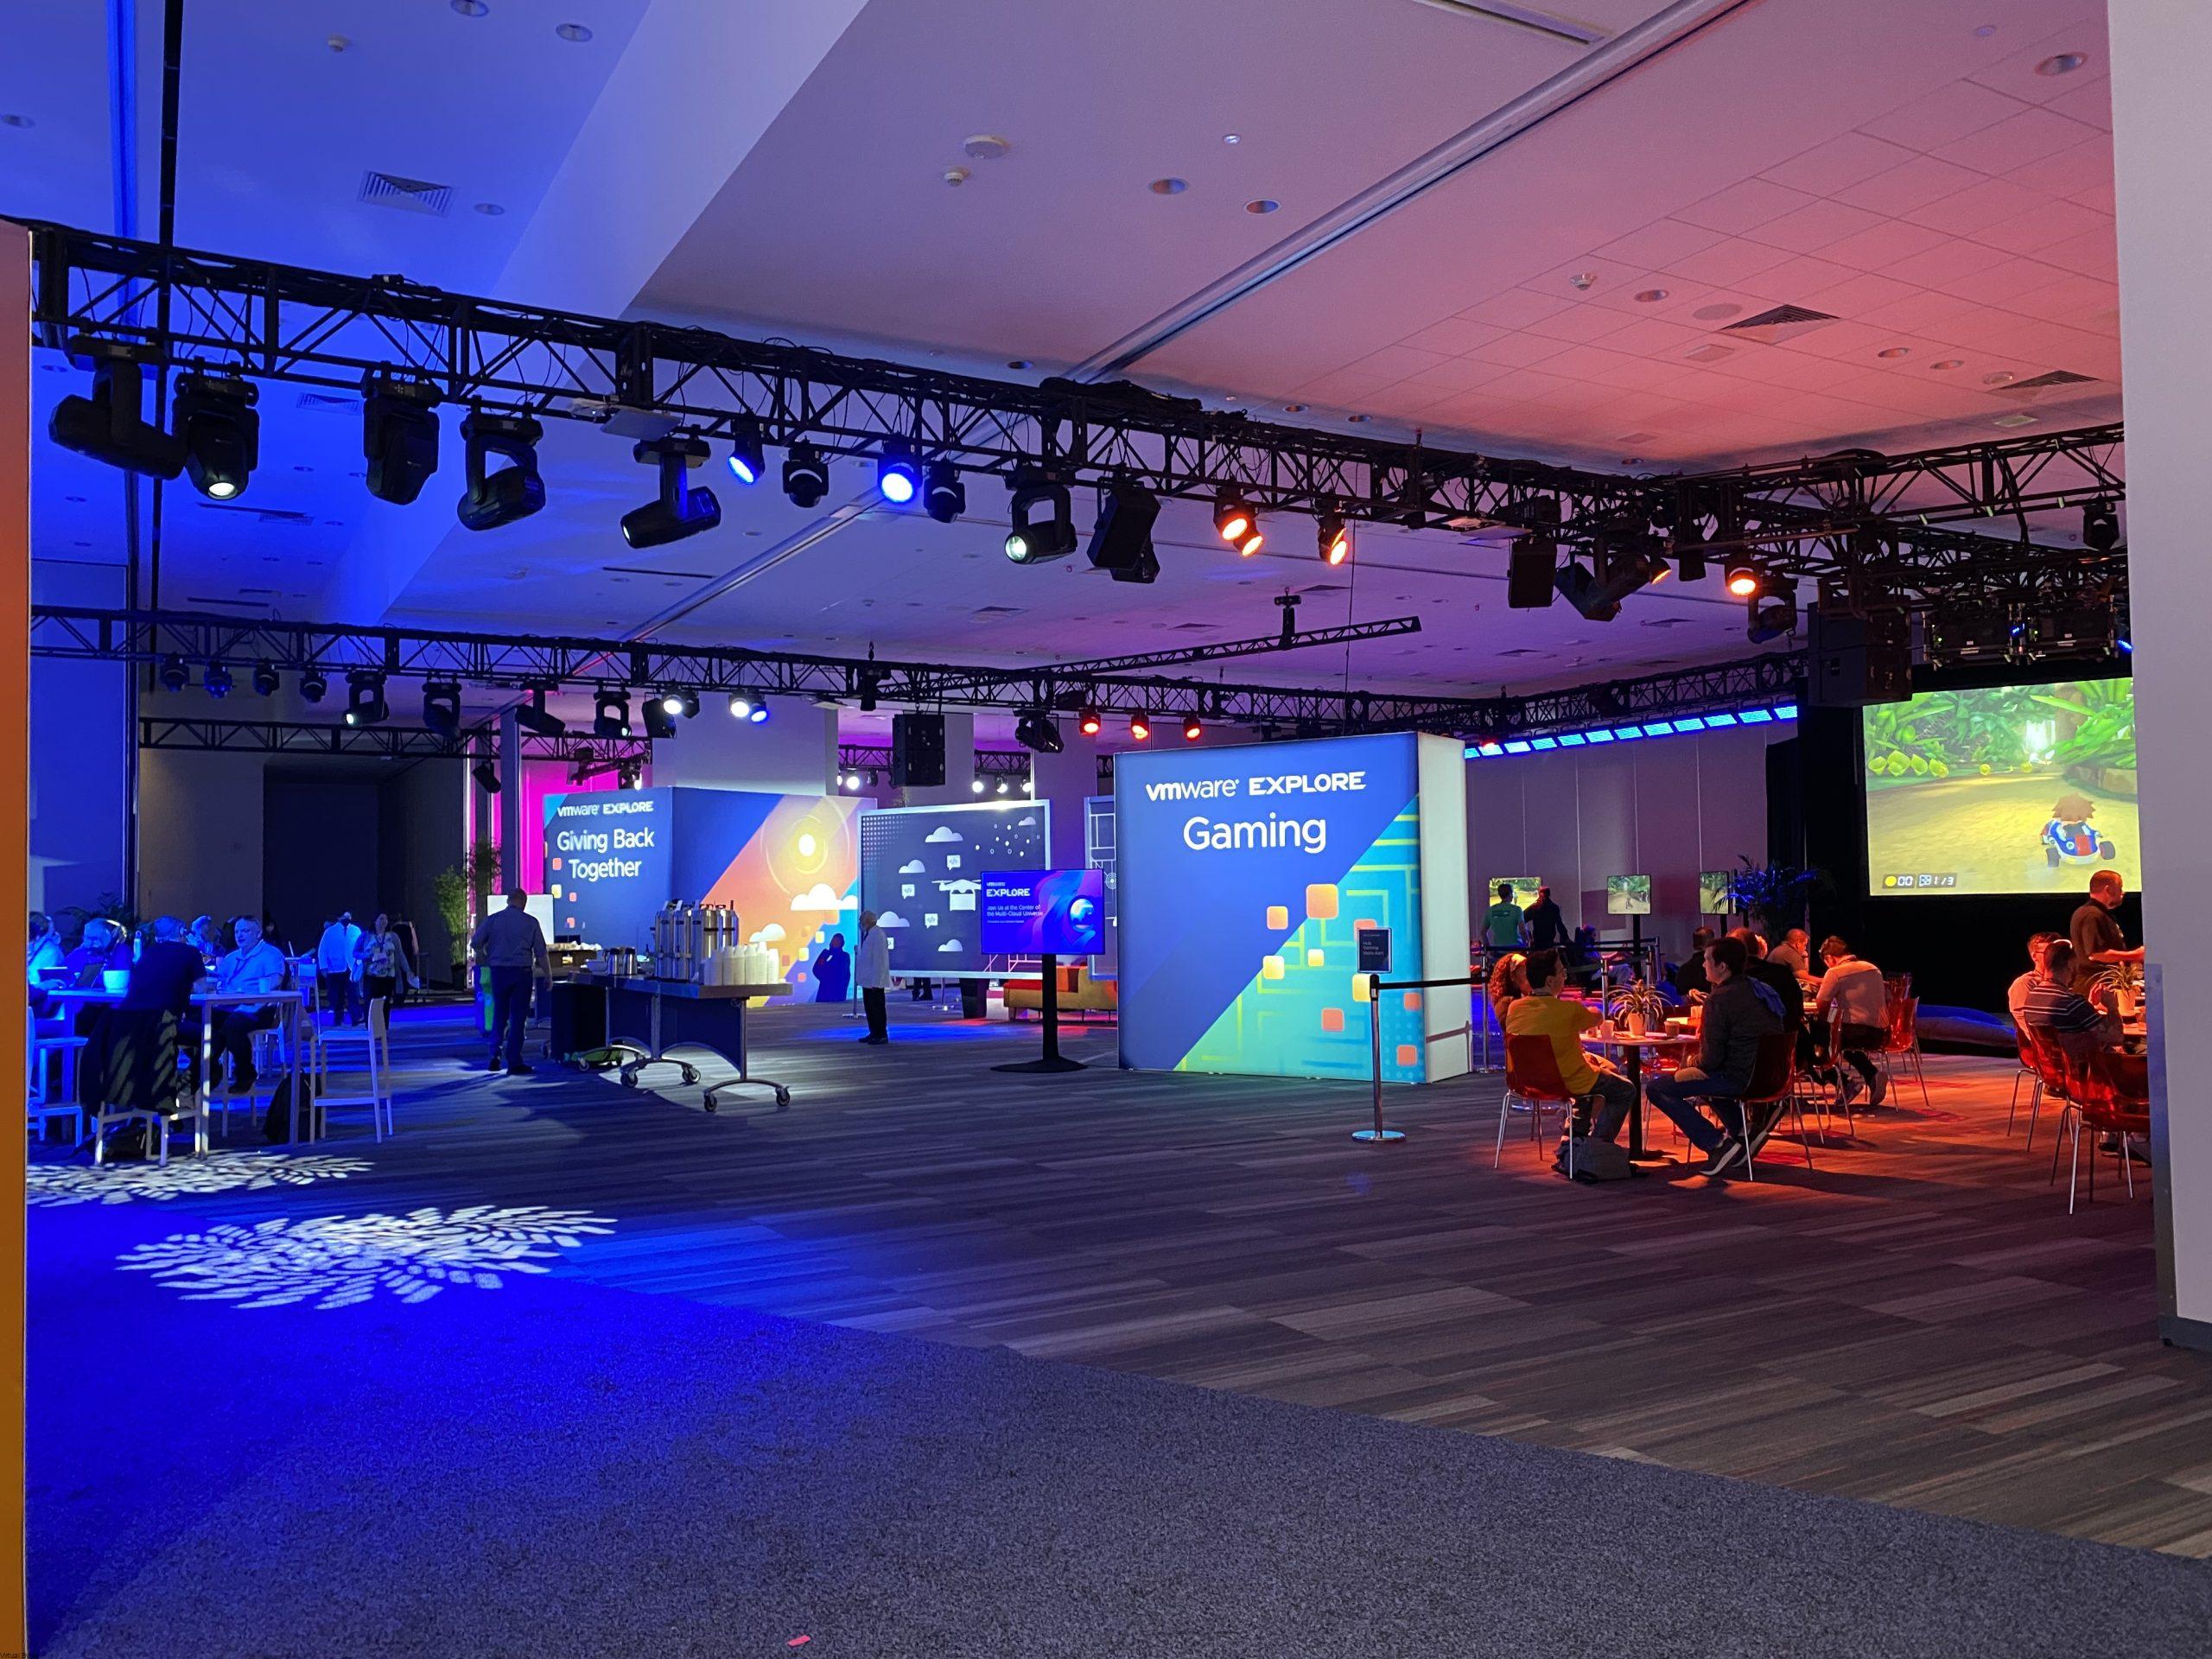
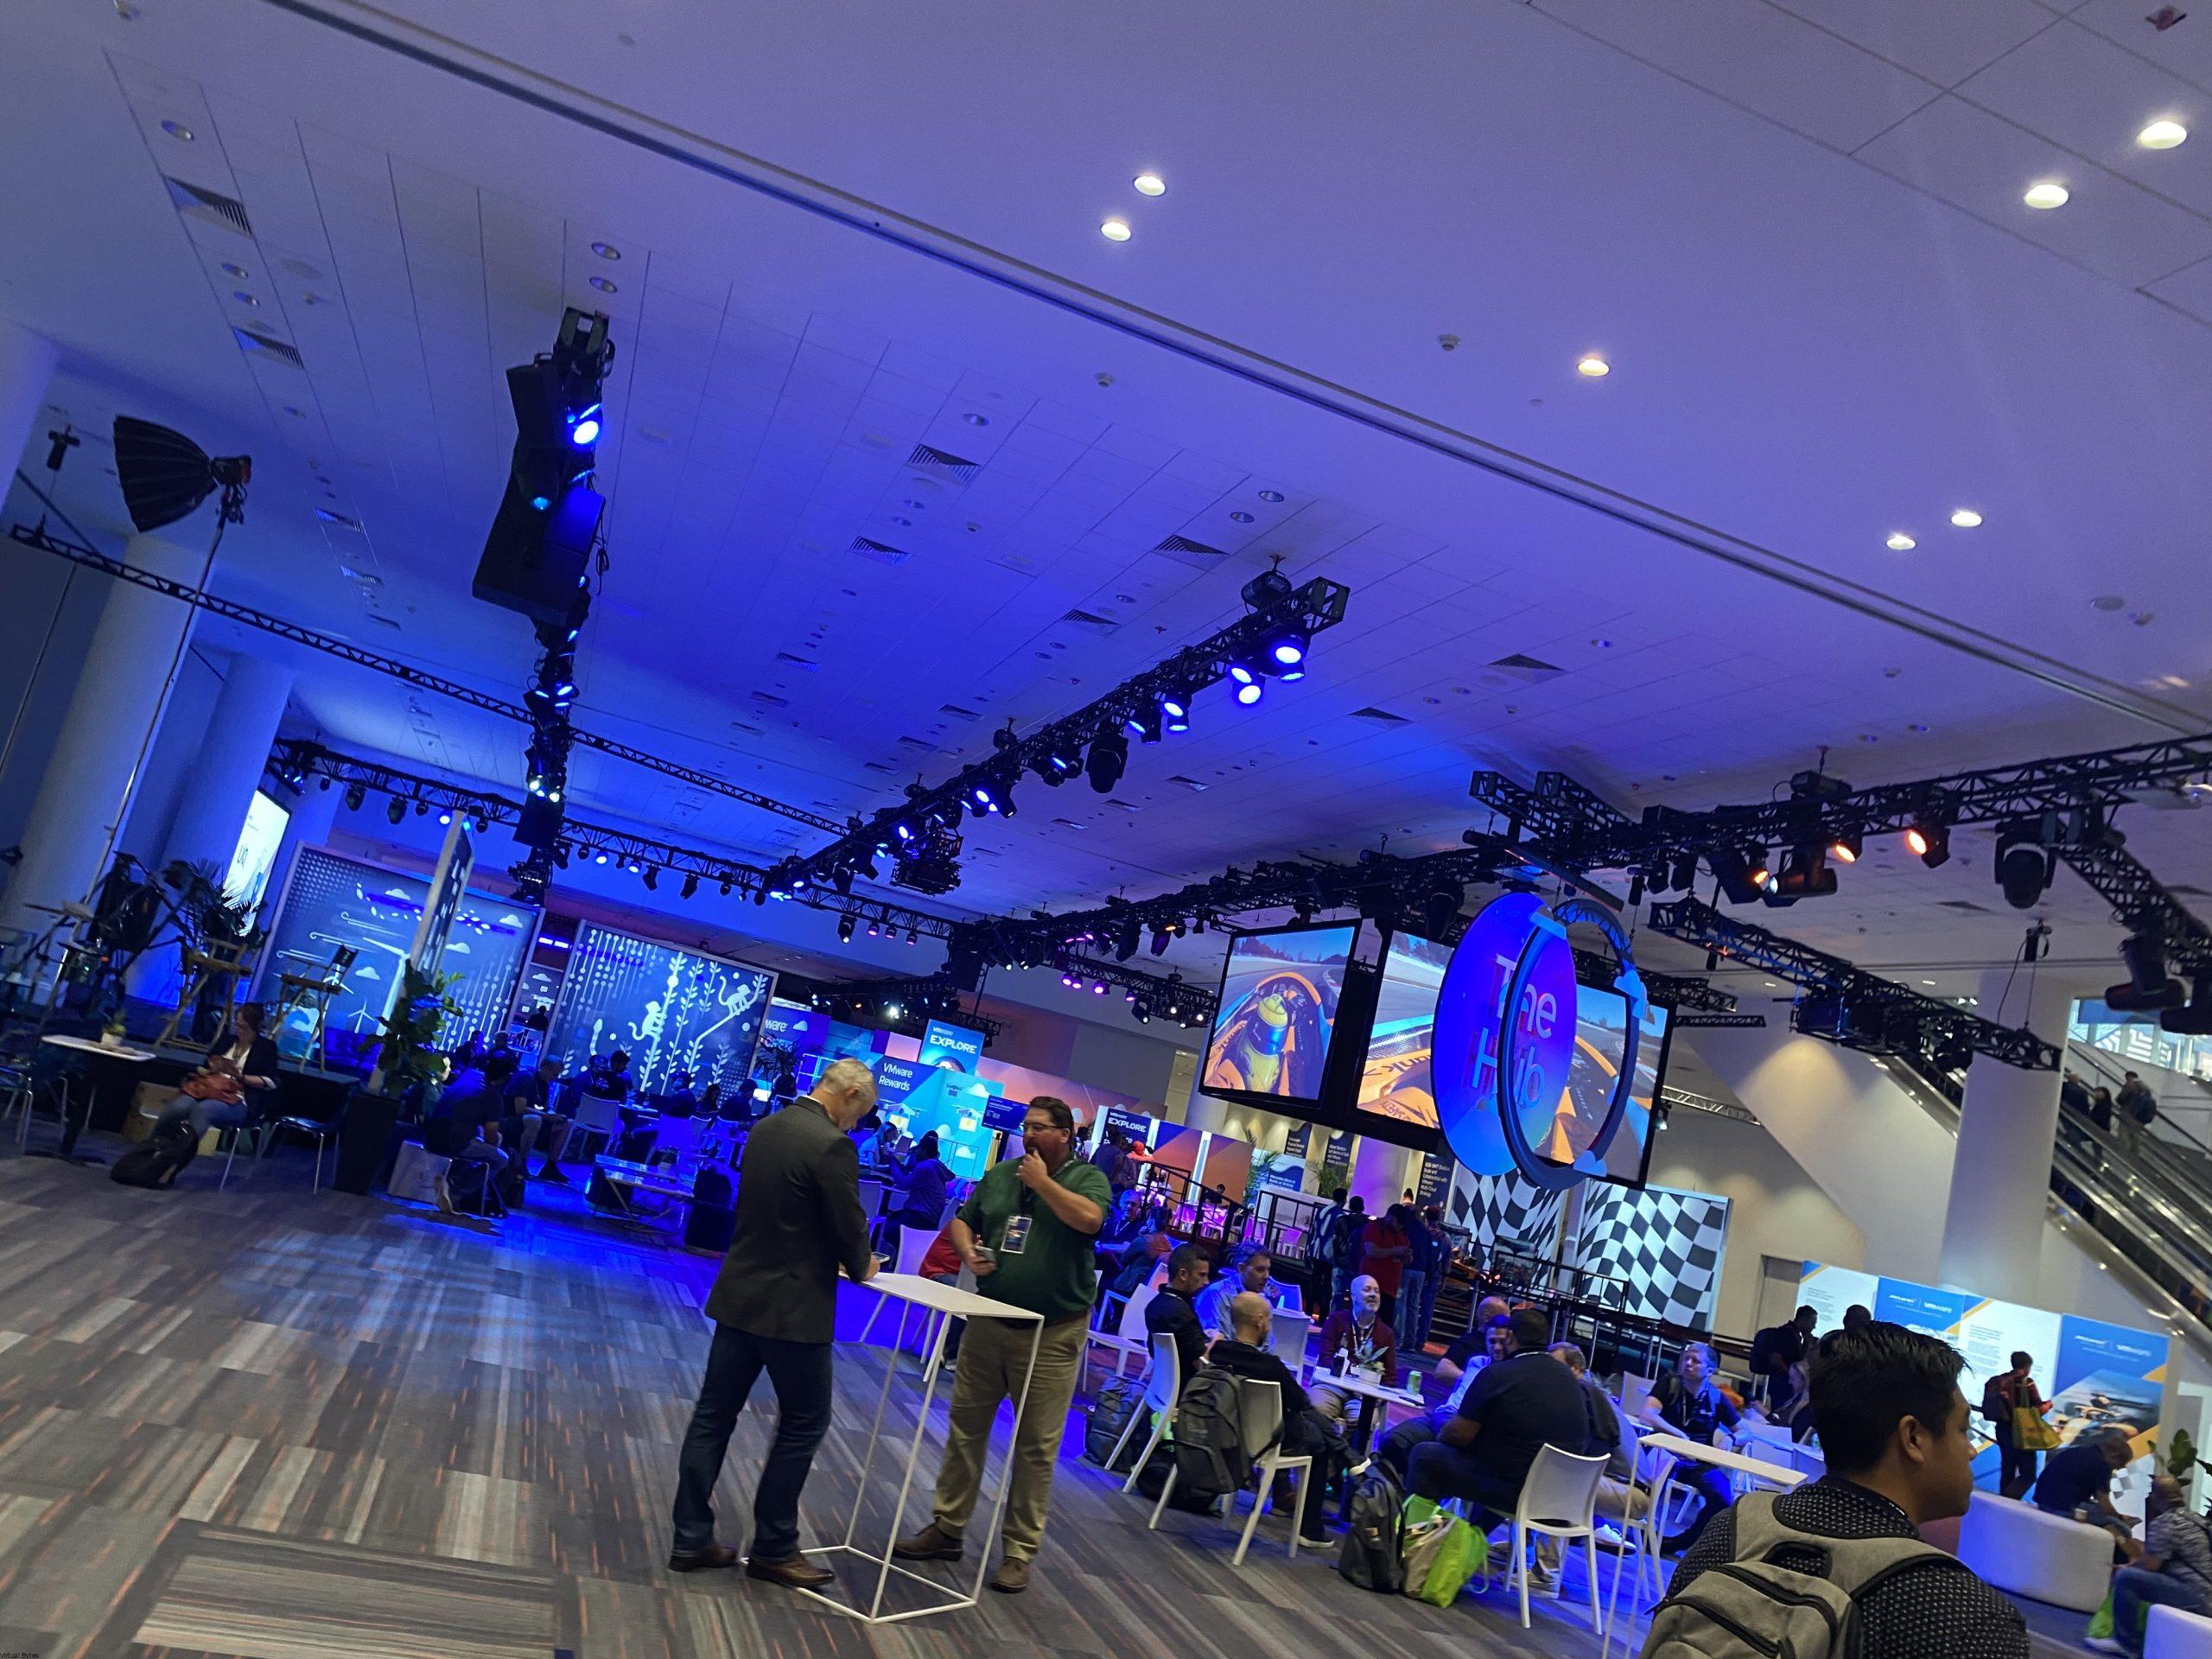
Monday came around the corner, I was so excited to go to the Moscone Convention Center and start exploring! I met even more people and even tagged along with many VMware employees! I have attended so many breakout sessions, and HOL events. It was hard to keep track of time. The General Session at Explore was amazing with the creativity and intros and how everything was laid out and well-presented it was amazing to experience it in person!
Picture of General Session – thousands of people were coming in!
The first day The Expo opened up!
I had the pleasure of meeting lots of other people and being able to collab and exchange knowledge and experiences. During my week with all the busy events, breakout sessions, I had meetings setup with a lot of the Vice Presidents & Management members of many of the Business Units within VMware (VMware Cloud Foundation, R&D Engineering, NSX ALB Team, VP of Products, Engineers and even the creator of VMware Cloud Director himself! ) It was a blast! and being able to exchange information and show case what I have been architecting and engineering a solution for my work. As with all those meetings going on, my most favorite was meeting Mark Gabryjelski #23 VCDX! He is Polish! just as I am, he and I got to geek out and show him my home lab! I even started the thought and goal I want to achieve, of being a VMware Certified Design Expert myself! Here I come for the VCDX!
(Me on Left, Mark Gabryjelski, VCDX#23 on right Right)
Overall, my experience at VMware Explore was amazing with the 41 Miles of walking I did, I can go on with so much more detail and keep talking about it but it might become a book! The VMware Party at the Chase Center Arena was awesome, tons of yummy food and tons of people! Local bands and DJ were playing live music!
                                                             THE PARTY!

VMware Explore 2023 – Here I come!

September 14, 2022 0 comments 670 views
0 FacebookTwitterLinkedinThreadsBlueskyEmail
Cloud

VMware Cloud Director – Customization & Branding w/ API

by Tommy Grot September 9, 2022
written by Tommy Grot 3 minutes read

A in depth post on how to customize your VMware Cloud Director! If your organization has a specific theme and logo, well tonight’s post will guide you through the steps to get it all configured and looking all spiffy!

By default, installation Cloud Director offers two types of themes, the default white mode and dark mode. You can manage, create, and add your own themes to VCD. The steps we will be following through will be done system level so all Tenants and the Provider will see the updated VCD UI!

First connect to VCD Cell appliance via SSH –

Change Directory to

cd /opt/vmware/vcloud-director/bin

Run the Cell Management Tool

./cell-management-tool manage-config -n backend.branding.requireAuthForBranding -v false

Next we will utilize Postman to do the next few tasks

Access Token Authentications

You will want to get your Access Token and API Version, below I will explain on how to do that to get your API version

Get -> https://<Your-IP-Here>/api/versions

Authorization Tab

  • Basic Auth – Username: “administrator@system” & Password: <your password>

Headers Tab

  • Key: Accept Value: application/*;version=37.0

Below is the supported version I utilized, I did not used the beta version.

</VersionInfo>
<VersionInfo deprecated="false">
    <Version>37.0</Version>
    <LoginUrl>https://172.16.204.120/cloudapi/1.0.0/sessions</LoginUrl>
    <ProviderLoginUrl>https://172.16.204.120/cloudapi/1.0.0/sessions/provider</ProviderLoginUrl>
</VersionInfo>

POST API Sessions

Now we will create a POST within Postman.

POST https://172.16.204.120/api/sessions

Authorization Tab

  • Basic Auth – Username: “administrator@system” & Password: <your password>

NOTE -> Once you execute the POST, make sure you get a 200 OK status before proceeding futher.

Next you will want to save the token above as sampled in the image, you will need it for the Beare Token.

Headers

  • KEY: x-vcloud-authorization VALUE: e31a8bd0d1244282bed8b4b809ba9e1f
  • KEY: X-VMWARE-VCLOUD-ACCESS-TOKEN VALUE: <eyJ….>

Cloud Director Web Portal Customization

For this next section you will need to execute GET calls to get the current portal configuration with the above Bearer Token KEYS and VALUES

GET https://172.16.204.120/cloudapi/branding

Once you execute the call you will want to go to the Body section and you will see something like this, but a fresh installation of VCD – Portal Name will be ” VMware Cloud Director” and the theme name would be “Default” Which mine is set to Dark mode.

Sample Body Configuration

{
    "portalName": "Virtual Bytes Cloud",
    "portalColor": null,
    "selectedTheme": {
        "themeType": "BUILT_IN",
        "name": "Dark"
    },
    "customLinks": [
        {
            "name": "help",
            "menuItemType": "override",
            "url": null
        },
        {
            "name": "imprint",
            "menuItemType": "override",
            "url": null
        },
        {
            "name": "about",
            "menuItemType": "override",
            "url": null
        },
        {
            "name": "vmrc",
            "menuItemType": "override",
            "url": null
        }
    ]
}

    Then once you get your custom configuration ready you will want to do a PUT Call via Postman

Once you POST your Branding configuration, go back to Web UI of VCD and hit refresh! You should see something like below 🙂

Cloud Director Web Portal Logo Customization

Now. for our logo we will do another API call via Postman to PUT a png file for the system level logo.

Authorization Tab

  • Bearer Token from previous API call we did

Headers

  • KEY: Accept VALUE: application/*;version=37.0
  • KEY: x-vcloud-authorization VALUE: “e31a8bd0d1244282bed8b4b809ba9e1f” <- Put your value for the call not mine 🙂
  • KEY: X-VMWARE-VCLOUD-ACCESS-TOKEN VALUE: “eyJhbGciOiJSUzI…..” <- I shorted the Bearer Token

Go to Body – Change it to binary and find your logo.png file to upload and then hit Send.

Top right corner you will see the logo I uploaded to Cloud Director!

September 9, 2022 0 comments 1.7K views
0 FacebookTwitterLinkedinThreadsBlueskyEmail
CloudVMware Cloud Foundation

VMware Cloud Foundation 4.4.0 Offline Bundle Walkthrough

by Tommy Grot September 4, 2022
written by Tommy Grot 1 minutes read

Hey there tech enthusiasts! Are you ready to dive into the nitty-gritty details of upgrading your VMware Cloud Foundation offline bundle? Well, you’ve come to the right place! In this blog post, we’ll be breaking down everything you need to know about upgrading your VMware Cloud Foundation offline bundle, step by step.

This Offline Walkthrough is valid for any VMware Cloud Foundation – Offline Upgrade, ensure you have at lease the most up-to-date bundle utility to proceed

Go to Drivers & Tools

Download Bundle Transfer Utility

Upload the Bundle Utility tool to SDDC Manager appliance via WINSCP or SCP.

Change Director to

/opt/vmware/vcf/lcm/lcm-tools/bin

Then run the command below to generate a marker file (This lets the bundle utility know what is needed to be downloaded)

./lcm-bundle-transfer-util --generateMarker

Then open up WINSCP and connect to SDDC Manager (Login as VCF user)

Once you copeid them from the /root/ directory to your home/vcf directory, then refresh your WinSCP window and you shall see the marker file.

If you do run into permission issues, elevate from vcf to root via ” su ” , type in password and then once your as root, run these commands.

chmod 777 markerFile
chmod 777 markerFile.md5
chown vcf:vcf markerFile
chown vcf:vcf markerFile.md5

Then copy the two maker files into your vcf directory on C:\

Run the command, you will see a long list of bundles-(xxxxx) to download, some will be patches, and installs, but you want the correct version for your VCF Bill of Materials.

Run the command below

./lcm-bundle-transfer-util -upload -bundleDirectory /nfs/vmware/vcf/nfs-mount/offlinebundle

Thats all! Now let the bundles keep getting ingested, this will take a bit depending on the amount of bundles.

September 4, 2022 1 comment 2.1K views
0 FacebookTwitterLinkedinThreadsBlueskyEmail
VMware NSX

VMware NSX 4.0.0.1 Upgrade from NSX-T 3.2.1

by Tommy Grot August 7, 2022
written by Tommy Grot 2 minutes read

Want to upgrade to VMware NSX? Yes, thats the new name for VMware NSX-T Datacenter. It has been renamed. More information from VMware.

Product Name Change: With the release of 4.0.0.1 the product name changes from “VMware NSX-T Data Center” to “VMware NSX.” This new name better reflects the multi-faceted value that NSX brings to customers. This update is apparent in the product graphical user interface as well as documentation. This change has no impact to the functionality of the product or changes to the API that impacts compatibility with previous releases. Want More info? Check out VMware’s site

First things first! Lets log into your NSX-T primary node. Then go to System and Upgrade.

Upload the VMware-NSX-upgrade-bundle-4.0.0.1.0.20159689.mub file.

This will take few min to upload, depending on your connection speeds.

This will verify the matrix and other settings prior to upgrading.

Once, the compatibility has been checked. Next you will need to accept the EULA.

Now, lets fire up the upgrade! This will upload the required files to each of the NSX-T Managers.

Continuation of the Upgrade Preperation

Run a Pre-Check before you execute the upgrade!

After, everything has passed the pre-checks. You may start the upgrades, but make sure you have backups if something happens and you need to restore! If you need to know how to setup backups check out my other post.

This will take few minutes, you may step away and come back, you should see the progress go through, starting from the NSX Edge Nodes, then ESXi Hosts, then VMware NSX Managers.

This will start the upgrade of the NSX Managers. Make sure again, that you have backups configured!!

After 15-20 minutes, depending on the environment your upgrade should be done! And that is it! Very simple way to upgrade NSX without any downtime!

August 7, 2022 0 comments 5.5K views
0 FacebookTwitterLinkedinThreadsBlueskyEmail
Newer Posts
Older Posts


Recent Posts

  • Offline VMware Cloud Foundation 9 Depot: Your Path to Air-Gapped Deployments
  • VMware Cloud Foundation 9: Simplifying Identity with a Unified SSO Experience
  • What’s New In VMware Cloud Foundation 9.0
  • Deploying & Configuring the VMware LCM Bundle Utility on Photon OS: A Step-by-Step Guide
  • VMware Cloud Foundation: Don’t Forget About SSO Service Accounts

AI cloud Cloud Computing cloud director configure cyber security director dns domain controller ESXi How To las vegas llm llms multicloud NSx NSX-T 3.2.0 NVMe sddc security servers ssh storage tenant upgrade vcd vcda VCDX vcenter VCF vcf 9 VDC vexpert Virtual Machines VMs vmware vmware.com vmware aria VMware Cloud Foundation VMware cluster VMware Explore VMware NSX vrslcm vsan walkthrough

  • Twitter
  • Instagram
  • Linkedin
  • Youtube

@2023 - All Right Reserved. Designed and Developed by Virtual Bytes

Virtual Bytes
  • Home
  • Home Data Center 2025
  • VMware
    • Cloud
    • Datacenter & Cloud Infrastructure
      • VMware ESXi
      • VMware vCenter
      • VMware vSAN
    • Networking & Security
    • Desktop & App Virtualization
      • Omnissa Horizon
    • Troubleshooting
    • Ansible
  • Education
  • Hardware
    • Hardware Tips & Tricks
  • Events
  • About
    • About Me
    • Home Lab Archives
      • Home Lab 2020-2022
      • Home Lab 2016-2020