Top Posts
Deploying & Configuring the VMware LCM Bundle Utility...
VMware Cloud Foundation: Don’t Forget About SSO Service...
VMware Explore Las Vegas 2025: Illuminating the Path...
Securing Software Updates for VMware Cloud Foundation: What...
VMware Cloud Foundation 5.2: A Guide to Simplified...
VMware Cloud Foundation 5.2: Unlocking Secure Hybrid Cloud...
VMware Cloud Foundation – Memory Tiering: Optimizing Memory...
Decoding VMware Cloud Foundation: Unveiling the numerous amount...
VMware Cloud Director 10.6.1: Taking Cloud Management to...
Omnissa Horizon Upgrade 2406 to 2412
Virtual Bytes
  • Home
  • Home Data Center 2025
  • VMware
    • Cloud
    • Datacenter & Cloud Infrastructure
      • VMware ESXi
      • VMware vCenter
      • VMware vSAN
    • Networking & Security
    • Desktop & App Virtualization
      • Omnissa Horizon
    • Troubleshooting
    • Ansible
  • Education
  • Hardware
    • Hardware Tips & Tricks
  • Events
  • About
    • About Me
    • Home Lab Archives
      • Home Lab 2020-2022
      • Home Lab 2016-2020
Tag:

ESXi

VMware Cloud Foundation

VMware Cloud Foundation 5.2: A Guide to Simplified Upgrade with Flexible BOM

by Tommy Grot March 11, 2025
written by Tommy Grot 5 minutes read

VMware Cloud Foundation (VCF) has revolutionized the way organizations deploy, manage, and secure their on-premises infrastructure. With the recent release of VCF 5.2, VMware continues to push the boundaries of hybrid-cloud innovation, offering enhanced features, improved scalability, and streamlined management capabilities.

One of the most significant enhancements in VCF 5.2 is the introduction of Flexible Bill of Materials (BOM), a game-changing approach to infrastructure upgrades. Gone are the days of rigid, one-size-fits-all upgrade paths; with Flexible BOM, administrators can now customize their upgrade process to meet the unique needs of their organization.

In this blog post, we’ll delve into the world of VCF 5.2 and Flexible BOM, exploring the benefits, best practices, and step-by-step procedures for a successful upgrade. Whether you’re a seasoned VCF administrator or just starting your hybrid-cloud journey, this guide will provide you with the insights and expertise needed to elevate your infrastructure to the next level

Flexible BOM Process


Downloading The Bits:

The files will be downloaded with a internet connected laptop/desktop or virtual machine.

Note: I am using “03102025” as the directory structure for this process, you can use any name you like for the folder.

First, let’s open up the Offline Bundle Utility Tool (LCM) and start preparing commands to enter, you may copy below and replace to fit your system and your credentials.

(Since, I am using windows for downloading the bundles you will want to run the LCM with out the ./lcm-bundle… as executable, so it would just be “lcm-bundle… for windows” )

lcm-bundle-transfer-util --download --manifestDownload --depotUser <email> --outputDirectory C:\03102025
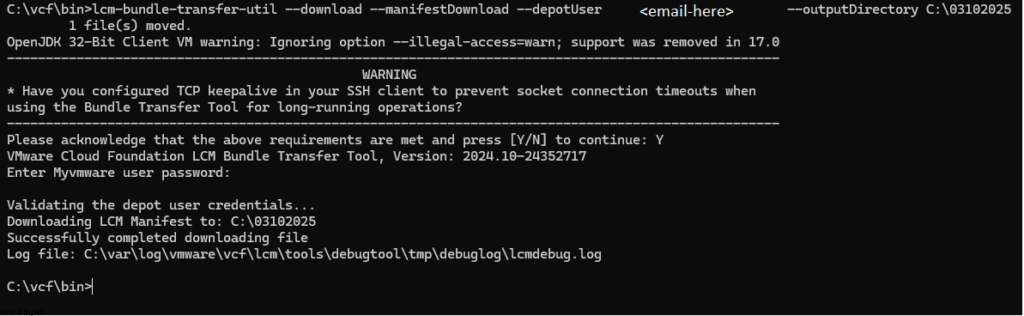
lcm-bundle-transfer-util --download --bundleManifests --depotUser <email> --bundleManifestsDir C:\03102025
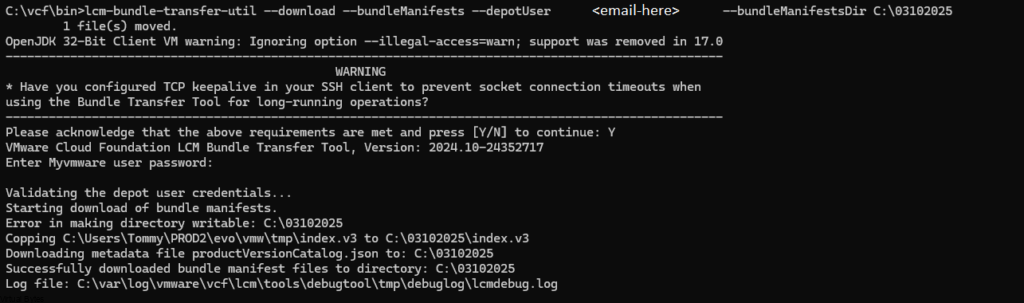
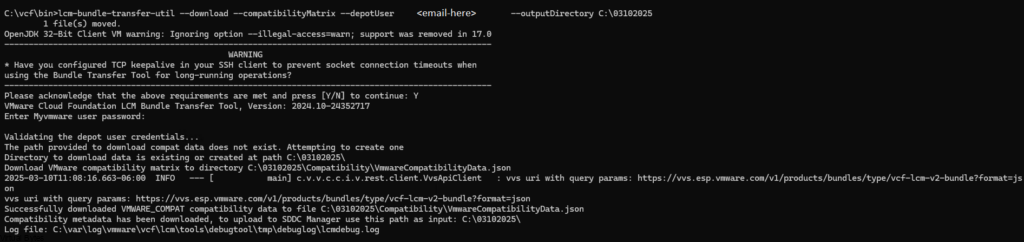
lcm-bundle-transfer-util --download --compatibilityMatrix --depotUser <email> --outputDirectory C:\03102025

Note: If you do not have a VXRAIL Platform, you and disregard the –pdu dell_depot_email, remove it from the syntax as below in the screenshot.

lcm-bundle-transfer-util --depotUser <email> --download productVersionCatalog --outputDirectory C:\03102025
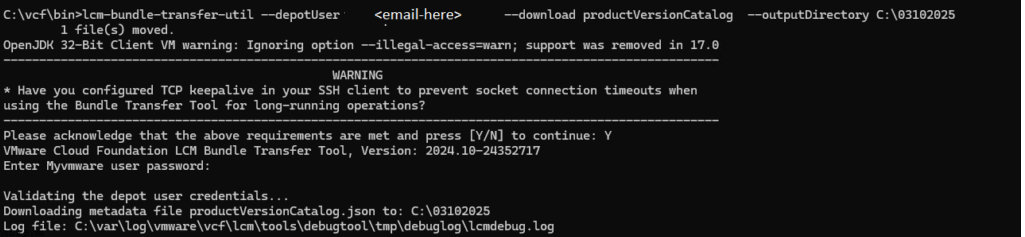
Uploading The Bits:

Once you have downloaded all the updates and manifest files, upload them to the SDDC manager appliance. Keep all the files extracted in the /home/vcf/ directory.

For actual bundles those will be uploaded to the /nfs/vmware/vcf/nfs-mount/ due to the large size and /home/vcf/ is limited on space.

File Structure Table

Note: This will provide simplified way of uploading and ingesting the VCF files and updates following the table below.

--bundleManifests/home/vcf/bundleManifestsUpload the bundleManifests directory into /home/vcf/
--compatibilityMatrix/home/vcf/Compatibility/Upload the Compatibility directory into /home/vcf/
productVersionCatalog/home/vcf/Upload the productVersionCatalog.json in /home/vcf/ directory
--sourceManifestDirectory/home/vcf/lcm/Upload the lcm directory into /home/vcf/
bundleManifests
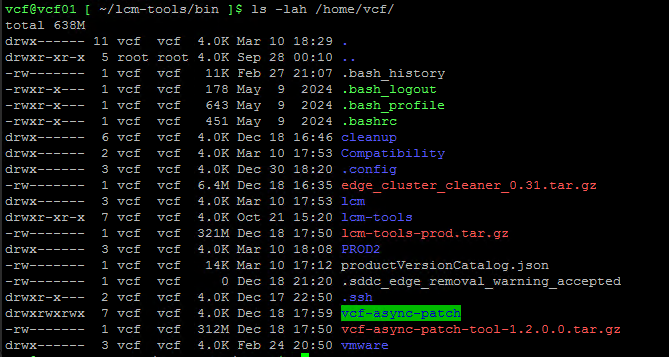
./lcm-bundle-transfer-util --update --sourceManifestDirectory /home/vcf --sddcMgrFqdn FQDN --sddcMgrUser [email protected]
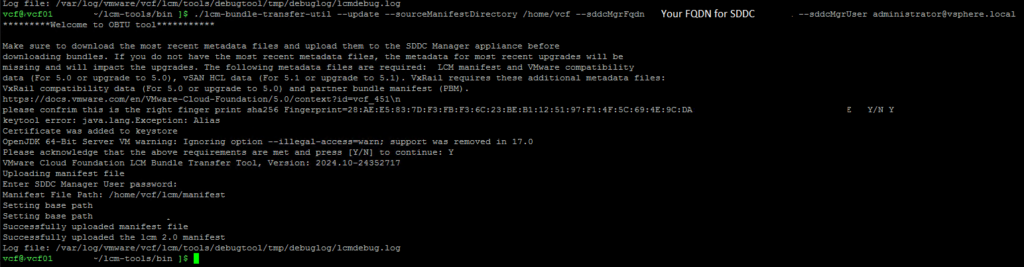
./lcm-bundle-transfer-util --upload --bundleManifests --bundleManifestsDir /home/vcf/
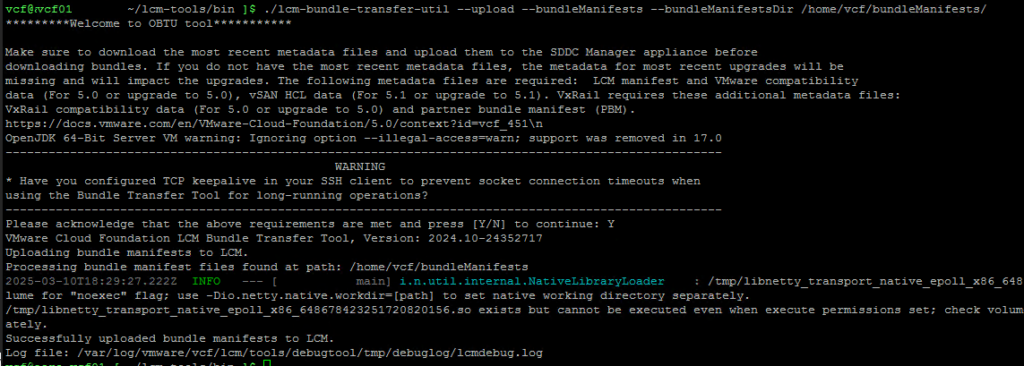
./lcm-bundle-transfer-util --update --compatibilityMatrix --inputDirectory /home/vcf --sddcMgrFqdn FQDN --sddcMgrUser [email protected]
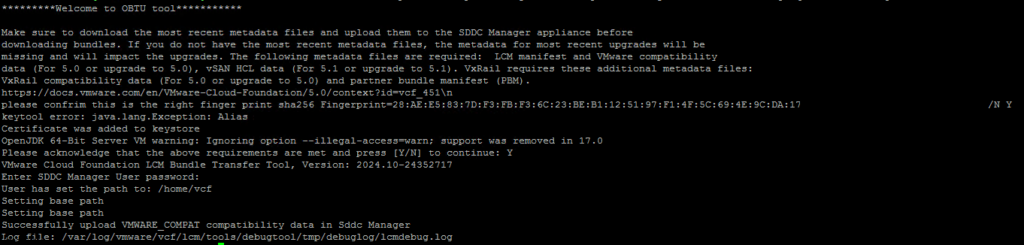
./lcm-bundle-transfer-util --upload productVersionCatalog --inputDirectory /home/vcf --sddcMgrFqdn FQDN --sddcMgrUser [email protected]

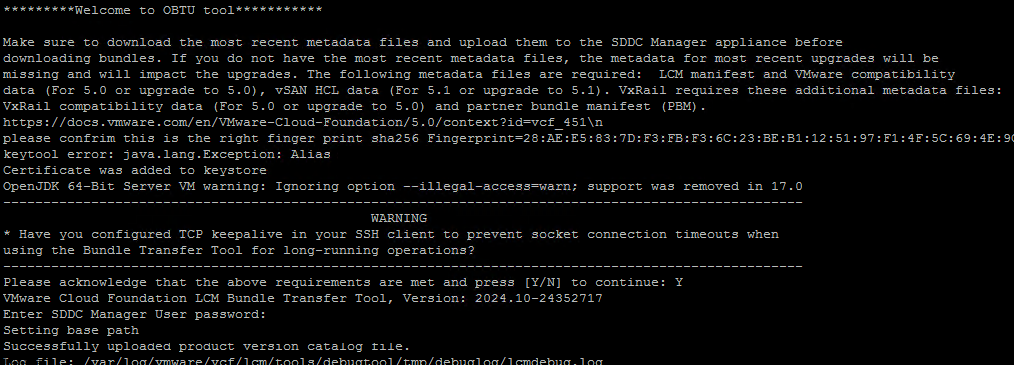
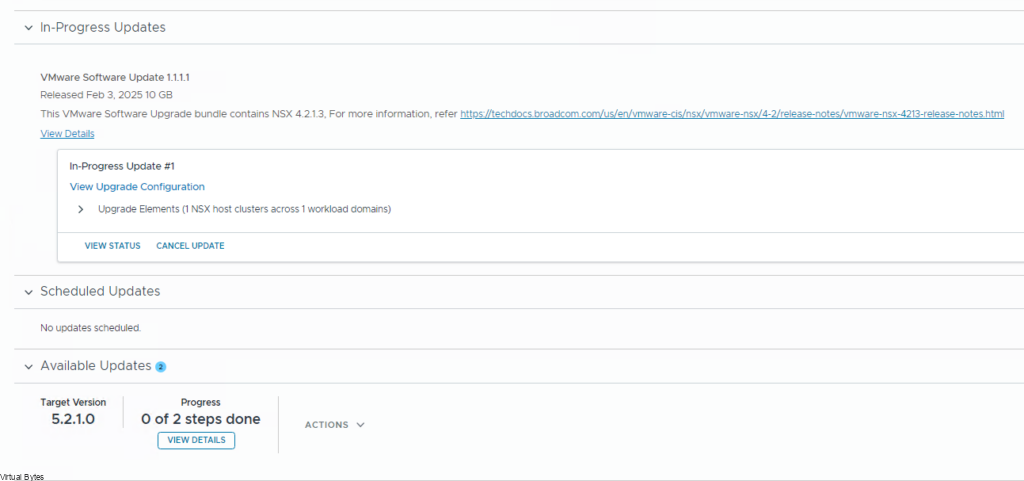
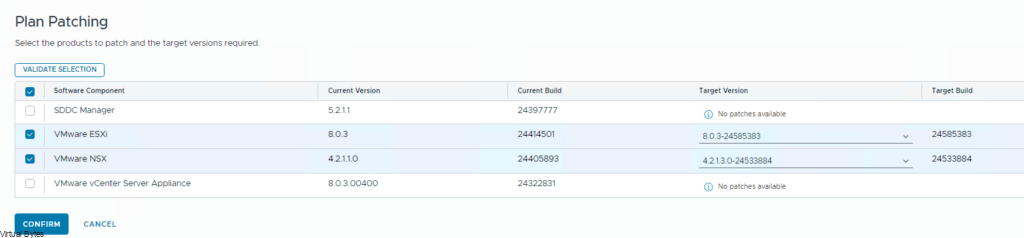
After you have completed the above steps for updating the BOM and Products, Manifests. Next we will go to the workload domain you want to patch. Select Plan Patching -> Select the Products you want to upgrade/patch.

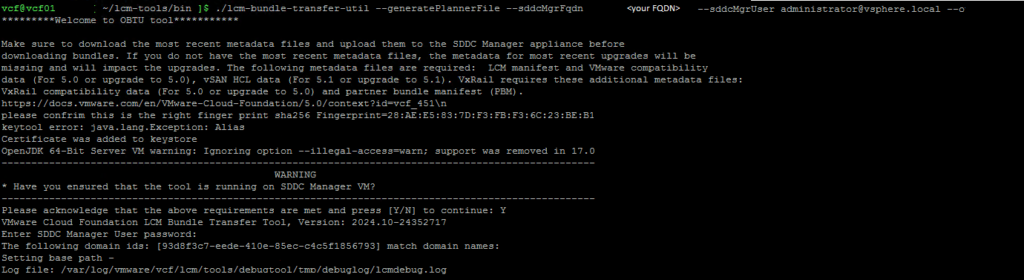
./lcm-bundle-transfer-util –generatePlannerFile –sddcMgrFqdn <your FQDN> –sddcMgrUser [email protected] –outputDirectory /home/vcf –domainNames vcf-m01 -p 5.2.1.0

An Example of the plannerFile.json below:

[{"id":"f486b010-2441-4ee3-93a3-1cae8d375e1e","type":"VMWARE_SOFTWARE","description":"This VMware Software Upgrade bundle contains vSphere ESXI 80U3d, for more information, refer https://techdocs.broadcom.com/us/en/vmware-cis/vsphere/vsphere/8-0/release-notes/esxi-update-and-patch-release-notes/vsphere-esxi-80u3d-release-notes.html","version":"608.169.14-83637536","severity":null,"vendor":"VMware","releasedDate":"2025-02-24T12:00:00Z","isCumulative":false,"isCompliant":null,"sizeMB":606.376953125,"downloadStatus":"PENDING","components":[{"description":"ESXI bundle element","vendor":"VMware","releasedDate":"2025-02-24T12:00:00Z","toVersion":"8.0.3-24585383","fromVersion":"1.1.1-1","imageType":"PATCH","id":"54bf5dce-40e1-408b-9a1d-6ebb63b3dabe","type":"HOST"}],"applicabilityStatus":"PENDING","applicabilityOrder":2,"isPartiallyUpgraded":false},{"id":"d70ed6b4-26b7-4e40-a516-57492b7ddb72","type":"VMWARE_SOFTWARE","description":"This VMware Software Upgrade bundle contains NSX 4.2.1.3, For more information, refer https://techdocs.broadcom.com/us/en/vmware-cis/nsx/vmware-nsx/4-2/release-notes/vmware-nsx-4213-release-notes.html","version":"310.71.51-83059794","severity":null,"vendor":"VMware","releasedDate":"2025-02-03T12:00:00Z","isCumulative":false,"isCompliant":null,"sizeMB":9070.224609375,"downloadStatus":"PENDING","components":[{"description":"NSX-T Manager patch bundle element","vendor":"VMware","releasedDate":"2025-02-03T12:00:00Z","toVersion":"4.2.1.3.0-24533884","fromVersion":"1.1.1-1","imageType":"PATCH","id":"2b89cce2-b0e9-4595-964e-0df5711b0a9d","type":"NSX_T_MANAGER"}],"applicabilityStatus":"AVAILABLE","applicabilityOrder":1,"isPartiallyUpgraded":false}]

Once you have generated the file, copy it from the SDDC Manager onto your internet connected machine.

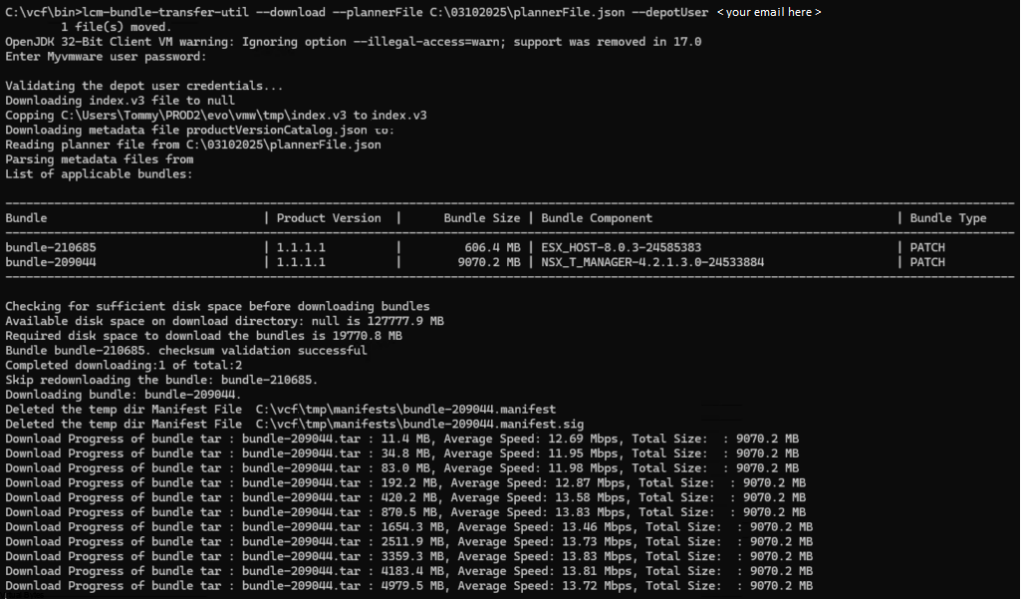
lcm-bundle-transfer-util --download --plannerFile C:\03102025\plannerFile.json --depotUser <your username for VMware Depot>

Once your bundles have been downloaded, you will want to transfer them to the system that will be upgraded. After everything is uploaded into the NFS Directory on SDDC Manager, you will want to make sure that you elevate to root by su for ingesting bundles.

Now we will go back to the SDDC Manager, upload the actual bundles into the /nfs/… share and ingest them with command below.

./lcm-bundle-transfer-util --upload --bundleDirectory /nfs/vmware/vcf/nfs-mount/03102025/

If you have a VXRAIL VCF Deployment you will want to upload the Partner Bundles with the command below:

./lcm-bundle-transfer-util --upload "uploadPartnerBundle" --bundleDirectory directory-path

Once all update bundles have been uploaded, go back to the SDDC Manager User Interface, and you should see that the Update Now button shows up and lets you proceed with the upgrade!

March 11, 2025 0 comments 701 views
0 FacebookTwitterLinkedinEmail
VMware Troubleshooting

How PCIe NVMe Disks affect VMware ESXi vmnic order assignment

by Tommy Grot April 18, 2023
written by Tommy Grot 3 minutes read

Today’s topic is about VMware Cloud Foundation and homogenous network mapping with additional PCIe interfaces within a server.

Physical PortDevice Alias
Onboard port 1vmnic0
Onboard port 2vmnic1
Onboard port 3vmnic2
Onboard port 4vmnic3
Slot #2 port 1vmnic4
Slot #2 port 2vmnic5
Slot #4 port 1vmnic6
Slot #4 port 2vmnic7

VMware KB – How VMware ESXi determines the order in which names are assigned to devices (2091560) this KB talks about vmnic ordering and assignment, but the post below will explain when a NVMe PCIe disk is apart of a host.

What kind of environment? – VMware Cloud Foundation 4.x

If a system has:

  • Four onboard network ports
  • One dual-port NIC in slot #2
  • One dual-port NIC in slot#4

Then devices names should be assigned as:

The problem:

If a physical server has additional PCIe interfaces that are greater in quantity over another server that you want to bring into an existing or new cluster.

An example – Dell PowerEdge R740, with 24 NVMe PCIe SSD Drives, and 2 – QSFP Mellanox 40Gig PCIe, and 1 – NDC LOM Intel X710 Quad 10Gb SFP+, and Boss Card, but another server that has few drives less than 24 as example above but the same network cards as following (2 – QSFP Mellanox 40Gig PCIe, 1 – NDC LOM Intel X710 Quad 10Gb SFP+, and Boss Card)

This will cause the physical server to have its PCIe Hardware IDs shift by (N) and cause the vmnic mapping to be out of order where certain vmnics will show up out of order, which causes the homogeneous network misconfiguration layout for VMware Cloud Foundation ESXi Hosts that are apart of a workload domain. It is important to have identical hardware for a VCF implementation to have successful VCF deployment of a workload domain.

This type of issue would cause problems for any future deployments of VMware Cloud Foundation 4.x. If they have an existing cluster with either type of configurations: high density compute node, or a vGPU node, or a high-density storage node it would throw off the PCIe mapping to and prevent all esxi hosts to have a homogeneous vmnic mapping to the physical nic.

The Fix:

Before you start doing any configurations with your ESXi host within VCF, please make sure to Decommission that host from your cluster within that workload domain.

Once the host is removed from that cluster within the workload domain:

Go to – > Workload Domains -> (Your Domain) ->

Clusters -> Hosts (Tab) -> Select the host you want to remove

Then Go back to Main SDDC Page – > Hosts -> and Decommission that select ESXi Host

Once, host is decommissioned, wipe all your NVMe Disks first, and then make sure to shutdown the ESXi host and unplug the NVMe disks just slightly to ensure that they do not get powered on, so then the next re-image of your ESXi host there will only be 1 disk which should be your boot drive or a Boss SSD M.2.

After server is up login back into your ESXi host and it should match to your liking where all the vmnics are aligned and correctly showing up in a homogenous layout

The Results:

Before

After

April 18, 2023 0 comments 659 views
0 FacebookTwitterLinkedinEmail
Cloud

VMware Cloud Director 10.3.2 Installation / Configuration

by Tommy Grot January 19, 2022
written by Tommy Grot 1 minutes read

Installing VMware Cloud Director, this walkthrough will guide you on how to deploy VMware Cloud Director 10.3.2. My next blog post will be on how to configure tenants and different network toplogies within vCD.

Download the OVA from VMware’s website login will be required to gain access to the installation medium

Login into vCenter, then right click on the Cluster, Deploy OVF Template

Select the VMware Cloud Director OVA and then click Next

Chose the naming convention of your vcd instance

Select the Compute Cluster that you wish to deploy VCD on

Review the details

Accept that lovely EULA! 🙂

Select the Configuration of the VCD instance. Each confiruation has different resouce allocations.

Select the Storage you wish to deploy the VCD instance too, for mine i chose my vSAN Storage

Select the Networks that VCD will utilize, for my setup I am using two NSX-T overlay backed Segments with the Database segment being isolated and the vcd segment being routable

Verify all settings before hitting Finish!

After the deployment is completed you can integrate VCD with NSX-T and vCenter

Login via https://x.x.x.x/provider (this will allow you to login into VCD as the provider)

Once logged in, go to Infrastructure Resource

Click ADD – to add vCenter server

Once you accepted the SSL Certificate from vCenter, then you will enable tenant access and click finish. After vCenter has been added you will see an overall vCenter Info, like in the screenshots below

After vCenter has been added, you may add NSX-T managers

Click on ADD – fill in the NSX-T Manager(s) URL/IP and user account

Trust the certificate from NSX-T Managers, then you are all set!

January 19, 2022 0 comments 2.4K views
1 FacebookTwitterLinkedinEmail
VMware Troubleshooting

vSphere ESXi Dump Collector

by Tommy Grot October 17, 2020
written by Tommy Grot 2 minutes read

If you have any issues or errors that occur within the ESXi Hypervisor, the ESXi Collector will send the current state of the VMkernel Memory. This will dump the core to the vCenter via network. So if a ESXi host fails or gets compromised there will be traces of sys log and other logs sent to the vCenter Serve which could be in the same organization datacenter or reside somewhere else in the cloud.

Cyber Security Tip! – DISABLE SSH after you are done working with it, this is strongly recommend to harden the ESXi host and prevent any cyber attacks against SSH (Port 22)

The ESXi Dump Collector traffic is not encrypted so best practice is to set it on a isolated VLAN that the internet or other networks do not communicate with it.

First step, is to log into VMware Server Management, also known as, VAMI.

https://YOUR_VCENTER_IP_OR_DNS:5480/

The login credentials to log into VAMI

Username : root

Password : The Password you setup during installation.

Once you are logged into VAMI, you will need to go to the Services section. Then look for VMware vSphere ESXI Dump Collector.

Select it, and click START

After the VMware vSphere ESXi Dump Collector is started and running, log into your ESXi host(s) via SSH.

To enable SSH on the cluster, login your vCenter, then go to the ESXi host, Click on Configure -> System -> Services. You will see SSH, click on that and select START.

Once SSH has started, open up your favorite SSH tool, for this tutorial I am using Putty. You may download it here.

Then log into the ESXi host and you will execute few commands to enable the ESXi host to offload the VMkernel logs to the vCenter Dump Collector.

esxcli system coredump network set --interface-name vmk0 --server (YOUR vCENTER IP) --server-port 6500
esxcli system coredump network set --enable true
esxcli system coredump network get

After all those 3 commands are executed with your specific vCenter IP, you will see that the final command will get the coredump network configuration and display it in the SSH session. Once that is enabled you will see that the Alert for ESXi Core Dumps log go away and logs are offloaded.

October 17, 2020 0 comments 2K views
0 FacebookTwitterLinkedinEmail
VMware ESXi

Installing / Upgrading VMware vSphere ESXi 7 Update 1 via iDRAC 8

by Tommy Grot October 7, 2020
written by Tommy Grot 2 minutes read

This post is guiding you on how to install or upgrade VMware ESXi 7 Update 1. This walk through will be the same for installing or upgrading ESXi, the only difference would be during the install you would specify a root password along with installing it.

Disclaimer: This also works for iDRAC 8 and below. On Dell PowerEdge 13th, 12th Generation servers.

Information Regarding the VMware vSphere Update via VMware’s Website – Click Here to Download, You will need to login with your VMware credentials.

Name:VMware-VMvisor-Installer-7.0U1-16850804.x86_64
Release Date:2020-10-06
Build Number:16850804

First Step: Log into iDRAC via root. Once logged in, click on Launch virtual console as below in the screenshot.

Once the Virtual Console window has opened. You will need to mount your VMware-VMvisor-Installer-7.0U1-16850804.x86_64.iso to the Virtual Optical Drive. Then click Map Device.

During the reboot of the server you may have to press F11 to get into the Boot Menu and select the One Time Boot Menu and go down to Virtual Optical Drive.

Once you select Virtual Optical Drive you will see the Dell BIOS loading and running through its boot up processes.

Now loading the VMware-VMvisor-Installer-7.0U1-16850804.x86_64.iso and it loads into memory.

Once the VMware ESXi 7.0.1 installer has loaded you will be greeted with a menu to follow through which is pretty straightforward.

Accept EULA.

Install or Upgrade VMware ESXi 7.0.1 on the correct corresponding datastore. If it is on a SD Card or Flash it will show up. Ensure to not install it on a VMFS datastore!

During this step. You have the ability to install a fresh or upgrade an existing environment. This will depend on your scenario. Please follow through carefully and ensure you have all backups of your DATA!

This will be the Final Screen prior to proceeding with the Installation or Upgrade! Press F11 to upgrade or accept if it is a fresh install.

Please be patient and let install finish 🙂

Install / Upgrade is complete! Now you may un map the virtual optical drive and reboot the host! And Enjoy the new VMware vSphere Update 7.0.1

October 7, 2020 1 comment 8.9K views
1 FacebookTwitterLinkedinEmail
VMware vCenter

VMware vCenter 7 Update 1 – Installation Walkthrough

by Tommy Grot October 6, 2020
written by Tommy Grot 3 minutes read


To Install vCenter 7.0 Update 1 with Embedded Platform Service Controller – Download the ISO from VMware (login will be required) Once downloaded, open the VMware VCSA.iso

  • Select vcsa-ui-installer folder
  • Then select choice of operating system (This tutorial is completed via Windows 10)
  • After going to win32
  • Then click on installer.exe

During this install we will be installing fresh new instance of VCSA.

  • Select Install

This installation now only offers Embedded Platform Services Controller. The External Platform Service Controller topology is depreciated model per VMware

Click Next

  • Accept EULA

Specify the VMware ESXi Host or vCenter IP Address – Example – 10.0.0.100 or DNS Name – esxi01.virtualbytes.io ; vcenter.virtualbytes.io

( VMware recommends to operate its platform with DNS names, this allows easier management and IP address modifications )

  • After all proper information is configured / documented – Click Next
  • Accept the Certificate Warning from the ESXi Host
  • Setup the appliance –
    • Specify a name for your vCenter Server (ex. vCenter, VCSA, etc)
    • Specify the VCSA root password ( If you do lose this password there is a step by step procedure to recover access)
  • During this Stage 1 – Here you can specify the VCSA installation to the specified datastore. Enabling Thin Disk Mode – will per-allocate the actual used storage of the virtual machine on the datastore (This saves storage from being filled)
  • VMware recommends to install vCenter under a FQDN (Fully Qualified Domain Name) with a FQDN – this allows you to change the IP address of a VCSA.
    Be cautious of filling the “Configure network settings” page – This will lead to a inoperable vCenter instance.
  • Recommendation – Setup an ‘A’ Record on your local network DNS server or Domain Controller to point to the fresh new vCenter Server Appliance

VERIFY! VERIFY! VERIFY! – If you do not verify your appliance deployment configuration and you mis-configure a setting – You will be reinstalling VCSA from scratch again. (BE CAREFUL!)

After you have verified all information – Click Next

  • This stage will take few minutes – Grab a coffee or water! 🙂
  • Once the Deploy vCenter Server Appliance is completed – You will see another window to “Continue” – Click Continue and this will lead you to the next window.
  • Stage 2 – This stage you will get to configure the Appliance configuration such as (SSH, SSO, CEIP)
  • SSH – is recommend to be turned off for security reasons, unless you are setting up more than one vCenter server and setting up vCenter High Availability
  • SSO – the single sign on, the default is vsphere.local, if you have a on premise domain controller, make sure you do not use the same domain name, this will prevent you from adding vCenter to the Active Directory domain forest.
  • Most recommended option is to synchronize the time with the ESXi Host – Also making sure that the NTP Service is running on the ESXi Host and is up to date with a relative time server.
  • During this option – SSO ( Single Sign On ) If you plan to join your vCenter to a Active Directory Domain – Make sure to specify a different domain or keep vsphere.local (You cannot use same AD domain as SSO domain on VCSA)

VERY IMPORTANT! Make sure the password you specify in this configuration window is accurate. If not you will be repeating the installation all over again – due to a password mis-configuration

  • Your choice to Join the CEIP Program ( This is recommend to join CEIP to get the Skyline Alerts and Health Updates)
  • Verify the finalization stage – this stage will configure your vCenter Server Appliance.

VERY IMPORTANT! Make sure the password you specify in this configuration window is accurate. If not you will be repeating the installation all over again due to a password mis-configuration

  • Once you confirm the final confirmation – There is no going back! Unless you took a snapshot of the vCenter Server Appliance prior to starting the vSphere SSO domain portion.
  • Enjoy your coffee or water – and wait patiently (This takes around 10-20 minutes, depending on the hardware)
  • You’ve installed vCenter Server Appliance! Now you may log into it URL to your server will be a – DNS A Record you configured in your local DNS Server.

https://your_vcenter_dns_name

October 6, 2020 0 comments 1.7K views
0 FacebookTwitterLinkedinEmail
VMware vSAN

Setting Up – Nested ESXi 6.7 on vSAN

by Tommy Grot April 12, 2019
written by Tommy Grot 1 minutes read

Today we will be installing Nested ESXi 6.7 on vSAN.

This is not a supported type of deployment for Production Environments. USE AT YOUR OWN RISK!

Before Installing ESXi 6.7 – There will be a requirement to add an ESXCLI command via SSH on each host that is apart of the vSAN Cluster

To Enable SSH on ESXi 6.7 – Go to desired host. Click on Configure -> System -> Services -> Click on SSH and click Start.

 esxcli system settings advanced set -o /VSAN/FakeSCSIReservations -i 1 

After the command is inputted. Continue Installation.

After installation – Setup ESXi to have Static IP Address
Once IP address is set, Apply the settings and Select Y – Yes ( This will not interrupt VM traffic only Management)
April 12, 2019 0 comments 2.1K views
0 FacebookTwitterLinkedinEmail
VMware vCenter

VMware vCenter 6.7 – Installation Walk-through

by Tommy Grot February 27, 2019
written by Tommy Grot 3 minutes read

To Install vCenter 6.7 with Embedded Platform Service Controller – Download the ISO from VMware (login will be required) Once downloaded, open the VMware VCSA.iso

  • Select vcsa-ui-installer
  • Then select choice of operating system (This tutorial is completed via Windows 10)
  • After going to win32
  • Then click on installer.exe

During this install we will be installing fresh new instance of VCSA.

  • Select Install
  • Click Next
  • Accept EULA
  • During this installation – we will choose Embedded Platform Services Controller. The External Platform Service Controller topology is depreciated model.
  • Specify the VMware ESXi Host or vCenter IP Address – Example – 10.0.0.100 or DNS Name – esxi01.virtualbytes.io ; vcenter.virtualbytes.io
    ( VMware recommends to operate its platform with DNS names, this allows easier management and IP address modifications )
  • Accept the Certificate Warning from the ESXi Host
  • Setup the appliance –
    • Specify a name for your vCenter Server (ex. vCenter, VCSA, etc)
    • Specify the VCSA root password
  • During this Stage 1 – Here you can specify the VCSA installation to the specified datastore. Enabling Thin Disk Mode – will per-allocate the actual used storage of the virtual machine on the datastore (This saves storage from being filled)
  • VMware recommends to install vCenter under a FQDN (Fully Qualified Domain Name) with a FQDN – this allows you to change the IP address of a VCSA.
    Be cautious of filling the “Configure network settings” page – This will lead to a inoperable vCenter instance.
  • Recommendation – Setup an ‘A’ Record on your local DNS server or Domain Controller to point to the fresh new vCenter Server Appliance

VERIFY! VERIFY! VERIFY! – If you do not verify your appliance deployment configuration and you mis-configure a setting – You will be reinstalling VCSA from scratch again. (BE CAREFUL!)

  • This stage will take few minutes – Grab a coffee or water! 🙂
  • Once the Deploy vCenter Server Appliance is completed – You will see another window to “Continue” – Click Continue and this will lead you to the next window.
  • Stage 2 – This stage you will get to configure the Appliance configuration such as (SSH, SSO, CEIP)
  • SSH – is recommend to be turned off for security reasons, unless you are setting up more than one vCenter server and setting up vCenter High Availability
  • SSO – the single sign on, the default is vsphere.local, if you have a on premise domain controller, make sure you do not use the same domain name, this will prevent you from adding vCenter to the Active Directory domain forest.
  • Most recommended option is to synchronize the time with the ESXi Host – Also making sure that the NTP Service is running on the ESXi Host and is up to date with a relative time server.
  • During this option – SSO ( Single Sign On ) If you plan to join your vCenter to a Active Directory Domain – Make sure to specify a different domain or keep vsphere.local

VERY IMPORTANT! Make sure the password you specify in this configuration window is accurate. If not you will be repeating the installation all over again – due to a password mis-configuration

  • Your choice to Join the CEIP Program
  • Verify the finalization stage – this stage will configure your vCenter Server Appliance.

VERY IMPORTANT! Make sure the password you specify in this configuration window is accurate. If not you will be repeating the installation all over again due to a password mis-configuration

  • Once you confirm the final confirmation – There is no going back! Unless you took a snapshot of the vCenter Server Appliance!
  • Enjoy your coffee or water – and wait patiently (This takes around 10-20 minutes, depending on the hardware)
  • You’ve installed vCenter Server Appliance! Now you may log into it URL to your server will be a – DNS A Record you configured in your local DNS Server.

https://your_vcenter_dns_name

February 27, 2019 0 comments 1.8K views
0 FacebookTwitterLinkedinEmail


Recent Posts

  • Deploying & Configuring the VMware LCM Bundle Utility on Photon OS: A Step-by-Step Guide
  • VMware Cloud Foundation: Don’t Forget About SSO Service Accounts
  • VMware Explore Las Vegas 2025: Illuminating the Path to Cloud Excellence!
  • Securing Software Updates for VMware Cloud Foundation: What You Need to Know
  • VMware Cloud Foundation 5.2: A Guide to Simplified Upgrade with Flexible BOM

AI AVI Vantage cloud Cloud Computing cloud director computing configure cyber security director dns domain controller ESXi las vegas llm llms multi-cloud multicloud NSx NSX-T 3.2.0 NVMe private AI servers ssh storage tenant upgrade vcd vcda VCDX vcenter VCF VDC vexpert Virtual Machines VMs vmware vmware.com vmware aria VMware Cloud Foundation VMware cluster VMware Explore VMware NSX vrslcm vsan walkthrough

  • Twitter
  • Instagram
  • Linkedin
  • Youtube

@2023 - All Right Reserved. Designed and Developed by Virtual Bytes

Virtual Bytes
  • Home
  • Home Data Center 2025
  • VMware
    • Cloud
    • Datacenter & Cloud Infrastructure
      • VMware ESXi
      • VMware vCenter
      • VMware vSAN
    • Networking & Security
    • Desktop & App Virtualization
      • Omnissa Horizon
    • Troubleshooting
    • Ansible
  • Education
  • Hardware
    • Hardware Tips & Tricks
  • Events
  • About
    • About Me
    • Home Lab Archives
      • Home Lab 2020-2022
      • Home Lab 2016-2020