Top Posts
What’s New In VMware Cloud Foundation 9.0
Deploying & Configuring the VMware LCM Bundle Utility...
VMware Cloud Foundation: Don’t Forget About SSO Service...
VMware Explore Las Vegas 2025: Illuminating the Path...
Securing Software Updates for VMware Cloud Foundation: What...
VMware Cloud Foundation 5.2: A Guide to Simplified...
VMware Cloud Foundation 5.2: Unlocking Secure Hybrid Cloud...
VMware Cloud Foundation – Memory Tiering: Optimizing Memory...
Decoding VMware Cloud Foundation: Unveiling the numerous amount...
VMware Cloud Director 10.6.1: Taking Cloud Management to...
Virtual Bytes
  • Home
  • Home Data Center 2025
  • VMware
    • Cloud
    • Datacenter & Cloud Infrastructure
      • VMware ESXi
      • VMware vCenter
      • VMware vSAN
    • Networking & Security
    • Desktop & App Virtualization
      • Omnissa Horizon
    • Troubleshooting
    • Ansible
  • Education
  • Hardware
    • Hardware Tips & Tricks
  • Events
  • About
    • About Me
    • Home Lab Archives
      • Home Lab 2020-2022
      • Home Lab 2016-2020
Tag:

vsan

Commvault Disaster Recovery

Deploying Commvault & Integrating with VMware vSphere 8

by Tommy Grot April 3, 2023
written by Tommy Grot 1 minutes read

Today’s Topic! Deploying Commvault, – Commvault is my most favorite Disaster Recovery Solution, it has so many features and many awesome features that are just simple to use and secure!

Simple, comprehensive backup and archiving

  • Comprehensive workload coverage (files, apps, databases, virtual, containers, cloud) from a single extensible platform and user interface
  • High-performance backups via storage integrations
  • Automated tiering for long-term retention and archiving

Trusted recovery, ransomware protection, and security

  • Rapid, granular recovery of data and applications, including instant recovery of virtual machines
  • Built-in ransomware protection including anomaly detection and reporting
  • End-to-end encryption, including data-at-rest and data-in-flight encryption, to ensure your data is secure

More information Visit Commvault’s Website here!

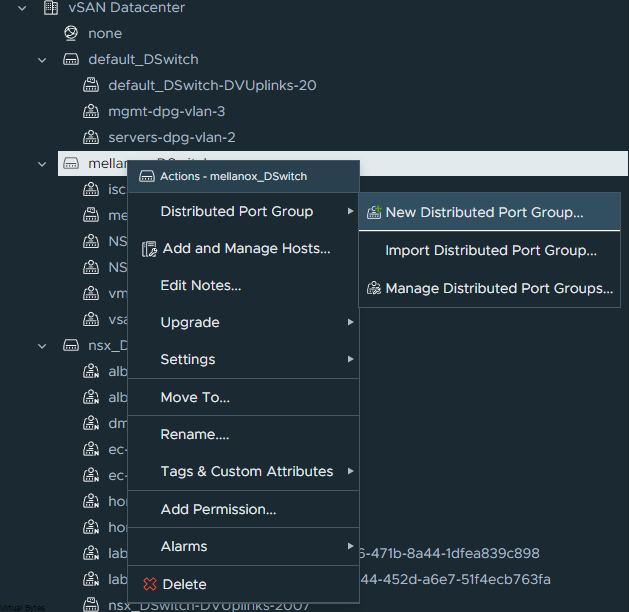
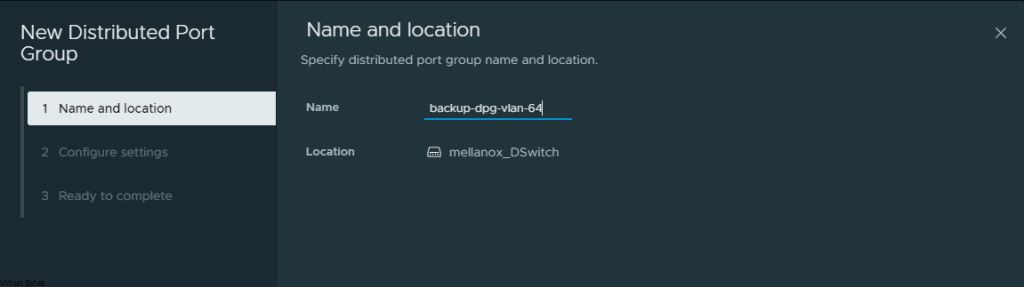
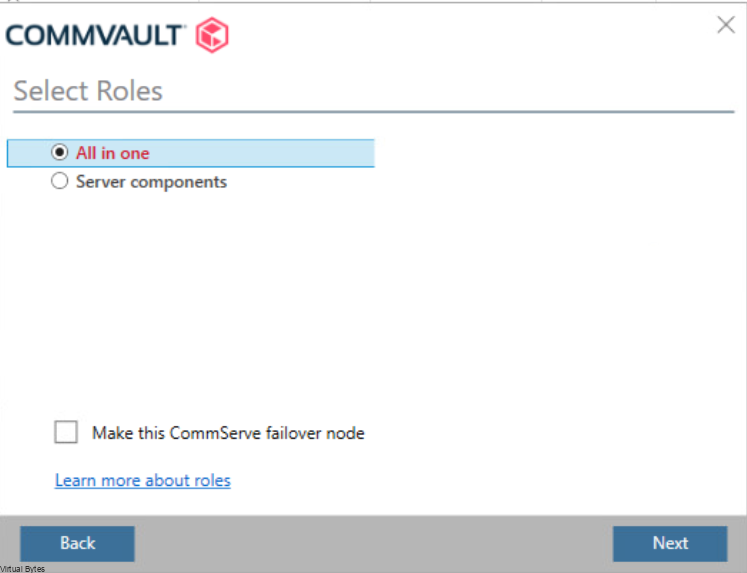
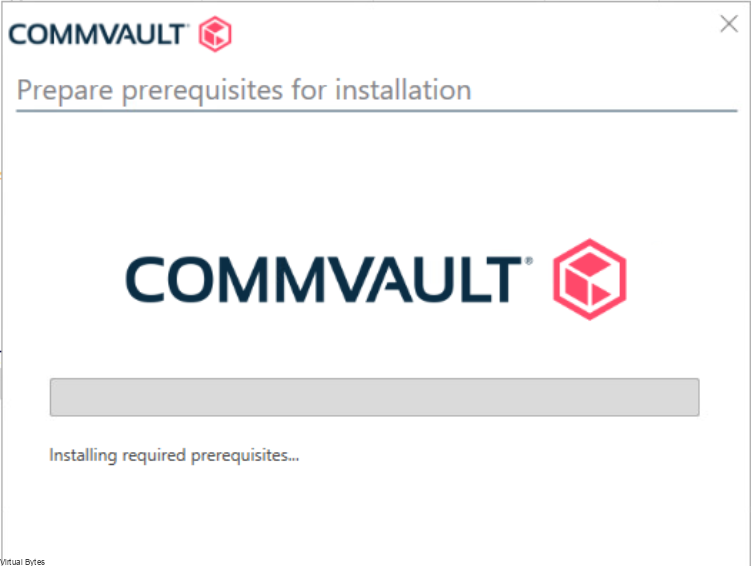
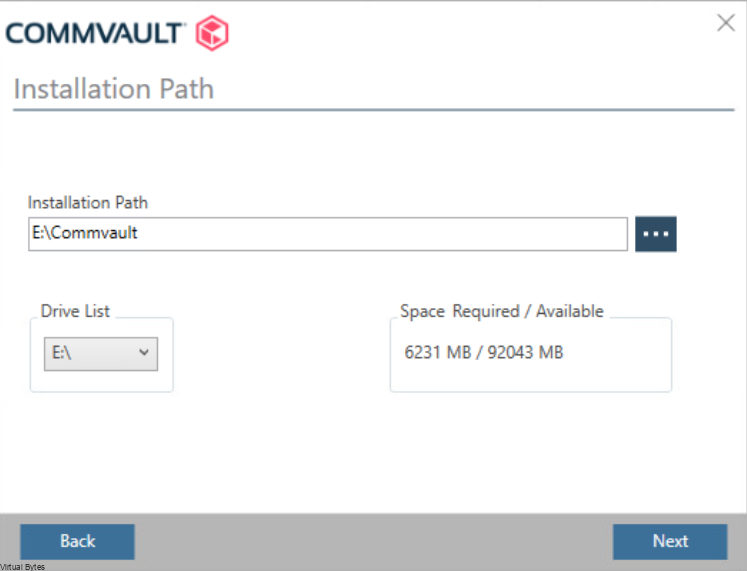
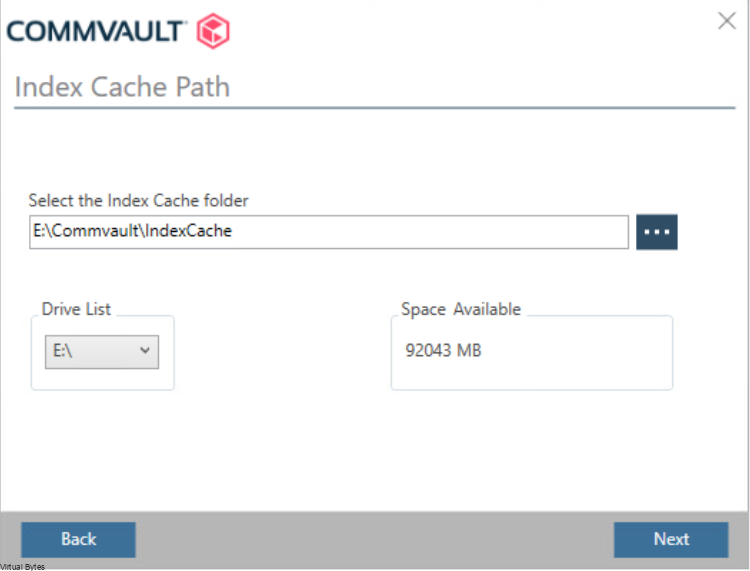
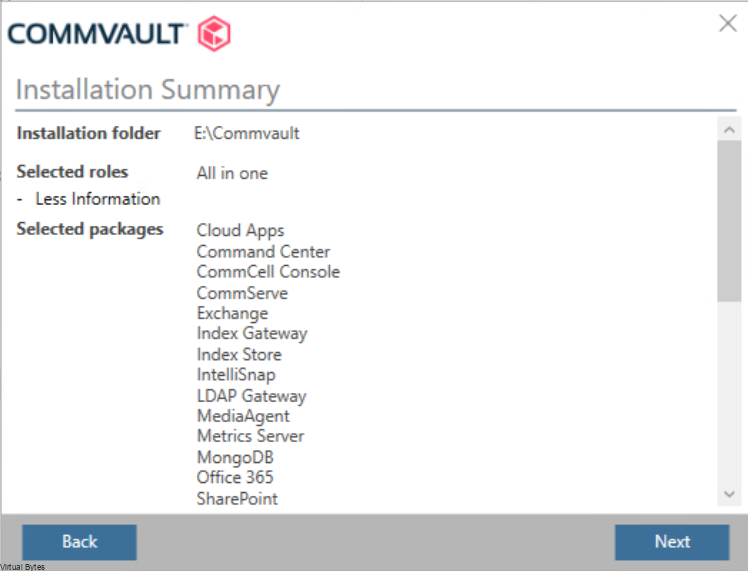
First we will setup a dedicated VLAN for our Commvault CommCell. This will be a multi-part post where first we install and deploy a virtual machine and deploy Commvault,

Prepare a dedicated network for backups

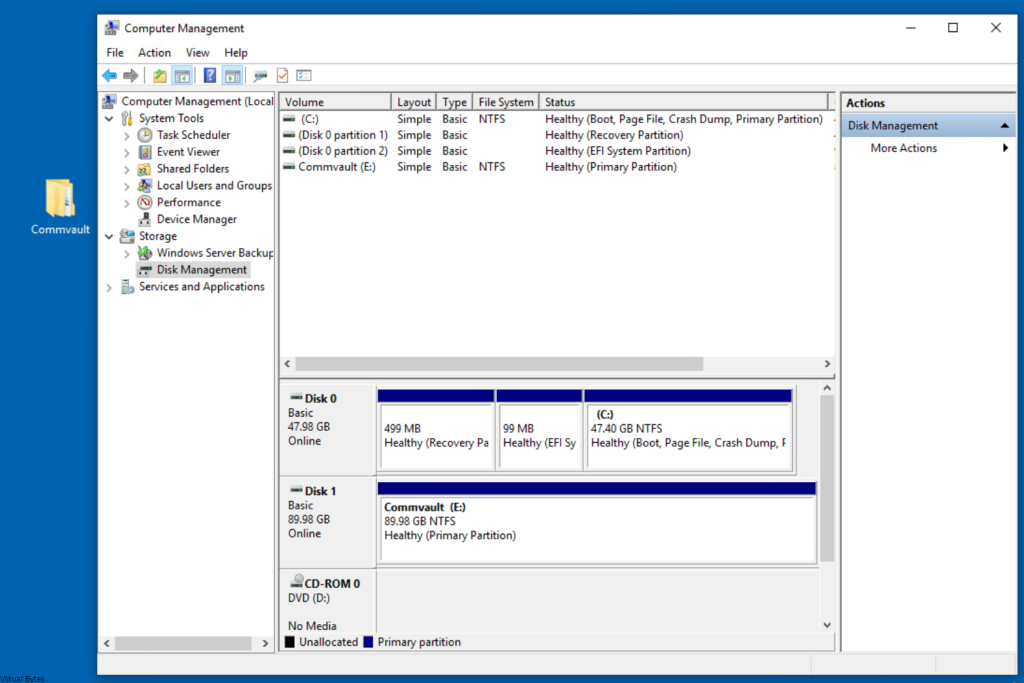
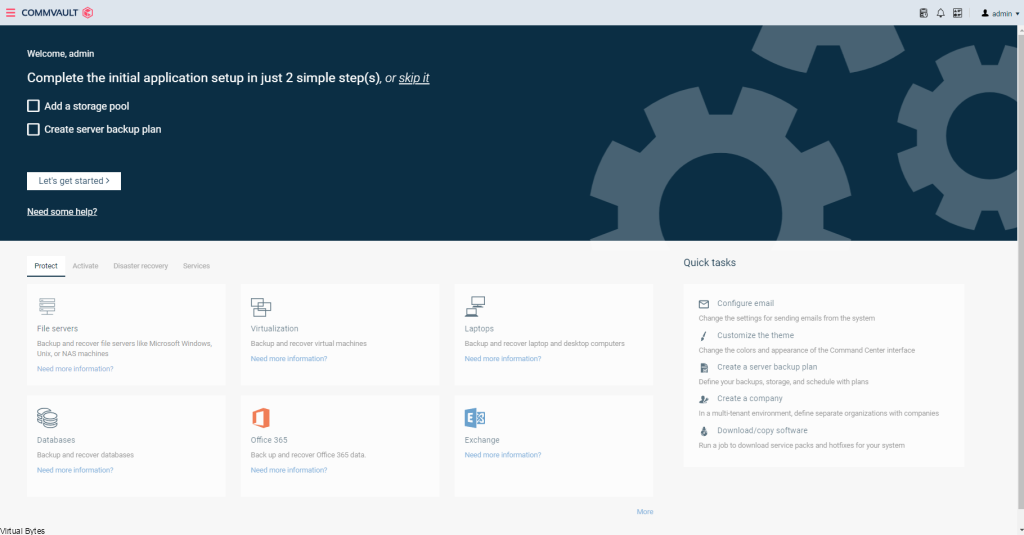
Once, installation is complete you will be able to login to your Comm Cell via web UI.

April 3, 2023 0 comments 711 views
0 FacebookTwitterLinkedinEmail
Cloud

VMware Cloud Director 10.4.x & Terraform Automation Part 1

by Tommy Grot April 3, 2023
written by Tommy Grot 5 minutes read

Today’s post is about VMware Cloud Director 10.4.x and Terraform!

With Terraform there are endless possibilities, creating a virtual data center and being able to tailor to your liking and keeping it in an automated deployment. In this multi-part blog post we will get into VCD and Terraform Infrastructure as Code automation. This will be a multi-part post, for now we are starting off at Part 1!

What You will Need:

  • A Linux VM to execute Terraform from
  • Latest Terraform Provider (I am using beta 3.9.0-beta.2 )
  • Gitlab / Code Repo (Optional to store your code)
  • VMware Cloud Director with NSX-T Integrated already
  • Local Account with Provider Permissions on VCD (mine is terraform)

Lets Begin!

To begin our terraform main.tf, we will specify the terraform provider VCD version which I am using 3.9.0-beta.2

 terraform {
  required_providers {
    vcd = {
      source  = "vmware/vcd"
      version = "3.9.0-beta.2"
    }
  }
}

provider "vcd" {
  url                  = "https://cloud.virtualbytes.io/api"
  org                  = "system"
  user                 = "terraform"
  password             = "VMware1!"
  auth_type            = "integrated"
  max_retry_timeout    = 60
  allow_unverified_ssl = true

Once you have your Terraform Provider configured and administrative privilege account next, we will start creating an Organization within VCD.

# Creating VMware Cloud Director Organization#
resource "vcd_org" "demo-org-10" {
  name             = "demo-org-10"
  full_name        = "demo-org-10"
  description      = ""
  is_enabled       = true
  delete_recursive = true
  delete_force     = true
  

  vapp_lease {
    maximum_runtime_lease_in_sec          = 3600 # 1 hour
    power_off_on_runtime_lease_expiration = true
    maximum_storage_lease_in_sec          = 0 # never expires
    delete_on_storage_lease_expiration    = false
  }
  vapp_template_lease {
    maximum_storage_lease_in_sec       = 604800 # 1 week
    delete_on_storage_lease_expiration = true
  }
}

Next the code below will create a Virtual Data Center within that Organization you have created above.

resource "vcd_org_vdc" "demo-org-10" {
  depends_on  = [vcd_org.demo-org-10]
  name        = "demo-org-10"
  description = ""
  org         = "demo-org-10"
  allocation_model  = "Flex"
  network_pool_name = "VB-POOL-01"
  provider_vdc_name = "Provider-VDC"
  elasticity = true
  include_vm_memory_overhead = true
  compute_capacity {
    cpu {
      allocated = 2048
    }

    memory {
      allocated = 2048
    }
  }

  storage_profile {
    name    = "vCloud"
    limit   = 10240
    default = true
  }
  network_quota            = 100
  enabled                  = true
  enable_thin_provisioning = true
  enable_fast_provisioning = true
  delete_force             = true
  delete_recursive         = true
}

Next, we will specify the automation to create a template library within that Virtual Data Center.

#Creating Virtual Data Center Catalog#
resource "vcd_catalog" "NewCatalog" {
  depends_on = [vcd_org_vdc.demo-org-10]
  org = "demo-org-10"

  name             = "Templates"
  description      = "Template Library"
  delete_recursive = true
  delete_force     = true
}

The next step will depend on if you have NSX already configured and ready to consume a Tier-0 VRF into this Provider Gateway we are about to ingest into this Virtual Data Center. My Tier-0 VRF is labeled = vrf-tier-0-edge-03-gw-lab, as I tell Terraform the existing data where to pull from NSX and to assign it to this VDC.

# Add NSX Edge Gateway Tier 0 to VDC
data "vcd_nsxt_manager" "main" {
  name = "nsx-m01"
}

data "vcd_nsxt_tier0_router" "vrf-tier-0-edge-03-gw-lab" {
  name            = "vrf-tier-0-edge-03-gw-lab"
  nsxt_manager_id = data.vcd_nsxt_manager.main.id
}

resource "vcd_external_network_v2" "ext-net-nsxt-t0" {
  depends_on = [vcd_org_vdc.demo-org-10]
  name        = "lab-03-pro-gw-01"
  description = "vrf-tier-0-edge-03-gw-lab"

  nsxt_network {
    nsxt_manager_id      = data.vcd_nsxt_manager.main.id
    nsxt_tier0_router_id = data.vcd_nsxt_tier0_router.vrf-tier-0-edge-03-gw-lab.id
  }

  ip_scope {
    enabled        = true
    gateway        = "192.168.249.145"
    prefix_length = "29"

    static_ip_pool {
      start_address  = "192.168.249.146"
      end_address   = "192.168.249.149"
    }
  }
}

Now, that we have created a Provider Gateway by consuming a VRF Tier-0 from NSX, next we will create a Tier-1 Gateway and attach it into the Virtual Data Center so we can add segments!

resource "vcd_nsxt_edgegateway" "lab-03-pro-gw-01" {
  depends_on = [vcd_org_vdc.demo-org-10]
  org         = "demo-org-10"
  owner_id    = vcd_vdc_group.demo-vdc-group.id
  name        = "lab-03-pro-gw-01"
  description = "lab-03-pro-gw-01"

  external_network_id = vcd_external_network_v2.ext-net-nsxt-t0.id

    subnet {
    gateway       = "192.168.249.145"
    prefix_length = "29"
    # primary_ip should fall into defined "allocated_ips" 
    # range as otherwise next apply will report additional
    # range of "allocated_ips" with the range containing 
    # single "primary_ip" and will cause non-empty plan.
    primary_ip = "192.168.249.146"
    allocated_ips {
      start_address  = "192.168.249.147"
      end_address   = "192.168.249.149"
    }
  }
}

Now we can create a segment and attach it to our Tier-1 Gateway within the Virtual Data Center!

#### Create VMware Managment Network /24 
resource "vcd_network_routed_v2" "nsxt-backed-1" {
  depends_on = [vcd_org_vdc.demo-org-10]
  org         = "demo-org-10"
  name        = "vmw-nw-routed-01"
  edge_gateway_id = vcd_nsxt_edgegateway.lab-03-pro-gw-01.id
  gateway       = "10.10.10.1"
  prefix_length = 24
  static_ip_pool {
    start_address = "10.10.10.5"
    end_address   = "10.10.10.10"
  }
}

This is it for Part 1! Stay tuned for Part 2 where we will customize this VDC we created with Terraform!

April 3, 2023 0 comments 1.2K views
0 FacebookTwitterLinkedinEmail
VMware Troubleshooting

VMware vRealize Lifecycle Suite & VMware Cloud Foundation 4.5 Rollback

by Tommy Grot March 20, 2023
written by Tommy Grot 1 minutes read

Today’s topic is on VMware Aria Life Cycle Manager formerly (vRSLCM) – Have you encountered an issue with vRSLCM or uploaded a PSPACK that you didn’t want to upload? Here we will walk through on how to roll back if you encounter any issues!

Tasks:

  • Create a snapshot of our SDDC VCF VM
  • Update vRSLCM Postgres
  • Delete via Developer Center
  • Re-Deploy

After the snapshot has been crated, lets now ssh into the VCF SDDC Manager appliance, then elevate to root

su root

Run Postgres SQL Command to remove it from VCF Database

psql -h localhost -U postgres -d platform -c "update vrslcm set status = 'DISABLED'"

Now – when should see that vRSLCM has been disabled and is letting know VCF that there is something wrong with it, so now it will let you Roll Back

Then Go back to VCF UI, Developer Center – > Scroll all the way down to APIs for managing vRealize Life Cycle Manager -> Select Delete – > Execute

After vRSLCM is Delete, you will see Roll Back under vRealize Suite and then you can deploy vRSLCM again!

March 20, 2023 0 comments 1.1K views
0 FacebookTwitterLinkedinEmail
Cloud

Upgrading VMware Cloud Director to 10.x Versions

by Tommy Grot March 3, 2023
written by Tommy Grot 4 minutes read

This walkthrough is valid for VMware Cloud Director 10.6.x Upgrade!


What’s New

VMware Cloud Director version 10.4.1.1 release provides bug fixes, updates the VMware Cloud Director appliance base OS and the VMware Cloud Director open-source components.

Resolved Issues

  • VMware Cloud Director operations, such as powering a VM on and off takes longer time to complete after upgrading to VMware Cloud Director 10.4.1After upgrading to VMware Cloud Director 10.4.1, VMware Cloud Director operations, such as powering a VM on or off takes longer time to complete. The task displays a Starting virtual machine status and nothing happens.The jms-expired-messages.logs log file displays an error.RELIABLE:LargeServerMessage & expiration=
  • During an upgrade from VMware Cloud Director 10.4 to version 10.4.1, upgrading the standby cell fails with a Failure: Error while running post-install scripts error messageWhen upgrading the VMware Cloud Director appliance by using an update package from version 10.4 to version 10.4.1, the upgrade of the standby cell fails with an error message.Failure: Error while running post-install scriptsThe update-postgres-db.log log file displays an error.> INFO: connecting to source node> DETAIL: connection string is: host=primary node ip user=repmgr> ERROR: connection to database failed> DETAIL:> connection to server at “primary node ip”, port 5432 failed: could not initiate GSSAPI security context: Unspecified GSS failure. Minor >> code may provide more information: No Kerberos credentials available (default cache: FILE:/tmp/krb5cc_1002)> connection to server at “primary node ip”, port 5432 failed: timeout expired
More Fixes and Known Issues here

More Information about VMware Cloud Director 10.4.1

VMware Cloud Director 10.4.1 introduces several new concepts that facilitate creating, deploying, running, and managing extensions. Solution Add-Ons are an evolution of VMware Cloud Director extensions that are built, implemented, packaged, deployed, instantiated, and managed following a new extensibility framework. Solution Add-Ons contain custom functionality or services and can be built and packaged by a cloud provider or by an independent software vendor. VMware also develops and publishes its own VMware Cloud Director Solution Add-Ons.

My Versions

  • VMware NSX 4.1.0.0.0.21332672
  • VMware vCSA 8.0.0 21216066
  • VMware Cloud Director 10.4.1

First. properly shutdown your VCD Cells if you have multiple cells. Once they are turned off take a snapshot of all of the appliances

Next we will want to upload the tar.gz file via WINSCP to the primary VCD Cell if you have a multi cell deployment you will need to upgrade the first cell, then second and third.

I have logged into the VCD appliance with root account

Then open up a Putty session to the VCD appliance login as root,

Then change directory to /tmp/ Once in the directory:

cd /tmp

Create a Directory within /tmp directory, with the command below:

mkdir local-update-package

Start to upload the VMware_Cloud_Director_10.4.1.9360-21373231_update.tar.gz file for the upgrade into /tmp/local-update-package via winscp

File has been successfully uploaded to the VCD appliance.

Next steps we will need to prepare the appliance for the upgrade:

We will need to move the VMware_Cloud_Director_10.4.1.9360-21373231_update.tar.gz from the /tmp directory to /tmp/local-update-package/

mv VMware_Cloud_Director_10.4.1.9360-21373231_update.tar.gz /tmp/local-update-package

Once in the local-update-package director, and you have your VMware_Cloud_Director_10.4.1.9360-21373231_update.tar.gz run the command below to extract the update package in the new directory we created in /tmp/local-update-package

tar -zxf VMware_Cloud_Director_10.4.1.9360-21373231_update.tar.gz

You can run the “ls” command and you shall see the VMware_Cloud_Director_10.4.1.9360-21373231_update.tar.gz file along with manifest and package-pool

After you have verified the local update directory then we will need to set the update repository.

vamicli update --repo file:///tmp/local-update-package

Check for update with this command after you have set the update package into the repository address

vamicli update --check

Now, we see that we have a upgrade that is staged and almost ready to be ran! But, we will need to shutdown the cell(s) with this command

/opt/vmware/vcloud-director/bin/cell-management-tool -u administrator cell --shutdown

Next is to take a backup of the database, log into VMware Cloud Director Appliance, https://<your-ip>:5480 , same port as vCSA VAMI.

Backup was successful! Now, time for the install

Apply the upgrade for VCD, the command below will run will install the update

vamicli update --install latest

Now, the next step is important, if you have any more VCD Cell appliances you will want to repeat first few steps and then just run the command below to upgrade the other appliances:

/opt/vmware/vcloud-director/bin/upgrade 

Select Y to Proceed with the upgrade

After successful upgrade, you may reboot VCD appliance and test, and after successful tests remove your snapshot.

March 3, 2023 0 comments 3.5K views
3 FacebookTwitterLinkedinEmail
VMware NSX

Upgrading VMware NSX 4.0.1.1 to 4.1.0

by Tommy Grot March 1, 2023
written by Tommy Grot 4 minutes read

Topic of the day – How to upgrade VMware NSX 4.0.1.1 to 4.1.0, during this walkthrough, I will go through all the steps that are required, along with how the upgrade process is and any issues I encounter.

Lets Begin!

What Will You Need:

  • VMware-NSX-upgrade-bundle-4.1.0.0.0.21332672.mub
  • Successful NSX Configuration Backups on your SFTP Server
  • 1 hour!

Version I am Running:

  • VMware ESXi 8.0 Build 21203435
  • VMware vCenter Server – 8.0.0.10200

The supported upgrade paths for the NSX product versions. (More Info Here)

Adhere to the following upgrade paths for each NSX release version.

  • NSX 3.2.x > NSX 4.1.x.
  • NSX 4.0.x > NSX 4.1.x.

What’s New

Information below is from VMware’s NSX Release Notes – More Info Check out here!

NSX 4.1.0 provides a variety of new features to offer new functionalities for virtualized networking and security for private, public, and multi-clouds. Highlights include new features and enhancements in the following focus areas:

  • IPv6 support for NSX internal control and management planes communication – This release introduces support for Control-plane and Management-plane communication between Transport Nodes and NSX Managers over IPv6. In this release, the NSX manager cluster must still be deployed in dual-stack mode (IPv4 and IPv6) and will be able to communicate to Transport Nodes (ESXi hosts and Edge Nodes) either over IPv4 or IPv6. When the Transport Node is configured with dual-stack (IPv4 and IPv6), IPv6 communication will be always preferred.
  • Multi-tenancy available in UI, API and alarm framework – With this release we are extending the consumption  model of NSX by introducing multi-tenancy, hence allowing multiple users in NSX to consume their own objects, see their own alarms and monitor their VMs with traceflow.  This is made possible by the ability for the Enterprise Admin to segment the platform into Projects, giving different spaces to different users while keeping visibility and control.
  • Antrea to NSX Integration improvements – With NSX 4.1, you can create firewall rules with both K8s and NSX objects. Dynamic groups can also be created based on NSX tags and K8s labels. This improves usability and functionality of using NSX to manage Antrea clusters.
  • Online Diagnostic System provides predefined runbooks that contain debugging steps to troubleshoot a specific issue. These runbooks can be invoked by API and will trigger debugging steps using the CLI, API and Scripts. Recommended actions will be provided post debugging to fix the issue and the artifacts generated related to the debugging can be downloaded for further analysis. Online Diagnostic System helps to automate debugging and simplifies troubleshooting

Interoperability Check for VMware vSphere 8 and NSX 4.1

Before we start the upgrade, make sure that you have successfully backups of your current NSX Environment! For my implementation I used a SFTP Server running on Ubuntu Linux VM which is hosted on a secondary tier storage SAN,

Now, that we verified our backups are good. Lets begin uploading the MUB file.

Go To Upgrade ->

Click on UPGRADE

Find via Browse the VMware-NSX-upgrade-bundle-4.1.0.0.0.21332672.mub and upload it

Wait few min for the MUB to upload

Now, the MUB has been successfully uploaded to NSX Manager appliance, now we wait and let it extract all the files.

Verifying Stage

Now, we are ready to prepare for the Upgrade! (Accept the EULA at the pop up)

This portion of the upgrade will go through many stages within this little window, you will see once as an example: Restarting Upgrade Coordinator

Click – Run Pre-Check Before upgrading!

Now Let the NSX Edge Nodes upgrade, this is a pretty quick automated process!

NSX Edge Nodes successfully upgraded!

Now time to upgrade the Transport Nodes (also known as ESXi Hosts)

You will see the upgrade process going in vCenter Tasks. (Make sure that all VMs that are not on any kind of shared storage such as vSAN or a iSCSI LUN which is shared within the cluster, off.)

In Process upgrade for Hosts.

Successful Upgrade

The final part, we will upgrade the NSX Managers

Confirm to start the upgrade

Upgrade in process for NSX Managers, it does them 1 at a time.

Data Migration upgrade process

Unpin API

Unpin UI

There it is! Fully upgrade to NSX 4.1.0 – Now, next blog post we will get into the new features. But Check out that new Project Tab drop down for multi-tenancy!

March 1, 2023 0 comments 4.5K views
0 FacebookTwitterLinkedinEmail
Education

I passed my VCAP-DCV Deploy 2023!

by Tommy Grot January 12, 2023
written by Tommy Grot 1 minutes read

On Wednesday 11th, 2023, I took the VCAP-DCV Deploy 2023 and passed it! It was my first lab/exam of 2023. After completing this exam, I earned the VCIX – VMware Certified Implementation Expert milestone, this unlocks the next level for me to pursue my VMware Certified Data Center Expert (VCDX).

Information on Data Center Virtualization track from VMware

Information About the Exam –

  • Exam cost $450.00 – 3V0-22.21 Advanced Deploy VMware vSphere 7.x
  • There are 17 Questions/Tasks
  • The proctored lab is simular to VMware Learning Platform Hands-On-Labs (HOL)

After getting logged in the first thing I did was fire up Notepad++ I created a task list of all 17 questions, this way any step I did during the exam I would document what I did and what I configured so I can trace back what I did. Overall, I enjoyed the exam/lab. It was fun to do the tasks, I recommend getting all the easy ones first that way you can concentrate on the longer duration tasks that.

January 12, 2023 0 comments 1.5K views
2 FacebookTwitterLinkedinEmail
CloudNetworking

Reverse Proxy & Load Balancing a Web Server with VMware NSX Advanced Load Balancer

by Tommy Grot December 16, 2022
written by Tommy Grot 3 minutes read

Want to setup a load balancer and reverse proxy with VMware NSX Advanced Load Balancer, and you want to replace your Nginx Reverse Proxy, well let’s get started!

First, we will make sure that you already have NSX ALB setup and configured within your environment, this walkthrough will only step you through on building a Virtual Service and Pools and VIPs for your multiple web servers. During this deployment you can set up many different FQDNs.

Requirements

  • Public FQDN
  • Lets Encrypt SSL Certificate (Wild Card or SAN or Single Cert)
  • NAT – Service Engine
  • Virtual IP
  • Service Pool
  • Web Server(s)

Product Versions:

  • VMware NSX ALB: 22.1.2
  • VMware NSX: 4.0.1.1.0.20598726

Steps

Login as an administrator account to NSX ALB ->

Go to Virtual Services -> Create Virtual Service

Select -> Advanced Setup

Next prompt -> Select your Cloud (For my setup I am doing everything NSX Overlay Backed)

Click Next -> Select your VRF Context (I am using a Tier 1 Gateway)

So now at this point – you should see this screen below, we will create a New Virtual Service, this will be the main ingress and egress point of your network and the external world. I have a NAT from my firewall going to this Virtual Service (VIP) Virtual IP.

  • Name: External-ParentSNI-VS (This is my naming convention, but you can choose your own)
  • Select: Enable Virtual Hosting VS
  • Virtual Hosting Type: SNI
  • VS VIP – (Create the main VIP for Ingress/Egress NAT, that is routable)
  • Application Profile: System-Secure-HTTP
  • WAF ( You can enable if you would like too, this is optional)
  • Service Port ( 80,443 – For 443 you will want to select SSL)
  • Pool – (Create a Pool, I used one of my very first web servers to start the pool)
  • SSL Certificate – Select your Cert – by default ALB will put System-Default-Cert

Click Save / Next – For this portion of the Virtual Service with Parent SNI we are done, next we will deploy the Child SNI which will be a parent to the main Ingress/Egress SNI Virtual Service.

As an example – I will use my Virtual Bytes SNI Child Virtual hosting.

Click on drop down for Pool, if you have not created a pool we will do so now.

  • Name: External-Parent-SNI-VS-Pool
  • VRF Context – Your Tier 1 Gateway
  • Default Server Port: 443

Select your first webserver, this will let you start the Virtual Service. You can do it via a IP Group or IP Address or DNS Name as well as have the capability to use a security group from NSX.

After you have created all the required services you should be able to access your web server from an internal or external (Internet) if you have NAT’d. But for the next steps we will repeat the steps for a Child SNI.

Child SNI Setup

  • Go to Virtual Services – > Click on Create Virtual Service (Advanced)
  • Name: You Web Server
  • Check – Virtual Hosting VS
  • Virtual Hosting Type: SNI
  • Virtual Hosting Parent: External-ParentSNI-VS (or your own naming)
  • Domain Name: www.yourdomain.com
  • Application Mode: System Secure-HTTP
  • Pool: Create a pool for the Virtual Machine or service you want to load balance
  • SSL Certificate: Select your Certificate

Click Next all the way till the end, and now you have successfully setup a Child SNI which now you can replicate the same steps for multiple web servers, and you no longer need to NAT anymore IPs, since your main ingress/egress is already NAT’d and everything will flow through the main Parent service.

December 16, 2022 0 comments 3.1K views
1 FacebookTwitterLinkedinEmail
Cloud

“The Next Chapter of Cloud Management” VMware’s LAST multi-cloud briefing of 2022

by Tommy Grot December 5, 2022
written by Tommy Grot 2 minutes read

With all these organizations trying to be multi-cloud centric it is hard to set up and control all those environments. Organizations that have Amazon Web Services or Azure and they run VMware Clouds on top of those environments, well that’s a tedious job to keep control and tabs on everything. Creating dashboards and information from a high level for leadership will let them know what kind of costs and consumption they are utilizing for their workloads. Well, with VMware Aria Hub – it is now possible to keep track of everything, from cost to capacity and consumption and how they can scale back workloads without compromising the business aspect and goals!

*** Disclaimer *** – Preview information and functionality will not be available till early 2023!

Links:

  • VMware Guard Rails
  • VMware Aria Migrations
  • VMware Aria Business Insight

Check out the Video below for more details –

VMware Aria Graph is a highly scalable system but also federated which you can federate from any other third party with their solutions. You can gather data from many third-party sources and create rich data and analytics to help your business needs. With VMware Aria Graph if you already own VMware vRealize Suite then this will be even better for your organization this will allow you to gather data and create more richer business models and practices with the data you will gather about your environment.

Main Dashboard – Shows overall cost, infrastructure and security compliance, and many more features.

Application View – This lets you see the aggregate information of your application, along with resources, and cost and what relationships the application has for what kind of image was used to build this and what kind of security settings have been applied like firewall rules..

Aria Guard Rails – Policy as code, continuous police enforcement engine. This will let you know what kind of security violations that are not controlled and with guard rails there is a library with pre-built templates for bootstrapping environments, cost, security. This will let you ensure that you set the proper security policies.

Deployment Information – Resources this draws out in detail how your workloads a connected and consumed and you can click on each individual icon and get into the depth information of each workload or VM

Migrating Workloads to VMC – you can select what kind of workloads you want to move to AWS VMC; you can get very granular on what kind of VM you want to move, you can move based on VLANs or prevent moving some workloads to save cost or keep on premise.

Cost of Ownership, this allows you to preview what your workload would cost on VMC on AWS.

Migration Planning – Gives you an awesome road map to plan out your workloads and how they will migrate and what business practices you want to implement and execute before running the migration.

Step 2 of Migration

Step 4 – Scheduling your migration

December 5, 2022 0 comments 480 views
0 FacebookTwitterLinkedinEmail
Cloud

VMware Aria – VMware Multi-Cloud Briefing December 5th, 2022

by Tommy Grot December 1, 2022
written by Tommy Grot 1 minutes read

The new and exciting annoucment that occured at VMware Explore 2022 about VMware Aria! I personally got to meet the team behind the VMware Aria and vRealize Buisness Unit team thank to our awesome VMware Senior Techinical Account Manager!

My first day at VMware Explore 2022, I got to see all the new release and information before it hit emargo, with Purnima’s Session with the Multi Cloud Journy. Overall, it was a great time to see how the product would help organizations and developers and engineers with creating new solutiuons that are multi-cloud. Many oragnizations today, are going versatile with many different clouds where many of the organizations are in a cloud chaos point in their life of their organization and they do not know or how to take control over and get their cloud infrastructures and development in line.

With that said! I am linking here some news that will be released on December 5th, 2022. So stay tuned and check this page below!

December 1, 2022 0 comments 439 views
0 FacebookTwitterLinkedinEmail
VMware ESXiVMware vCenter

vSphere 8 vMotion Unified Data Transport

by Tommy Grot November 29, 2022
written by Tommy Grot 2 minutes read

Tonight’s topic is about vMotion! But not just any kind of vMotion, we are going to enable blazing fast speeds to migrate your workloads. Before we get into the topic, I want to bring up information on VMware vSphere 8! I have been using the GA version of vSphere 8 on my new home lab (datacenter) and it’s been great so far!

vSphere vMotion migrates a(n) running state of a virtual machine from one ESXI host to another ESXI host in minutes or now even seconds! This allows you to vMotion workloads much faster now with vMotion protocol in vSphere 8 and all its huge performance improvements cause before standard vMotion utilized Network File Copy (NFC) which this was much slower and took longer but now with Unified Data Transport we will now enable Provisioning on the same vMotion VMkernel to speed up migration of workloads!

Here is more information from VMware:

To solve this problem, we introduce a new protocol called Unified Data Transport (UDT). In a nutshell, UDT combines the best of the NFC and vSphere vMotion protocols. Unified Data Transport (UDT) uses NFC as a control channel but offloads the data transfer to the vSphere vMotion protocol to benefit from the substantially greater performance and throughput.

How to Configure? Well Lets start!

Login into your vCSA

Go to your first ESXi hosts -> VMkernel Adapters

Click Edit on vMotion VMkernel, for mine it is vmk2

Select Provisioning along make sure your vMotion Enabled Service stays selected.

Click OK -> You will see a +1 Under Enabled Services and now I have vMotion and Provisioning Enabled on my single vmk2.

Repeat the steps on your next following ESXi Hosts.

That is it! Start enjoying the blazing speeds of migrating your workloads from ESXi host to another ESXi host!

November 29, 2022 0 comments 1.7K views
0 FacebookTwitterLinkedinEmail
Newer Posts
Older Posts


Recent Posts

  • What’s New In VMware Cloud Foundation 9.0
  • Deploying & Configuring the VMware LCM Bundle Utility on Photon OS: A Step-by-Step Guide
  • VMware Cloud Foundation: Don’t Forget About SSO Service Accounts
  • VMware Explore Las Vegas 2025: Illuminating the Path to Cloud Excellence!
  • Securing Software Updates for VMware Cloud Foundation: What You Need to Know

AI AVI Vantage cloud Cloud Computing cloud director computing configure cyber security director dns domain controller ESXi How To las vegas llm llms multi-cloud multicloud NSx NSX-T 3.2.0 private AI servers ssh storage tenant upgrade vcd vcda VCDX vcenter VCF VDC vexpert Virtual Machines VMs vmware vmware.com vmware aria VMware Cloud Foundation VMware cluster VMware Explore VMware NSX vrslcm vsan walkthrough

  • Twitter
  • Instagram
  • Linkedin
  • Youtube

@2023 - All Right Reserved. Designed and Developed by Virtual Bytes

Virtual Bytes
  • Home
  • Home Data Center 2025
  • VMware
    • Cloud
    • Datacenter & Cloud Infrastructure
      • VMware ESXi
      • VMware vCenter
      • VMware vSAN
    • Networking & Security
    • Desktop & App Virtualization
      • Omnissa Horizon
    • Troubleshooting
    • Ansible
  • Education
  • Hardware
    • Hardware Tips & Tricks
  • Events
  • About
    • About Me
    • Home Lab Archives
      • Home Lab 2020-2022
      • Home Lab 2016-2020