Top Posts
Deploying & Configuring the VMware LCM Bundle Utility...
VMware Cloud Foundation: Don’t Forget About SSO Service...
VMware Explore Las Vegas 2025: Illuminating the Path...
Securing Software Updates for VMware Cloud Foundation: What...
VMware Cloud Foundation 5.2: A Guide to Simplified...
VMware Cloud Foundation 5.2: Unlocking Secure Hybrid Cloud...
VMware Cloud Foundation – Memory Tiering: Optimizing Memory...
Decoding VMware Cloud Foundation: Unveiling the numerous amount...
VMware Cloud Director 10.6.1: Taking Cloud Management to...
Omnissa Horizon Upgrade 2406 to 2412
Virtual Bytes
  • Home
  • Home Data Center 2025
  • VMware
    • Cloud
    • Datacenter & Cloud Infrastructure
      • VMware ESXi
      • VMware vCenter
      • VMware vSAN
    • Networking & Security
    • Desktop & App Virtualization
      • Omnissa Horizon
    • Troubleshooting
    • Ansible
  • Education
  • Hardware
    • Hardware Tips & Tricks
  • Events
  • About
    • About Me
    • Home Lab Archives
      • Home Lab 2020-2022
      • Home Lab 2016-2020
Category:

VMware vCenter

VMware Cloud FoundationVMware vCenter

How To Apply Async Patch to VMware Cloud Foundation 5.1+

by Tommy Grot March 2, 2024
written by Tommy Grot 3 minutes read

The VMware SDDC Manager async patch tool allows you to upgrade individual products outside of the standard VMware Cloud Foundation (VCF) baseline. This tool can be used to upgrade products such as vCenter, NSX, and ESXi to newer versions without affecting the overall VCF deployment.

To use the async patch tool, you will need to download the patch or upgrade package for the specific product you want to update. You can then upload the package to the SDDC Manager and initiate the upgrade process. The async patch tool will automatically handle the upgrade process for the individual product, ensuring that it is seamlessly integrated into your VCF environment.

Overall, the async patch tool provides a convenient way to keep your VMware products up to date without disrupting your VCF deployment.

VMware Docs for Async Patch Tool


Async Patch Tool Walkthrough

Lets begin! – Open WinSCP or/ SCP upload the vcf-async-patch-tool-1.1.0.2.tar.gz,
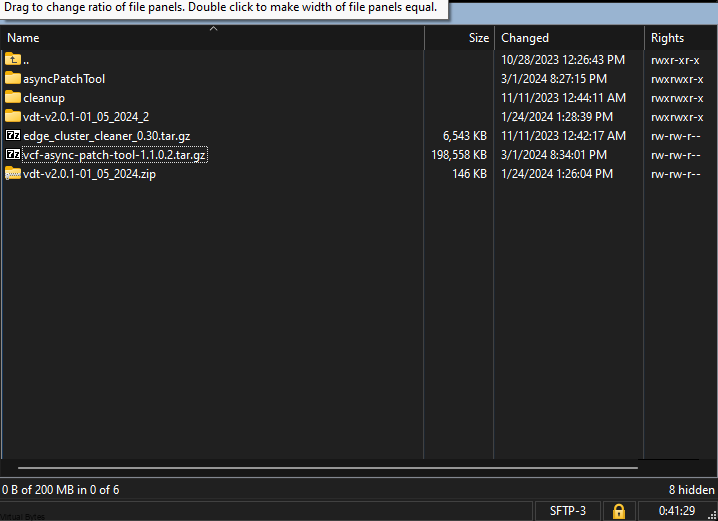
Then, take a snapshot of your vCenter and as well SDDC Manager for safety!

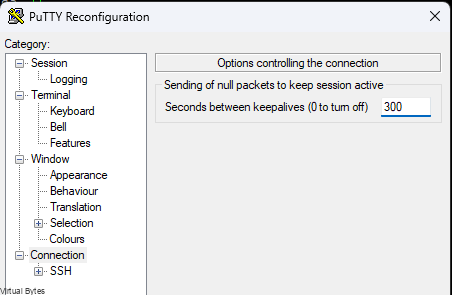
Once snapshots are done and verified then, SSH into your SDDC Manager with vcf user, but ensure to enable the SSH Time out. ( Example Below)

  • 300 Second is five minutes
  • Putty -> Change Settings -> Connection -> Seconds between keepalives (0 to turn off) > set to 300 > Apply
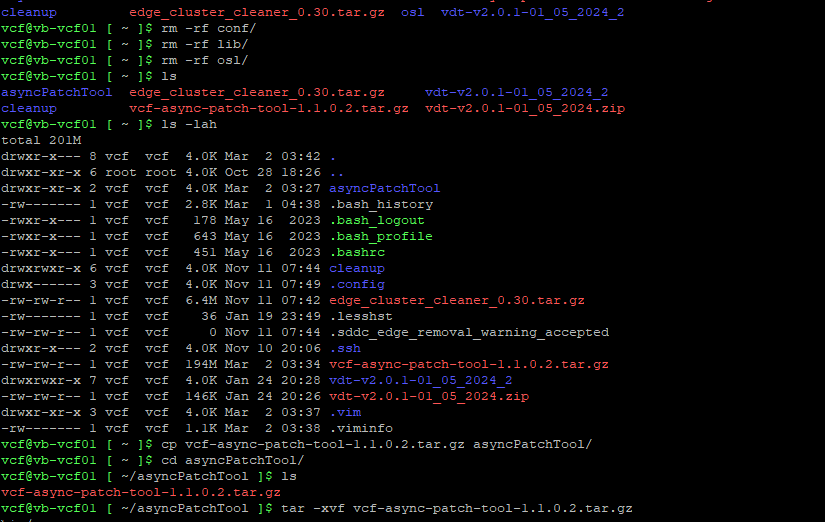
Then we will need to make the directory for async patch tool

mkdir /home/vcf/asyncPatchTool

Copy the vcf-async-patch-tool-1.1.0.2.tar.gz, (or latest version) into /home/vcf/asyncPatchTool

tar -xvf vcf-async-patch-tool-1.1.0.2.tar.gz
Set the permissions for the asyncPatchTool directory
cd /home/vcf/
chmod -R 755 asyncPatchTool
chown -R vcf:vcf asyncPatchTool

Next, you will execute the command below to enable async to pull patches.

./vcf-async-patch-tool --listAsyncPatch --du < Your E-Mail for Customer Connect >
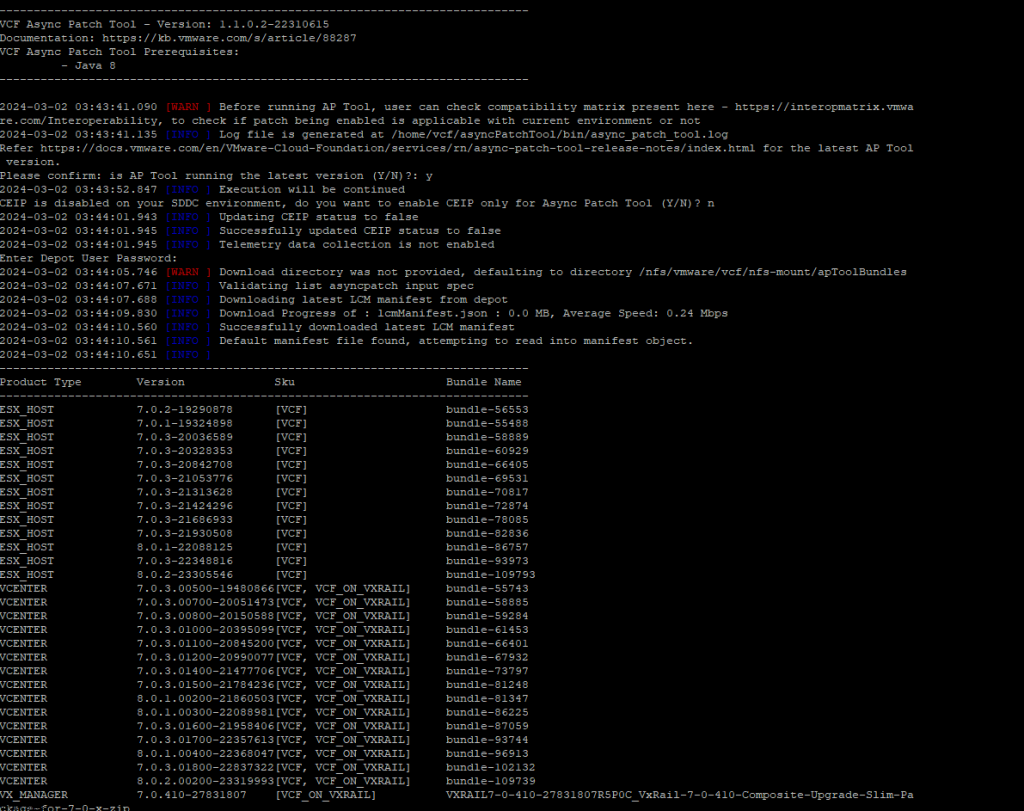
Next the Patch Tool will ask you if your running the latest version ( Y ) or ( N ) and CEIP as well.

  • Enter Y to confirm that you are running the latest version of the Async Patch Tool.
  • Read the information and enter Y to acknowledge the pre-requisites.
  • Enter Y or N to choose whether or not to participate in the VMware Customer Experience Improvement Program (CEIP).
  • Enter the password for the super user (vcf) account.
  • Enter the password for the root user account.
  • Enter the password for the management domain SSO user account.
  • Enter your VMware Customer Connect (Depot) password.

So, for my patch I select the latest vCenter Server 8U2b and I repeated the same setups for gaining my ESXi Patch as well.

./vcf-async-patch-tool -e --patch VCENTER:8.0.2.00200-23319993 --du <E Mail Customer Connect> --sddcSSOUser <SSOuser> --sddcSSHUser vcf --it ONLINE

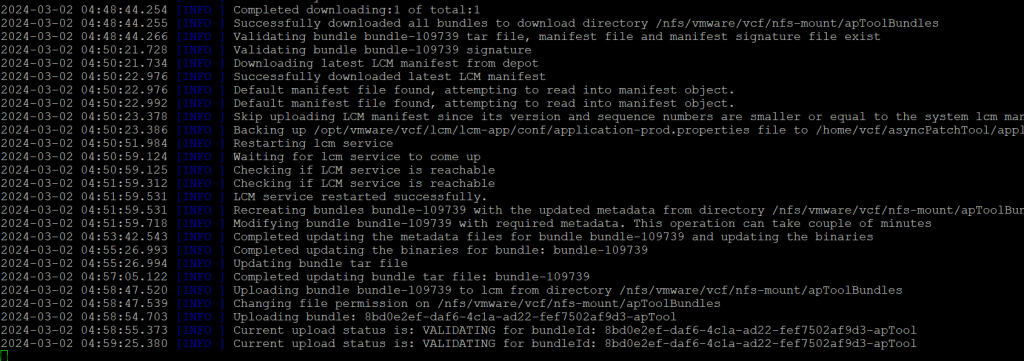
Status of Async Progress shown in these snips

Now you will see Bundles showing up within Bundle Management!

Snippet Below Shows Running Async patch tool

After the bundles have been uploaded, we may go back to SDDC UI and go to the specific workload domain, for my environment it is the Management Workload domain. Upgrade progress snippet below of vCenter Server

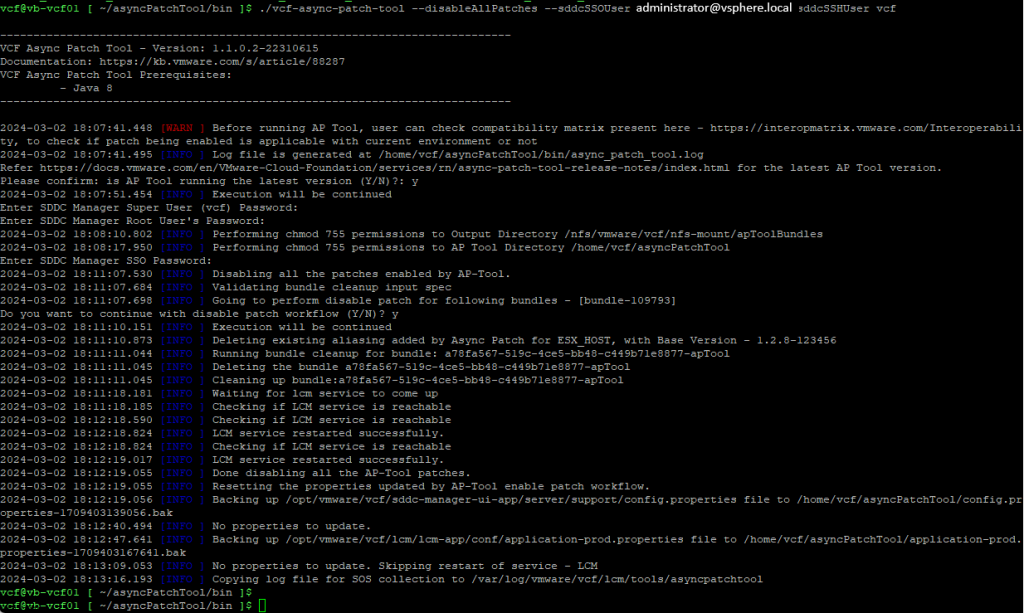
Once all patches are completed, SSH back into VCF SDDC Manager and execute the following command to disable patches.

  • Navigate to /home/vcf/asyncPatchTool/bin.
  • Run the following command:
./vcf-async-patch-tool --disableAllPatches --sddcSSOUser SSOuser --sddcSSHUser vcf
March 2, 2024 2 comments 2.5K views
2 FacebookTwitterLinkedinEmail
VMware TroubleshootingVMware vCenter

vCenter 8.0 U2 Storage Policies Go Missing – Due to Service Account (SPS) VMware vSphere Profile-Driven Storage Service

by Tommy Grot February 29, 2024
written by Tommy Grot 2 minutes read

Tonight’s blog post goes in-depth on Service Accounts especially the SPS account which the VMware vSphere Profile-Driven Storage Service relies on that lives within the Administrators group. Well, imagine the panic when the SPS service account goes missing, leaving your vSAN and storage policies in limbo.

In this blog post, we’ll dive into the nightmare scenario of losing these vital components and explore how to troubleshoot and recover from such a disaster. So grab a cup of coffee and get ready to learn how to tackle this challenging situation head-on. Let’s get started!
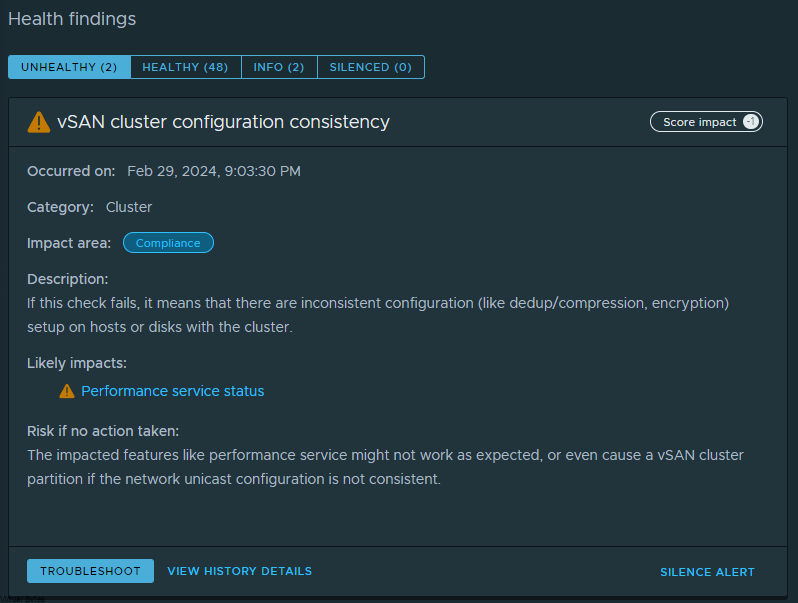
So Below – I logged into my vCenter Server 8 today, and I was like why are my policies missing and my vSAN Performance complaining ?? Well I started to dig in and found some evidence of the SPS service account gone.

Storage Providers are missing ?! What is happening?!

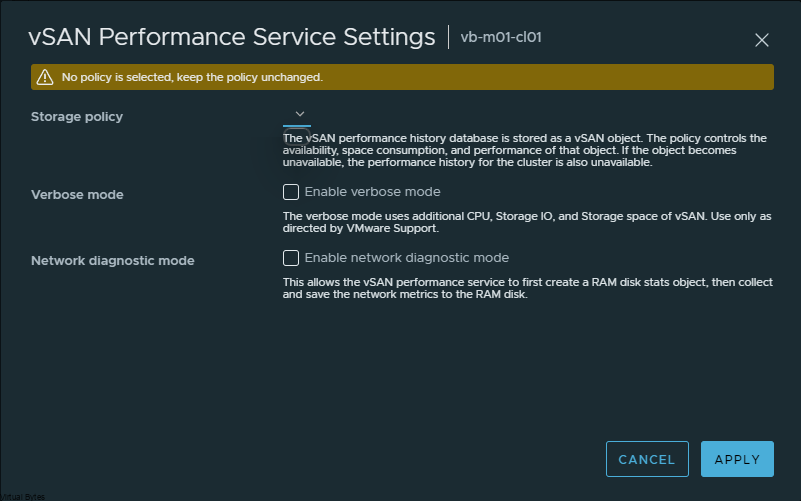
vSAN Performance complaining about its policy not being there, and your can see that the Storage Policy drop down is broken / not loading the vSAN policies I have for vSAN Performance

So – First thing is take a snapshot of what your current vCenter is, yeah we know its broken and SPS is missing but safety first!

First, what I did – is, I checked the logs where the VMware vSphere Profile-Driven Storage Service

/var/log/vmware/vmware-sps/sps.log

You will see lots of different spring frame work events and processes, but what you are really looking for is your specific SPS Service Account, for me, mine was

sps-71587023-8efd-4f7e-b094-ede500183201

Once you have your account copied – open your favorite text editor. You will want to structure your command below in the same way. As an example you may copy i provided mine from the screen shot – But replace my SPS account with yours.

/usr/lib/vmware-vmafd/bin/dir-cli group modify --name Administrators --add sps-71587023-8efd-4f7e-b094-ede500183201

After you hit enter, you will see that it will ask you for the [email protected] password, if you are running VCF, you will need to pull your password from the SDDC Manager if you have Auto Rotate passwords enabled.

Once Password has been entered you shall see the same following prompt where the SPS account has been added to the Administrators group.

Enter password for [email protected]:
Account [sps-71587023-8efd-4f7e-b094-ede500183201] added to group [Administrators]
Group member [sps-71587023-8efd-4f7e-b094-ede500183201] added successfully

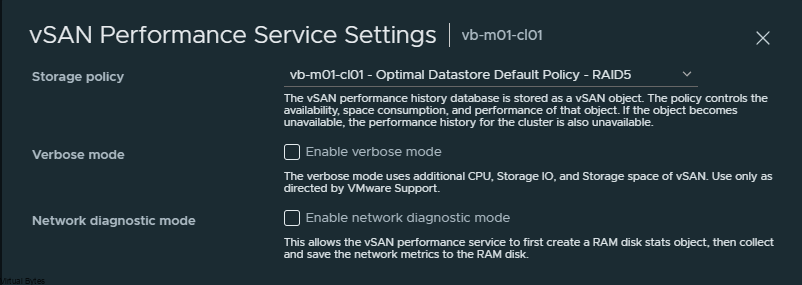
Woohoo! vSAN and vCenter are all up and running with working VM Storage Policies

And Finally – We see our SPS account back in the Administrators Group!

February 29, 2024 0 comments 2.2K views
1 FacebookTwitterLinkedinEmail
VMware vCenter

How To Upgrade to vSphere 8 Update 2

by Tommy Grot September 21, 2023
written by Tommy Grot 2 minutes read

Tonight’s blog post is about – VMware vSphere 8 Update 2 and its upgrade process! If you’re an avid virtualization enthusiast or a tech wizard looking to stay ahead of the game, you’ve come to the right place. VMware vSphere 8 Update 2 brings a plethora of new features, enhancements, and performance improvement!

What you will need, if you do not utilize vSphere Image Lifecycle then you will need to download these:

VMware-VCSA-all-8.0.2-22385739.iso
VMware-VMvisor-Installer-8.0U2-22380479.x86_64.iso

Below is some information from VMware’s website on vSphere 8 Update 2!

Reduced Downtime Upgrade

First, let’s talk about patching and updating. We’ve all patched vCenter instances and we know that task can often take a long time to complete, and during that time, vCenter services are offline. We introduced Reduced Downtime Upgrade as a new method to update vCenter instances with vSphere+. We’re bringing that same functionality to on-premises vCenter instances that are not connected to vSphere+.

vCenter reduced downtime upgrade is supported for single self-managed vCenter instances initially. It does not support vCenter instances enabled with vCenter HA or vCenter instances participating in Enhanced Linked Mode (ELM). vCenter reduced downtime upgrade is supported to update vCenter instances running version 8.0 or 8.0 U1 to 8.0 U2 and will support updating 8.0 U2 to future versions.

Non-disruptive Certificate Management

vSphere 8 Update 2 introduces non-disruptive certificate management. This means vSphere administrators can renew and replace the vCenter SSL/TLS certificate without requiring service restarts. External solutions, like VMware NSX, may require re-authentication to vCenter after a certificate is changed. With industry best practice encouraging the reduction in the maximum validity of TLS certificates, vSphere administrators can adhere to these best practices and perform annual certificate renewals without impacting vCenter productivity.

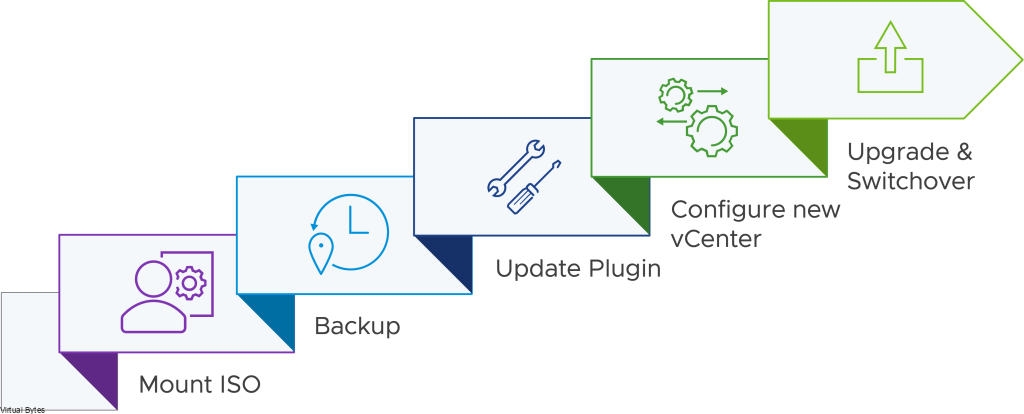
Let’s take a deeper look at each of the 5 steps during a reduced downtime upgrade.

Before you upgrade! Ensure you have backups configured have successful backups.

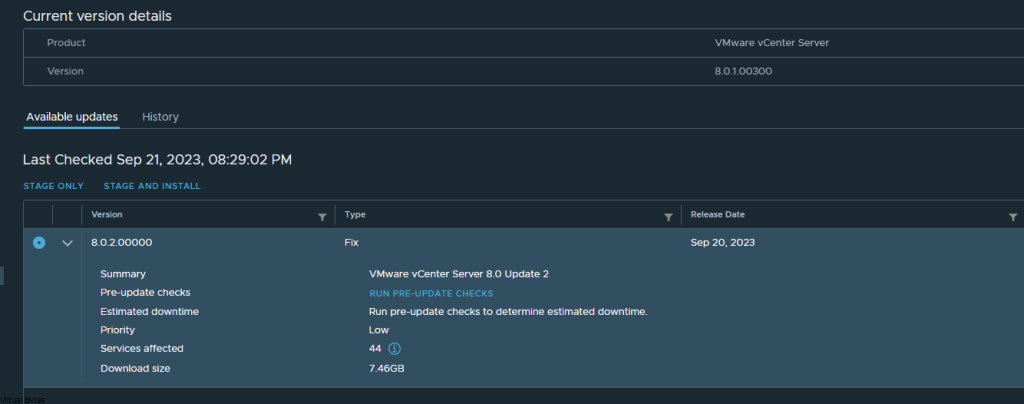
Login to VAMI – Update – Stage and Install

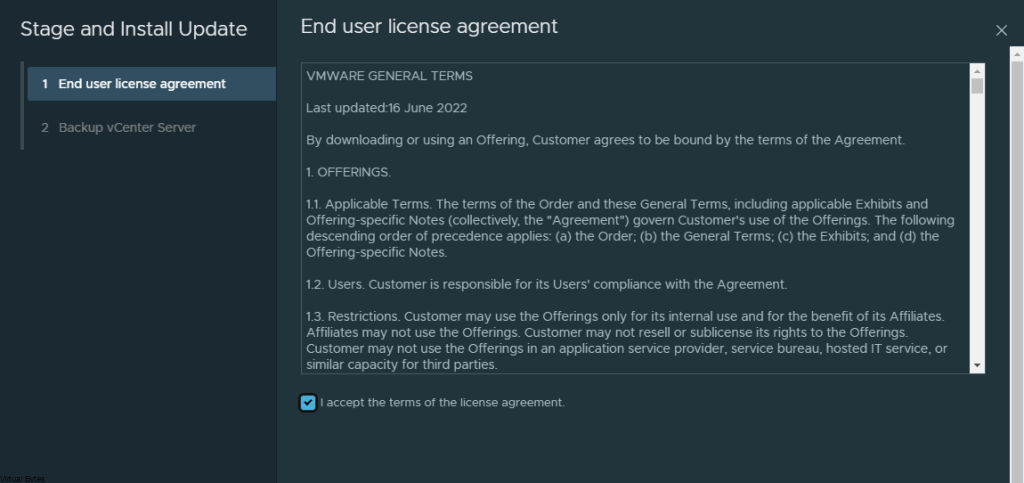
Lets Accept the EULA!

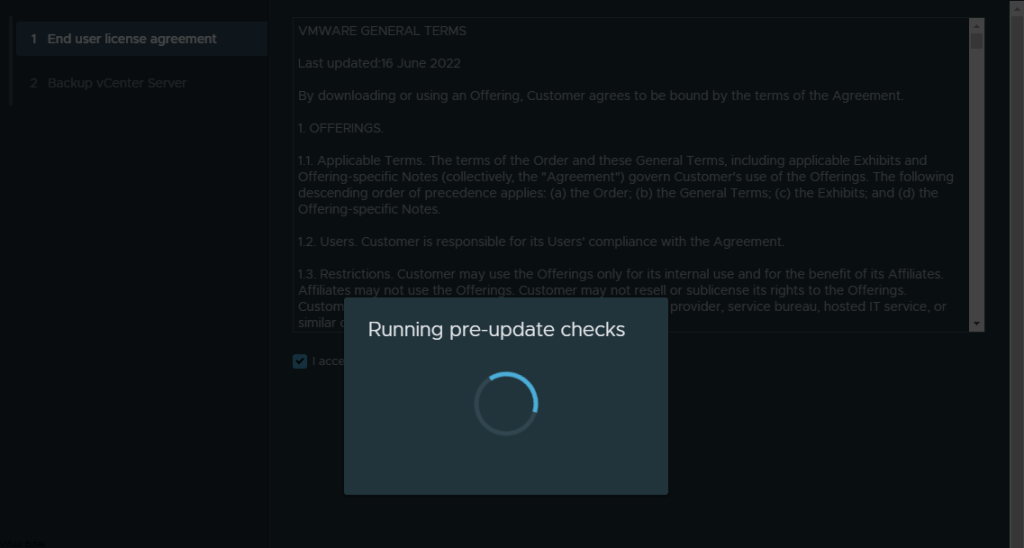
Good ole Prechecks prior to update!

Right here, make sure you have solid backups – For my deployment this is a lab so i can rebuild without any issues but for production. STOP and Go back to Backup page and ensure you have good backups if not, take one!

Backup Section

The upgrade process was very quick!

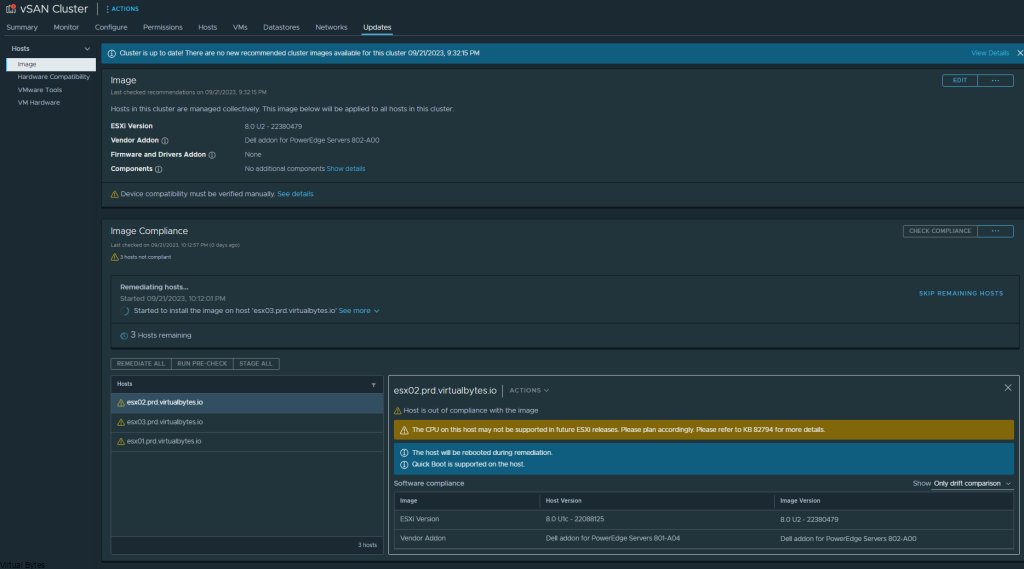
Now, that we have upgraded VCSA, lets login and lets stage our ESXi upgrade process. Utilizing the Image Managment

Select 8.0 U2 22380479 Image

Then hit Remediate all, if you have all pre-checks successfully staged and ready to upgrade lets upgrade our ESXi hosts!

There we go! One of the 3 hosts has upgraded!

September 21, 2023 0 comments 5K views
0 FacebookTwitterLinkedinEmail
VMware vCenter

vCLS VMs failing to power on vSphere 8.x

by Tommy Grot June 14, 2023
written by Tommy Grot 2 minutes read

Tonight’s troubleshooting tidbit is an important topic that you’ll want to stick around for. We all know that upgrading your system can be a daunting task, especially when something goes wrong. In this blog post, we’ll be discussing an issue that many of you may be facing after upgrading your vSphere 8.0 to 8.0.1.

Are you experiencing problems with DRS not working or vCLS not powering back on? If so, don’t worry, we’ve got you covered! We’ll be diving into the root cause of this issue and providing you with some solutions to get your system back up and running smoothly. So, grab a cup of coffee and let’s get started!

Error Message: vSphere DRS functionality was impacted due to unhealthy state vSphere Cluster services caused by the unavailability of vSphere Cluster Service VMs. vSphere Cluster Service VMs are required to maintain the health of vSphere DRS.

Events Tab will have errors for the following Privilege check failed for user VSPHERE.LOCAL\vpxd-extension-xxxx for missing permission.

Before You Start!

  • Take a Snapshot of your vCSA
  • SSH into vCSA

Change to shell

mkdir /certificate
/usr/lib/vmware-vmafd/bin/vecs-cli entry getcert --store vpxd-extension --alias vpxd-extension --output /certificate/vpxd-extension.crt
/usr/lib/vmware-vmafd/bin/vecs-cli entry getkey --store vpxd-extension --alias vpxd-extension --output /certificate/vpxd-extension.key
python /usr/lib/vmware-vpx/scripts/updateExtensionCertInVC.py -e com.vmware.vim.eam -c /certificate/vpxd-extension.crt -k /certificate/vpxd-extension.key -s <FQDN> -u [email protected]

2023-06-15T02:32:01.586Z Updating certificate for “com.vmware.vim.eam” extension
2023-06-15T02:32:01.645Z Successfully updated certificate for “com.vmware.vim.eam” extension
2023-06-15T02:32:01.669Z Verified login to vCenter Server using certificate=”/certificate/vpxd-extension.crt” is successful

service-control --stop vmware-eam

Operation not cancellable. Please wait for it to finish…
Performing stop operation on service eam…
Successfully stopped service eam

service-control --start vmware-eam

Operation not cancellable. Please wait for it to finish…
Performing start operation on service eam…
Successfully started service eam

Few seconds later in your vSphere UI, you will see vCLS starting to turn back on!

June 14, 2023 0 comments 4.4K views
2 FacebookTwitterLinkedinEmail
VMware ESXiVMware vCenter

Upgrading to VMware vSphere 8 Update 1

by Tommy Grot April 18, 2023
written by Tommy Grot 4 minutes read

Tonight’s topic is upgrading to the new and most anticipated update of: vSphere 8 Update 1 from vSphere 8.0. In this walk through we will do a step by step process of what you will need to do before you upgrade your vSphere environment.

What’s New

Some tidbits of information below from the Release Notes – More Information check out the release notes here

  • vSphere 8.0 IA/GA Release Model: For more information on the Release Model of vSphere Update releases, see The vSphere 8 Release Model Evolves.
  • vSphere Configuration Profiles: vSphere 8.0 Update 1 officially launches vSphere Configuration Profiles, which allow you to manage ESXi cluster configurations by specifying a desired host configuration at the cluster level, automate the scanning of ESXi hosts for compliance to the specified Desired Configuration and remediate any host that is not compliant. vSphere Configuration Profiles require that you use vSphere Lifecycle Manager images to manage your cluster lifecycle, a vSphere 8.0 Update 1 environment, and Enterprise Plus or vSphere+ license. For more information, see Using vSphere Configuration Profiles to Manage Host Configuration at a Cluster Level.
  • With vSphere 8.0 Update 1, vSphere Distributed Services Engine adds support for:
    • NVIDIA BlueField-2 DPUs to server designs from Lenovo (Lenovo ThinkSystem SR650 V2).
    • 100G NVIDIA BlueField-2 DPUs to server designs from Dell.
    • UPTv2 for NVIDIA BlueField-2 DPUs.
    • AMD Genoa CPU based server designs from Dell.
  • Support for heterogenous virtual graphics processing unit (vGPU) profiles on the same GPU hardware: vSphere 8.0 Update 1 removes the requirement that all vGPUs on a physical GPU must be of the same type and you can set different vGPU profiles, such as compute, graphics, or Virtual Desktop Infrastructure workload, on one GPU to save cost by higher GPU utilization and reduced workload fragmentation.
  • Integration of VMware Skylineâ„¢ Health Diagnosticsâ„¢ with vCenter: Starting with vSphere 8.0 Update 1, you can detect and remediate issues in your vSphere environment by using the VMware Skyline Health Diagnostics self-service diagnostics platform, which is integrated with the vSphere Client. For more information, see VMware Skyline Health Diagnostics for vSphere Documentation.
  • VM-level power consumption metrics: Starting with vSphere 8.0 Update 1, you as a vSphere admin can track power consumption at a VM level to support the environmental, social, and governance goals of your organization.

What you need:

  • SFTP Server to back up your VCSA
  • ESXi 8.0.1 Image via Customer Connect – (VMware-VMvisor-Installer-8.0U1-21495797.x86_64.iso)
  • Few minutes of preparation

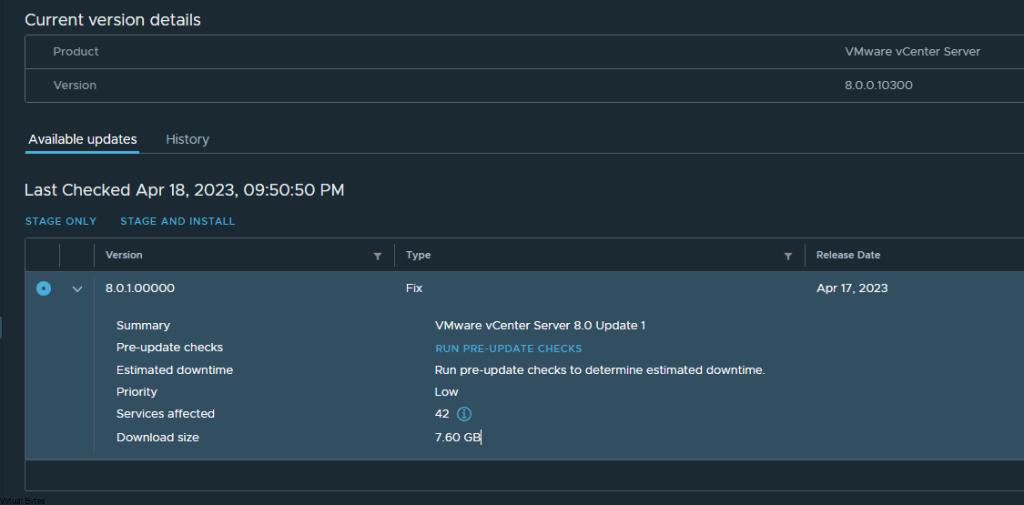
First thing you want to get your vCenter Server Appliance on the newest version, before you upgrade your VMware ESXi hosts to 8.0.1.

Below we will walk through the process to get your VCSA backed up before upgrading!

(Side Note – Make sure you have SFTP or any other means of backing up your VCSA, for this walk through we will not go through setting up a SFTP server)

Once the VCSA is backed up successfully – > Then click Stage and Install

Accept that lovely EULA 🙂 If you don’t then no upgrade for you.

Click Next – it will be running pre-checks, and the upgrade process will start, the whole process took roughly less than 15 minutes, this depends on your environment and how large the db and how many objects maintained within VCSA.

Install in progress….

During this process it will convert your data from the previous installation over to your new one, so if there is lots of metrics and logs and historical information it may take a bit.

I went and took a look at how the vSphere Client status is, and there is a new UI addon where it is different from previous deployments of vSphere 8.0

Lets log back into your vCenter!

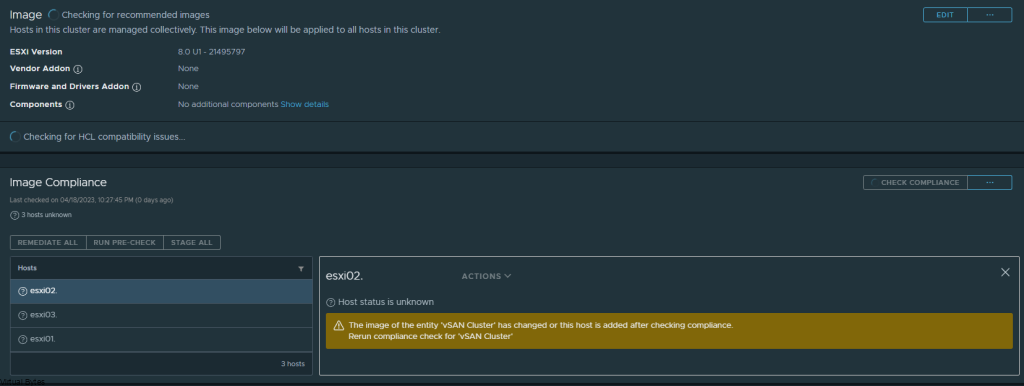
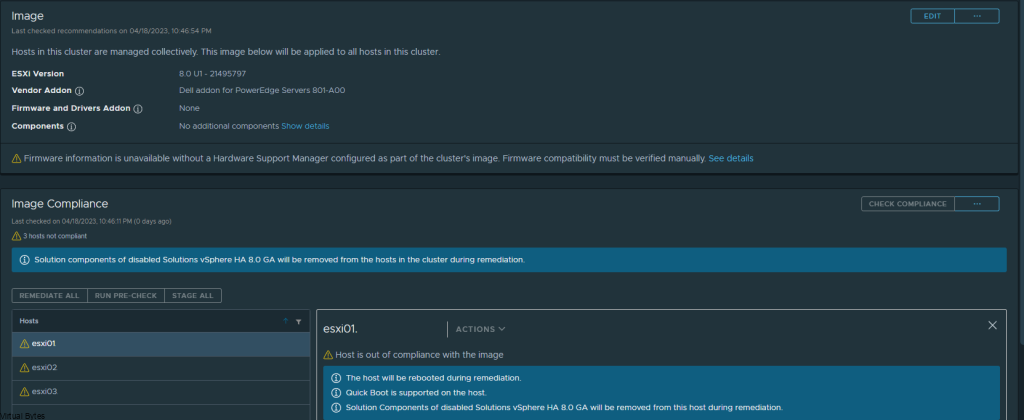
We will prep the cluster image and since I have Dell PowerEdge R740s (14th Gen) hardware I make sure I have the correct Vendor addon selected and validated.

After few minutes of validating, your Image for your cluster will be ready to be applied

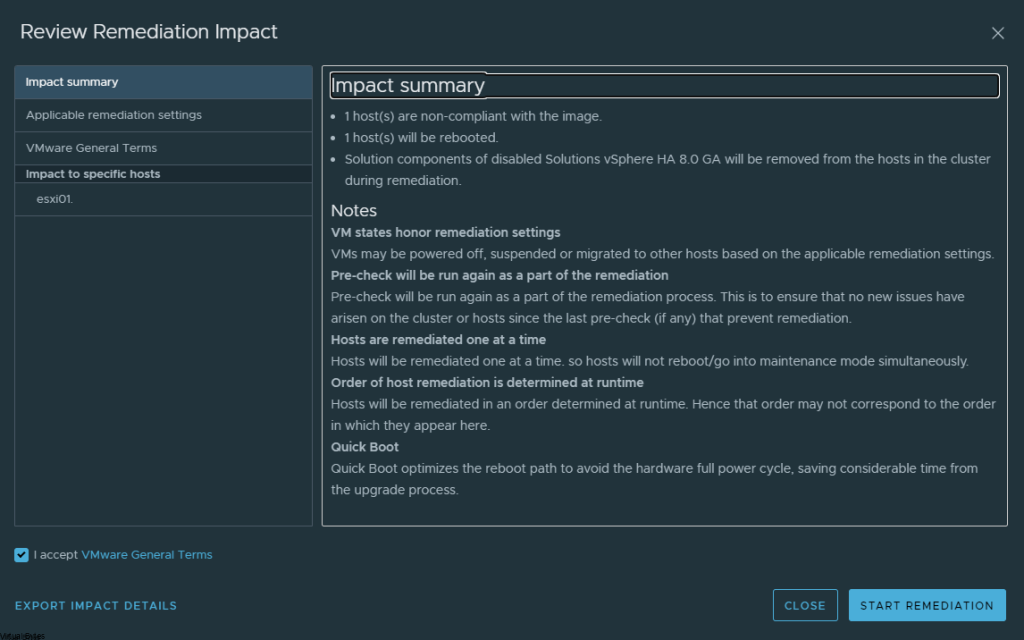
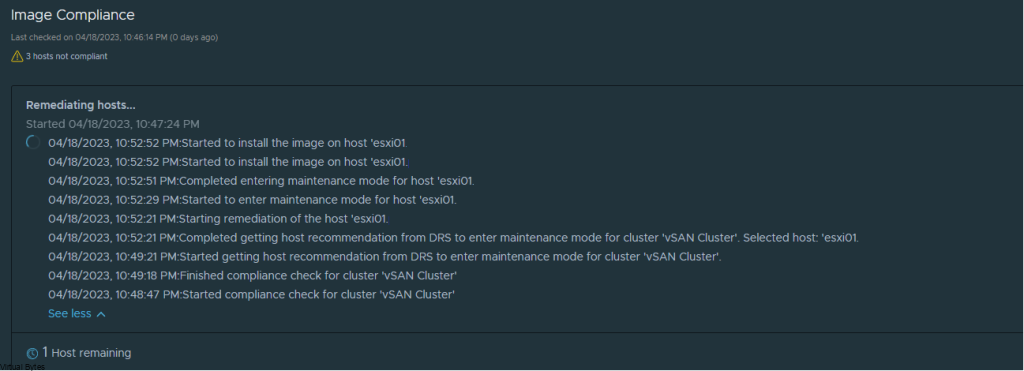
Lets start remediating some servers, one by one. As I have Dell PowerEdge R740s, I have quick boot enabled so the whole upgrade process for each ESXi host was less than 10 minutes for each host.

Upgrade In Process…

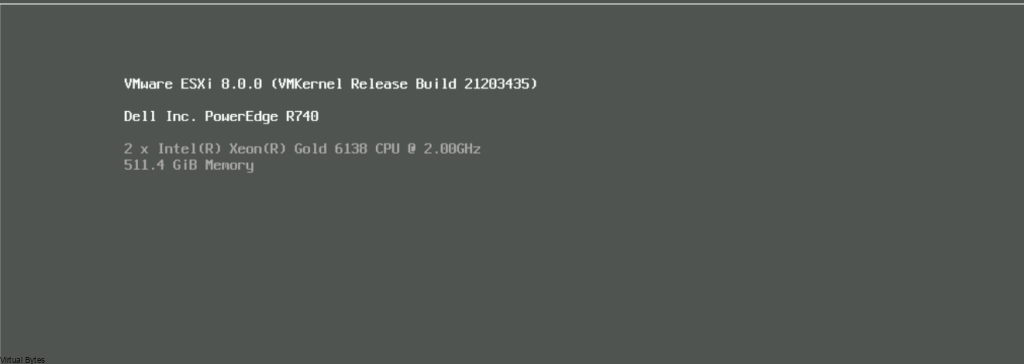
While we are waiting, I like to login to the servers iDRAC and watch the upgrade process.

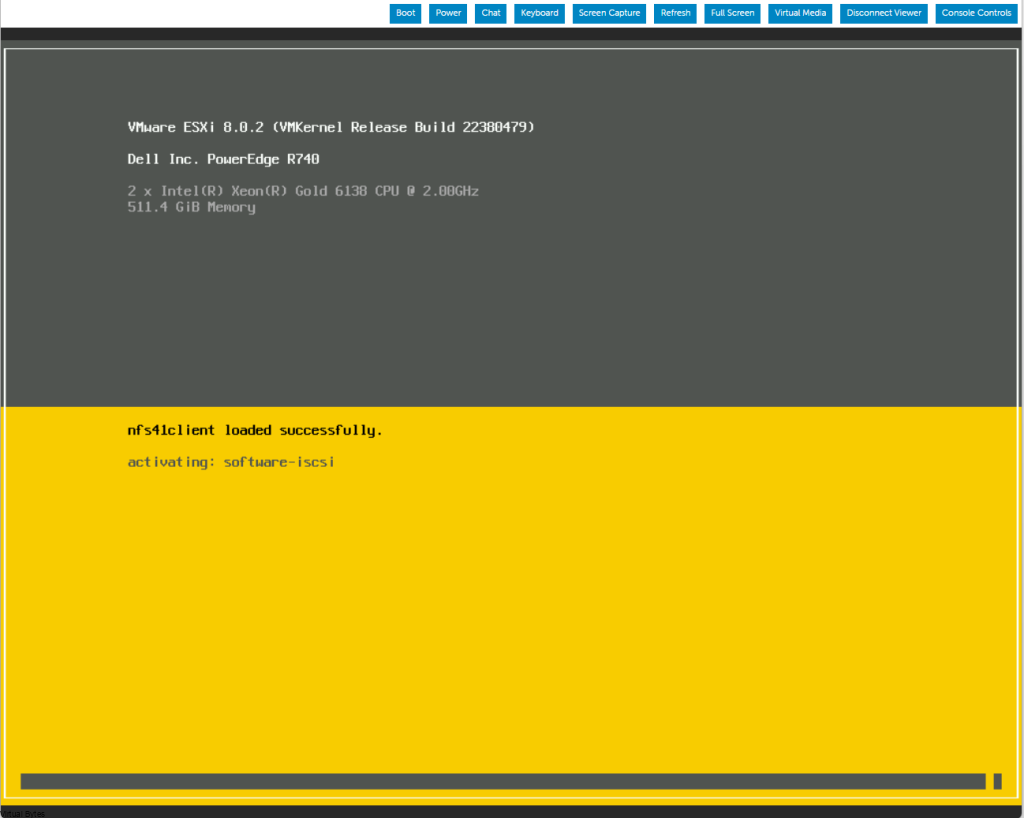
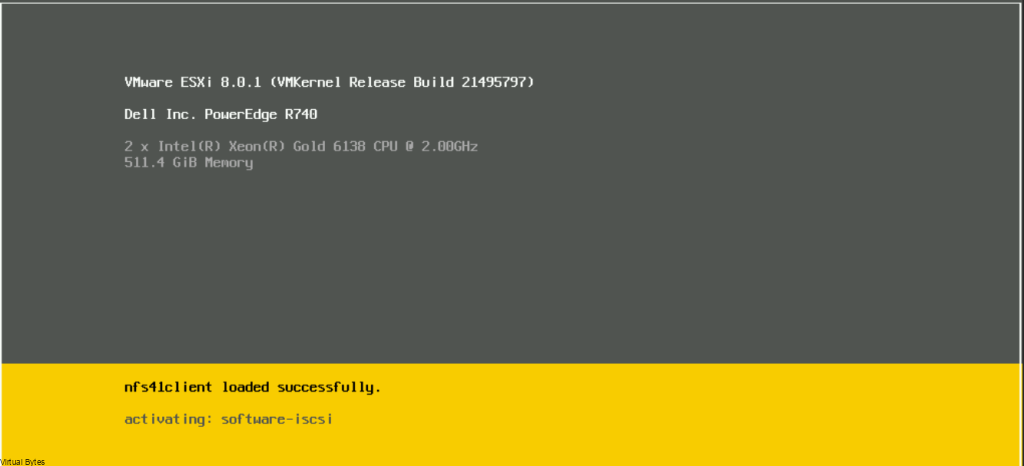
Few minutes later we are on VMware ESXi 8.0.1

After all ESXi hosts are upgrade to 8.0.1, next we will go to Configure -> vSAN – > Disk Management -> Upgrade Disks format version to version 18.0 from 17.0

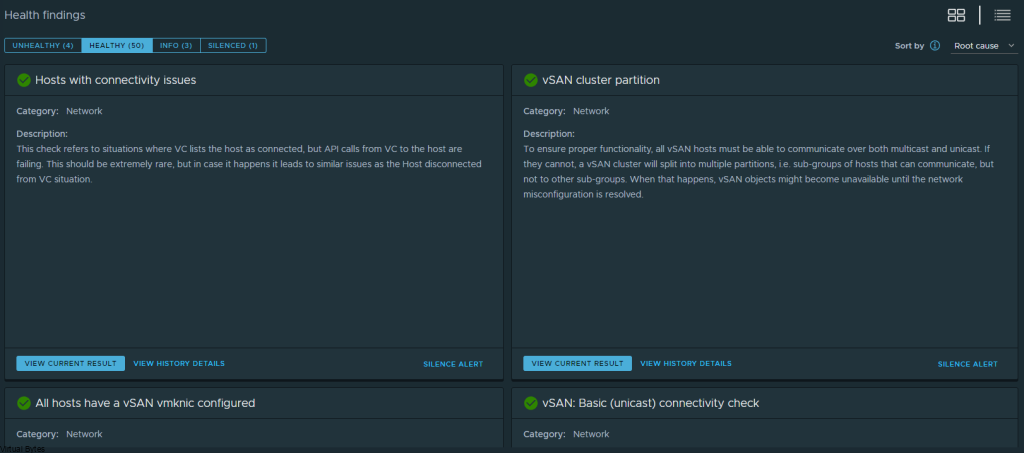
Some neat additions to vSphere 8 Update 1 – I do like how there are tiles now with more detailed information, but also you can toggle the hamburger menu to collapse all these tiles into a easier to see all Health Findings.

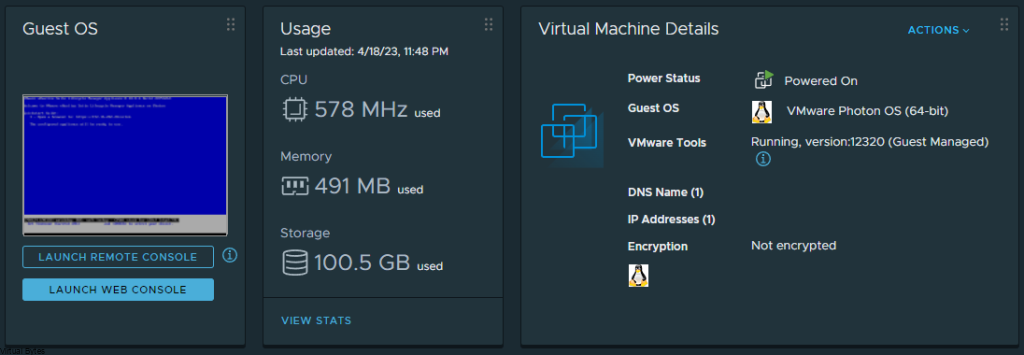
Also, I am glad that the usage is back into its tile on the vSphere User Interface, it is a much needed and appreciated addon back into vSphere 8.0.1

That is all! After following through the walkthrough you should of been able to upgrade your vSphere 8 to vSphere 8.0.1.

April 18, 2023 0 comments 4.5K views
0 FacebookTwitterLinkedinEmail
VMware ESXiVMware vCenter

vSphere 8 vMotion Unified Data Transport

by Tommy Grot November 29, 2022
written by Tommy Grot 2 minutes read

Tonight’s topic is about vMotion! But not just any kind of vMotion, we are going to enable blazing fast speeds to migrate your workloads. Before we get into the topic, I want to bring up information on VMware vSphere 8! I have been using the GA version of vSphere 8 on my new home lab (datacenter) and it’s been great so far!

vSphere vMotion migrates a(n) running state of a virtual machine from one ESXI host to another ESXI host in minutes or now even seconds! This allows you to vMotion workloads much faster now with vMotion protocol in vSphere 8 and all its huge performance improvements cause before standard vMotion utilized Network File Copy (NFC) which this was much slower and took longer but now with Unified Data Transport we will now enable Provisioning on the same vMotion VMkernel to speed up migration of workloads!

Here is more information from VMware:

To solve this problem, we introduce a new protocol called Unified Data Transport (UDT). In a nutshell, UDT combines the best of the NFC and vSphere vMotion protocols. Unified Data Transport (UDT) uses NFC as a control channel but offloads the data transfer to the vSphere vMotion protocol to benefit from the substantially greater performance and throughput.

How to Configure? Well Lets start!

Login into your vCSA

Go to your first ESXi hosts -> VMkernel Adapters

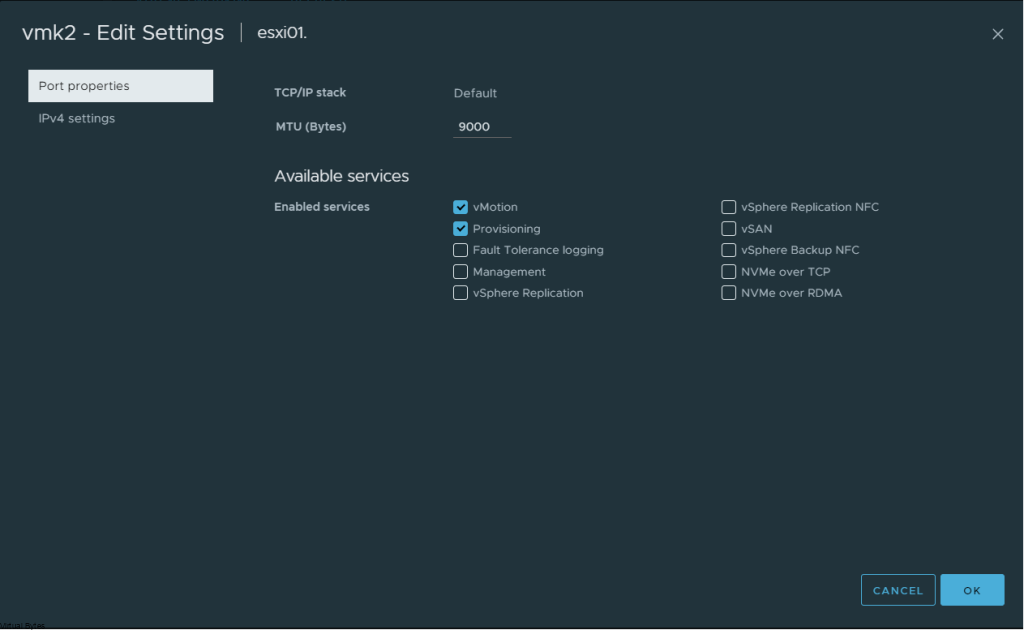
Click Edit on vMotion VMkernel, for mine it is vmk2

Select Provisioning along make sure your vMotion Enabled Service stays selected.

Click OK -> You will see a +1 Under Enabled Services and now I have vMotion and Provisioning Enabled on my single vmk2.

Repeat the steps on your next following ESXi Hosts.

That is it! Start enjoying the blazing speeds of migrating your workloads from ESXi host to another ESXi host!

November 29, 2022 0 comments 1.7K views
0 FacebookTwitterLinkedinEmail
VMware vCenter

Upgrading vSphere 7.0.3 to vSphere 8.0

by Tommy Grot October 12, 2022
written by Tommy Grot 6 minutes read

vSphere 8 Update 1 – Released!! If you want to see how to upgrade go here to new blog post!

I will be going over on how to upgrade your vSphere 7 to vSphere 8! I will be doing step by step screenshots to walk anyone through, keep in mind that this is upgrading from vSphere 7.0.3 going to vSphere 8.0.

Exciting news! vSphere 8 is (IA) Yes, there is a new release model. Below I have some information below from VMware’s website but if you want to get more in-depth information go to the link below!

New IA/GA model (Information from VMware)

Our intent going forward is that all major and update vSphere releases will be delivered first with an IA designation. An IA release is a production-quality release that meets all GA quality gates and is fully partner certified. IA releases will be available during the IA phase to all customers for production deployments.

Changing to this IA/GA model is motivated by several factors. Most importantly, feedback from customers who want us to be more explicit when a release has achieved strong traction and usage without having to wait for the next update release, which they sometimes use as a proxy. By switching the designation from IA to GA, we’ll be making it clear when the release has gained wide adoption. We think this is a better model than waiting for a 6-month update, particularly as these updates now include feature enhancements as well as net new features.

DISCLAIMER:

– Everything I document here is on my lab, do not try this on a production system if you do not have backups or a way to restore if something goes wrong.

– This Walkthrough is only for a vSphere Cluster upgrade

Before you start the upgrde ensure you have a backup of your vCenter Server Appliance.

We will be upgrading a vSphere 7.0.3 Cluster to vSphere 8.0! Below is the vSphere 7 snippet

Download you ISO from VMware’s website and copy the iso to your local workstation

Once you get your ISO ready mount it to your local computer and drill down into the

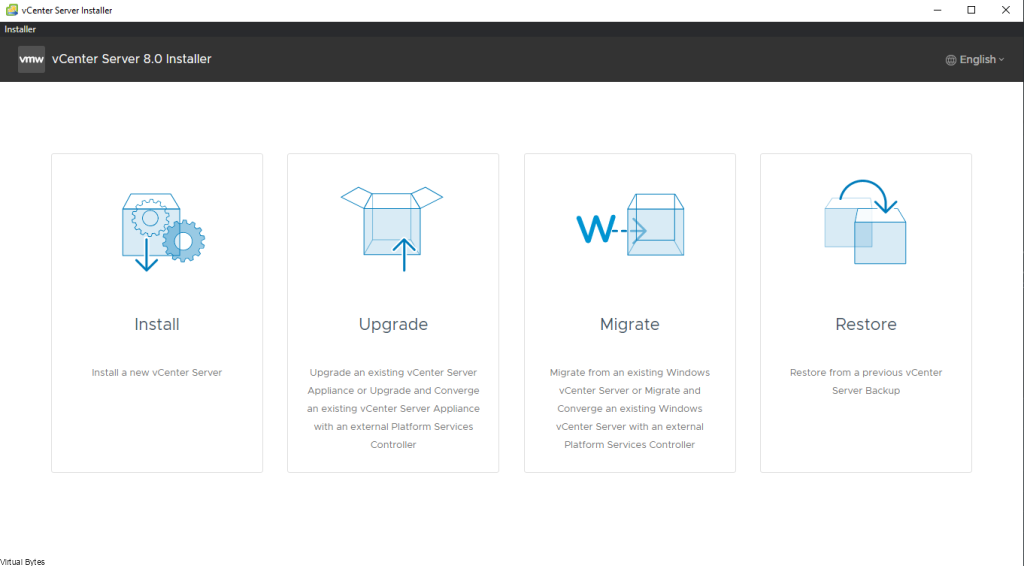
vcsa-ui-installer -> win32 -> then execute installer.exe

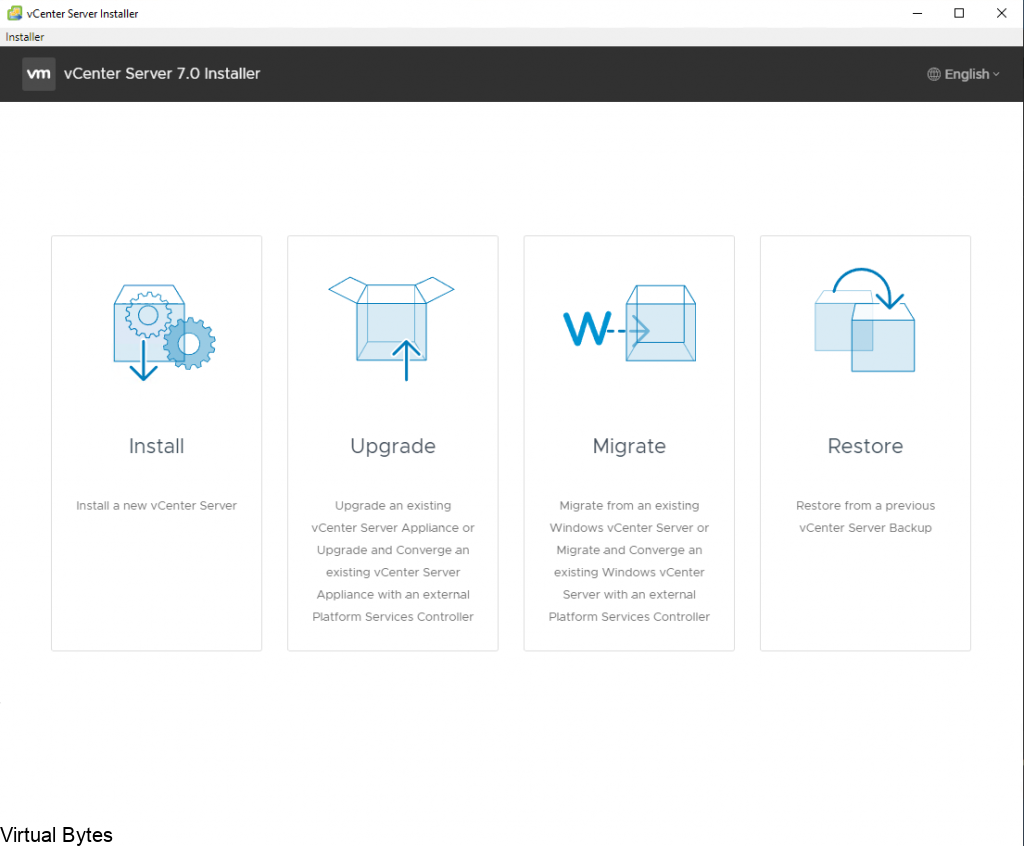
Go to Upgrade ->

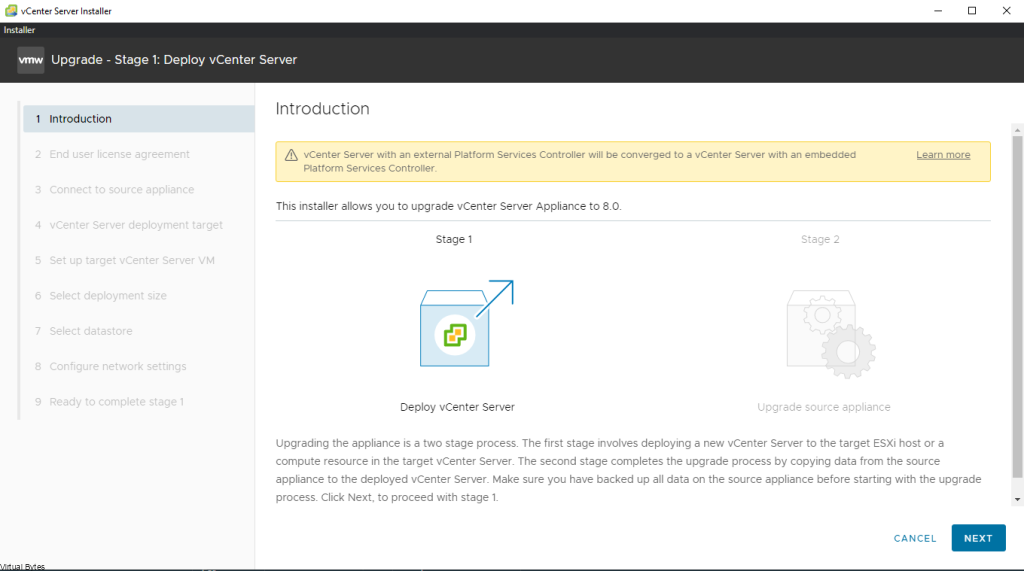
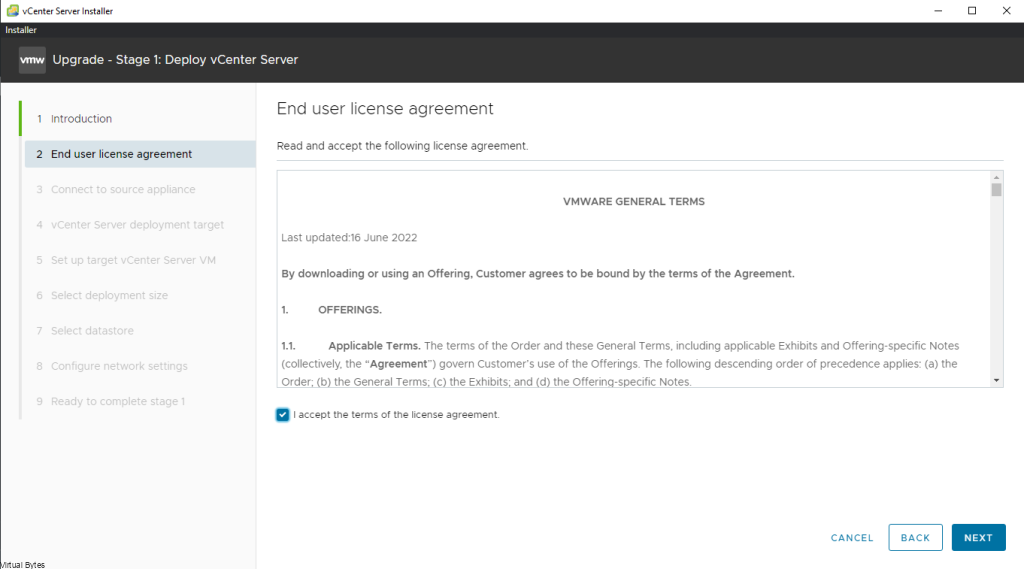
Once you are ready to upgrade your environment you will go Next

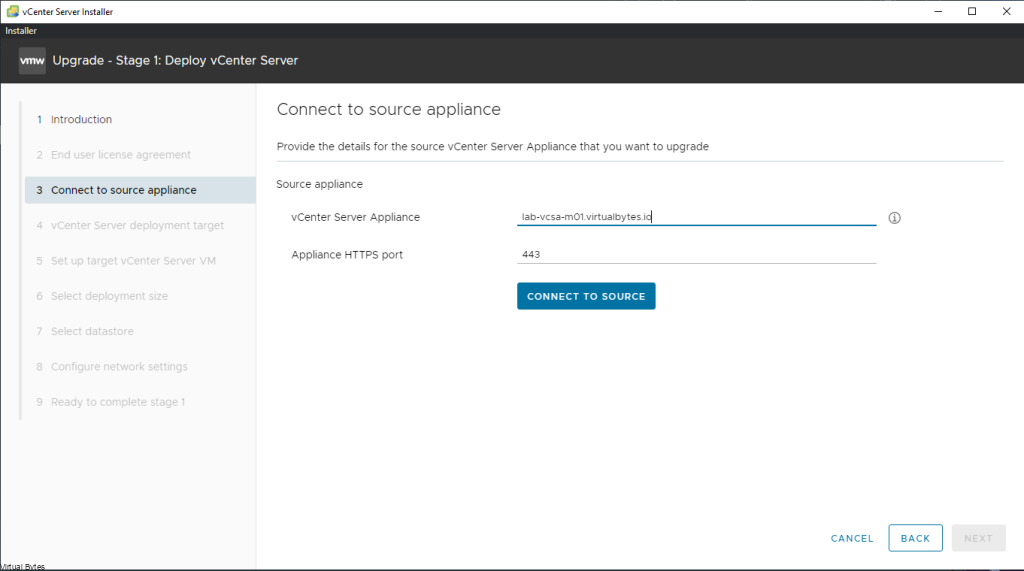
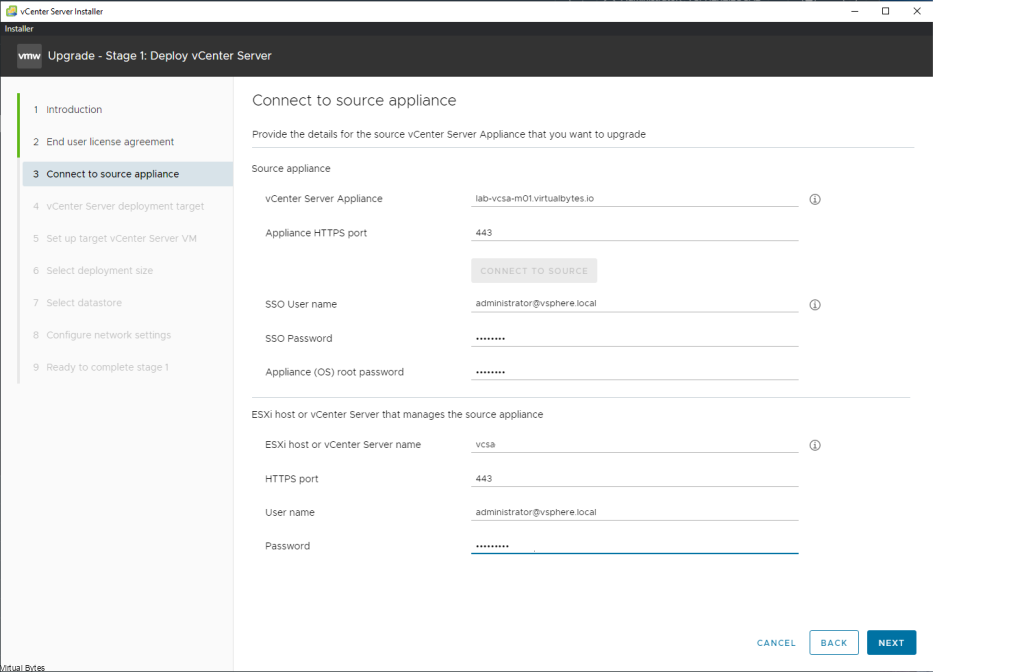
Once you get to this window, you will want to fill in your Source Appliance which is the vSphere 7 Cluster you want to upgrade. For Example: lab-vcsa-m01.virtualbytes.io

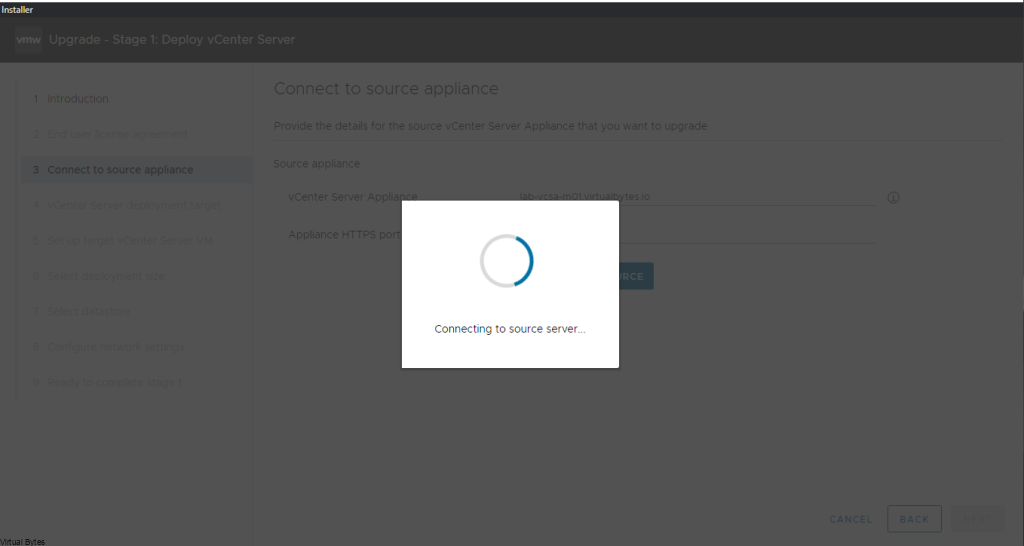
Then -> Click Connect to Source

Once it connects to the source server, you will get this detail specific page during the deployment asking to fill in the vCenter Server Appliance SSO Username and Password along with the Appliance (OS) root password along with the ESXi Host or vCenter Server that manages the source appliance

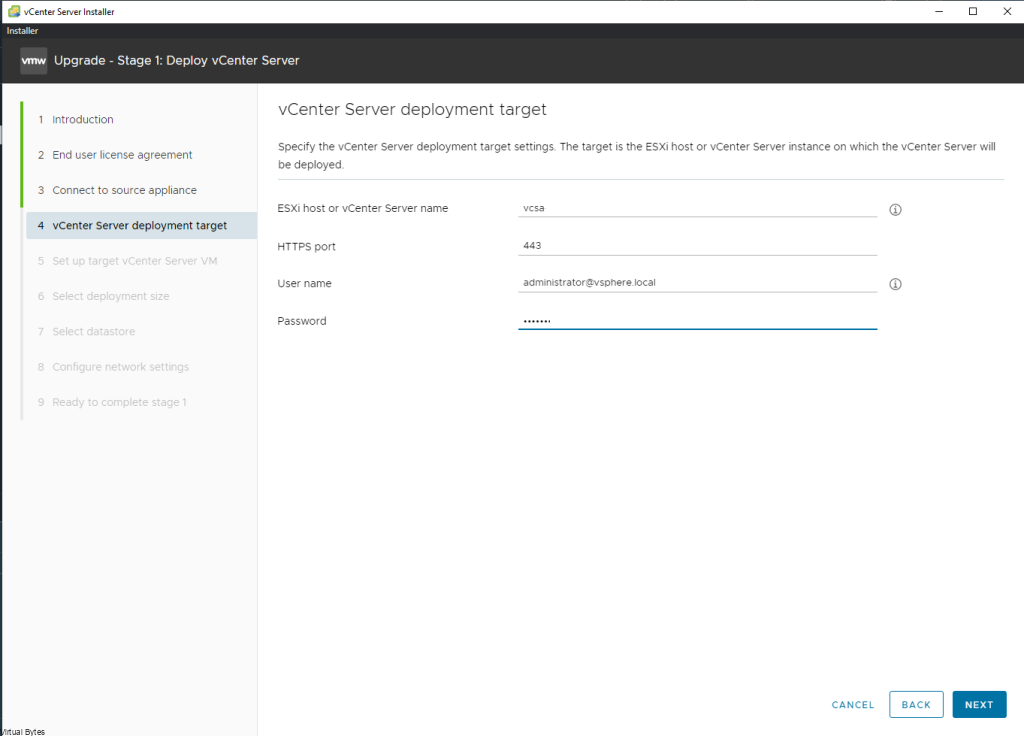
Accept the Certificate Warning which you will have your Source and Destination servers where the appliance will get deployed

Input your vCenter Server deployment target, where the new vCenter Server Appliance will get deployed

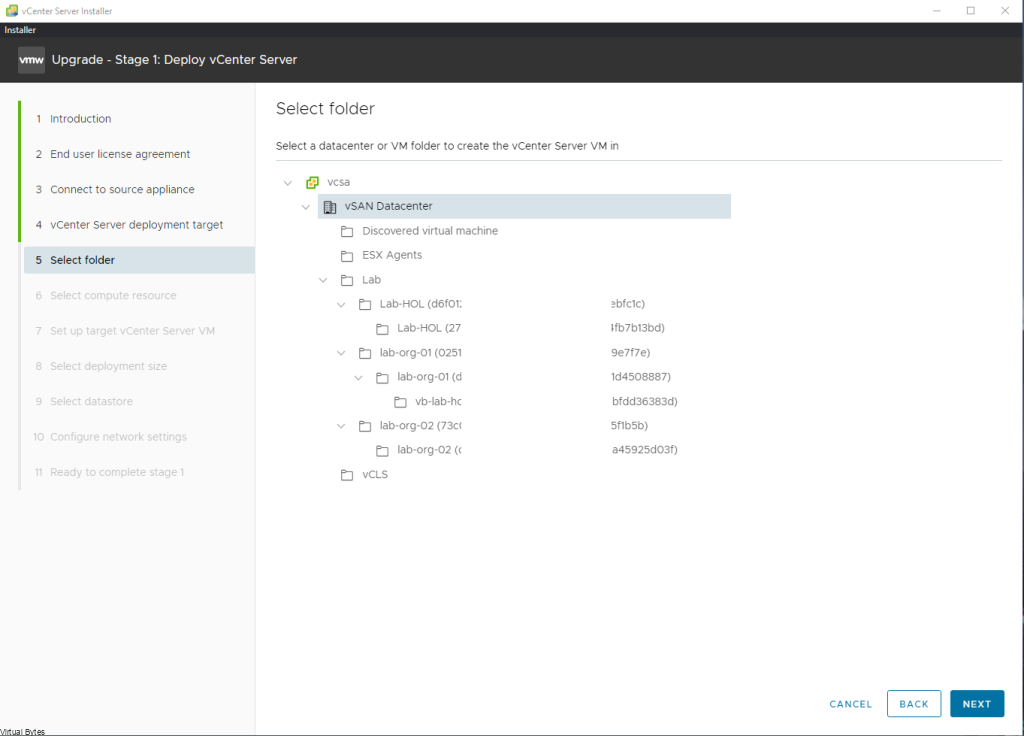
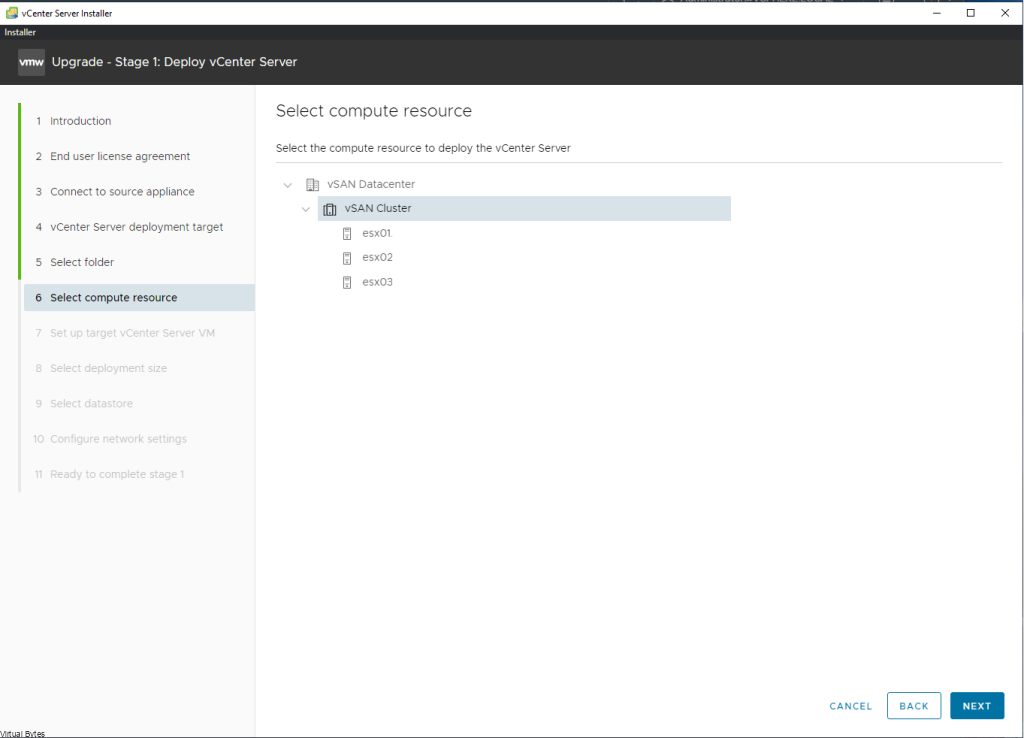
If you are installing this select your current datacenter object where the vCSA appliance will be stored in

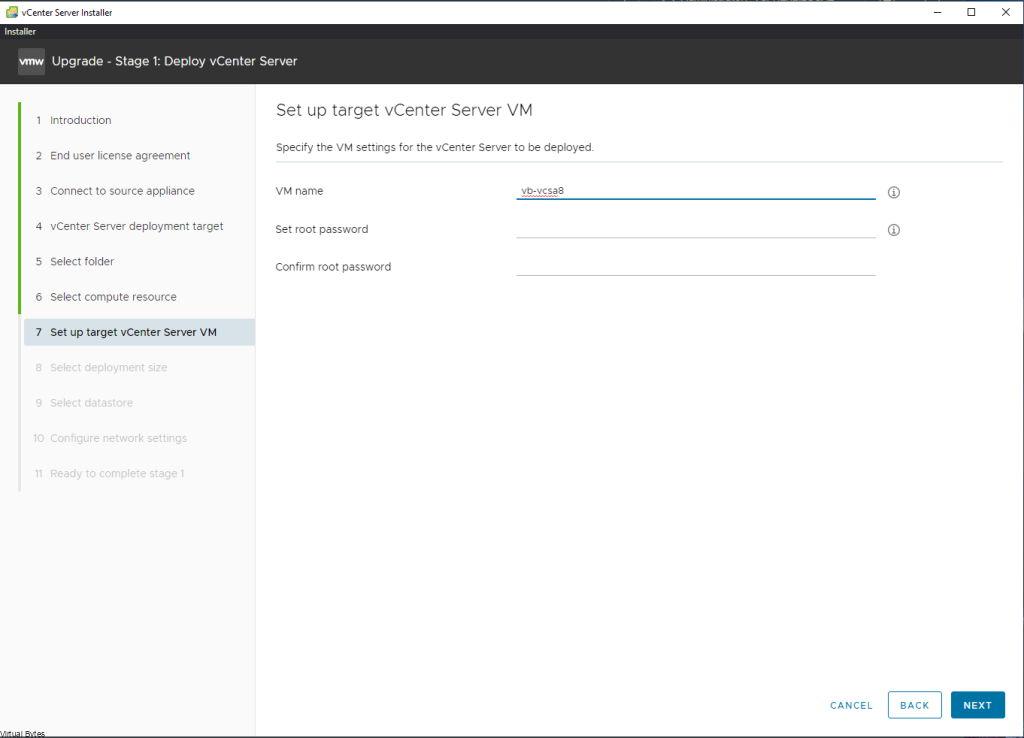
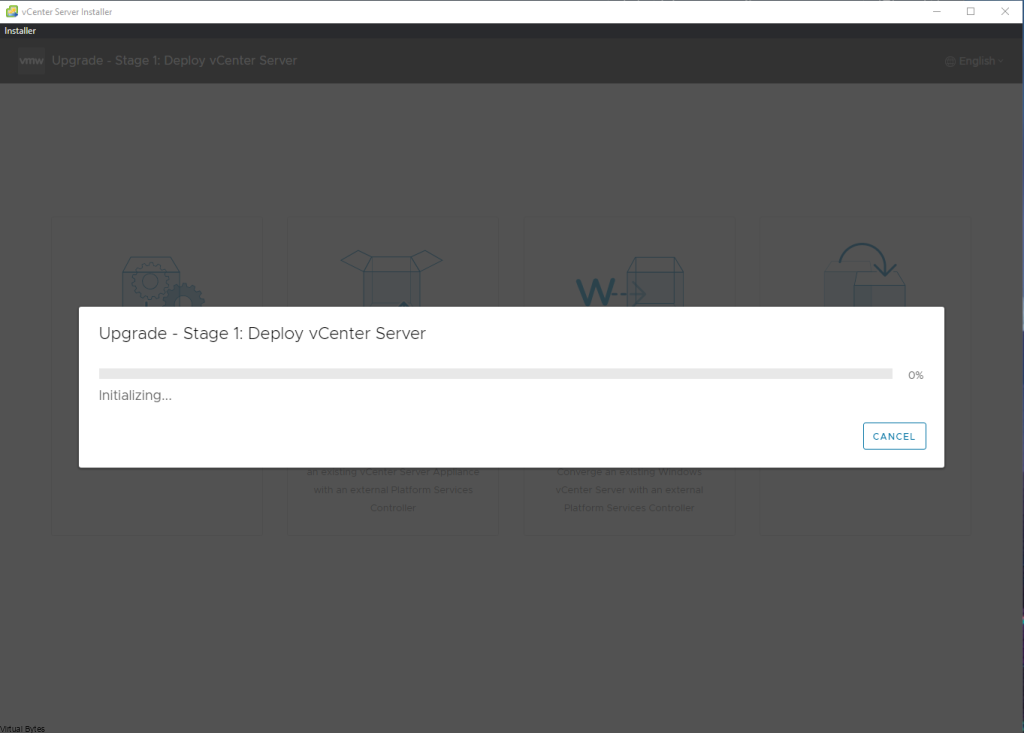
This is creating the new vCSA on the target server, you will want to make sure that the two vCenter Server Appliances do not collide with the same naming convention or you will get any error saying this name for the VM exists.

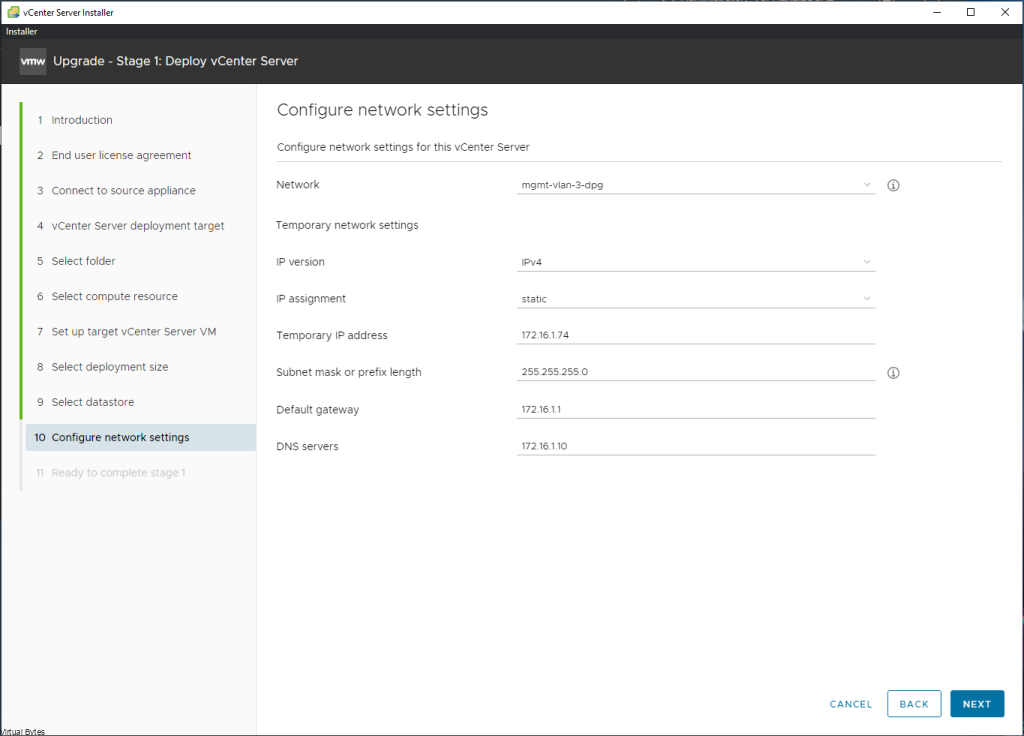
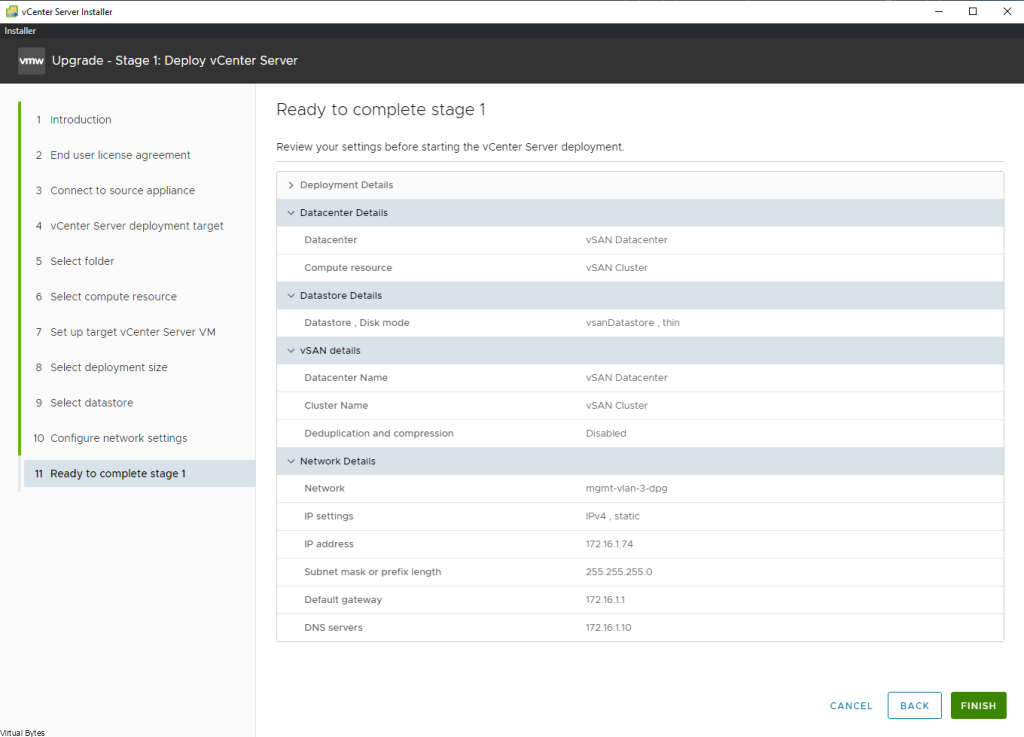
Fill in your network information for the upgraded preparation

After ~15 minutes, you will get to the Phase 2 of the Upgrade Process, Click -> Next

I purposly did not enable SSH on my source vCenter Server, this way if anyone encounters the same issue, this will guide you to make sure you have SSH enabled on the Source vCenter Server Applaince or you will get this error below 🙂

After you enabled SSH and re-try the task you will go into the Pre-Upgrade Checks state

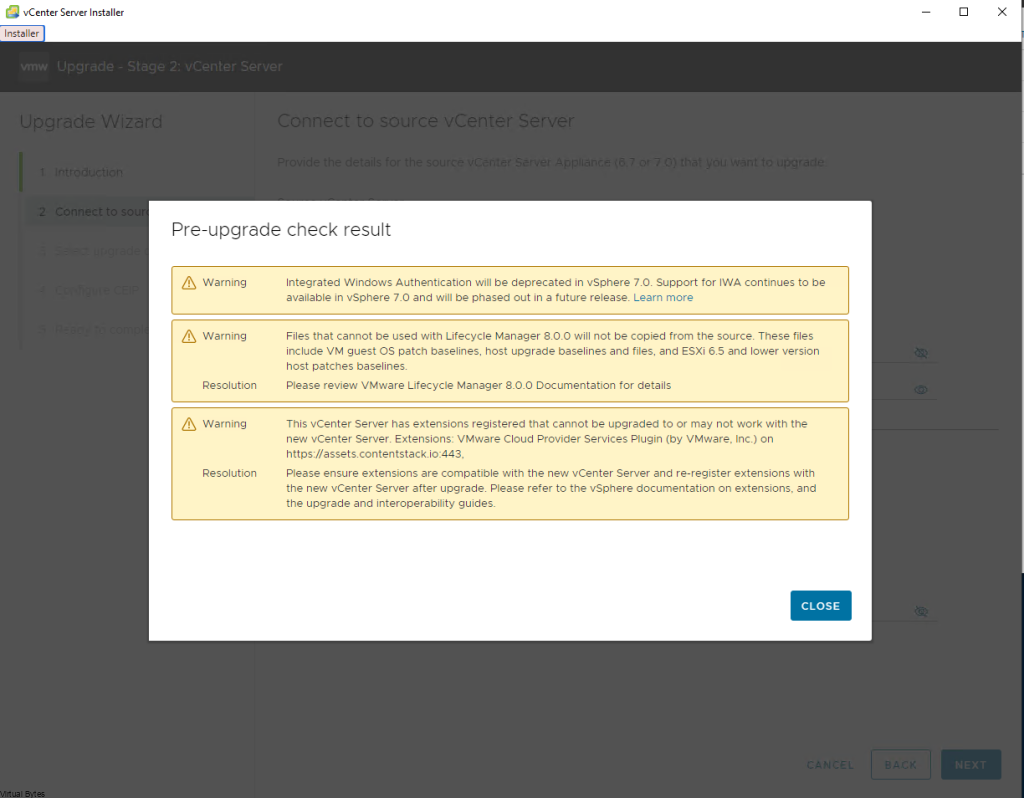
Below is a Pre-Upgrade check result which has some Warnings to let you know

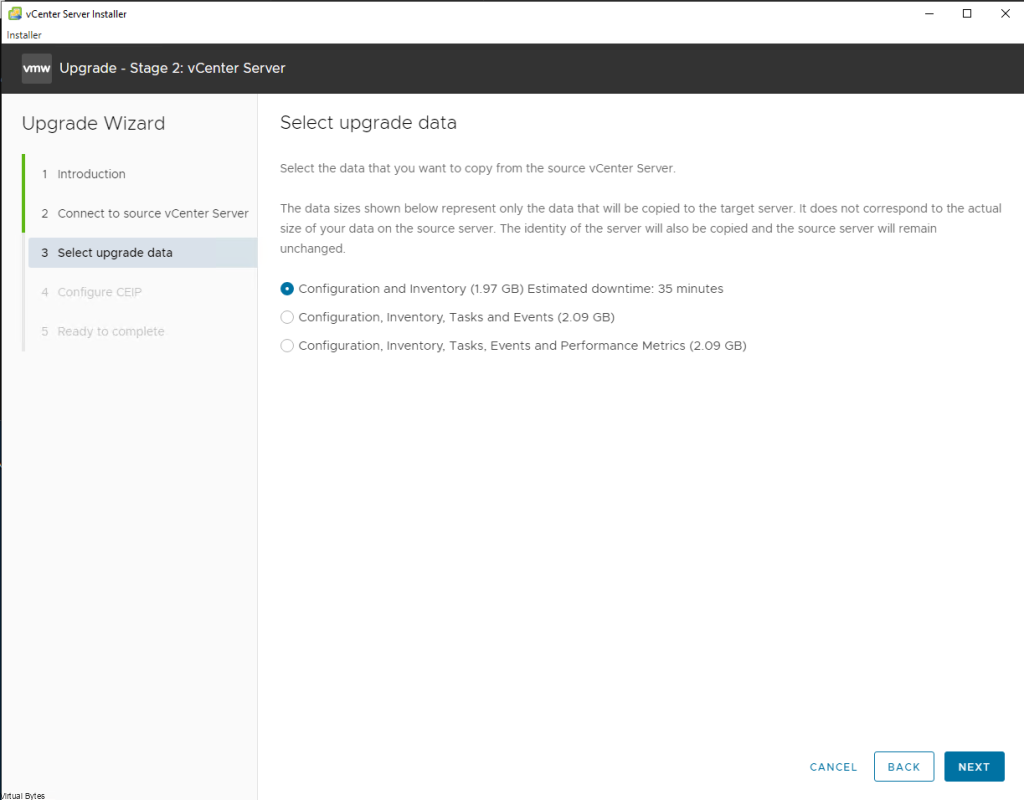
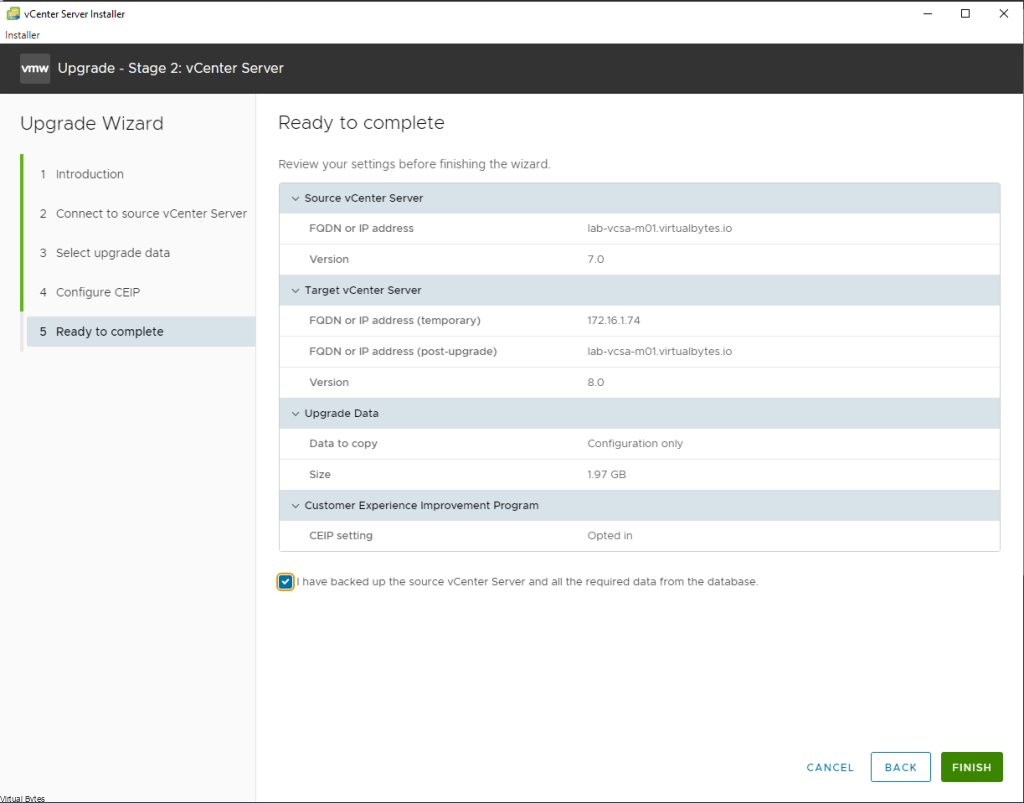
Here at this step we are about to upgrade the data for our vCSA! Select your requirment, i only did the Configuration and Inventory.

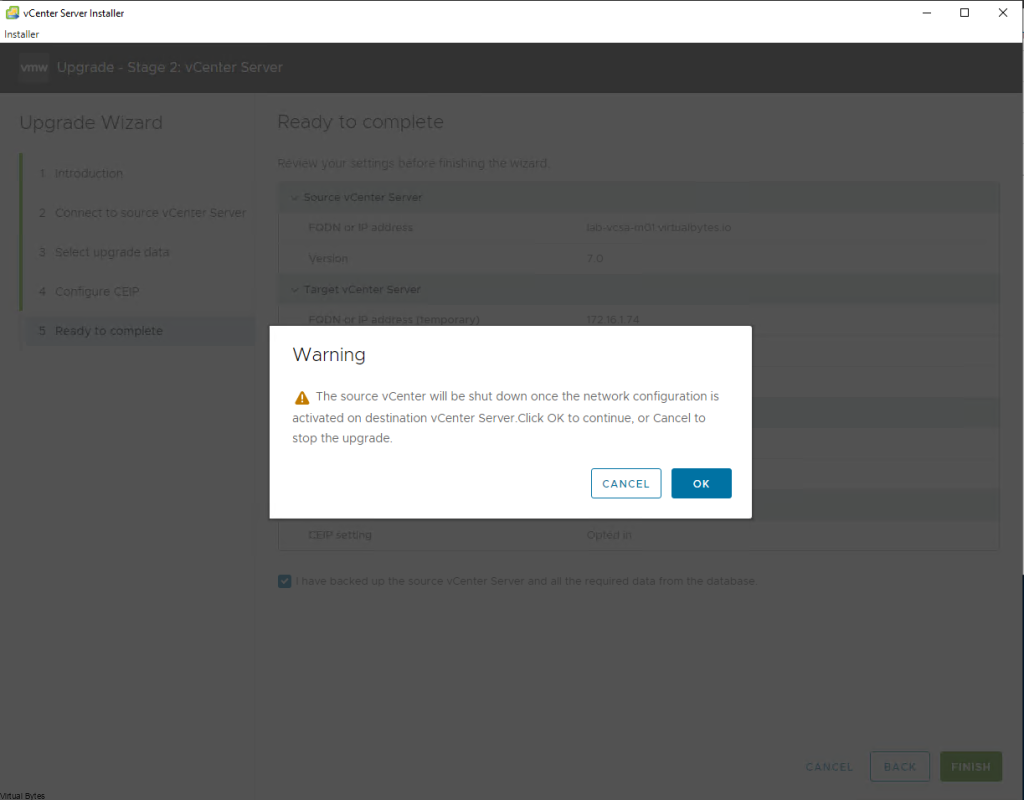
Select – > I have backed up the source vCenter Server and all the required data from the database.

WARNING!! – Make sure you have your source vCenter backed up and/or snapshot to revert too if something does not upgrade properly.

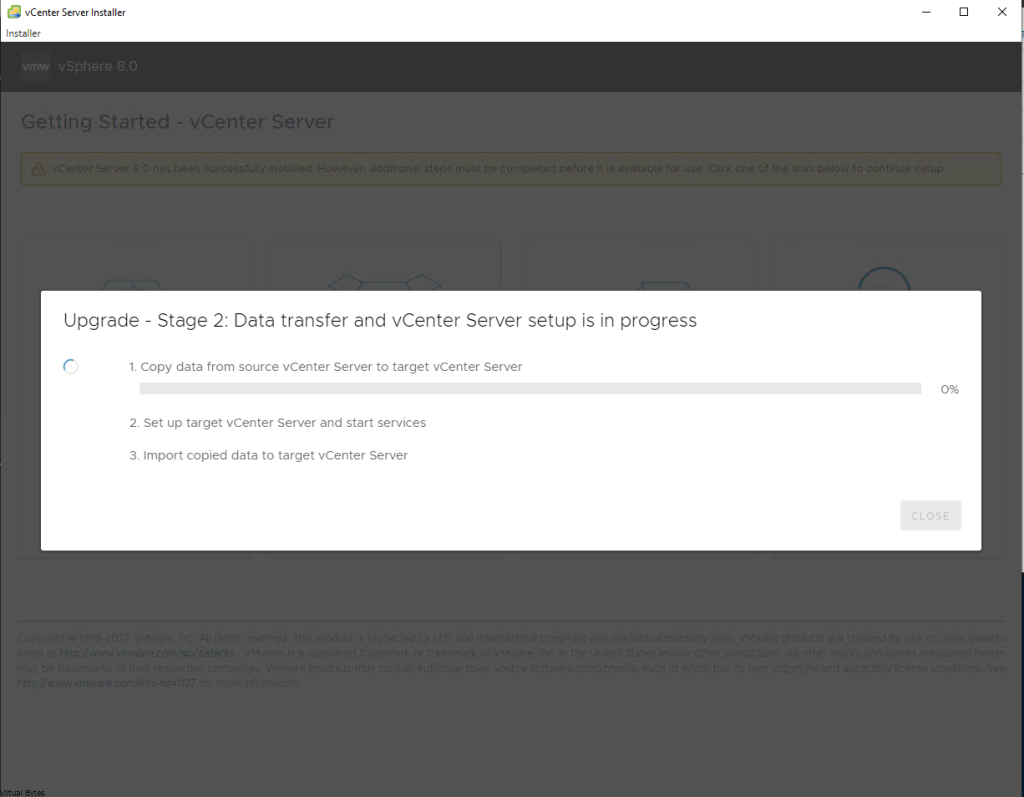
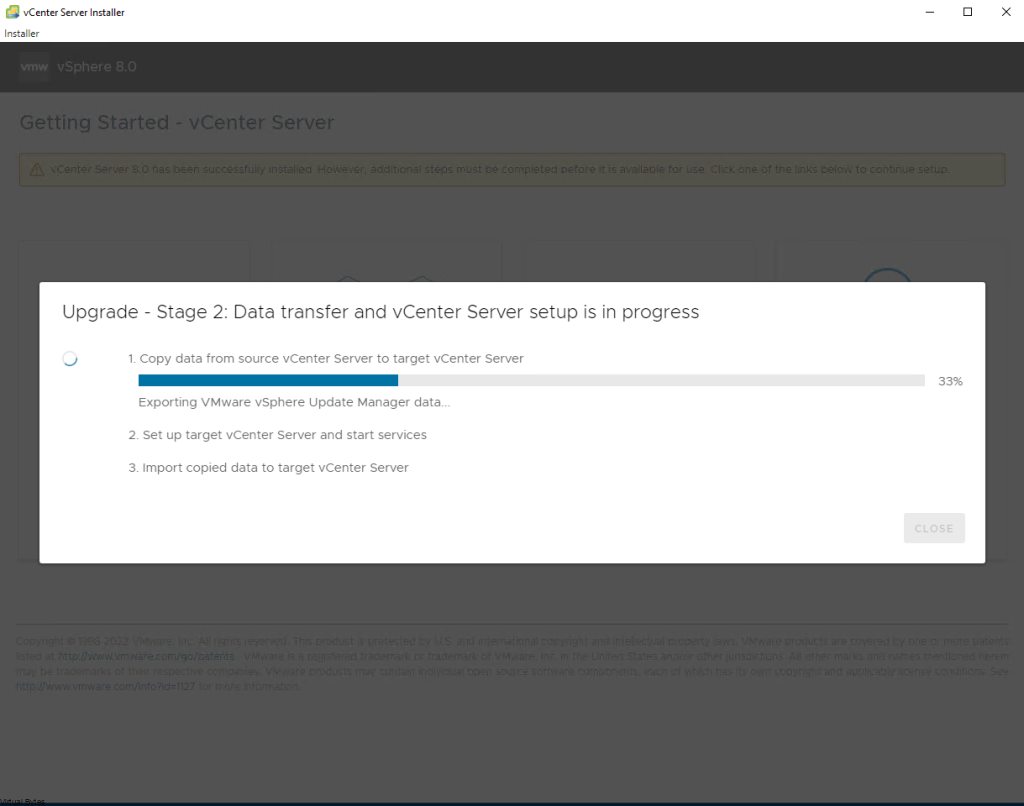
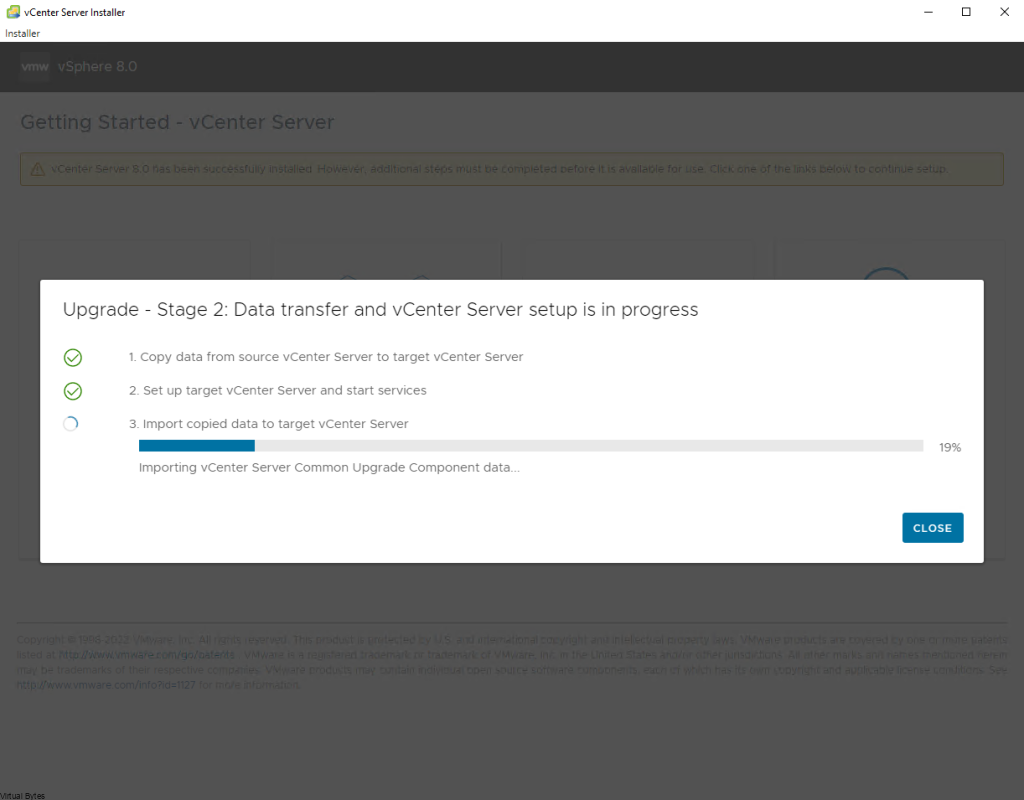
This process will take ~ 15 – 20 minutes max, but this also depends on how large your environment is, the more objects in the data base the longer it will take.

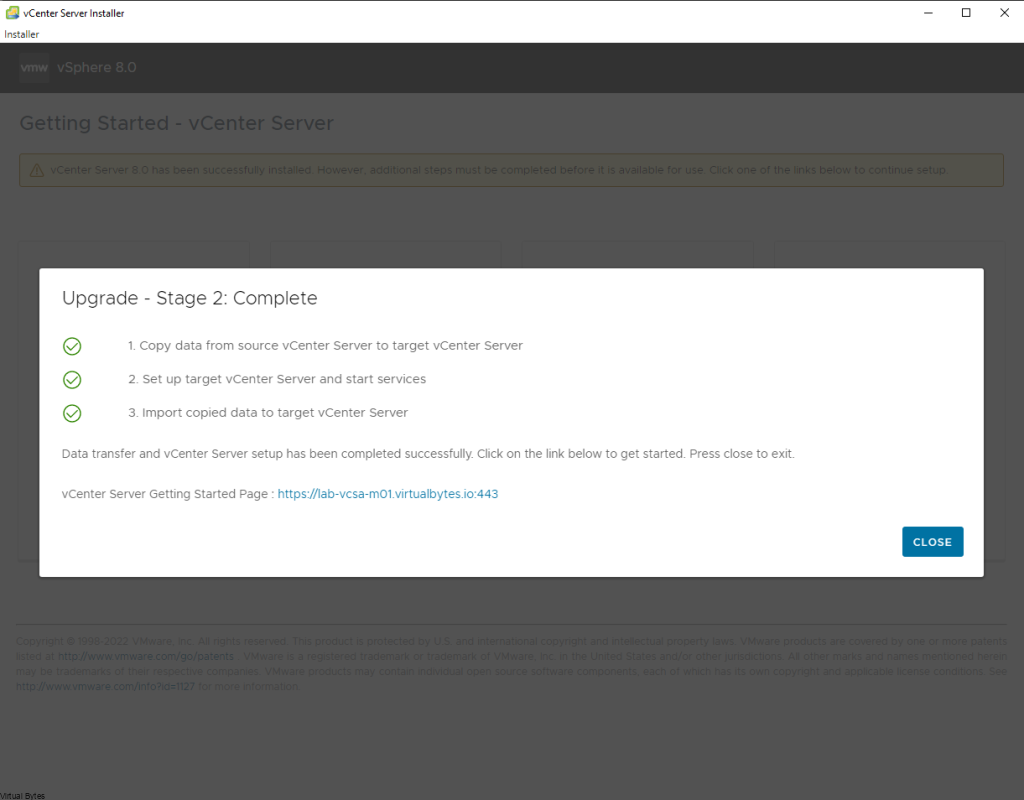
Next snippet, will show you that we have copied the data from the source vCenter Server to the Targer vCenter Server

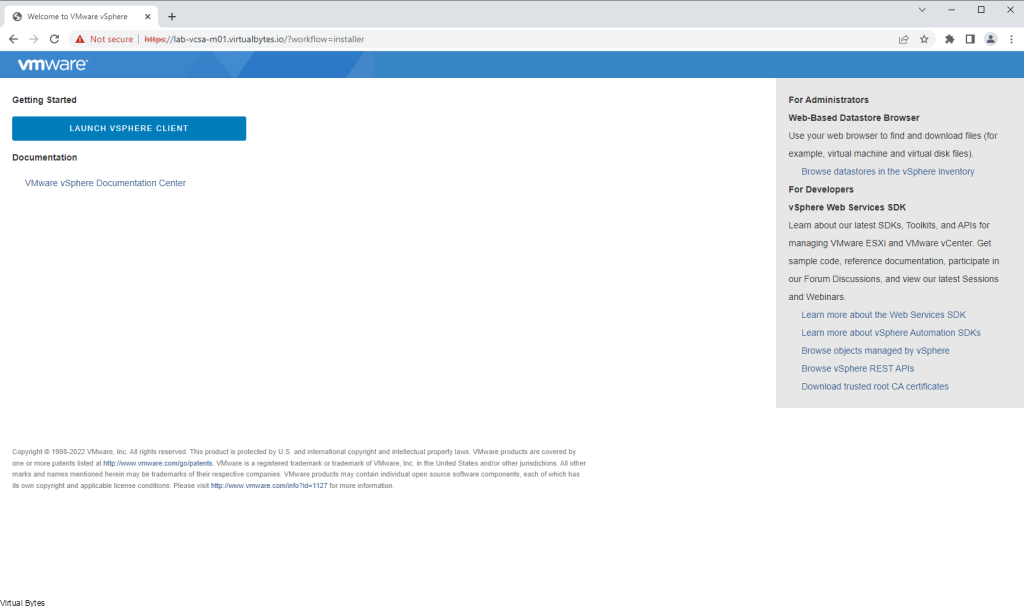
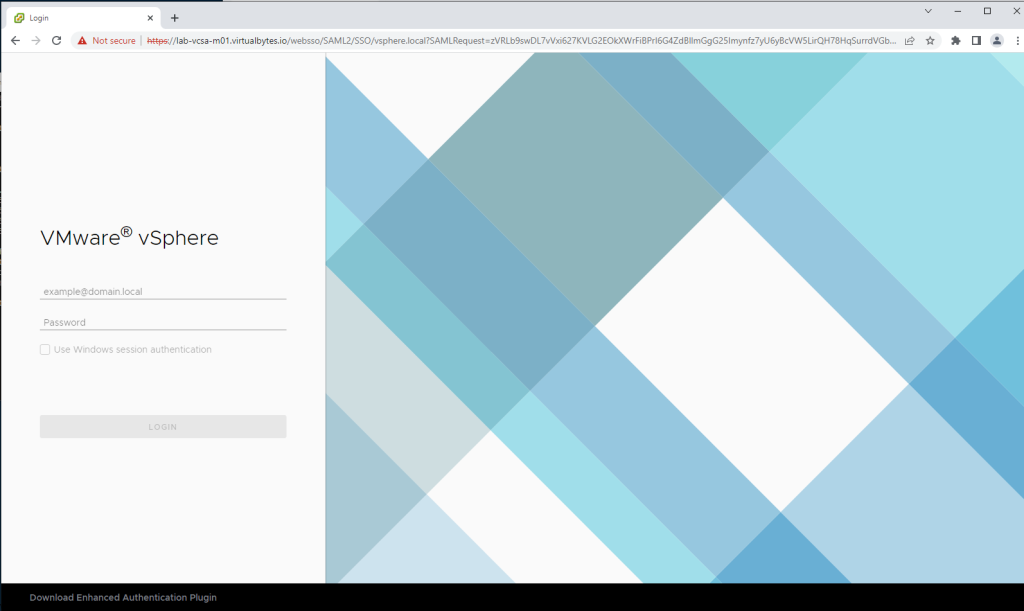
Now, that we have finalized the migration and the import to the target vCenter Server is done, we will log into the new vCSA appliance.

Login with your ” [email protected]”

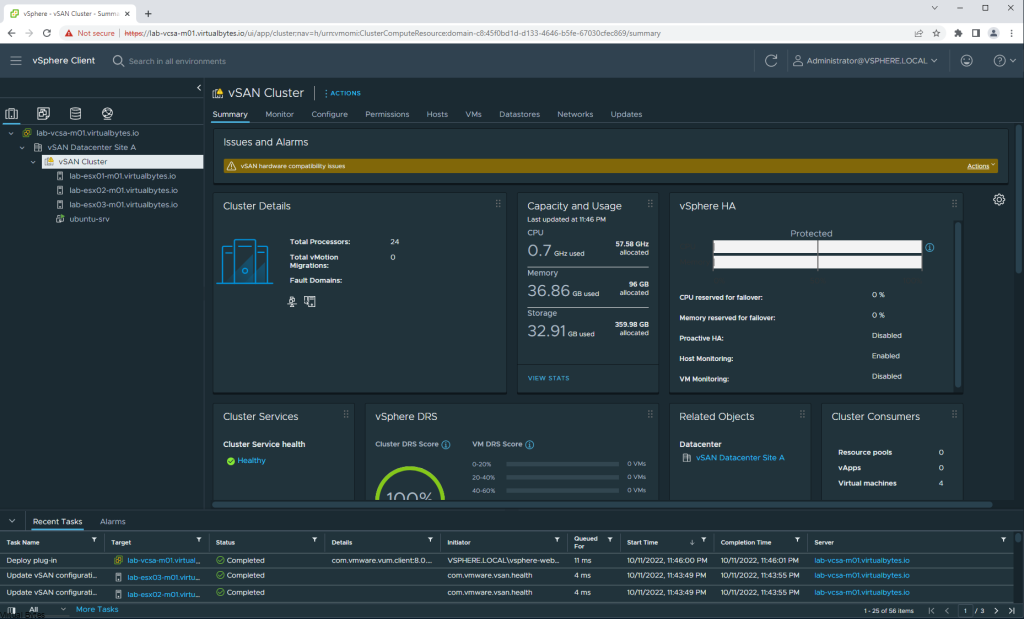
Now, you shall see that our vCenter Server is at vSphere 8. Next we will be creating a Baseline within vSphere Life Cycle Manager to upgrade our Hosts.

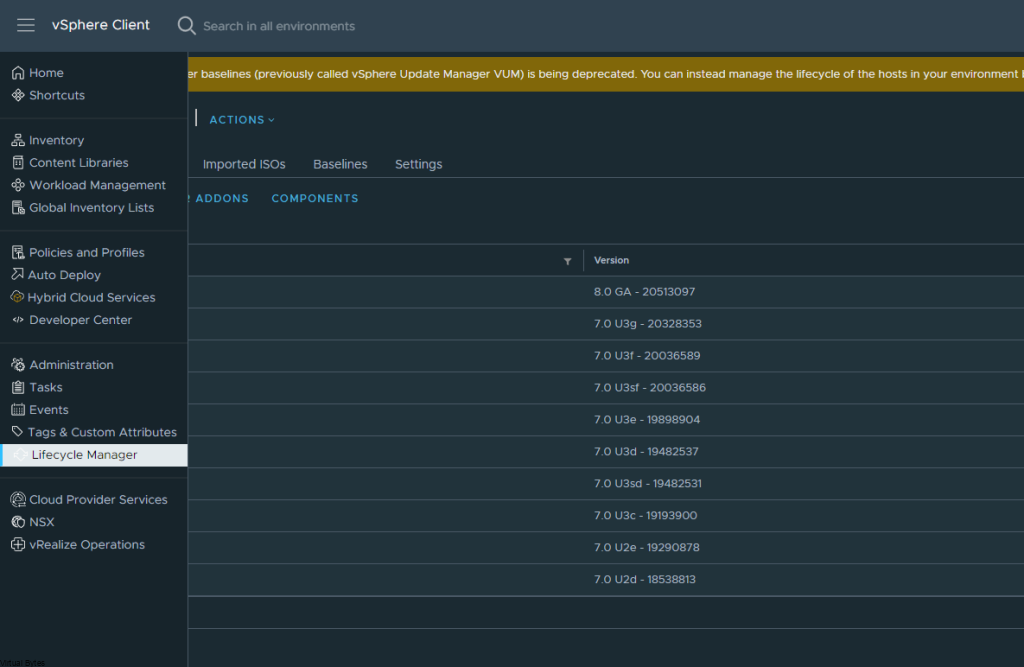
Click on the top right hamburger menu -> Life Cycle Manager

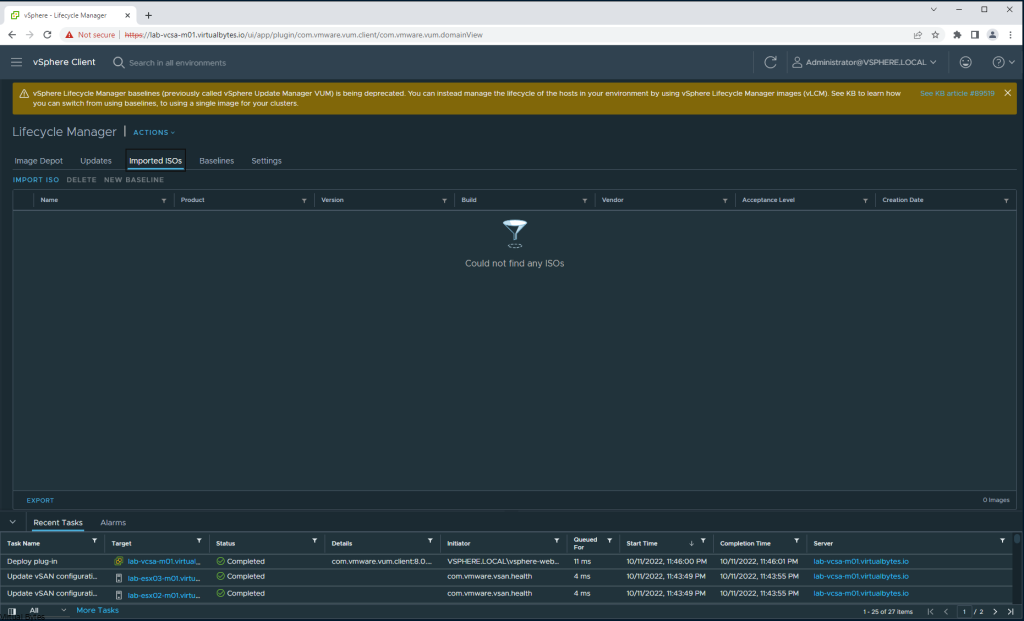
Go to Imported ISOs ->

Now we will upload our vSphere 8 ISO – > VMware-VMvisor-Installer-8.0-20513097.x86_64.iso

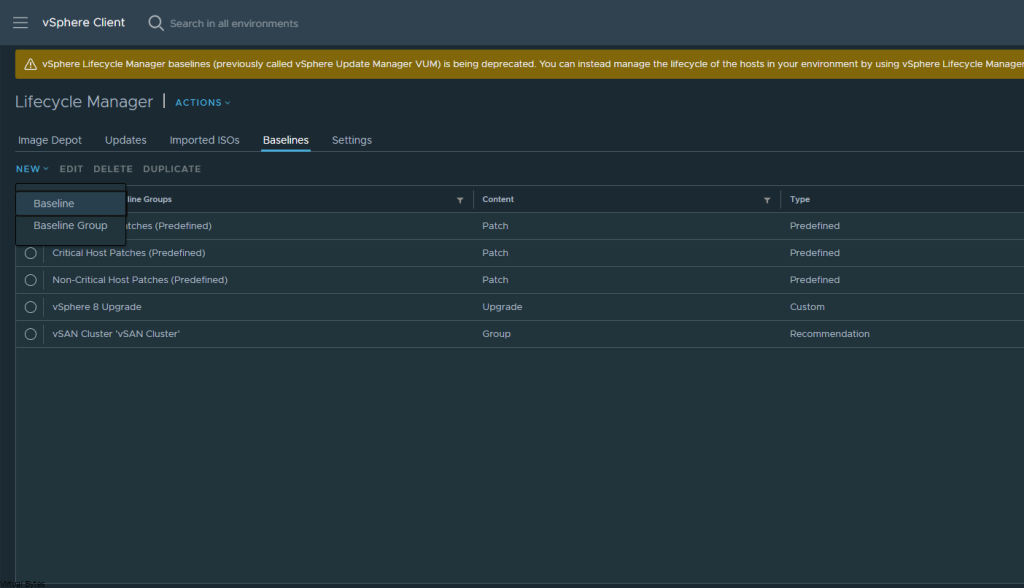
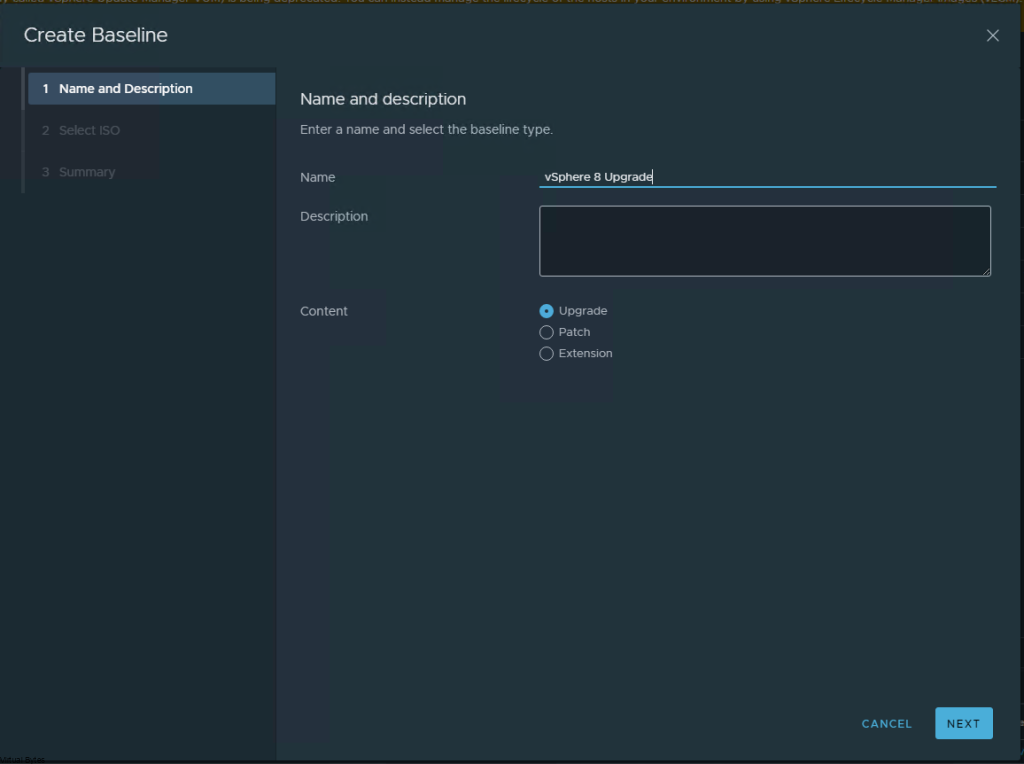
Once it is uploaded, we will go and create a Baseline for our new Image to upgrade the ESXi hosts from ESXi 7 to 8

Then go “Baselines” -> New -> Baseline

Now we will create a name for our baseline -> vSphere 8 Upgrade

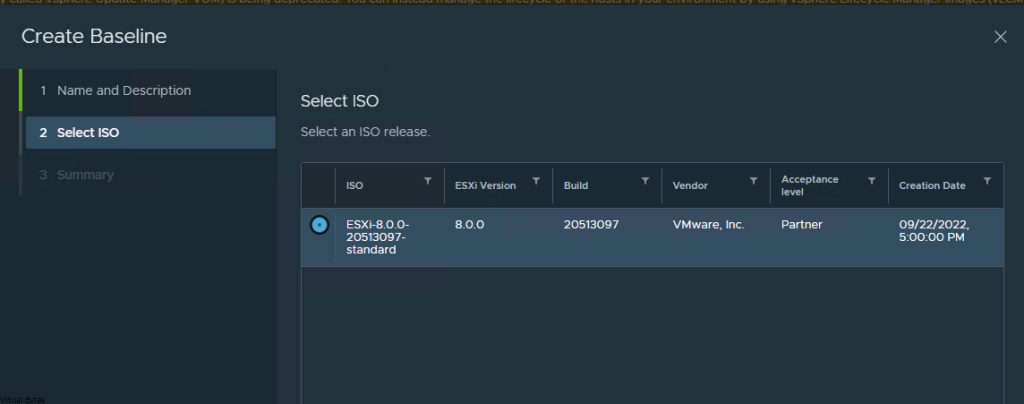
Attach the vSphere 8.0 iso we just uploaded earlier to this baseline.

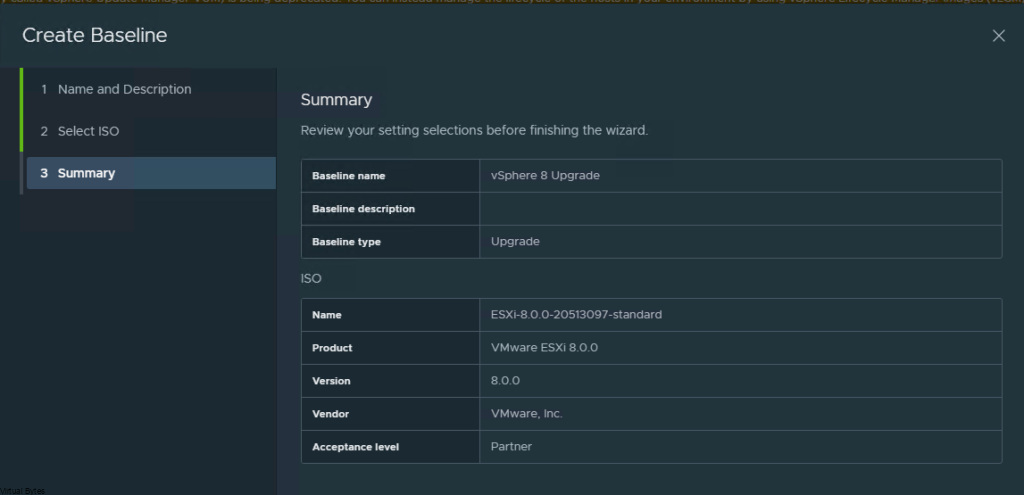
Finalize the Creation of the vSphere 8 Upgrade baseline

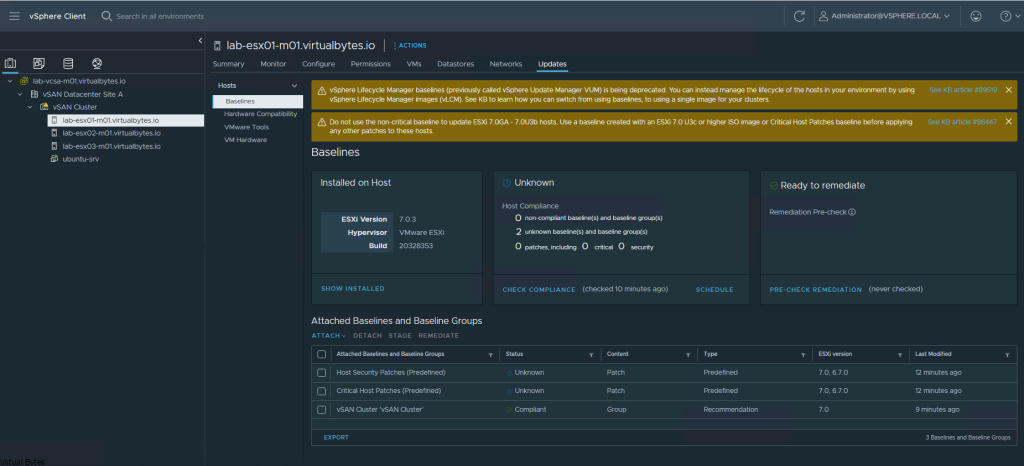
Then go back to the ESXi host object, and go to Updates tab

Here we will attach the vSphere 8 Upgrade Baseline we created

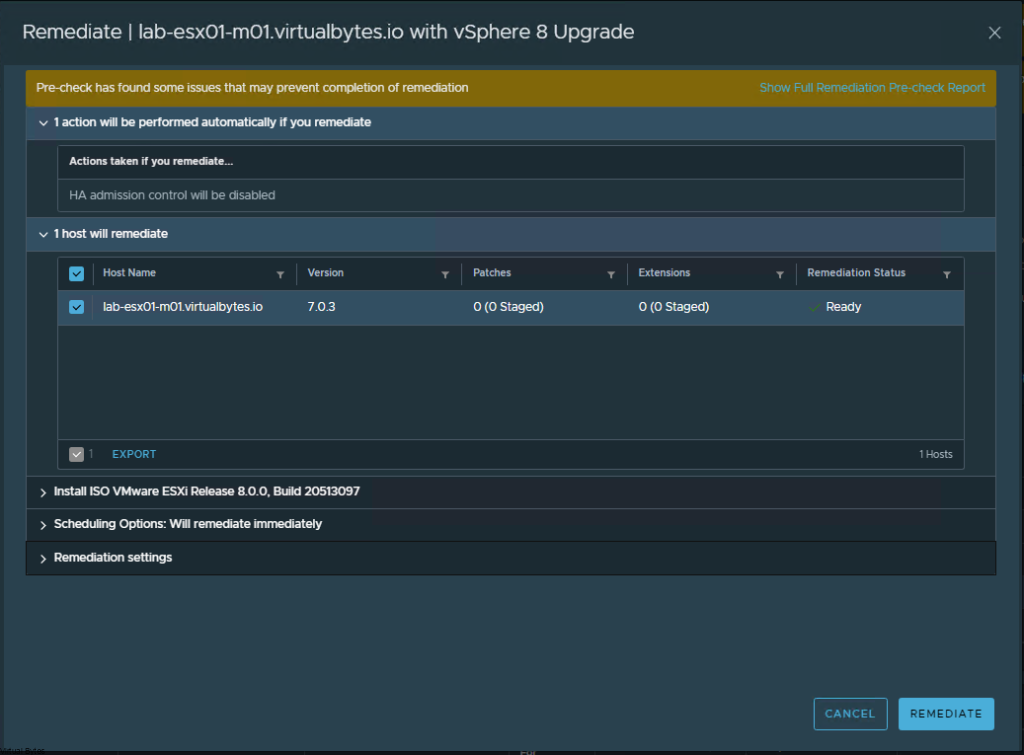
Once the ESXi host has the new vSphere 8 baseline attached, you can now Remediate the host, and then repeat the vLCM (vSphere Life Cycle Manager) Baseline attach to the rest of your hosts and then follow the traditional Remediation process that way your ESXi hosts properly migrate workloads off to other ESXi hosts during this process to ensure that you won’t have any downtime.

Web console view of our ESXi host that just got upgraded!!

Our first ESXi host has been upgraded to vSphere 8!

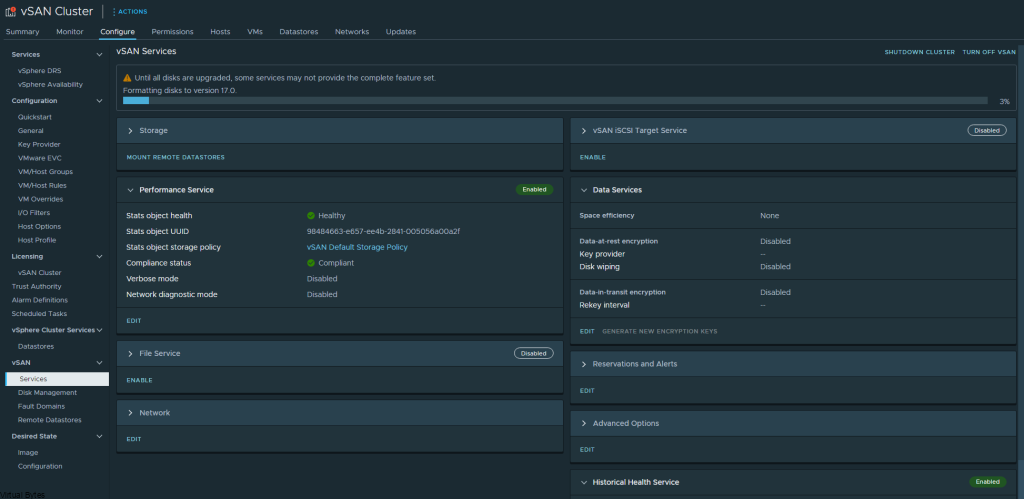
Next, after all our ESXi hosts are on vSphere 8, we will want to make sure that our vSAN version is upgraded so you will want to upgrade it.

Go to your vSAN Cluster -> Configure -> Services

Once you get to vSAN Services, you will see Pre-Check vSAN upgrade and Upgrade vSAN. A proper best practice is to do a pre-check of your vSAN cluster to ensure that all the objects are healthy and synchronized and there are not disk issues before doing a vSAN upgrade.

After vSAN upgrade – Your vSphere Cluster is now officially upgraded to vSphere 8! with vSAN 8! This walkthrough was able to walk you through any issues that you may encounter. Next blog post will be on how to convert a vSAN (OSA) Datastore to vSAN (ESA) – Express Storage Architecture

October 12, 2022 0 comments 28.8K views
6 FacebookTwitterLinkedinEmail
VMware vCenter

vCenter 7.0 Install with vSAN

by Tommy Grot February 6, 2021
written by Tommy Grot 4 minutes read

Hello VBs! Todays topic will be on installing vCenter onto a vSAN cluster, whether it is a all flash or a mixed capacity cluster with some spindles and 1 SSD for caching. There are some requirements you will need to have a vSAN cluster, which requires minimum 3 nodes or 2 + 1 witness node which resides on a non vSAN cluster. For this walkthrough we will be concentrating on only a 3 node cluster for vSAN!

Below – is the requirements pulled from VMware

Storage ComponentRequirements
CacheOne SAS or SATA solid-state disk (SSD) or PCIe flash device.Before calculating the Primary level of failures to tolerate, check the size of the flash caching device in each disk group. Verify that it provides at least 10 percent of the anticipated storage consumed on the capacity devices, not including replicas such as mirrors.vSphere Flash Read Cache must not use any of the flash devices reserved for vSAN cache.The cache flash devices must not be formatted with VMFS or another file system.
Virtual machine data storageFor hybrid group configuration, make sure that at least one SAS, NL-SAS, or SATA magnetic disk is available.For all-flash disk group configuration, make sure at least one SAS, or SATA solid-state disk (SSD), or PCIe flash device.
Storage controllersOne SAS or SATA host bus adapter (HBA), or a RAID controller that is in passthrough mode or RAID 0 mode.

Memory

The memory requirements for vSAN depend on the number of disk groups and devices that the ESXi hypervisor must manage. Each host must contain a minimum of 32 GB of memory to accommodate the maximum number of disk groups (5) and maximum number of capacity devices per disk group (7).

Flash Boot Devices

During installation, the ESXi installer creates a coredump partition on the boot device. The default size of the coredump partition satisfies most installation requirements.

  • If the memory of the ESXi host has 512 GB of memory or less, you can boot the host from a USB, SD, or SATADOM device. When you boot a vSAN host from a USB device or SD card, the size of the boot device must be at least 4 GB.
  • If the memory of the ESXi host has more than 512 GB, you must boot the host from a SATADOM or disk device. When you boot a vSAN host from a SATADOM device, you must use single-level cell (SLC) device. The size of the boot device must be at least 16 GB.

Now, we will install vCenter, once the ISO has mounted and you startup the executable file. You will see this below.

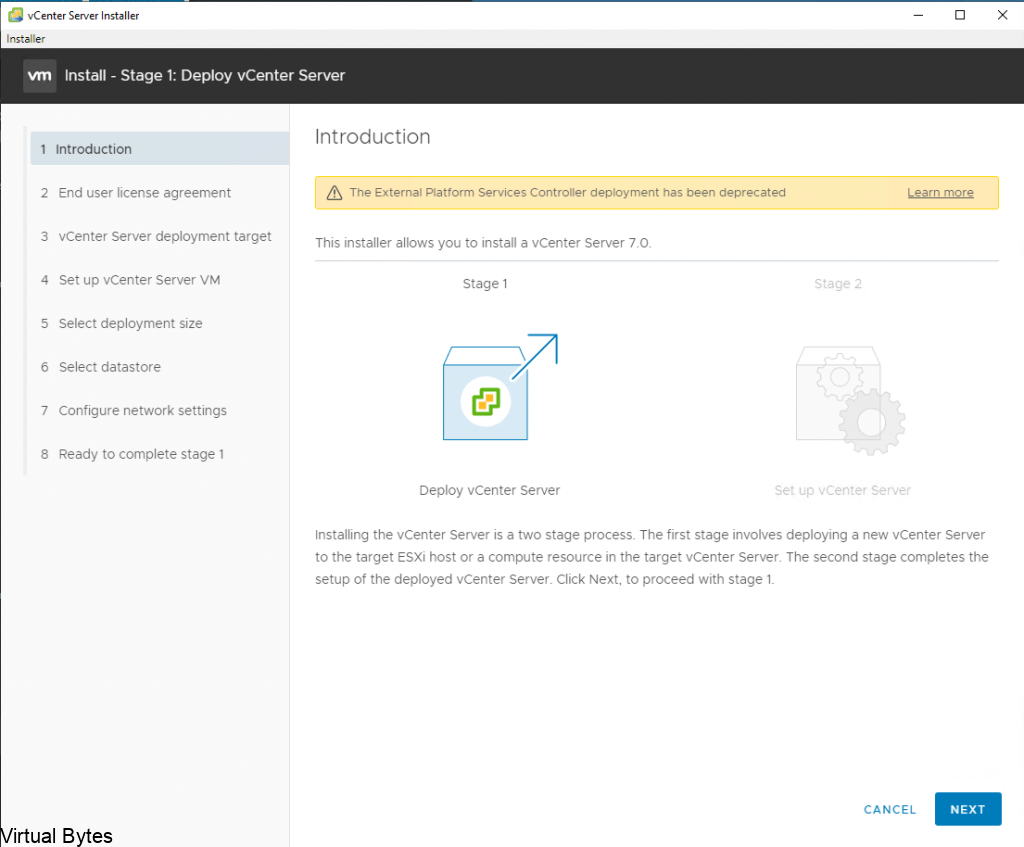
The Platform Service Controller has been deprecated in these new installs of vCenter, which if your setup does have a PSC, it is recommended to upgrade or rebuild a brand new vCenter install.

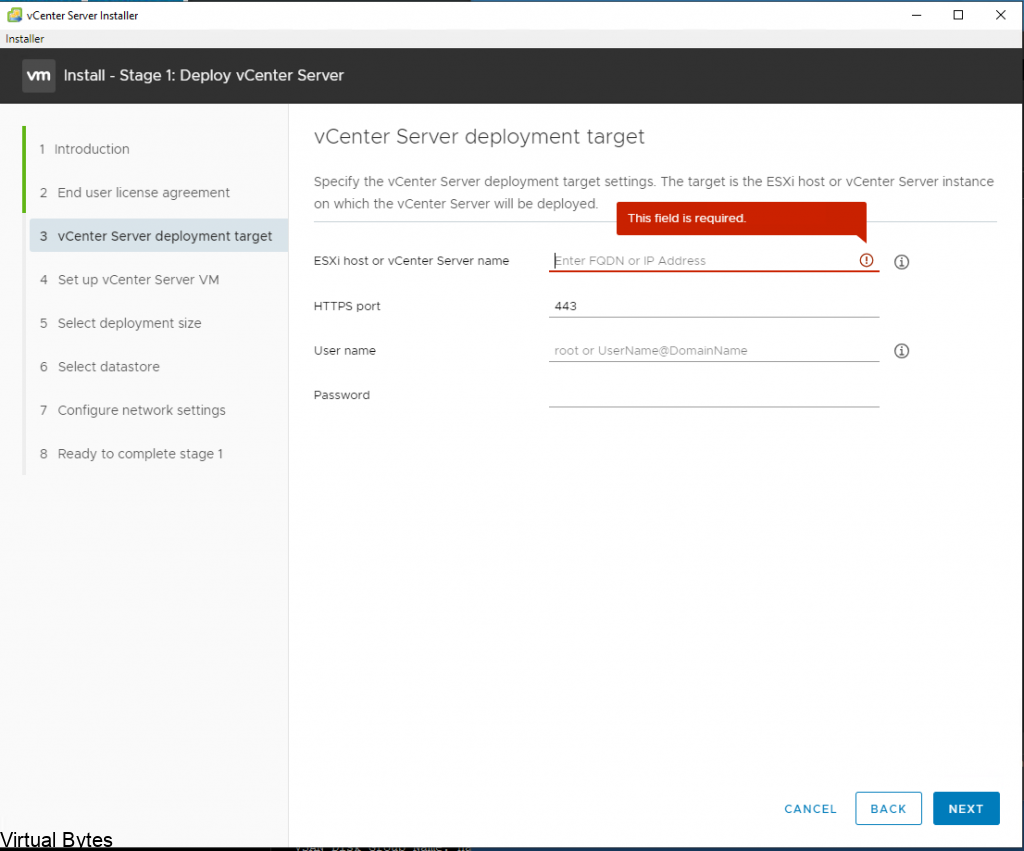
Specify the VMware ESXi Host or vCenter IP Address – Example – 10.0.0.100 or DNS Name – esxi01.virtualbytes.io ; vcenter.virtualbytes.io

( VMware recommends to operate its platform with DNS names, this allows easier management and IP address modifications )

After all proper information is configured / documented – Click Next

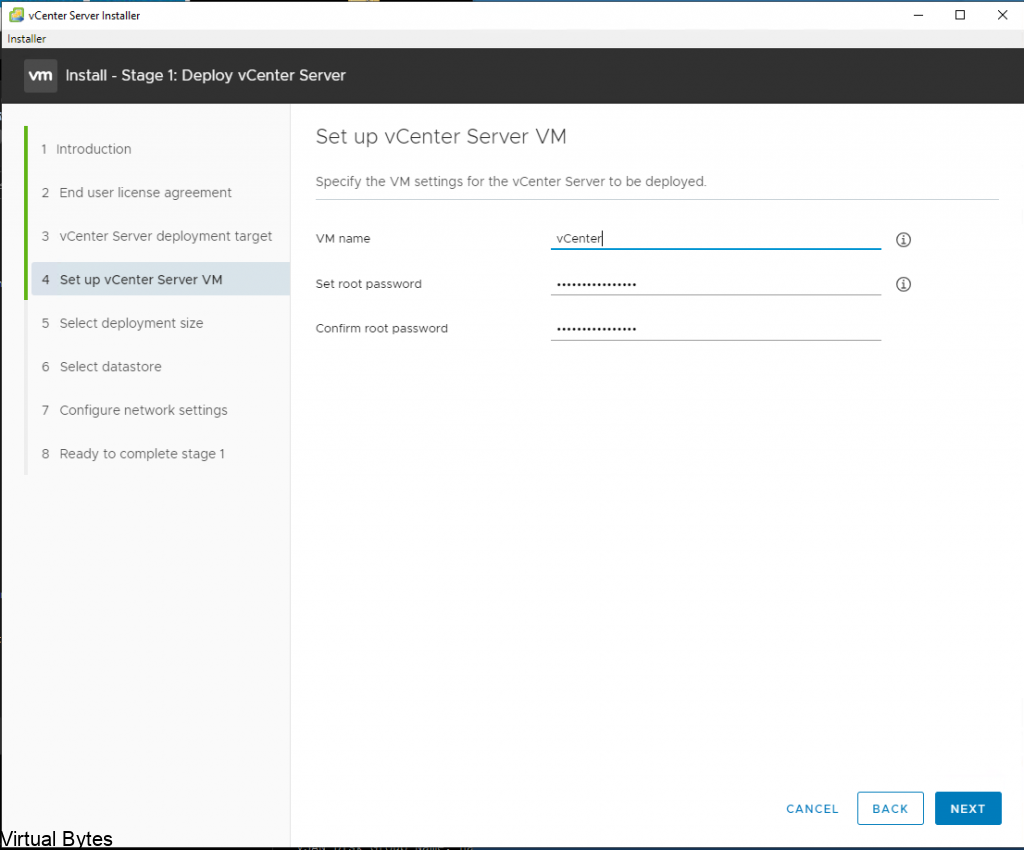
Setup the appliance –

  • Specify a name for your vCenter Server (ex. vCenter, VCSA, etc)
  • Specify the VCSA root password ( If you do lose this password there is a step by step procedure to recover access)

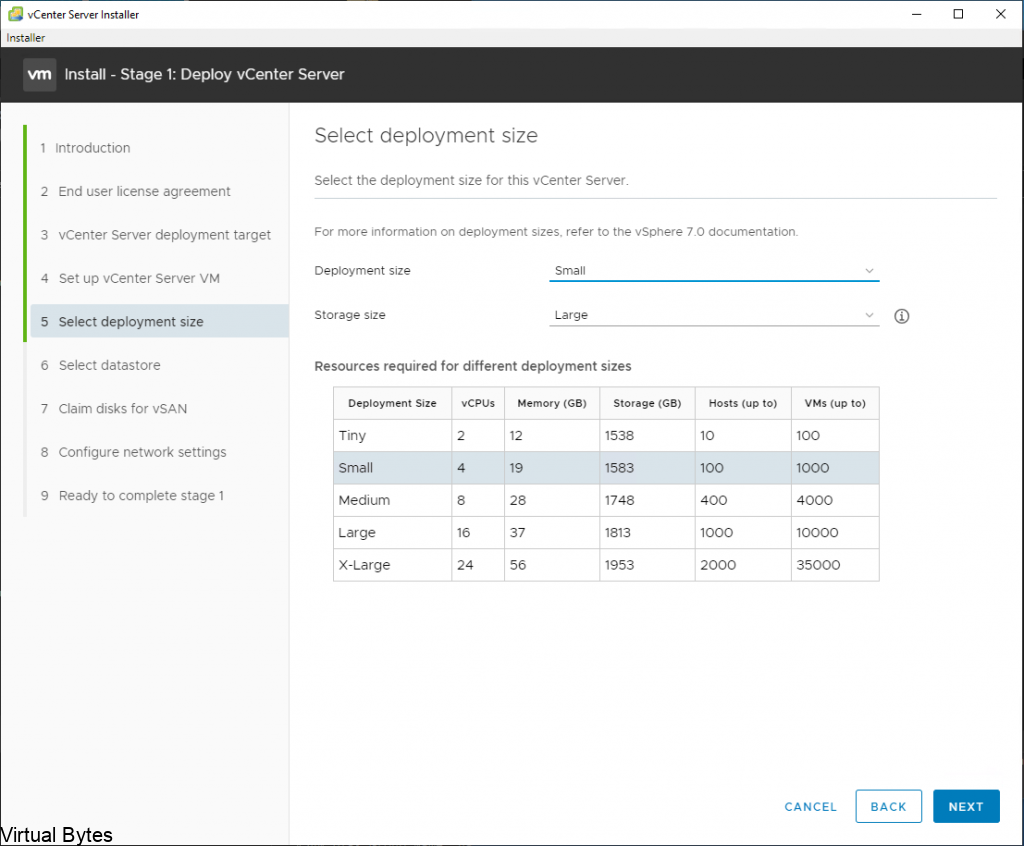
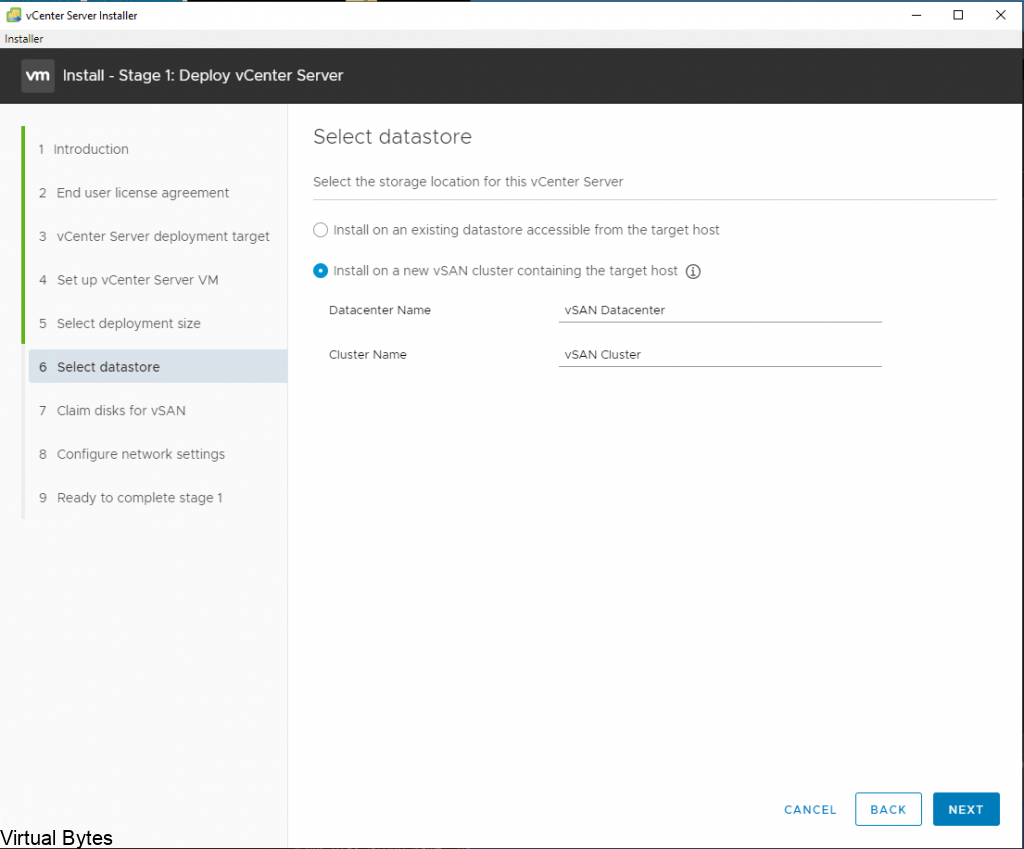
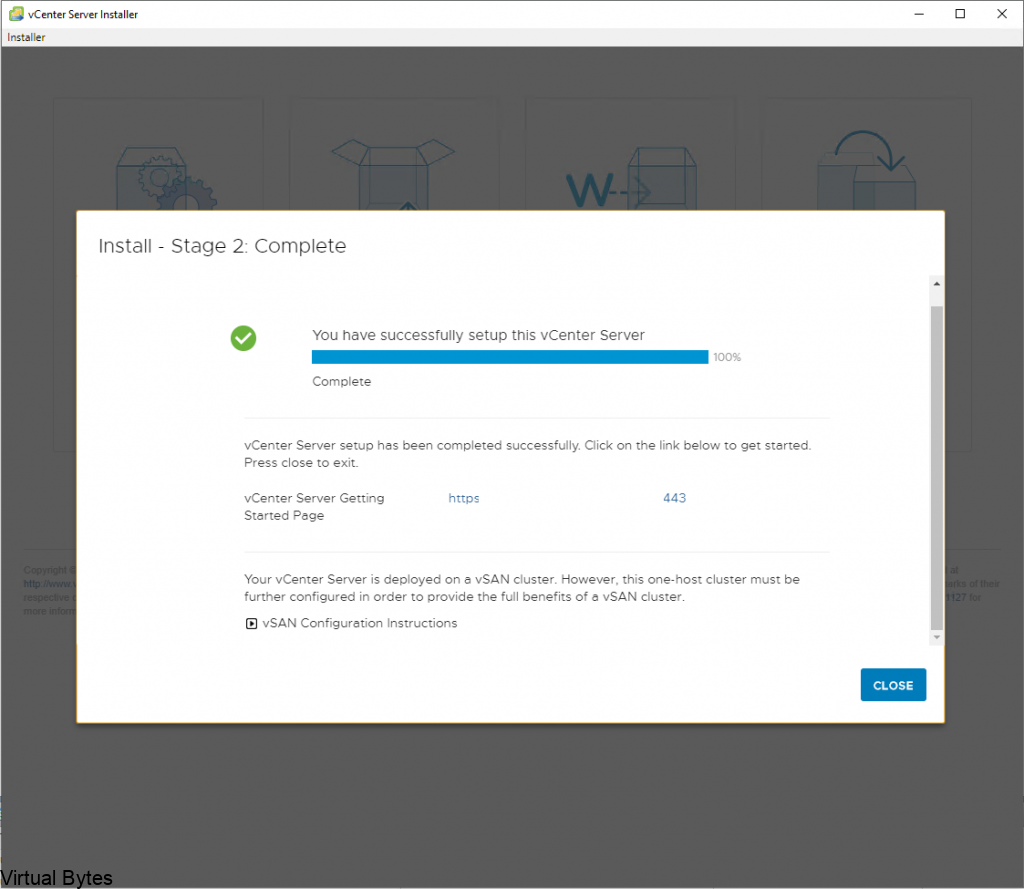
During this Stage 1 – Here you can specify the VCSA installation to the specified datastore. vCenter will be installed on a vSAN Cluster, this installation will install on a single host, once you have setup vCenter and log into vCenter you will see a vSAN datastore, this is not a complete setup! You will need to add additional two ESXi hosts and setup the rest of the vSAN cluster to have data protection.

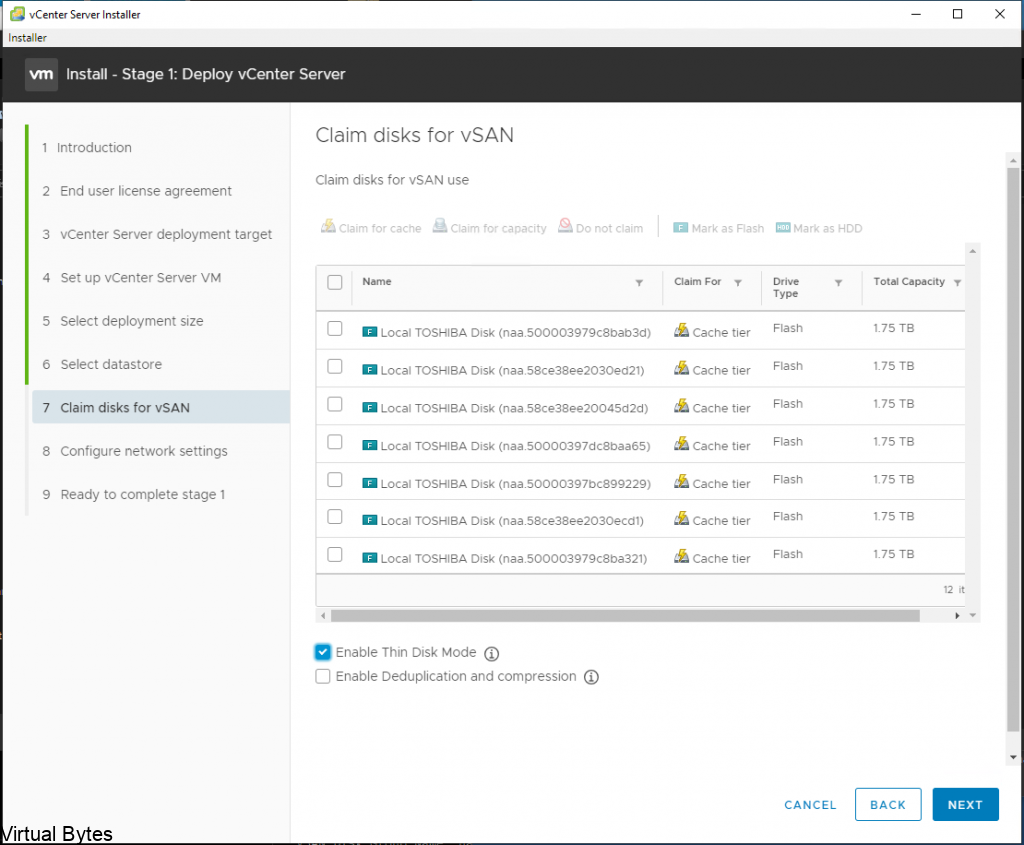
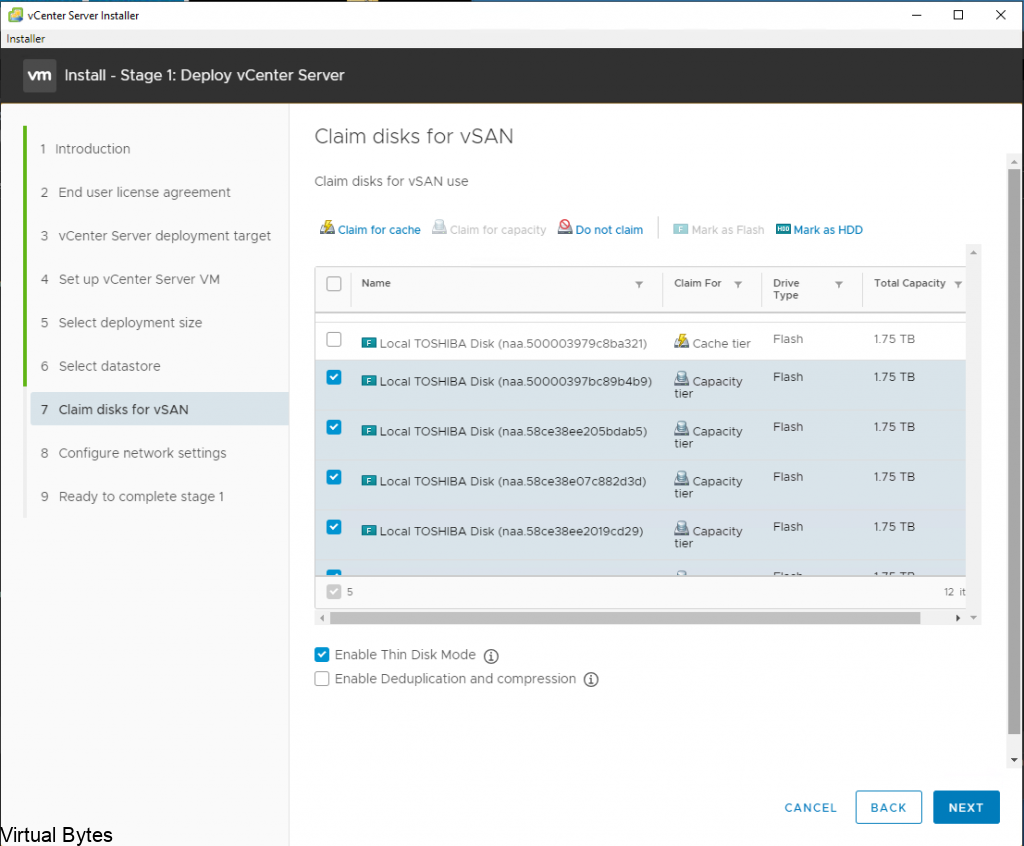
In this step, you will be selecting the disks, which in this case each user will have different amount of disks, so you will want to created 2 disk groups that are evenly created for this installation.

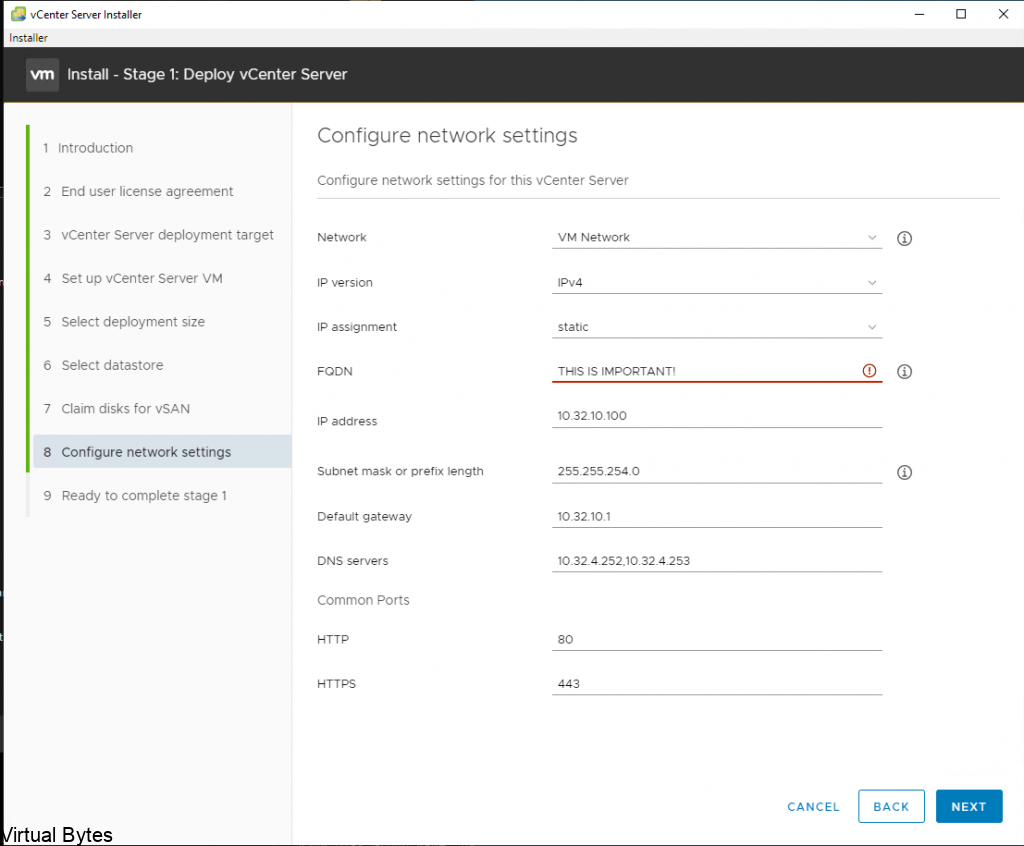
  • VMware recommends to install vCenter under a FQDN (Fully Qualified Domain Name) with a FQDN – this allows you to change the IP address of a VCSA.
    Be cautious of filling the “Configure network settings” page – This will lead to a inoperable vCenter instance.
  • Recommendation – Setup an ‘A’ Record on your local network DNS server or Domain Controller to point to the fresh new vCenter Server Appliance

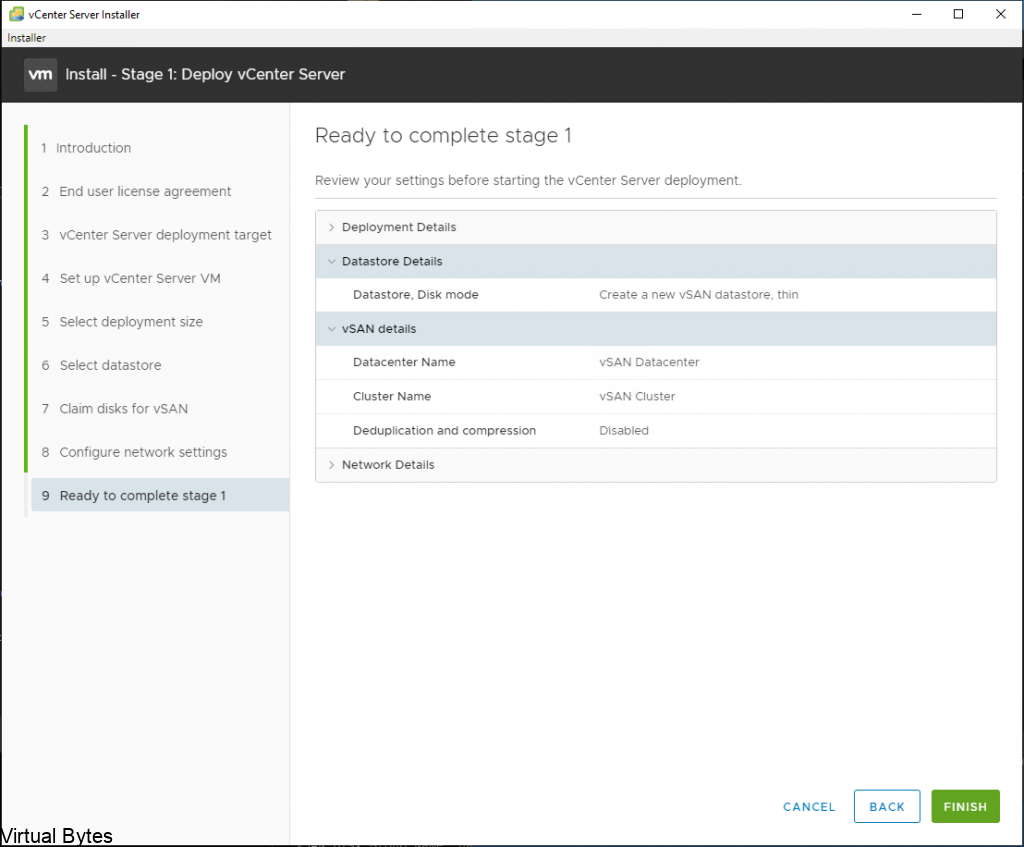
VERIFY! VERIFY! VERIFY! – If you do not verify your appliance deployment configuration and you mis-configure a setting – You will be reinstalling VCSA from scratch again. (BE CAREFUL!)

After you have verified all information – Click Next

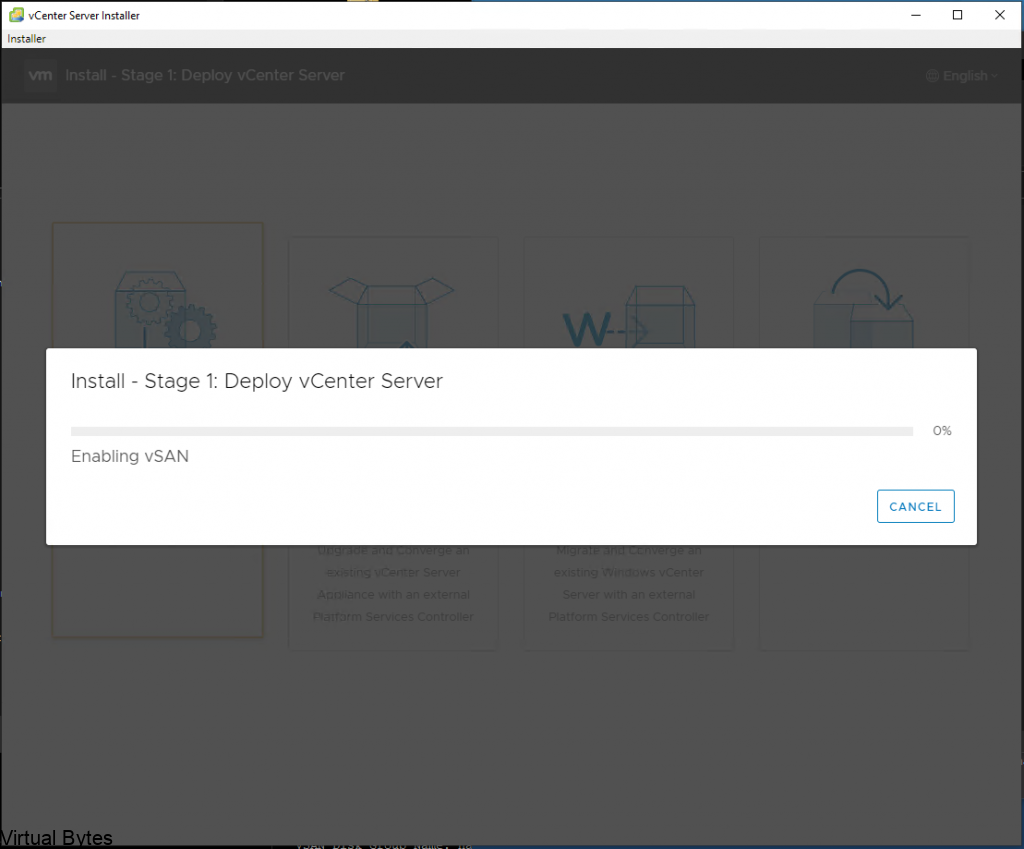
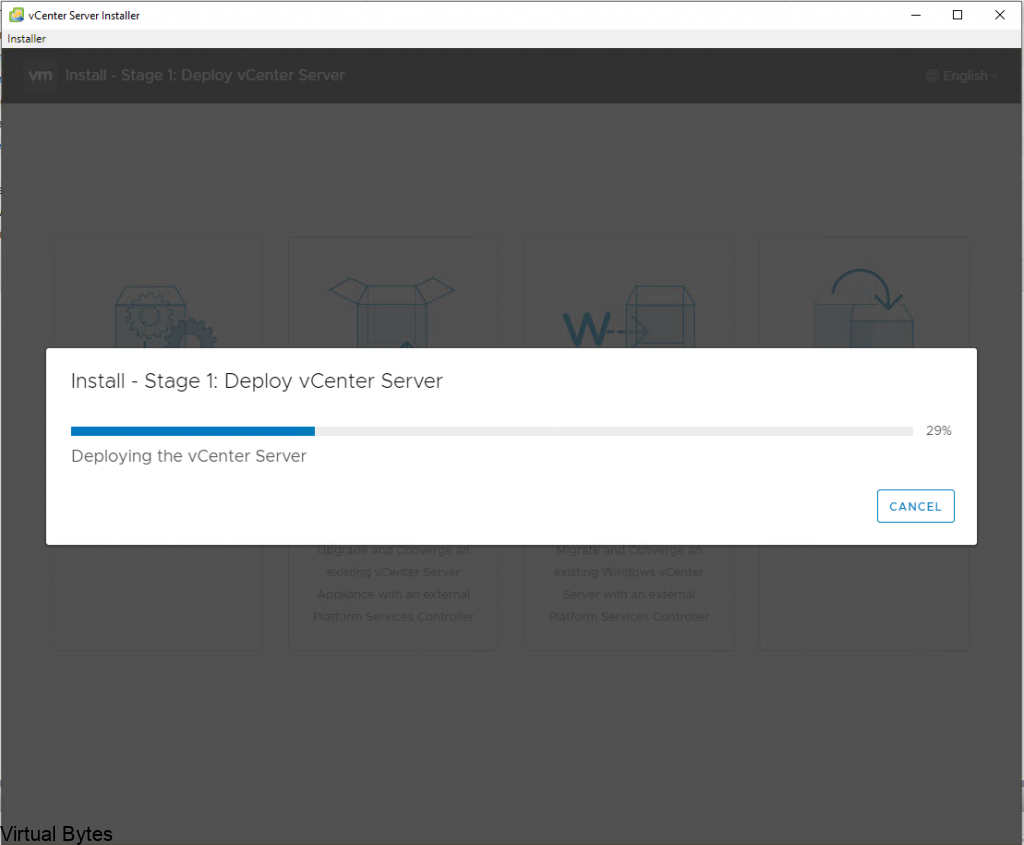
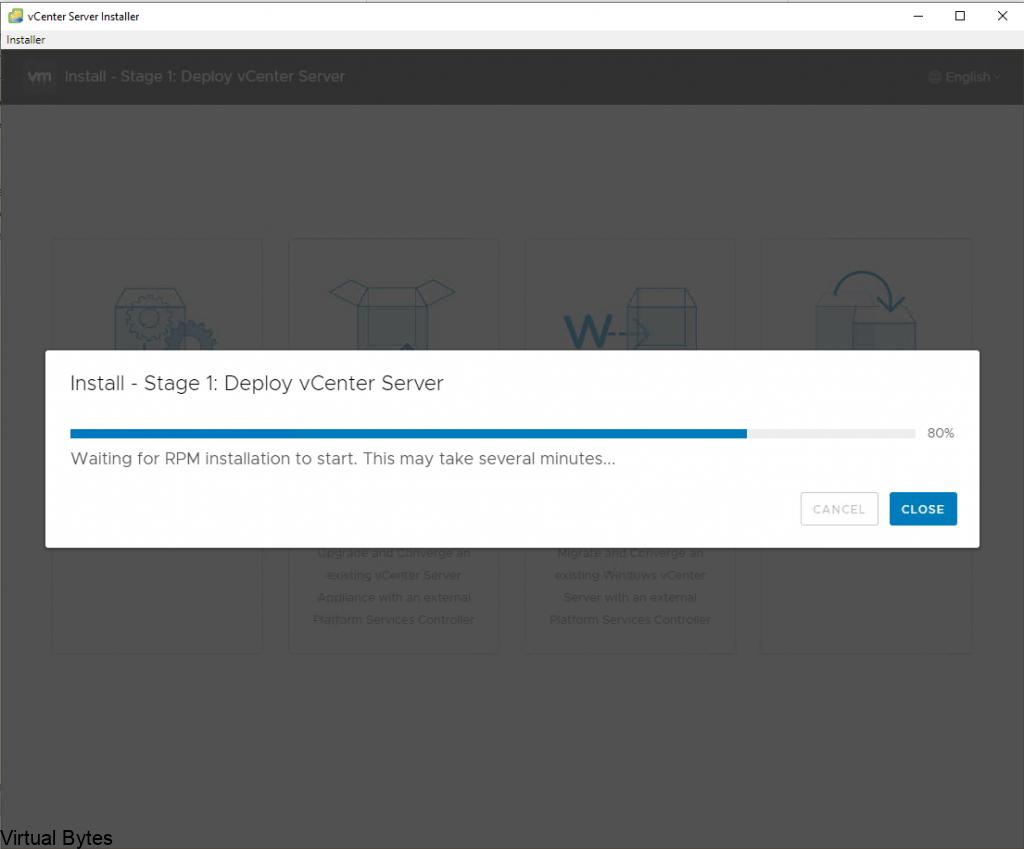
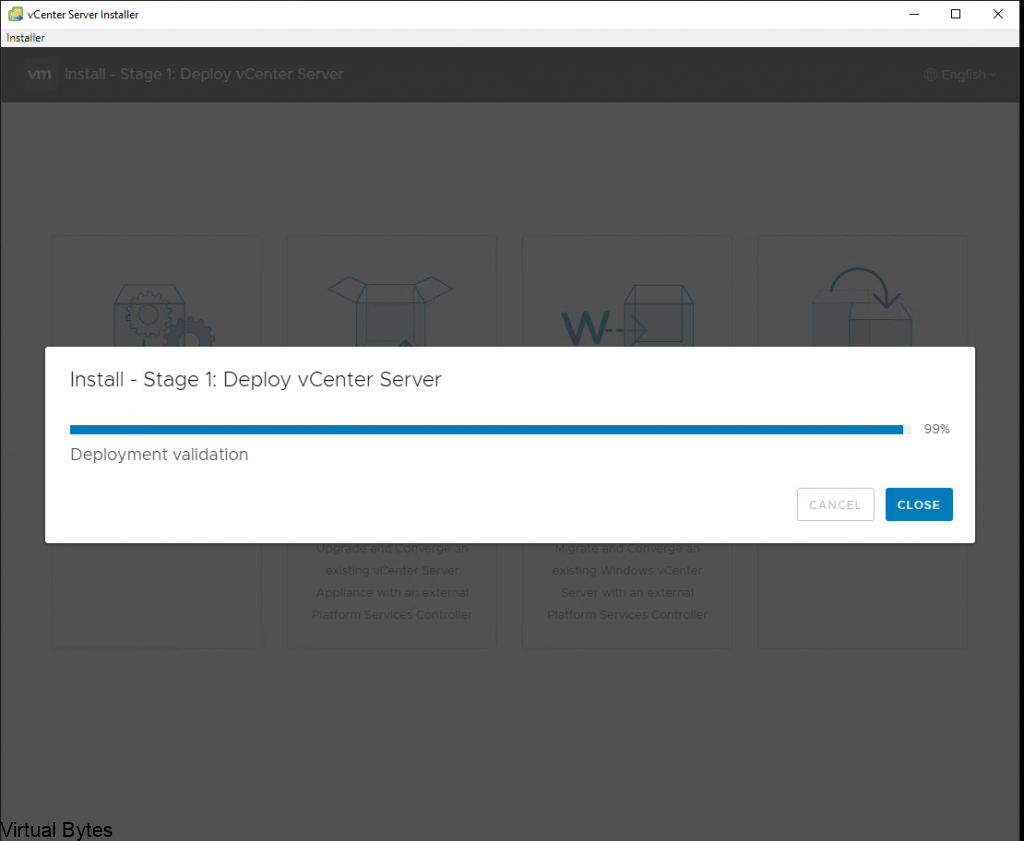
This stage will take few minutes – Grab a coffee or water! 🙂

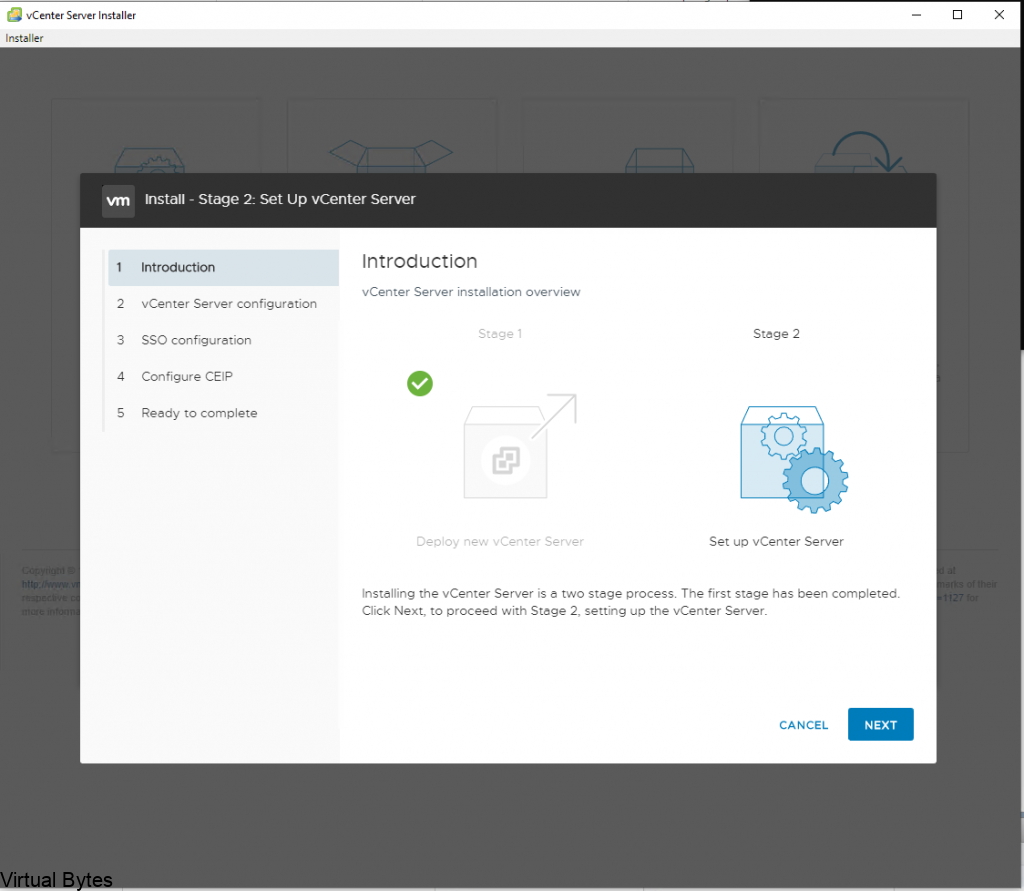
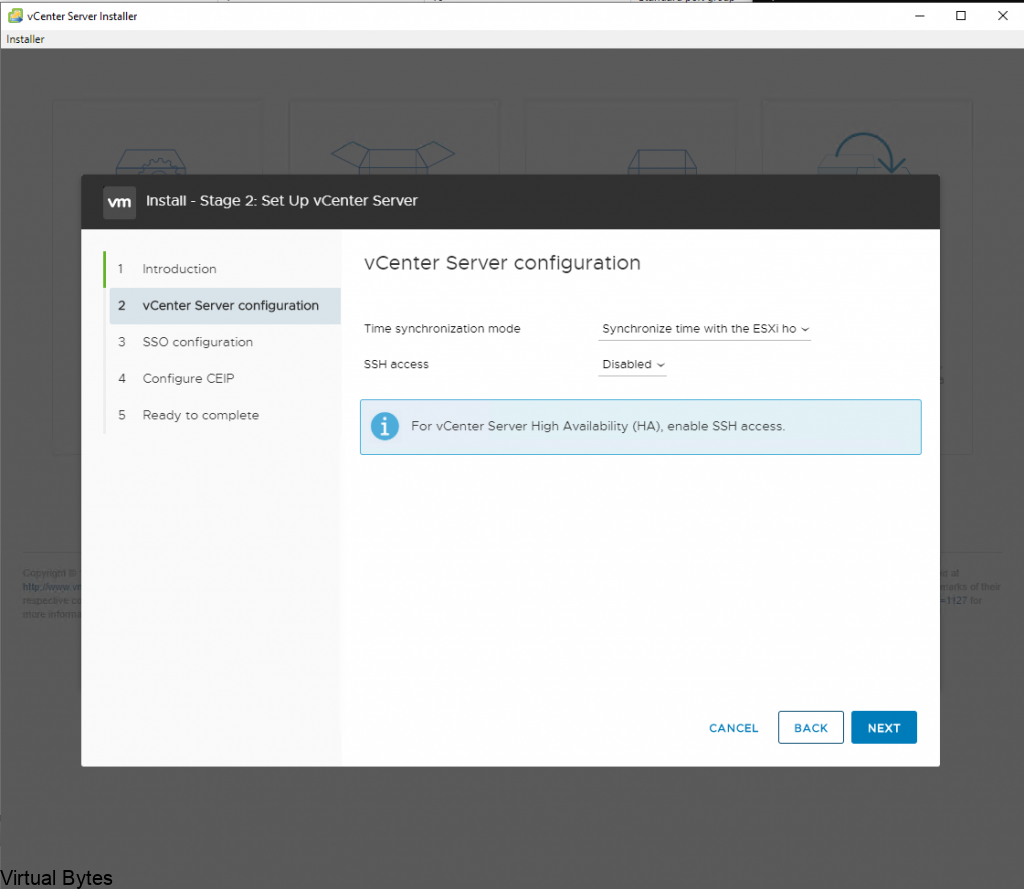
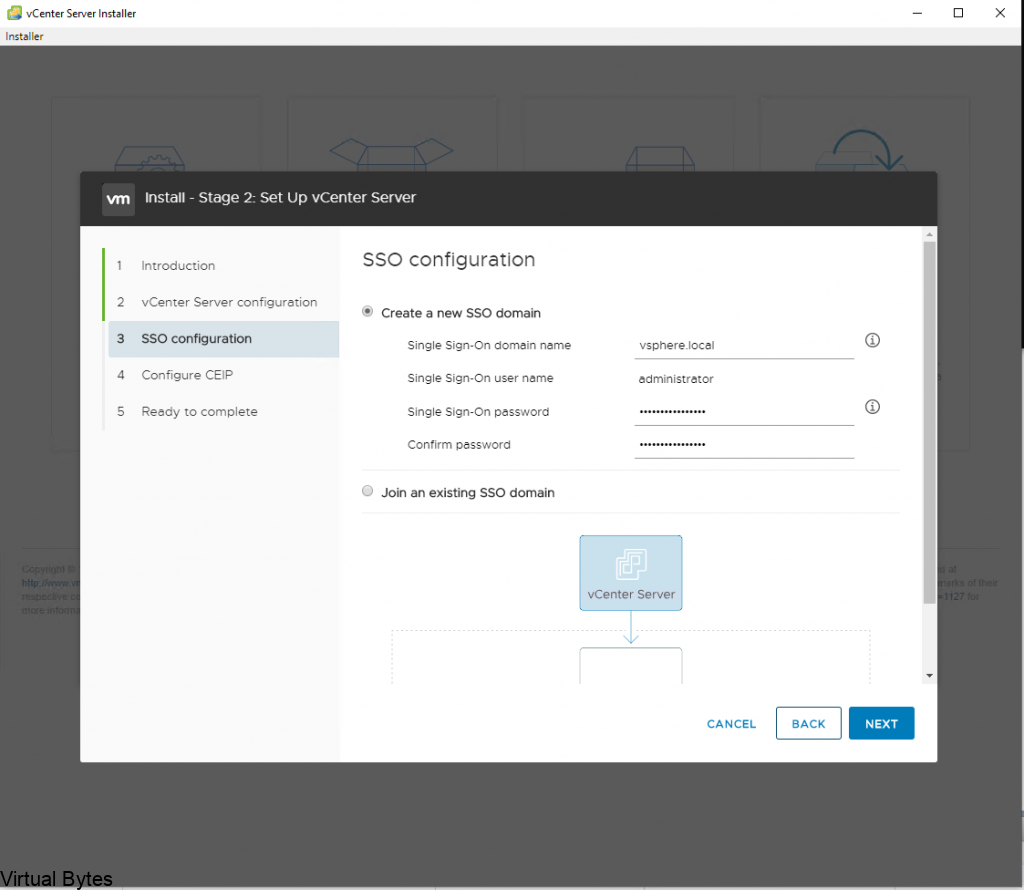
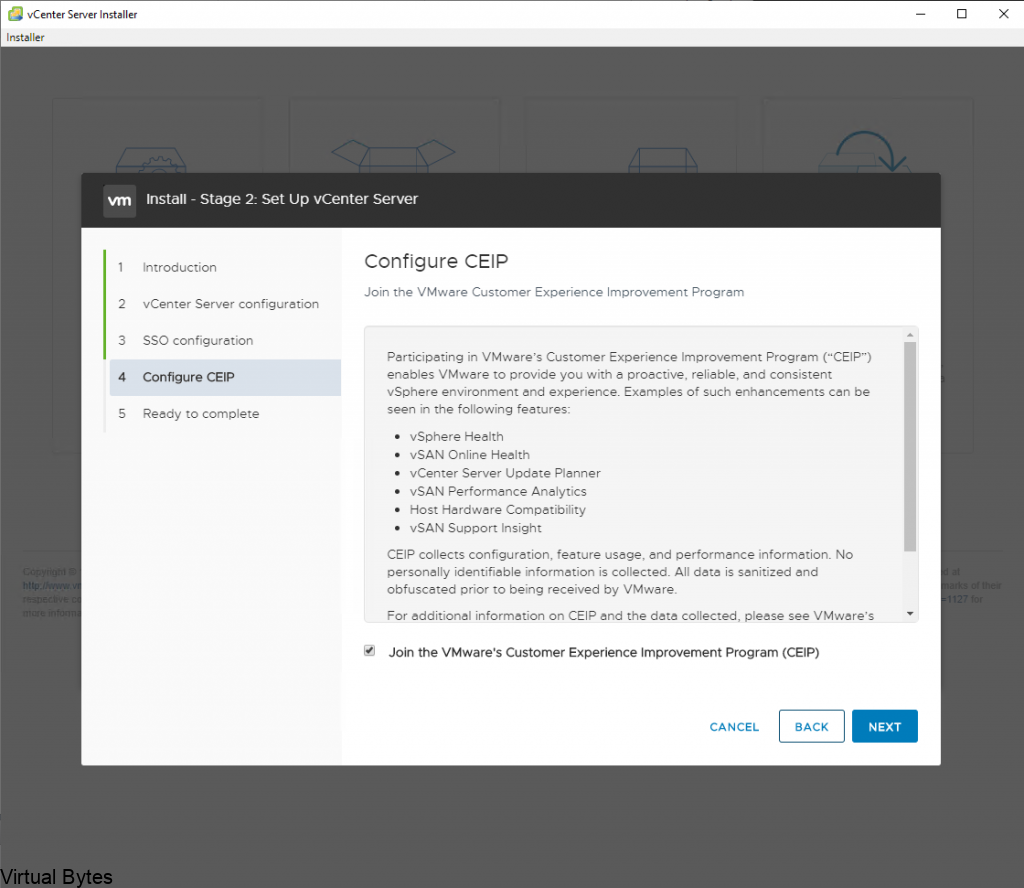
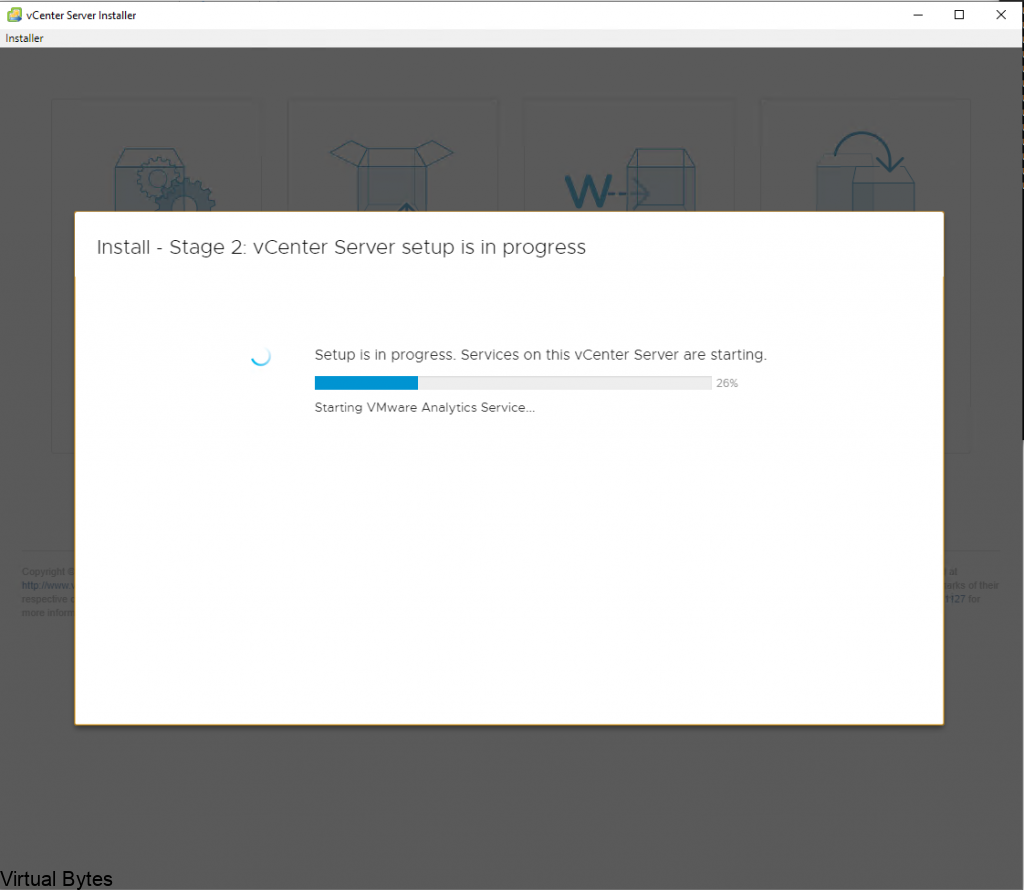
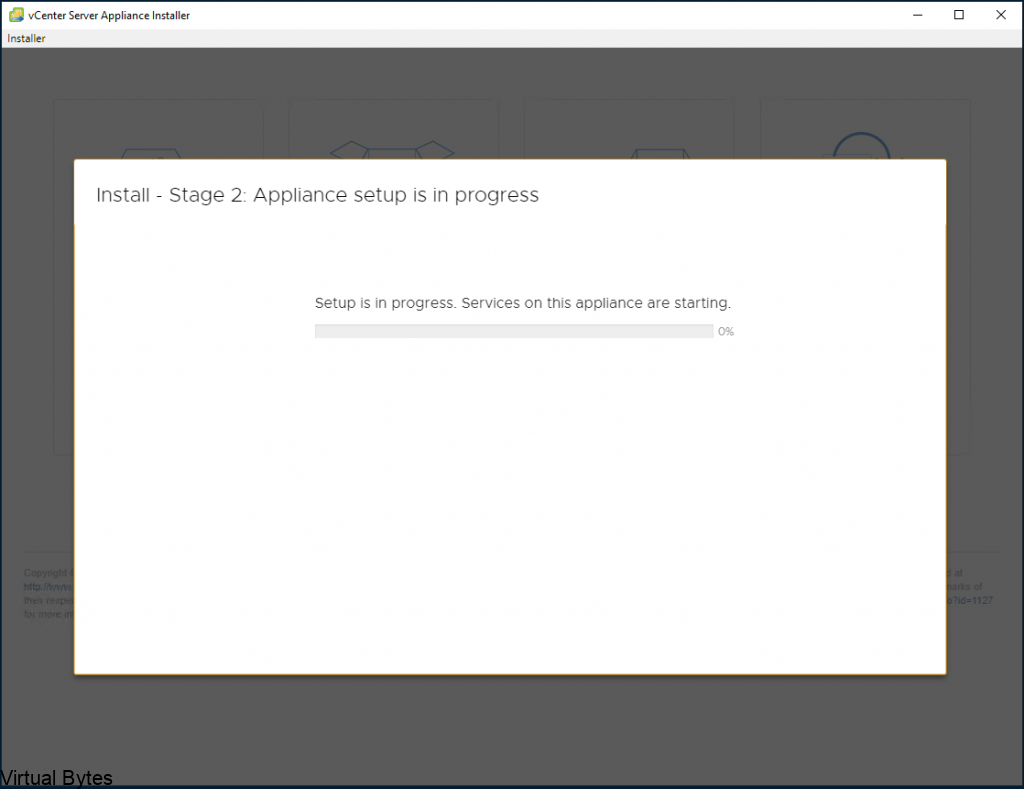
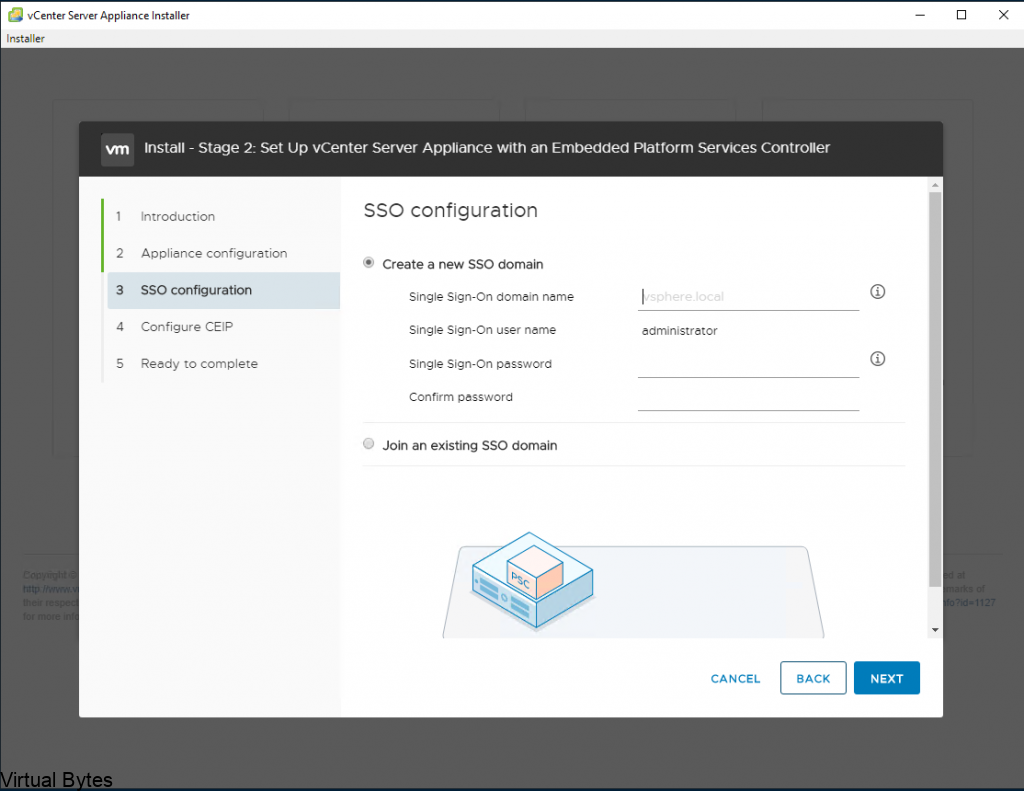
  • Stage 2 – This stage you will get to configure the Appliance configuration such as (SSH, SSO, CEIP)
  • SSH – is recommend to be turned off for security reasons, unless you are setting up more than one vCenter server and setting up vCenter High Availability
  • SSO – the single sign on, the default is vsphere.local, if you have a on premise domain controller, make sure you do not use the same domain name, this will prevent you from adding vCenter to the Active Directory domain forest.
February 6, 2021 0 comments 2.9K views
0 FacebookTwitterLinkedinEmail
VMware vCenter

VMware vCenter 7 Update 1 – Installation Walkthrough

by Tommy Grot October 6, 2020
written by Tommy Grot 3 minutes read


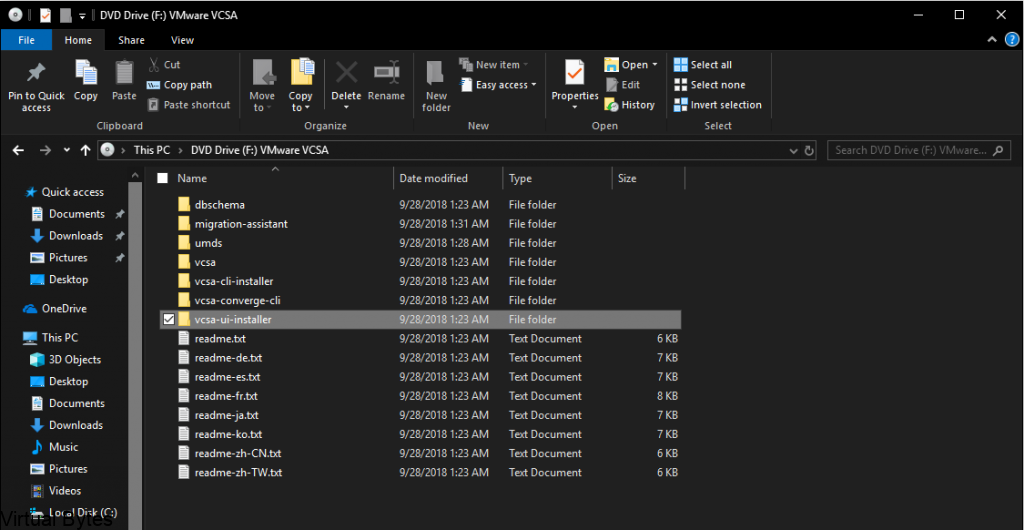
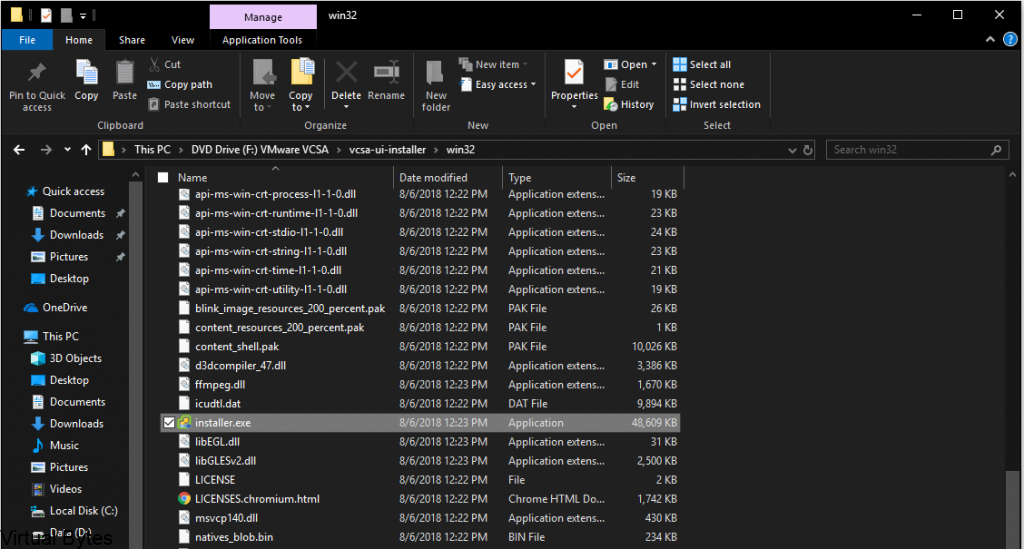
To Install vCenter 7.0 Update 1 with Embedded Platform Service Controller – Download the ISO from VMware (login will be required) Once downloaded, open the VMware VCSA.iso

  • Select vcsa-ui-installer folder
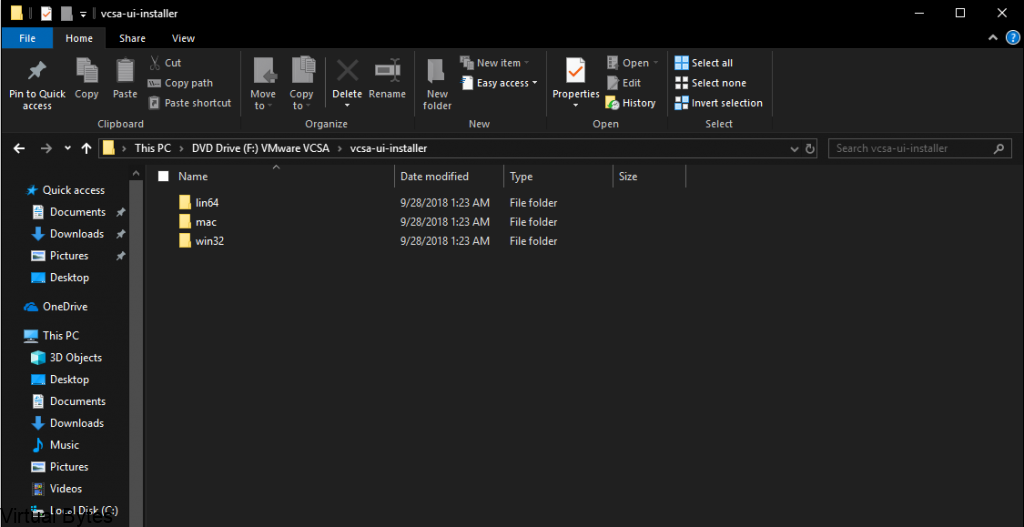
  • Then select choice of operating system (This tutorial is completed via Windows 10)
  • After going to win32
  • Then click on installer.exe

During this install we will be installing fresh new instance of VCSA.

  • Select Install

This installation now only offers Embedded Platform Services Controller. The External Platform Service Controller topology is depreciated model per VMware

Click Next

  • Accept EULA

Specify the VMware ESXi Host or vCenter IP Address – Example – 10.0.0.100 or DNS Name – esxi01.virtualbytes.io ; vcenter.virtualbytes.io

( VMware recommends to operate its platform with DNS names, this allows easier management and IP address modifications )

  • After all proper information is configured / documented – Click Next
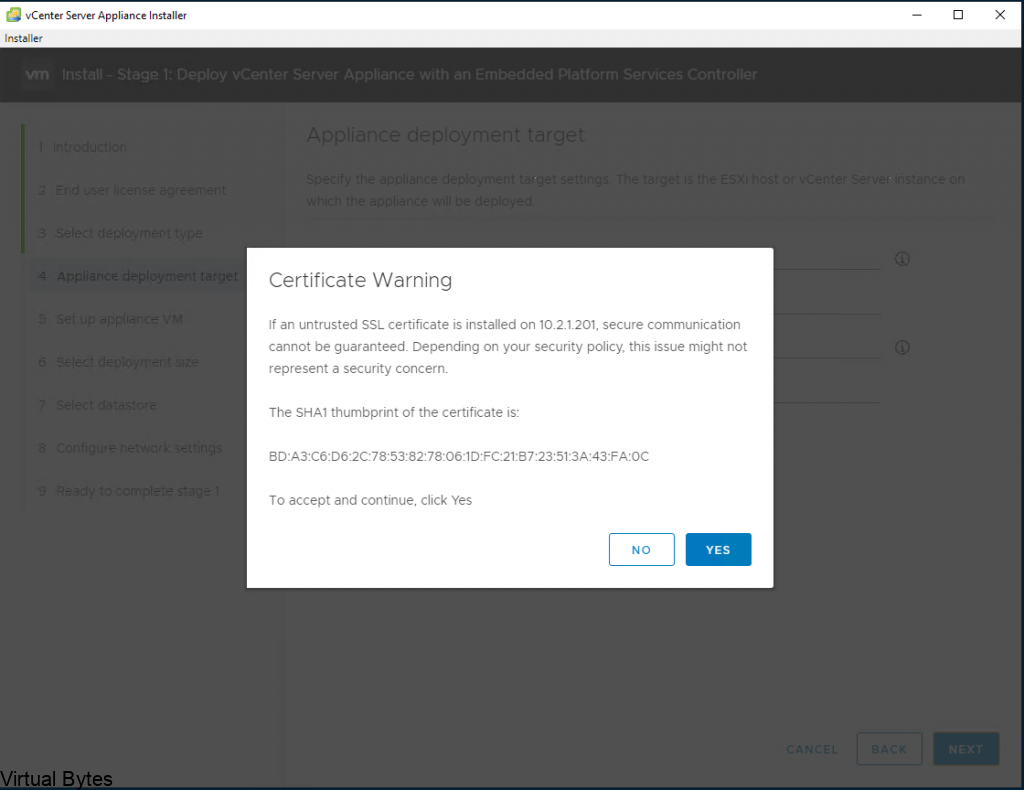
  • Accept the Certificate Warning from the ESXi Host
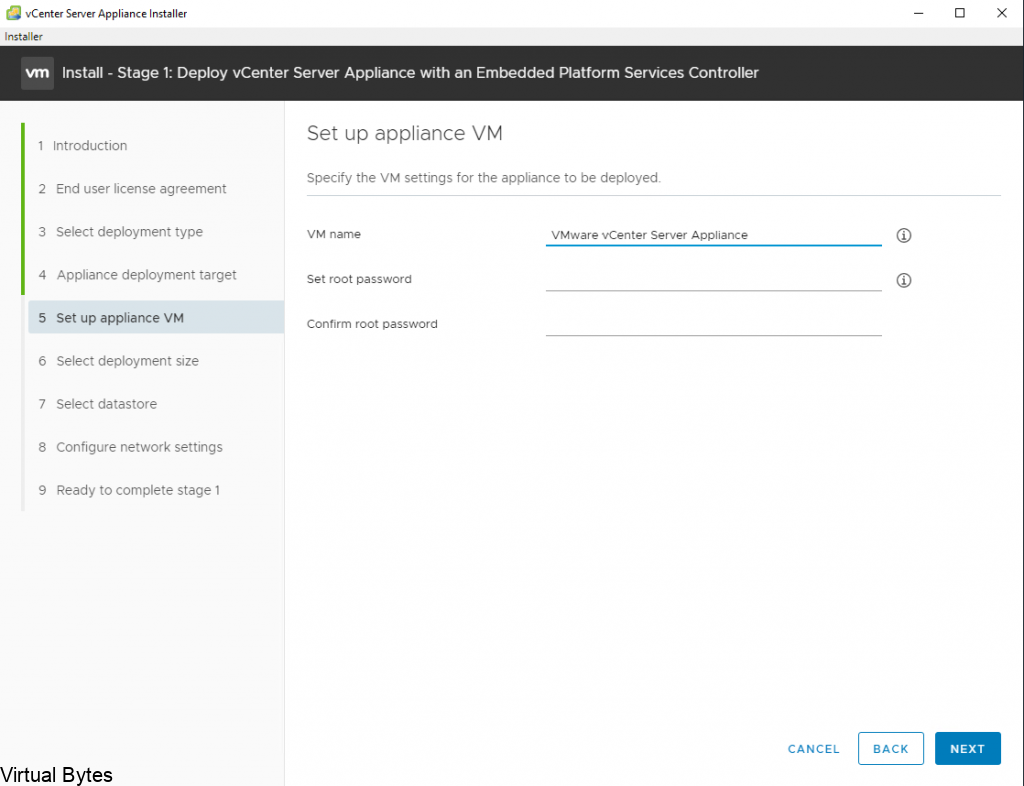
  • Setup the appliance –
    • Specify a name for your vCenter Server (ex. vCenter, VCSA, etc)
    • Specify the VCSA root password ( If you do lose this password there is a step by step procedure to recover access)
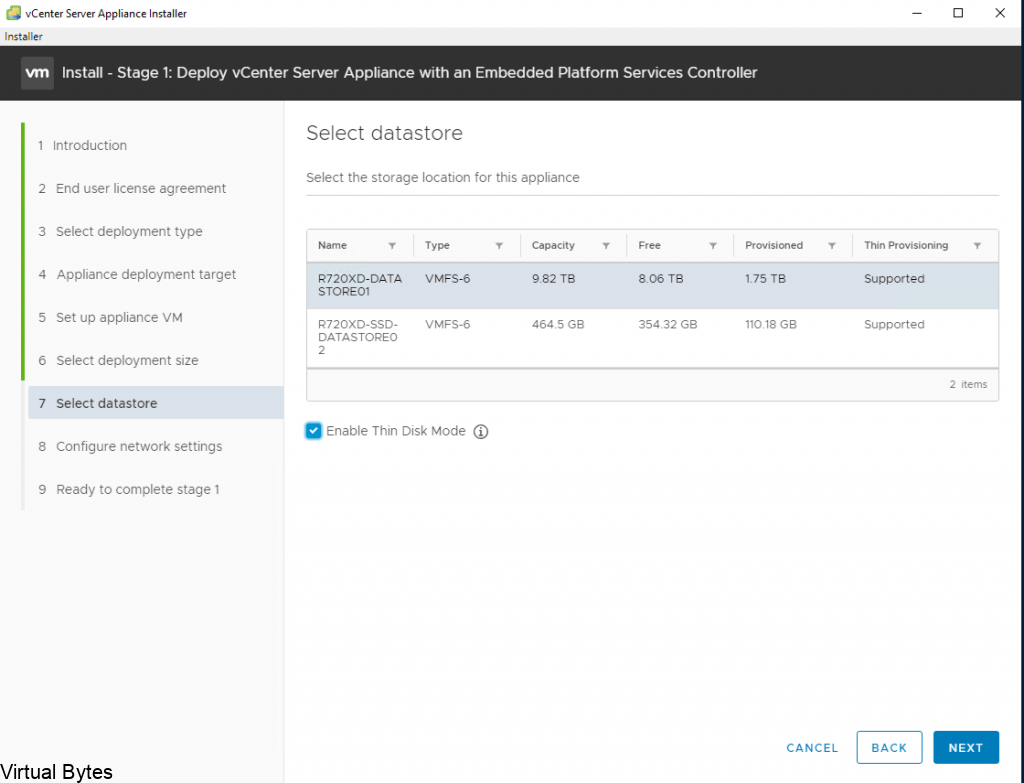
  • During this Stage 1 – Here you can specify the VCSA installation to the specified datastore. Enabling Thin Disk Mode – will per-allocate the actual used storage of the virtual machine on the datastore (This saves storage from being filled)
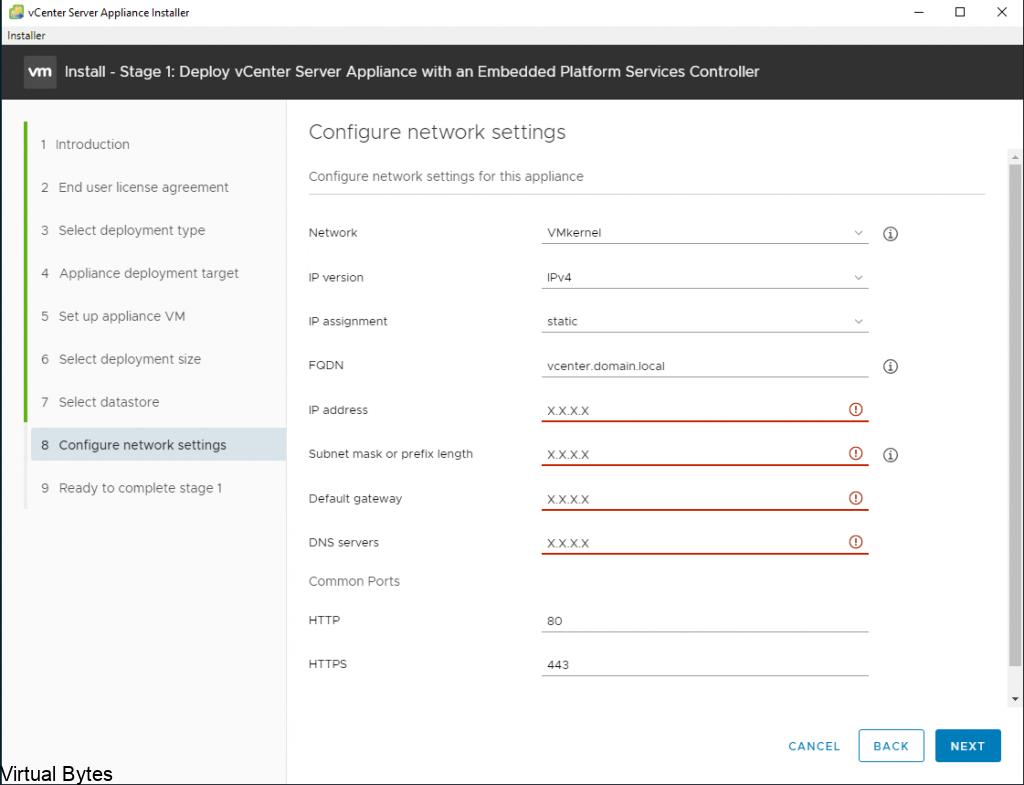
  • VMware recommends to install vCenter under a FQDN (Fully Qualified Domain Name) with a FQDN – this allows you to change the IP address of a VCSA.
    Be cautious of filling the “Configure network settings” page – This will lead to a inoperable vCenter instance.
  • Recommendation – Setup an ‘A’ Record on your local network DNS server or Domain Controller to point to the fresh new vCenter Server Appliance

VERIFY! VERIFY! VERIFY! – If you do not verify your appliance deployment configuration and you mis-configure a setting – You will be reinstalling VCSA from scratch again. (BE CAREFUL!)

After you have verified all information – Click Next

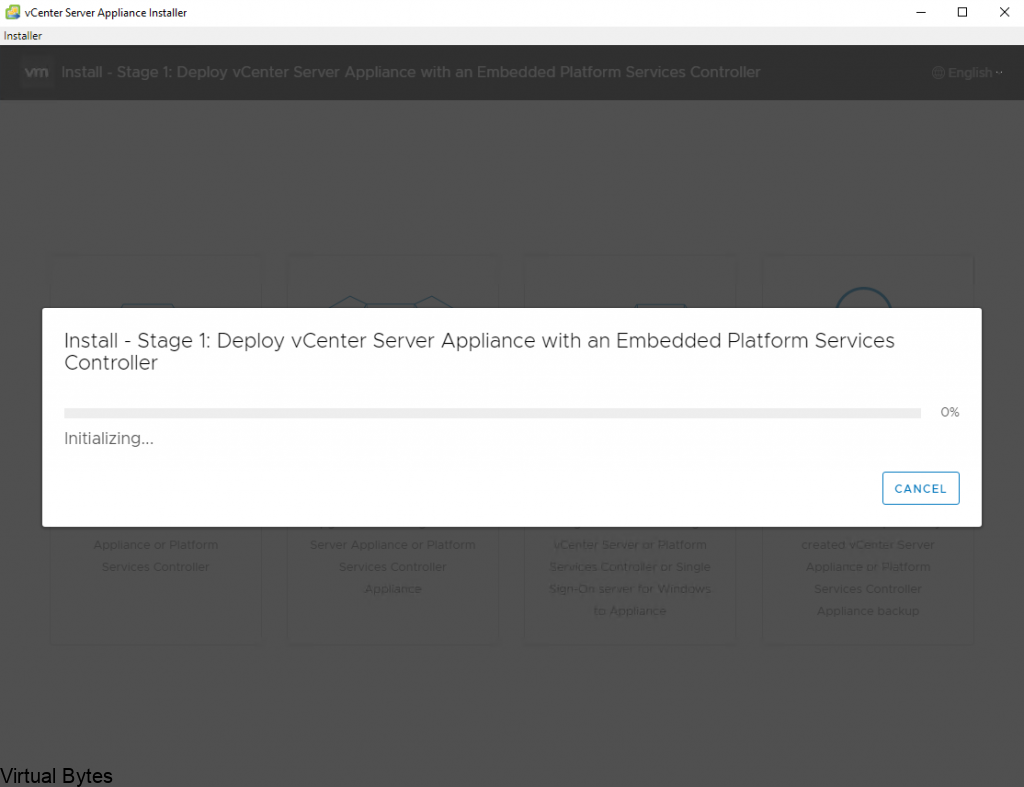
  • This stage will take few minutes – Grab a coffee or water! 🙂
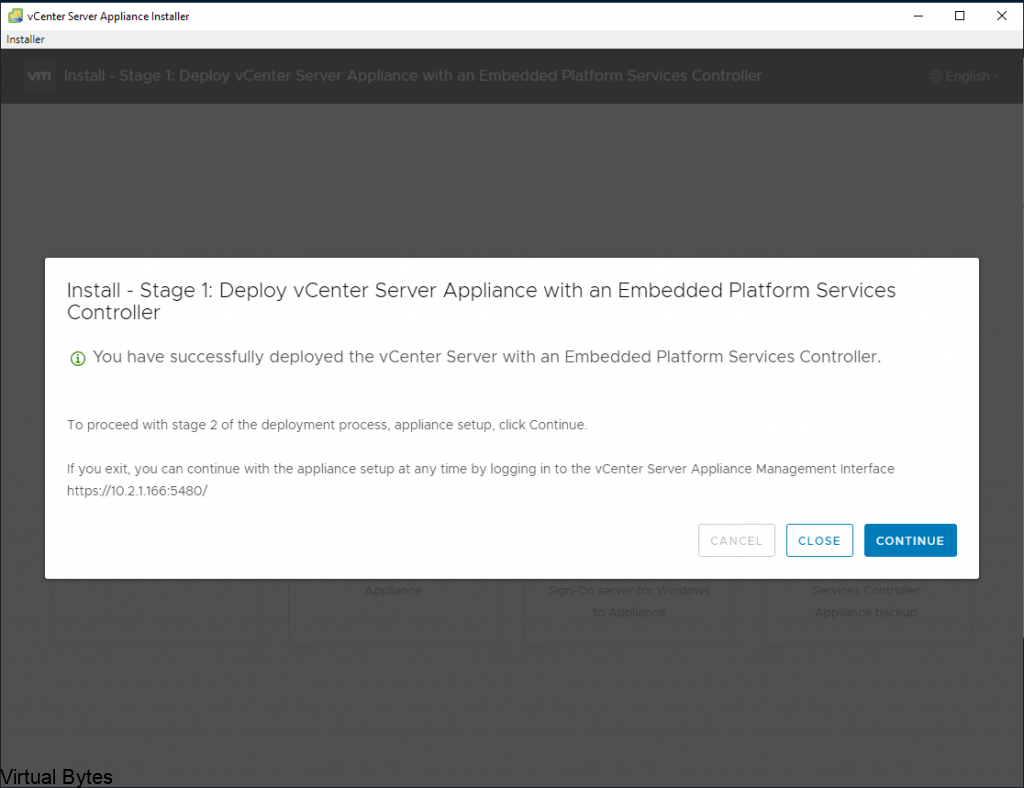
  • Once the Deploy vCenter Server Appliance is completed – You will see another window to “Continue” – Click Continue and this will lead you to the next window.
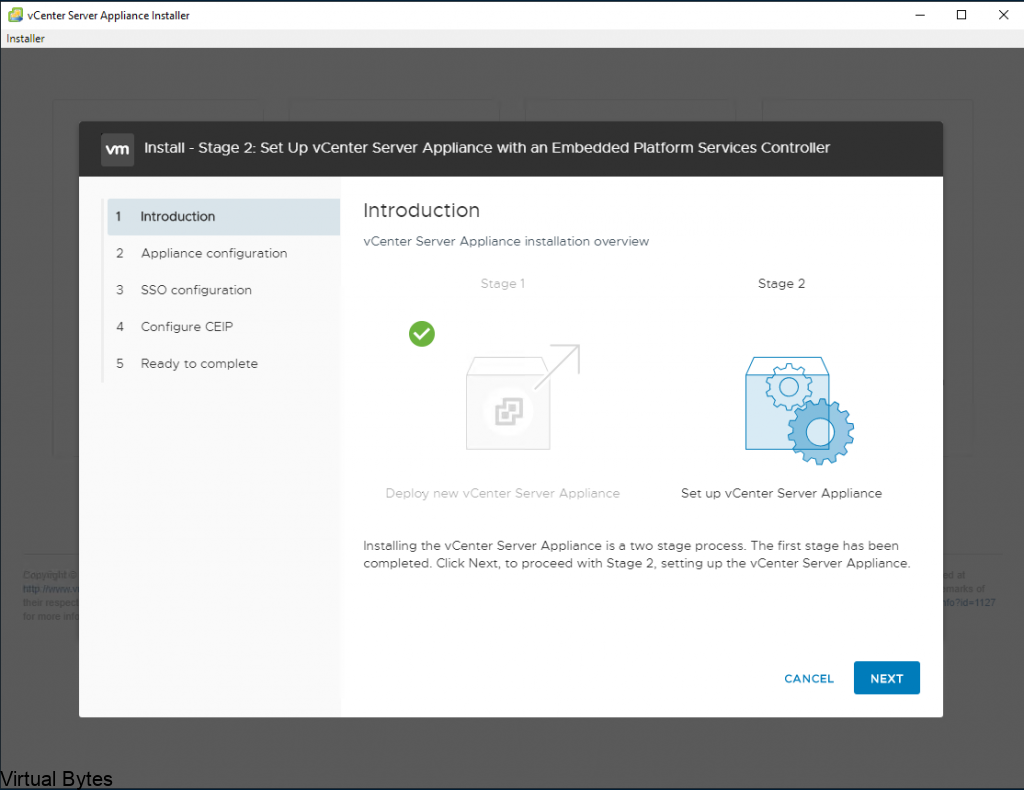
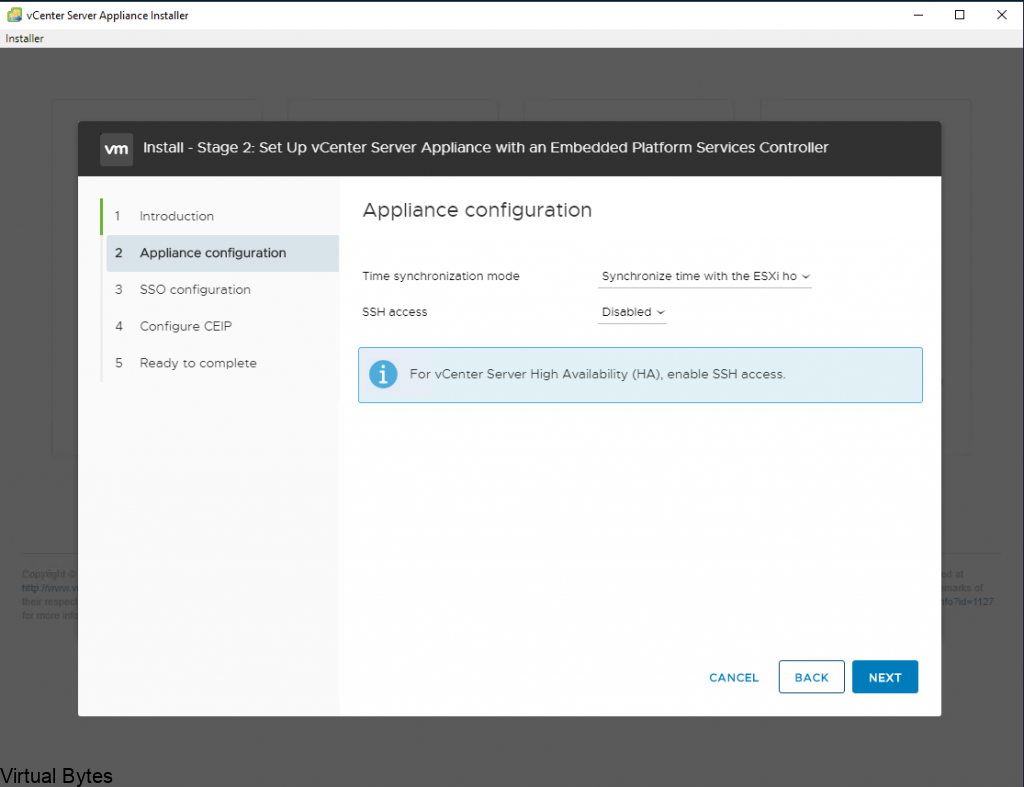
  • Stage 2 – This stage you will get to configure the Appliance configuration such as (SSH, SSO, CEIP)
  • SSH – is recommend to be turned off for security reasons, unless you are setting up more than one vCenter server and setting up vCenter High Availability
  • SSO – the single sign on, the default is vsphere.local, if you have a on premise domain controller, make sure you do not use the same domain name, this will prevent you from adding vCenter to the Active Directory domain forest.
  • Most recommended option is to synchronize the time with the ESXi Host – Also making sure that the NTP Service is running on the ESXi Host and is up to date with a relative time server.
  • During this option – SSO ( Single Sign On ) If you plan to join your vCenter to a Active Directory Domain – Make sure to specify a different domain or keep vsphere.local (You cannot use same AD domain as SSO domain on VCSA)

VERY IMPORTANT! Make sure the password you specify in this configuration window is accurate. If not you will be repeating the installation all over again – due to a password mis-configuration

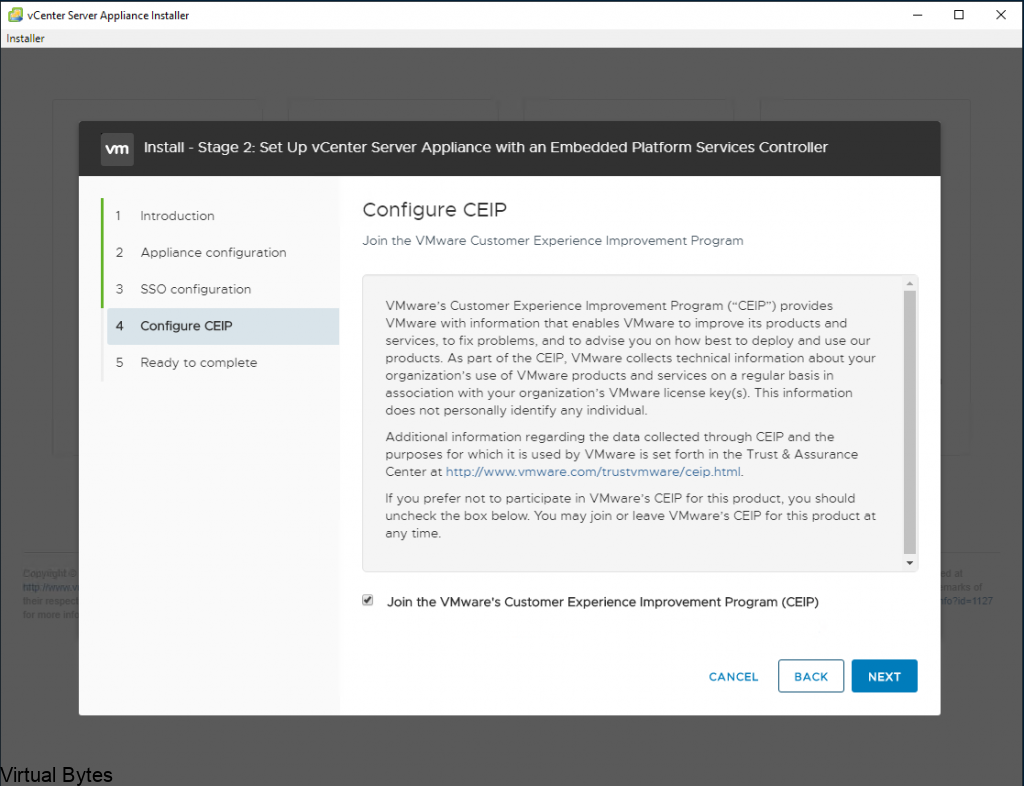
  • Your choice to Join the CEIP Program ( This is recommend to join CEIP to get the Skyline Alerts and Health Updates)
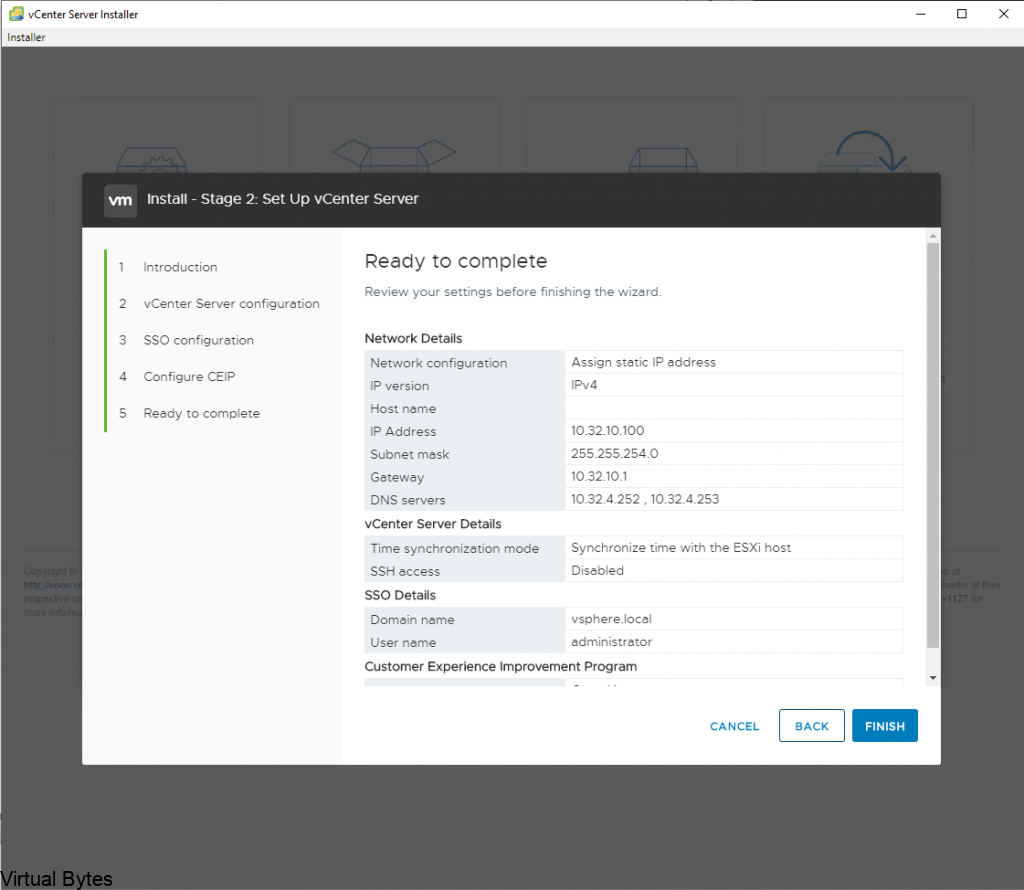
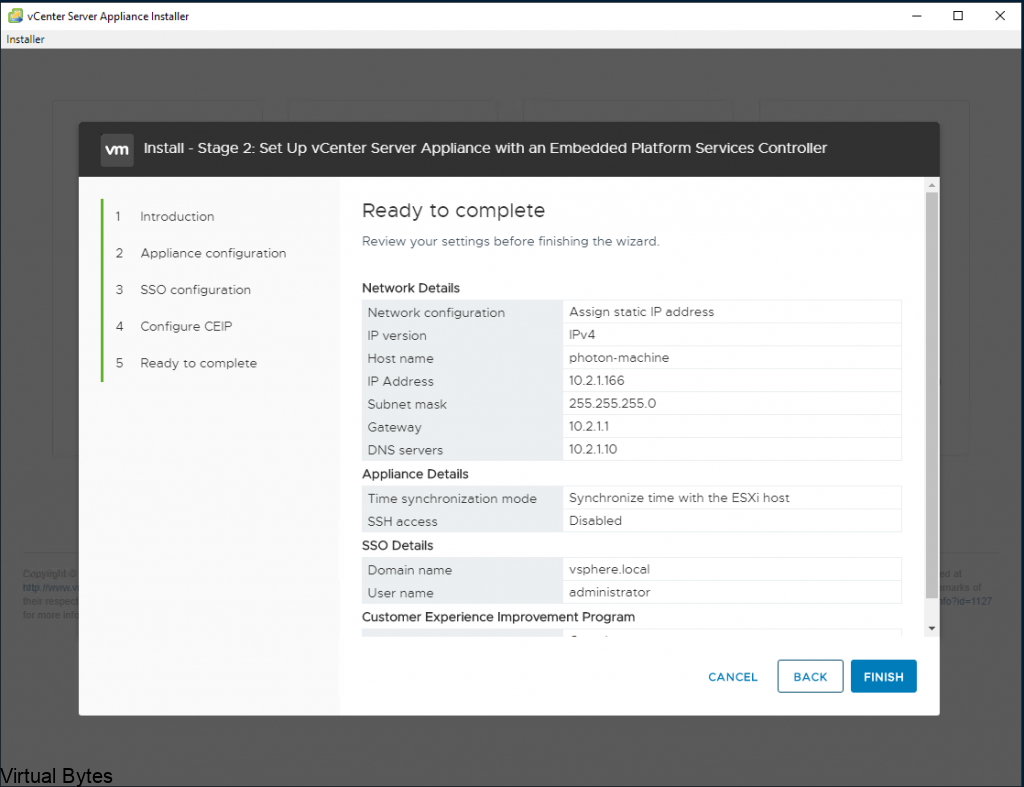
  • Verify the finalization stage – this stage will configure your vCenter Server Appliance.

VERY IMPORTANT! Make sure the password you specify in this configuration window is accurate. If not you will be repeating the installation all over again due to a password mis-configuration

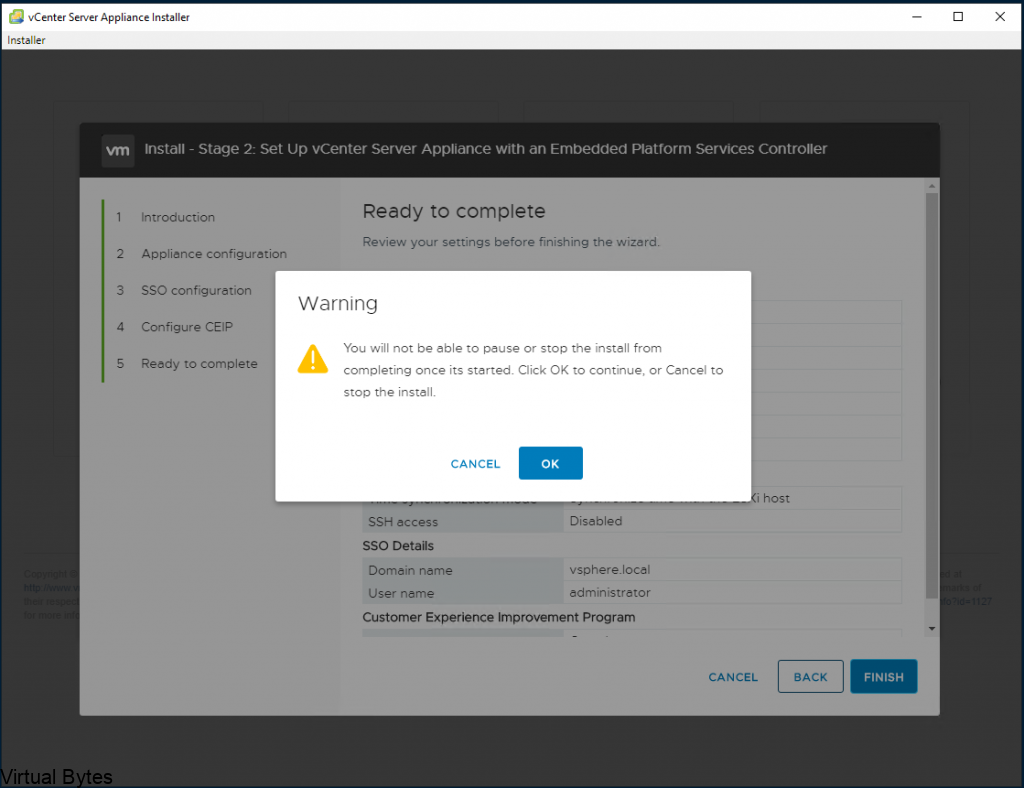
  • Once you confirm the final confirmation – There is no going back! Unless you took a snapshot of the vCenter Server Appliance prior to starting the vSphere SSO domain portion.
  • Enjoy your coffee or water – and wait patiently (This takes around 10-20 minutes, depending on the hardware)
  • You’ve installed vCenter Server Appliance! Now you may log into it URL to your server will be a – DNS A Record you configured in your local DNS Server.

https://your_vcenter_dns_name

October 6, 2020 0 comments 1.7K views
0 FacebookTwitterLinkedinEmail
VMware vCenter

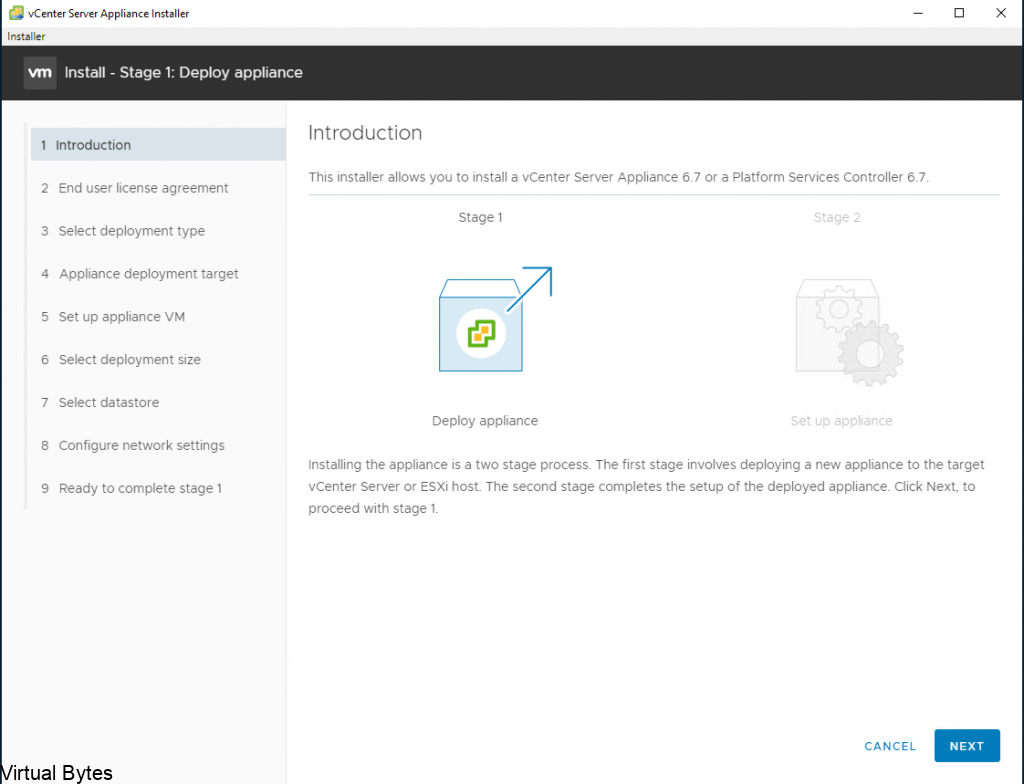
VMware vCenter 6.7 – Installation Walk-through

by Tommy Grot February 27, 2019
written by Tommy Grot 3 minutes read

To Install vCenter 6.7 with Embedded Platform Service Controller – Download the ISO from VMware (login will be required) Once downloaded, open the VMware VCSA.iso

  • Select vcsa-ui-installer
  • Then select choice of operating system (This tutorial is completed via Windows 10)
  • After going to win32
  • Then click on installer.exe

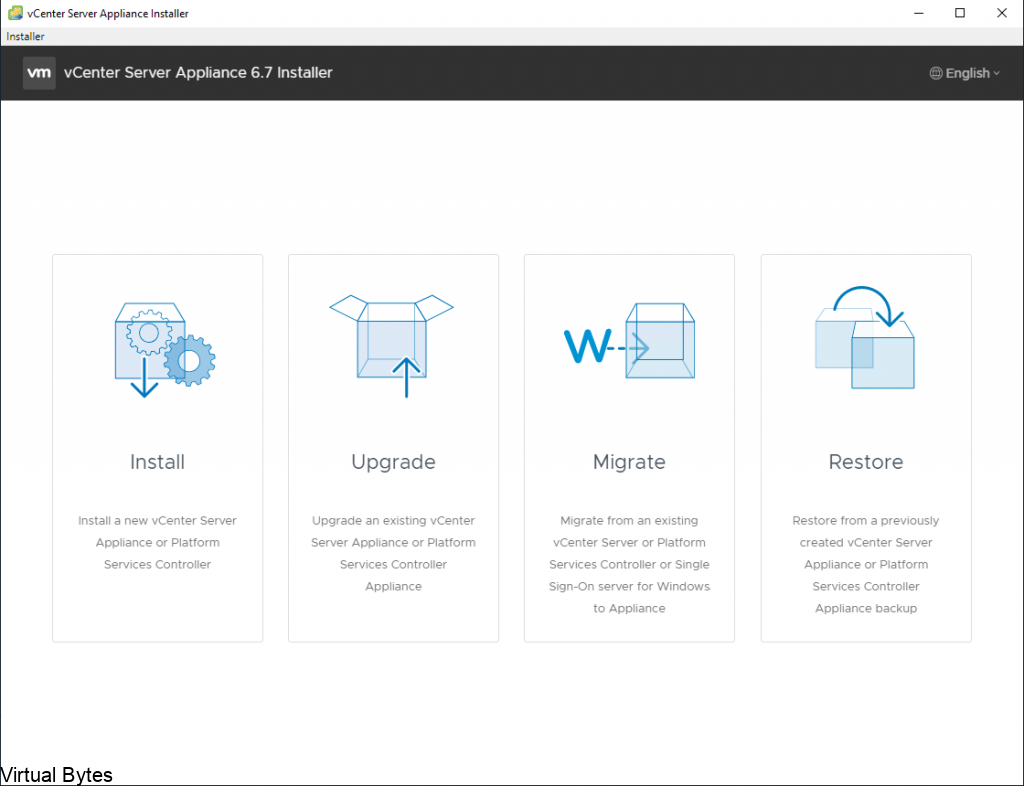
During this install we will be installing fresh new instance of VCSA.

  • Select Install
  • Click Next
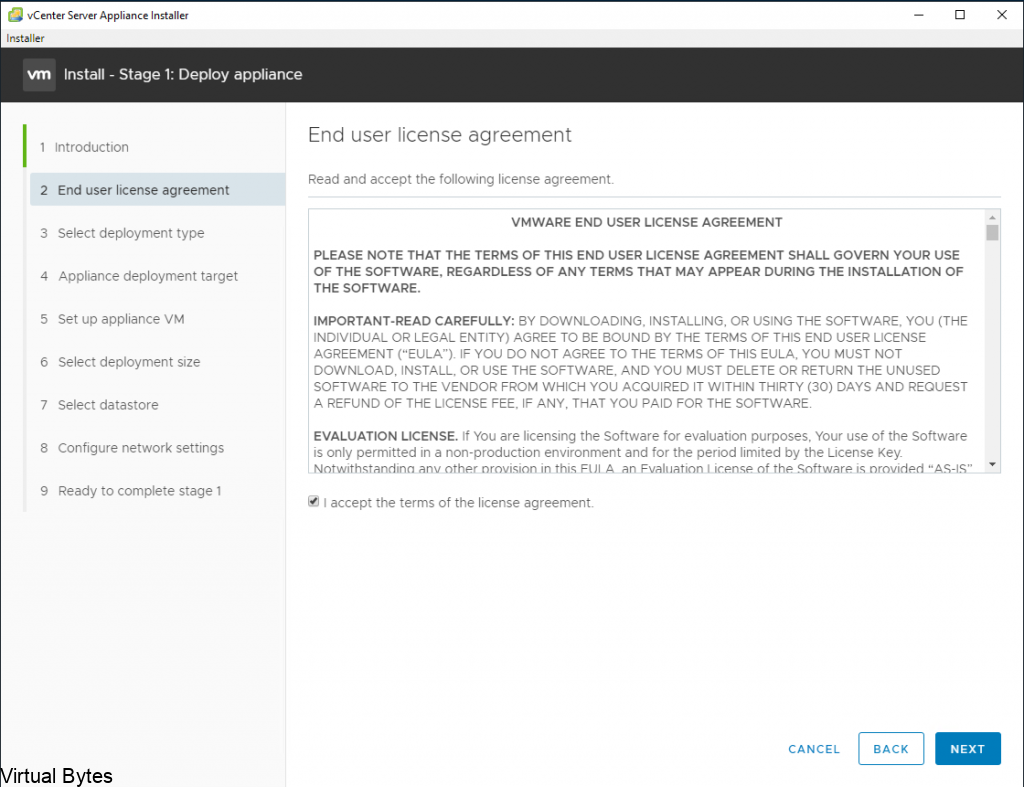
  • Accept EULA
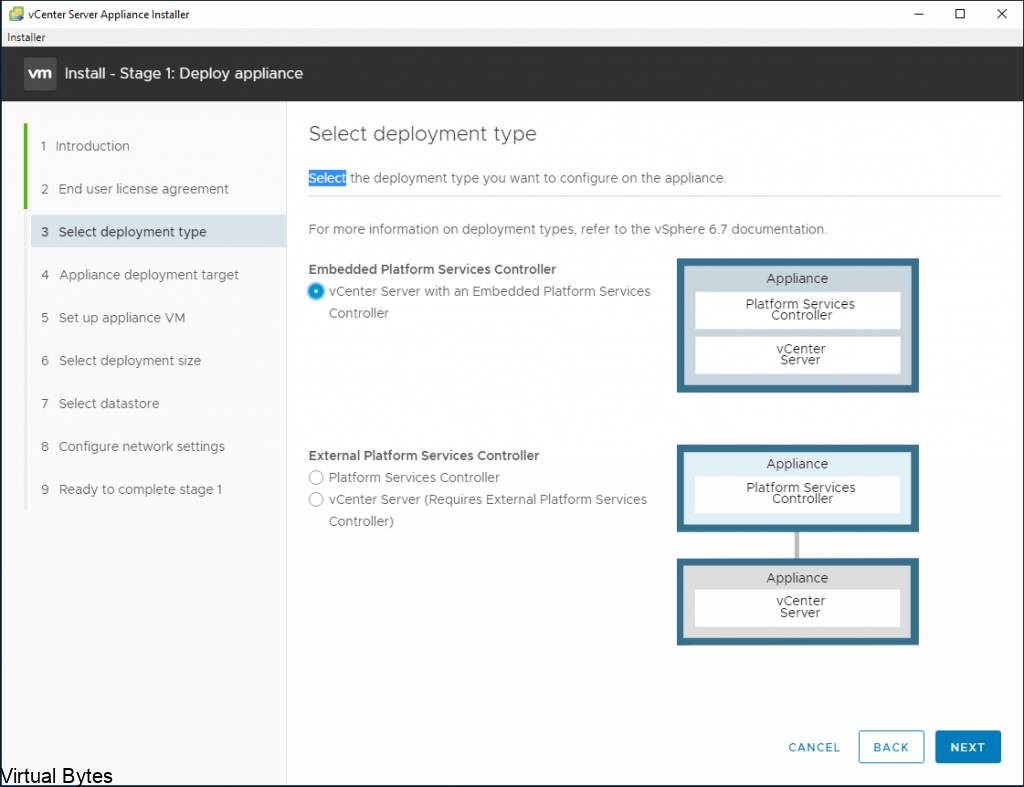
  • During this installation – we will choose Embedded Platform Services Controller. The External Platform Service Controller topology is depreciated model.
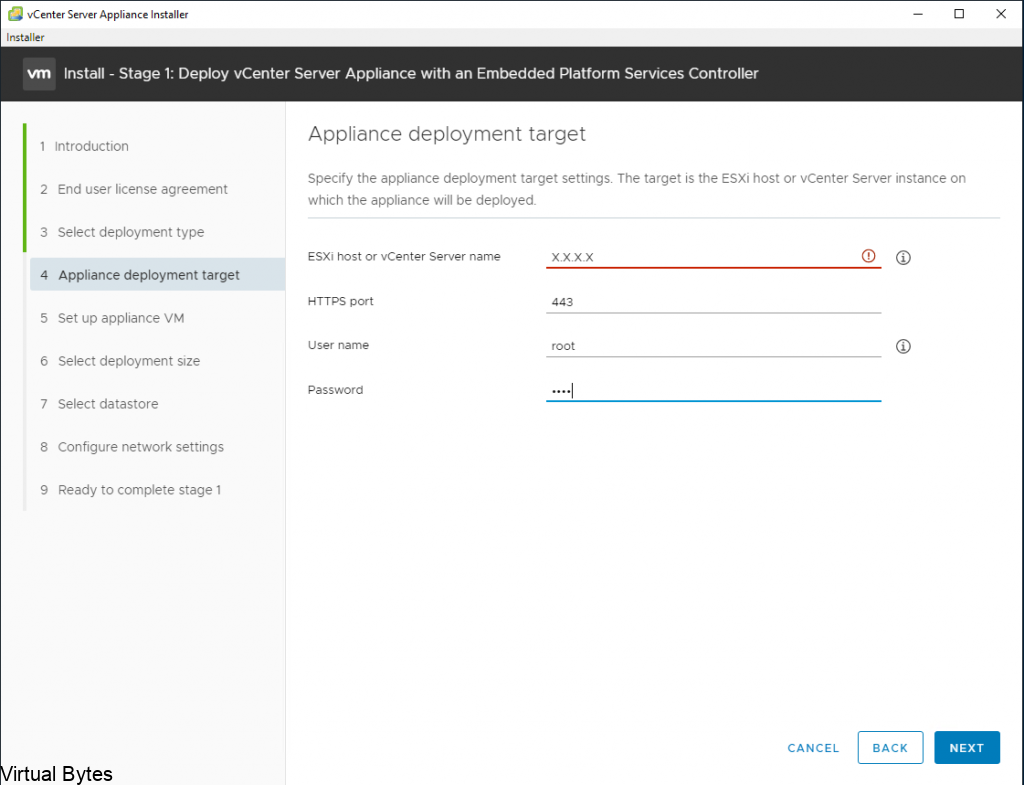
  • Specify the VMware ESXi Host or vCenter IP Address – Example – 10.0.0.100 or DNS Name – esxi01.virtualbytes.io ; vcenter.virtualbytes.io
    ( VMware recommends to operate its platform with DNS names, this allows easier management and IP address modifications )
  • Accept the Certificate Warning from the ESXi Host
  • Setup the appliance –
    • Specify a name for your vCenter Server (ex. vCenter, VCSA, etc)
    • Specify the VCSA root password
  • During this Stage 1 – Here you can specify the VCSA installation to the specified datastore. Enabling Thin Disk Mode – will per-allocate the actual used storage of the virtual machine on the datastore (This saves storage from being filled)
  • VMware recommends to install vCenter under a FQDN (Fully Qualified Domain Name) with a FQDN – this allows you to change the IP address of a VCSA.
    Be cautious of filling the “Configure network settings” page – This will lead to a inoperable vCenter instance.
  • Recommendation – Setup an ‘A’ Record on your local DNS server or Domain Controller to point to the fresh new vCenter Server Appliance

VERIFY! VERIFY! VERIFY! – If you do not verify your appliance deployment configuration and you mis-configure a setting – You will be reinstalling VCSA from scratch again. (BE CAREFUL!)

  • This stage will take few minutes – Grab a coffee or water! 🙂
  • Once the Deploy vCenter Server Appliance is completed – You will see another window to “Continue” – Click Continue and this will lead you to the next window.
  • Stage 2 – This stage you will get to configure the Appliance configuration such as (SSH, SSO, CEIP)
  • SSH – is recommend to be turned off for security reasons, unless you are setting up more than one vCenter server and setting up vCenter High Availability
  • SSO – the single sign on, the default is vsphere.local, if you have a on premise domain controller, make sure you do not use the same domain name, this will prevent you from adding vCenter to the Active Directory domain forest.
  • Most recommended option is to synchronize the time with the ESXi Host – Also making sure that the NTP Service is running on the ESXi Host and is up to date with a relative time server.
  • During this option – SSO ( Single Sign On ) If you plan to join your vCenter to a Active Directory Domain – Make sure to specify a different domain or keep vsphere.local

VERY IMPORTANT! Make sure the password you specify in this configuration window is accurate. If not you will be repeating the installation all over again – due to a password mis-configuration

  • Your choice to Join the CEIP Program
  • Verify the finalization stage – this stage will configure your vCenter Server Appliance.

VERY IMPORTANT! Make sure the password you specify in this configuration window is accurate. If not you will be repeating the installation all over again due to a password mis-configuration

  • Once you confirm the final confirmation – There is no going back! Unless you took a snapshot of the vCenter Server Appliance!
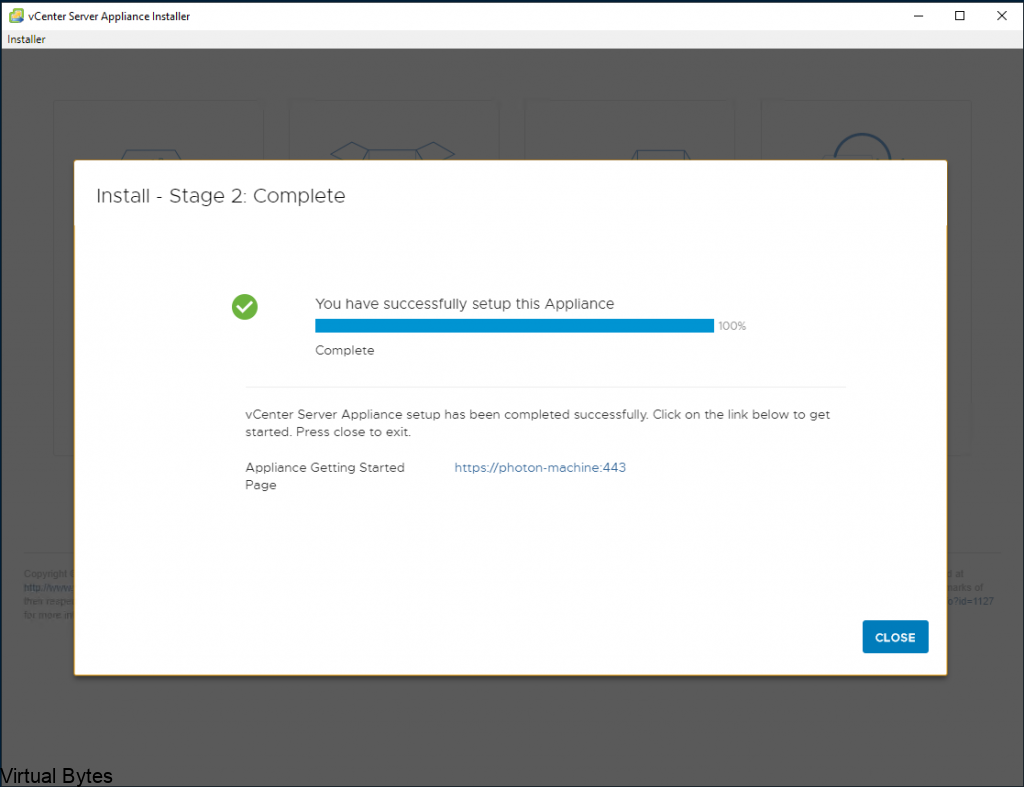
  • Enjoy your coffee or water – and wait patiently (This takes around 10-20 minutes, depending on the hardware)
  • You’ve installed vCenter Server Appliance! Now you may log into it URL to your server will be a – DNS A Record you configured in your local DNS Server.

https://your_vcenter_dns_name

February 27, 2019 0 comments 1.8K views
0 FacebookTwitterLinkedinEmail


Recent Posts

  • Deploying & Configuring the VMware LCM Bundle Utility on Photon OS: A Step-by-Step Guide
  • VMware Cloud Foundation: Don’t Forget About SSO Service Accounts
  • VMware Explore Las Vegas 2025: Illuminating the Path to Cloud Excellence!
  • Securing Software Updates for VMware Cloud Foundation: What You Need to Know
  • VMware Cloud Foundation 5.2: A Guide to Simplified Upgrade with Flexible BOM

AI AVI Vantage cloud Cloud Computing cloud director computing configure cyber security director dns domain controller ESXi las vegas llm llms multi-cloud multicloud NSx NSX-T 3.2.0 NVMe private AI servers ssh storage tenant upgrade vcd vcda VCDX vcenter VCF VDC vexpert Virtual Machines VMs vmware vmware.com vmware aria VMware Cloud Foundation VMware cluster VMware Explore VMware NSX vrslcm vsan walkthrough

  • Twitter
  • Instagram
  • Linkedin
  • Youtube

@2023 - All Right Reserved. Designed and Developed by Virtual Bytes

Virtual Bytes
  • Home
  • Home Data Center 2025
  • VMware
    • Cloud
    • Datacenter & Cloud Infrastructure
      • VMware ESXi
      • VMware vCenter
      • VMware vSAN
    • Networking & Security
    • Desktop & App Virtualization
      • Omnissa Horizon
    • Troubleshooting
    • Ansible
  • Education
  • Hardware
    • Hardware Tips & Tricks
  • Events
  • About
    • About Me
    • Home Lab Archives
      • Home Lab 2020-2022
      • Home Lab 2016-2020