Top Posts
Offline VMware Cloud Foundation 9 Depot: Your Path...
VMware Cloud Foundation 9: Simplifying Identity with a...
What’s New In VMware Cloud Foundation 9.0
Deploying & Configuring the VMware LCM Bundle Utility...
VMware Cloud Foundation: Don’t Forget About SSO Service...
VMware Explore Las Vegas 2025: Illuminating the Path...
Securing Software Updates for VMware Cloud Foundation: What...
VMware Cloud Foundation 5.2: A Guide to Simplified...
VMware Cloud Foundation 5.2: Unlocking Secure Hybrid Cloud...
VMware Cloud Foundation – Memory Tiering: Optimizing Memory...
Virtual Bytes
  • Home
  • Home Data Center 2025
  • VMware
    • Cloud
    • Datacenter & Cloud Infrastructure
      • VMware ESXi
      • VMware vCenter
      • VMware vSAN
    • Networking & Security
    • Desktop & App Virtualization
      • Omnissa Horizon
    • Troubleshooting
    • Ansible
  • Education
  • Hardware
    • Hardware Tips & Tricks
  • Events
  • About
    • About Me
    • Home Lab Archives
      • Home Lab 2020-2022
      • Home Lab 2016-2020
Tag:

VMs

VMware Cloud Foundation

VMware Cloud Foundation 5.x Posters

by Tommy Grot April 5, 2024
written by Tommy Grot 1 minutes read

Get ready to dive into the world of a private cloud platform, with the new and exciting poster that showcases the intricate topology and architecture of VMware Cloud Foundation 5.x. This comprehensive visual guide will take you on a journey through the innovative features and capabilities of VMware’s cutting-edge cloud platform. Whether you’re a seasoned IT professional looking to enhance your knowledge or a newcomer eager to explore the possibilities of VCF, this poster is sure to spark your curiosity and ignite your passion for cloud technology. Join us as we unravel the complexities of VCF and unlock the potential of cloud computing like never before!

Download your copy today and get it printed at your favorite print shop!

Overview

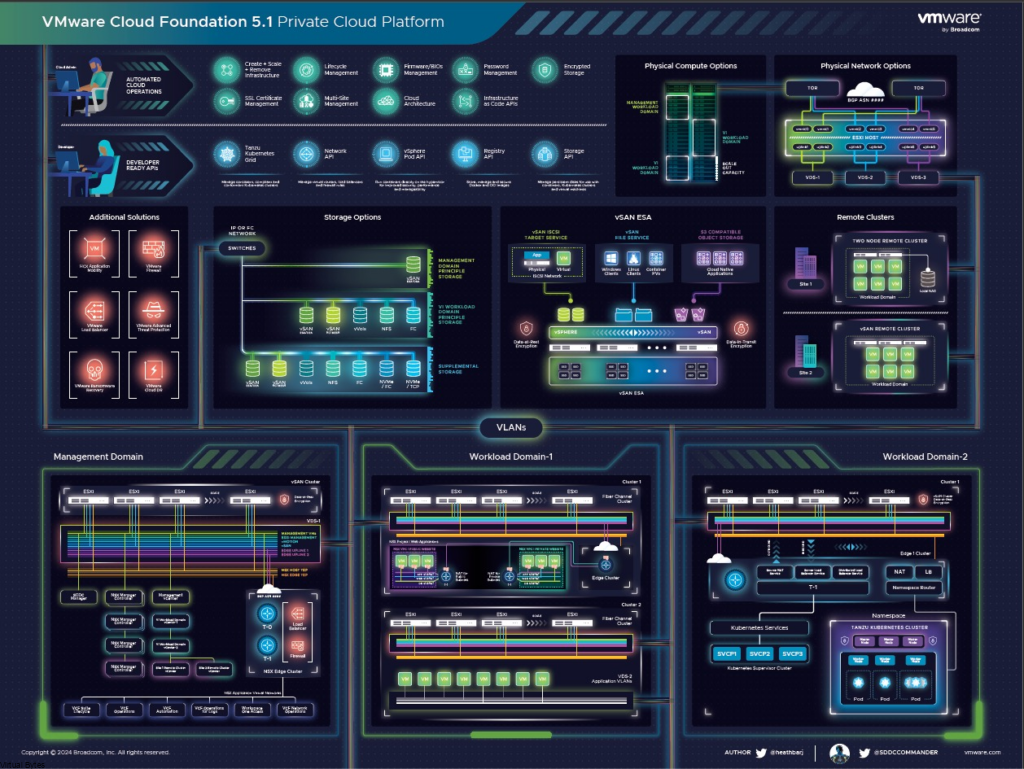
Two Persona – Cloud Admin & Developer

Management Workload Domain
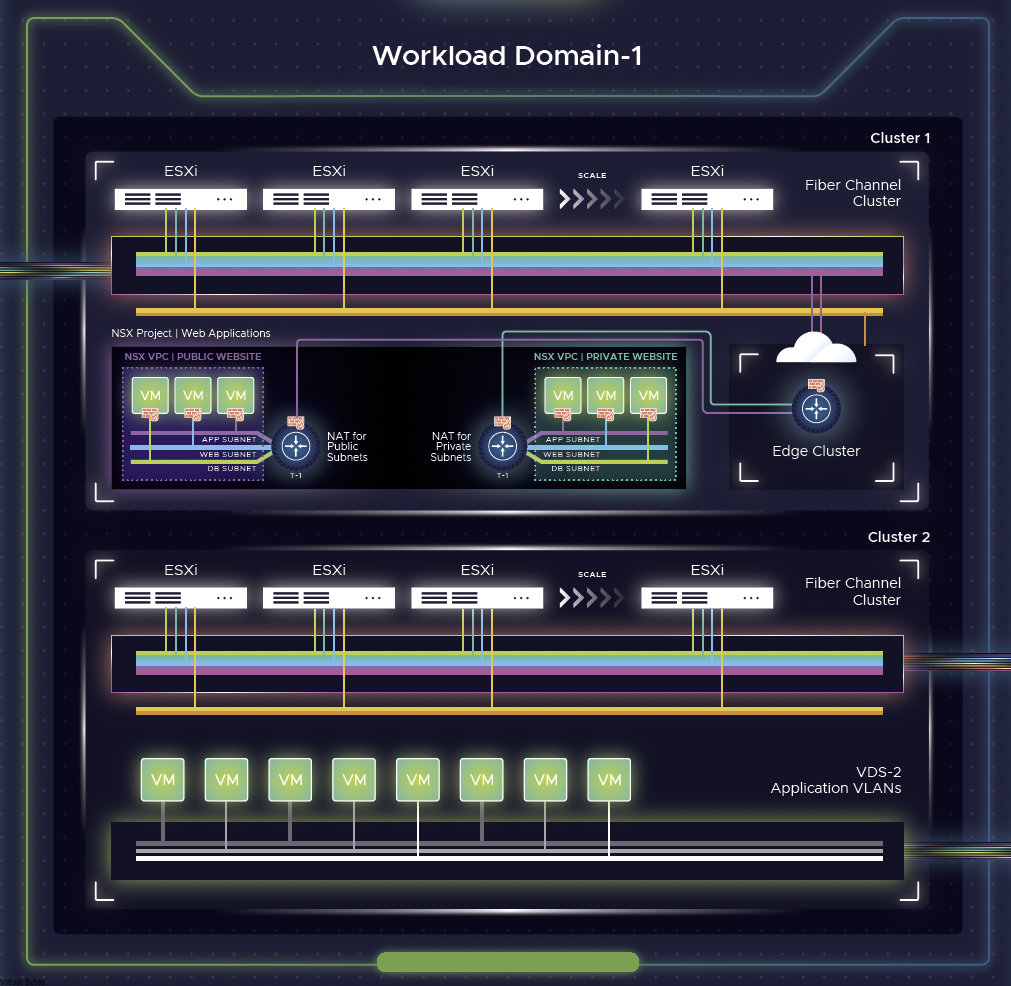
Workload Domain

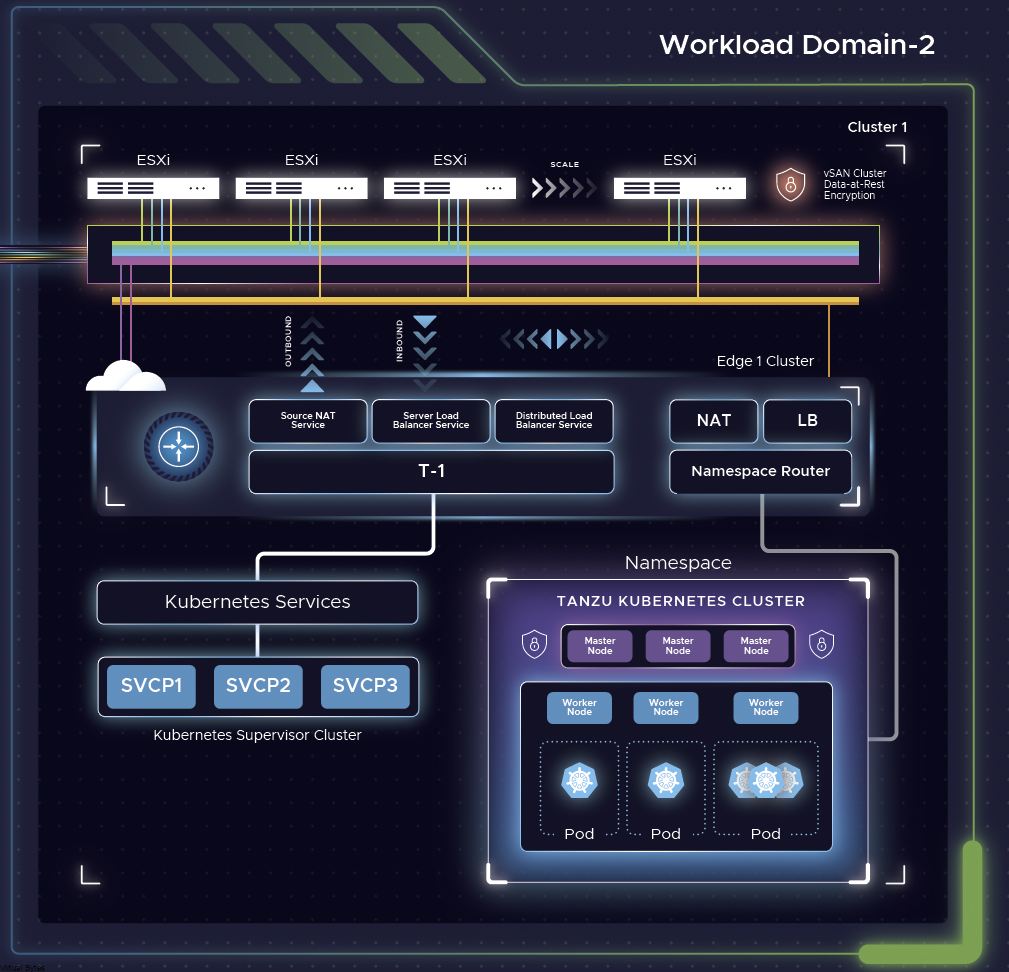
Workload Domain with Tanzu

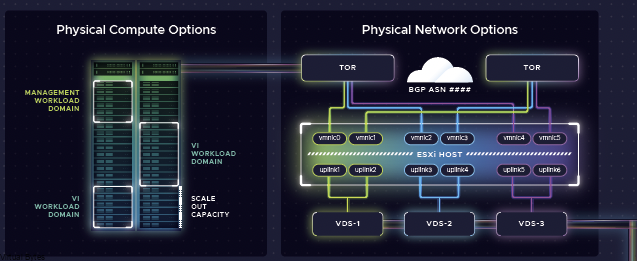
Workload Domain Physical Networking

April 5, 2024 0 comments 1.1K views
1 FacebookTwitterLinkedinEmail
VMware Cloud FoundationVMware Troubleshooting

Decoupling or Redeploying VMware Aria Suite Lifecycle

by Tommy Grot March 31, 2024
written by Tommy Grot 1 minutes read

Are you looking to know how to decouple or need to re-deploy the Aria Suite Lifecycle Manager from VMware Cloud Foundation? Well, you’ve come to the right place!

  • Take a Snapshot of your SDDC Manager (Offline) and a snapshot your vCenter Server appliance.
  • Then SSH to your SDDC Manager and elevate to root
su  

Below are the psql commands you will need to execute to remove the old vRSLCM entries.

psql -h localhost -U postgres -d platform -c "truncate vrslcm;"
psql -h localhost -U postgres -d platform -c "delete from vm_and_vm_type_and_domain where vm_type ='VRSLCM';"

As well as cleaning up the old Passwords, this will also remove the Life Cycle Suite from the Password UI.

psql -h localhost -U postgres -d platform -c "delete from credentialhistory where credential_id in (select id from credential where entitytype ='VRSLCM');"
psql -h localhost -U postgres -d platform -c "delete from credential where entitytype ='VRSLCM';"

Lets re-deploy through SDDC Manager!

After all is removed, you may restart the deployment, for the deployment you will be asked few questions on DNS, IP , and as well a Tier 1 Load Balancer, I used the next available IP address where i knew that the previous one was locked in and couldn’t clean it up, but after the deployment the old load balancer IP was cleaned up!

That’s it! Once you vRSLCM gets re-deployed re-run your Certificate generations from CSR and re-install the cert! Don’t forget to rotate your vRSLCM password but also enable password rotation to prevent any issues in the future.

March 31, 2024 0 comments 1.4K views
0 FacebookTwitterLinkedinEmail
CloudVMware Cloud Foundation

How To Upgrade VMware Cloud Foundation 5.1.x

by Tommy Grot March 26, 2024
written by Tommy Grot 4 minutes read

Have you heard the exciting news about the latest release of VMware Cloud Foundation 5.1.1? This update is packed with tons of new features that are sure to get you pumped up. From AI technologies and Private AI implementations to a slew of other enhancements, there’s something for everyone in this release. Whether you’re a seasoned pro or just dipping your toes into the world of cloud computing, this update has something to offer. So grab your favorite beverage, settle in, and let’s dive into all the new and exciting features that VMware Cloud Foundation 5.1.1 has to offer!

Highlighted Features

As announced at the 2024 GTC AI Conference, Broadcom has announced initial availability of  VMware Private AI Foundation with NVIDIA as an advanced add-on to VMware Cloud Foundation. VMware Private AI Foundation marks the beginning of a new era for infrastructure solutions, powered by VMware Cloud Foundation to support a wide range of Generative AI use cases. Read more about VMware Cloud Foundation AI/ML Solutions here.   

VMware Private AI Foundation with NVIDIA

VMware Cloud Foundation is the core infrastructure platform for VMware Private AI Foundation with NVIDIA, delivering modern private cloud that enables organizations to dynamically scale GenAI workloads on demand.  VMware Cloud Foundation provides an automated, self-service cloud experience that accelerates productivity for developers and data scientists, while delivering comprehensive security and resilience to protect and recover an organization’s most sensitive intellectual property.  

VMware Cloud Foundation 5.1.1 Bill of Materials: 

VMware Cloud Foundation 5.1.1 – Release Notes


Lets start the Upgrade!

Take a snapshot of your SDDC Manager and your vCenter Server, ensure they are offline snapshots.

Login to your SDDC Manager, and you shall see new bundles appear, this is only true if you have a internet connected VCF stack. If you are in a offline deployment follow this other walk through i made on how to download bundles for VCF and other products.

Example of what you shall see when bundles are automatically downloaded into your SDDC Manager

Next before we upgrade – ensure you run a Pre-Check Under the Workload Domains you want to upgrade

The Pre-check will verify connectivity and password authentication with service accounts to all different appliances. Once the pre-check is done we will proceed to the next step which is to plan the upgrade!

My Pre-check had few errors, one of the major errors was related to VM/Host Affinity rules for certain VMs like domain controller, Aria Logs, Aria Operations, so I had to disable the rules for the upgrade to ensure that there is no error during deployment.

Disabled VM/Host Rules

Here you will see the Pre-Check Results, I had 5 errors which one of of them was storage capacity of the vCenter Server and then VM/Host Rules that were enabled that needed to be disabled to continue the upgrade.

Once Pre-Check has been completed, you will see that your workload domain will have Updates Available in the right side of the window as shown below.

Now we plan for the upgrade, this is a new addition which helps out the upgrade path and sees the source and target version along with being able to see what bundles or what products have been upgraded if you have utilized the Async Patch tool like in this blog post here.

Now, you will see that my vCenter Server and NSX have been upgraded that is due to the Async patch tool, I upgraded my VCF out of cycle of the main released to fix few issues and security vulnerabilities. So thus the Green check marks for NSX_T Manager and vCenter and ESXi.

Now, we will wait – this task is running in the background, you will in a moment see that the Download Bundles task(s) will be running.

After the binaries have been downloaded, staged and prepared. You will see that your workload domain that was once with updates available is now ready for upgrade.

Lets Start the upgrade! Ensure you have GOOD BACKUPS and/or SNAPSHOTS of the SDDC Manager and vCenter Server. If you do lets continue!

SDDC Manager is now upgrading itself, it will upgrade the core components as well as the drift update if it is needed.

  • Setup Common Appliance Platform
  • Validate Services Before Upgrade
  • Remove Packages Pre Upgrade
  • Update Necessary RPMs For Photon4 Upgrade
  • VMware Cloud Foundation Services and Platform Upgrades
  • Authenticate Common Appliance Platform
  • Update VCF Service and Platform rpms
  • Reboot SDDC Manager
  • Refresh Custom Certificates
  • Update SDDC Manager Appliance Version
  • SDDC Manager Deployment Drift
  • Run VCF Services and Platform upgrades Post Validation
  • Validate Services
  • Cleanup
  • Stop Common Appliance platform Service

After 16 minutes and 29 seconds, we have an upgraded SDDC Manager! Since my vCenter and NSX have all been upgraded the upgrade would of continued and all the hosts would have upgraded automatically minus few questions being asked during the deployment.

Successfully deployed VMware Cloud Foundation 5.1.1!

March 26, 2024 5 comments 1.7K views
1 FacebookTwitterLinkedinEmail
VMware Cloud FoundationVMware NSX

NSX Manager Repository High Disk Usage

by Tommy Grot March 25, 2024
written by Tommy Grot 1 minutes read

If you’ve recently upgraded your NSX environment and noticed a spike in disk usage for the repository partition, you’re not alone. In this blog post, we’ll dive into the reasons behind this increase and provide some tips on how to manage and optimize your disk space. We’ll discuss common causes for the surge in disk usage post-upgrade, and explore some best practices for keeping your NSX environment running smoothly.

VMware Cloud Foundation (SDDC Manager) Password Lookup Utility

Next, we will need to SSH into the NSX Managers, if you are running NSX within VMware Cloud Foundation, you will need to run the VCF Lookup Password Utility within the SDDC Manager and login via remote console in vSphere to enable SSH services

To Start SSH Service on NSX Manager –

start service ssh

To Enable SSH Service on reboot –

set service start-on-boot

There is the 84% Usage of the repository partition, this partition holds all the previous patches and upgrades of NSX.

Now we delete the old folders, I also had old version of NSX Advanced Load Balancer which I cleaned up as well.

Example –

rm -rf 4.1.2.1.0.22667789/

There we go! No more alarms for high disk usage.

After a upgrade of your VMware NSX environment, it is always good to clean up the bundles and old binaries to prevent high disk usage and prevent and issue with your NSX Managers.

March 25, 2024 0 comments 961 views
0 FacebookTwitterLinkedinEmail
CloudVMware Cloud Foundation

VMware Cloud Foundation 5.x – SDDC Manager Password Operations Not Allowed

by Tommy Grot March 21, 2024
written by Tommy Grot 2 minutes read

Tonight’s topic – I want to share with you a recent headache I encountered while working with my VMware Cloud Foundation SDDC Manager 5.x and NSX Password Rotation for Audit account! I was in the middle of a routine password rotation service when suddenly, my task got stuck, leaving me scratching my head in frustration. I couldn’t believe how one little hiccup could bring my whole operation to a screeching halt. In this blog post, I will walk you through the issue I faced, how I troubleshooted it, and ultimately resolved it. So grab a cup of your favorite drink, sit back, and let’s dive into this tech challenge together!

Lets Begin!

  • Take Snapshot (Uncheck Memory) of SDDC Manager
  • SSH into SDDC Manager Appliance
  • Elevate to Root ( su – )

Now we will start digging in the Postgres Database, we will try to find the culprit of what is holding up the lifecycle management of VCF.

The command below will display any locked tasks that are running or are stuck

psql --host=localhost -U postgres -d platform -c "select * from lock"

My Issue – NSX Audit Password got stuck rotating and caused a halt in all operations, example below

{“serviceIdentifier”:”LCM”,”operationIdentifier”:”NSX_AUDIT”,”description”:”Resource of type NSX locked by service (ID: LCM) and operation (ID: NSX_AUDIT)”,”pollingInterval”:0,”expirationTime”:0}

Now that we have our locks displayed, for mine there was 2 locks I had to delete – eample below

psql --host=localhost -U postgres -d platform -c "delete from lock where id='ba4e6ff4-689a-4905-92ff-635cb7403698'";
psql --host=localhost -U postgres -d platform -c "delete from lock where id='ID_FROM_RESOURCE_NAME'";

Next, we will remove the second lock from the database:

psql --host=localhost -U postgres -d platform -c "delete from lock where id='6bd393ba-ad8f-4e1a-a6c3-0695c4556c29'";
psql --host=localhost -U postgres -d platform -c "delete from lock where id='ID_FROM_RESOURCE_NAME'";

Now we have a healthy and happy SDDC Manager!

As well our password options are no longer blocked out!

Reboot and remove snapshot after you are done, ensure you have all working services before snapshot is removed or a good backup!

March 21, 2024 0 comments 2K views
0 FacebookTwitterLinkedinEmail
CloudVMware Cloud Foundation

VMware Cloud Director 10.5.x Certificate Replacement

by Tommy Grot March 15, 2024
written by Tommy Grot 1 minutes read

Today’s topic is about managing certificates for VMware Cloud Director. Well, you’ve come to the right place! In this blog post, we’ll walk you through the step-by-step process of changing certificates for VMware Cloud Director 10.5.x. Whether you’re a seasoned pro or a newbie in the world of virtualization, we’ve got you covered. Say goodbye to the headaches of dealing with expired or invalid certificates, and say hello to a smoother, more secure experience with VMware Cloud Director. Let’s get started!

This process is much easier! Than the days of Postman and API calls and trying to get the certificate loaded into the web store and many other pain points that were noticeable, but not anymore this processes is super easy!

Login to your provider portal of VCD with your administrator account or a system admin account.

Go to – Administration

Click on Certificates Library – >

Click on Import -> Then fill our a friendly name and upload the .pem format of your cert and as well the private.key with the passphrase.

Once your certificate has been imported, also ensure to have your CA Signed Certs Trusted (Root and Subordinate) in your trusted certs library.

Then go back to Resources -> Cloud Cells -> Click on the Cell you want to change the certificate first in.

Then click on Edit

The pop up will come up to select the certificate we just imported earlier in the walk through, select that one.

Now you will “Use Certificate” and it will run the API Calls and certificate tasks behind the scenes.

Select your certificate and then click edit and use certificate, few seconds later you should see a successful message in the recent tasks!

March 15, 2024 8 comments 3.1K views
2 FacebookTwitterLinkedinEmail
VMware Cloud FoundationVMware vCenter

How To Apply Async Patch to VMware Cloud Foundation 5.1+

by Tommy Grot March 2, 2024
written by Tommy Grot 3 minutes read

The VMware SDDC Manager async patch tool allows you to upgrade individual products outside of the standard VMware Cloud Foundation (VCF) baseline. This tool can be used to upgrade products such as vCenter, NSX, and ESXi to newer versions without affecting the overall VCF deployment.

To use the async patch tool, you will need to download the patch or upgrade package for the specific product you want to update. You can then upload the package to the SDDC Manager and initiate the upgrade process. The async patch tool will automatically handle the upgrade process for the individual product, ensuring that it is seamlessly integrated into your VCF environment.

Overall, the async patch tool provides a convenient way to keep your VMware products up to date without disrupting your VCF deployment.

VMware Docs for Async Patch Tool


Async Patch Tool Walkthrough

Lets begin! – Open WinSCP or/ SCP upload the vcf-async-patch-tool-1.1.0.2.tar.gz,

Then, take a snapshot of your vCenter and as well SDDC Manager for safety!

Once snapshots are done and verified then, SSH into your SDDC Manager with vcf user, but ensure to enable the SSH Time out. ( Example Below)

  • 300 Second is five minutes
  • Putty -> Change Settings -> Connection -> Seconds between keepalives (0 to turn off) > set to 300 > Apply

Then we will need to make the directory for async patch tool

mkdir /home/vcf/asyncPatchTool

Copy the vcf-async-patch-tool-1.1.0.2.tar.gz, (or latest version) into /home/vcf/asyncPatchTool

tar -xvf vcf-async-patch-tool-1.1.0.2.tar.gz
Set the permissions for the asyncPatchTool directory
cd /home/vcf/
chmod -R 755 asyncPatchTool
chown -R vcf:vcf asyncPatchTool

Next, you will execute the command below to enable async to pull patches.

./vcf-async-patch-tool --listAsyncPatch --du < Your E-Mail for Customer Connect >

Next the Patch Tool will ask you if your running the latest version ( Y ) or ( N ) and CEIP as well.

  • Enter Y to confirm that you are running the latest version of the Async Patch Tool.
  • Read the information and enter Y to acknowledge the pre-requisites.
  • Enter Y or N to choose whether or not to participate in the VMware Customer Experience Improvement Program (CEIP).
  • Enter the password for the super user (vcf) account.
  • Enter the password for the root user account.
  • Enter the password for the management domain SSO user account.
  • Enter your VMware Customer Connect (Depot) password.

So, for my patch I select the latest vCenter Server 8U2b and I repeated the same setups for gaining my ESXi Patch as well.

./vcf-async-patch-tool -e --patch VCENTER:8.0.2.00200-23319993 --du <E Mail Customer Connect> --sddcSSOUser <SSOuser> --sddcSSHUser vcf --it ONLINE

Status of Async Progress shown in these snips

Now you will see Bundles showing up within Bundle Management!

Snippet Below Shows Running Async patch tool

After the bundles have been uploaded, we may go back to SDDC UI and go to the specific workload domain, for my environment it is the Management Workload domain. Upgrade progress snippet below of vCenter Server

Once all patches are completed, SSH back into VCF SDDC Manager and execute the following command to disable patches.

  • Navigate to /home/vcf/asyncPatchTool/bin.
  • Run the following command:
./vcf-async-patch-tool --disableAllPatches --sddcSSOUser SSOuser --sddcSSHUser vcf
March 2, 2024 2 comments 2.6K views
2 FacebookTwitterLinkedinEmail
VMware TroubleshootingVMware vCenter

vCenter 8.0 U2 Storage Policies Go Missing – Due to Service Account (SPS) VMware vSphere Profile-Driven Storage Service

by Tommy Grot February 29, 2024
written by Tommy Grot 2 minutes read

Tonight’s blog post goes in-depth on Service Accounts especially the SPS account which the VMware vSphere Profile-Driven Storage Service relies on that lives within the Administrators group. Well, imagine the panic when the SPS service account goes missing, leaving your vSAN and storage policies in limbo.

In this blog post, we’ll dive into the nightmare scenario of losing these vital components and explore how to troubleshoot and recover from such a disaster. So grab a cup of coffee and get ready to learn how to tackle this challenging situation head-on. Let’s get started!

So Below – I logged into my vCenter Server 8 today, and I was like why are my policies missing and my vSAN Performance complaining ?? Well I started to dig in and found some evidence of the SPS service account gone.

Storage Providers are missing ?! What is happening?!

vSAN Performance complaining about its policy not being there, and your can see that the Storage Policy drop down is broken / not loading the vSAN policies I have for vSAN Performance

So – First thing is take a snapshot of what your current vCenter is, yeah we know its broken and SPS is missing but safety first!

First, what I did – is, I checked the logs where the VMware vSphere Profile-Driven Storage Service

/var/log/vmware/vmware-sps/sps.log

You will see lots of different spring frame work events and processes, but what you are really looking for is your specific SPS Service Account, for me, mine was

sps-71587023-8efd-4f7e-b094-ede500183201

Once you have your account copied – open your favorite text editor. You will want to structure your command below in the same way. As an example you may copy i provided mine from the screen shot – But replace my SPS account with yours.

/usr/lib/vmware-vmafd/bin/dir-cli group modify --name Administrators --add sps-71587023-8efd-4f7e-b094-ede500183201

After you hit enter, you will see that it will ask you for the [email protected] password, if you are running VCF, you will need to pull your password from the SDDC Manager if you have Auto Rotate passwords enabled.

Once Password has been entered you shall see the same following prompt where the SPS account has been added to the Administrators group.

Enter password for [email protected]:
Account [sps-71587023-8efd-4f7e-b094-ede500183201] added to group [Administrators]
Group member [sps-71587023-8efd-4f7e-b094-ede500183201] added successfully

Woohoo! vSAN and vCenter are all up and running with working VM Storage Policies

And Finally – We see our SPS account back in the Administrators Group!

February 29, 2024 0 comments 2.3K views
1 FacebookTwitterLinkedinEmail
NetworkingVMware vSAN

VMware vSAN and Remote Direct Memory Access

by Tommy Grot January 5, 2024
written by Tommy Grot 3 minutes read

Welcome to the first blog post of 2024! We are thrilled to kick off the year with a topic that is bound to ignite your vSAN Cluster. Get ready to dive into the world of RDMA (Remote Direct Memory Access) and vSAN (Virtual Storage Area Network) implementation. These cutting-edge technologies are revolutionizing the way data is transferred and stored, promising lightning-fast speeds and unparalleled efficiency. Whether you are a tech enthusiast, a system administrator, or simply someone intrigued by the latest advancements in the tech universe, this blog post will unravel the mysteries of RDMA and vSAN, leaving you with a newfound understanding and enthusiasm for these game-changing innovations. So, buckle up and lets get ready!

Lets configured your ESXi Host to be ready for RDMA for vSAN

First thing you will want your Core Networking Switches to have Data Center bridging configured for all interfaces that are connected to your vSAN Cluster. Link to Arista

Example Syntax From my Arista DCS-7050QX-32S-F
   description ESX01-VDS01-1-VMNIC4
   mtu 9214
   dcbx mode ieee
   speed forced 40gfull
   switchport mode trunk
   priority-flow-control on
   priority-flow-control priority 3 no-drop

Sample Config

So, now that the networking is prepared next we will need to SSH into each ESXi Host and you will need configure the settings below:

Example of vSAN Cluster Health regarding RDMA not configured

While in SSH – you will need to configured each host with the parameters’ below in each code block

dcbx int Set DCBX operational mode
Values : 0 – Disabled, 1 – Enabled Hardware Mode, 2 – Enabled Software Mode, 3 – If Hardware Mode is supported Enable Hardware Mode, else Enable Software

esxcli system module parameters set -m nmlx5_core -p dcbx=3

pfctx int 0x08 Priority based Flow Control policy on TX.
Values : 0-255
It’s 8 bits bit mask, each bit indicates priority [0-7]. Bit value:
1 – generate pause frames according to the RX buffer threshold on the specified priority.
0 – never generate pause frames on the specified priority.
Notes: Must be equal to pfcrx.
Default: 0

pfcrx int 0x08 Priority based Flow Control policy on RX.
Values : 0-255
It’s 8 bits bit mask, each bit indicates priority [0-7]. Bit value:
1 – respect incoming pause frames on the specified priority.
0 – ignore incoming pause frames on the specified priority.
Notes: Must be equal to pfctx.
Default: 0

trust_state int Port policy to calculate the switch priority and packet color based on incoming packet
Values : 1 – TRUST_PCP, 2 – TRUST_DSCP
Default: 1

esxcli system module parameters set -m nmlx5_core -p "pfctx=0x08 pfcrx=0x08 trust_state=2 max_vfs=0"

pcp_force int PCP value to force on outgoing RoCE traffic.
Cannot be active when dscp_to_pcp is enabled.
Values : -1 – Disabled, 0-7 – PCP value to force
Default: -1

dscp_force int DSCP value to force on outgoing RoCE traffic.

Values : -1 – Disabled, 0-63 – DSCP value to force
Default: -1

esxcli system module parameters set -m nmlx5_rdma -p "pcp_force=-1 dscp_force=26"

Now, that your have configured all the ESXi hosts, you will need to repeat the syntax above to each host you have. Once updated you will need to put each host in maintenance mode and reboot each host.

Once all ESXi hosts are configured and rebooted, vSAN Health should report back RDMA Configuration Healthy.

Below are some Network Backbone tests over RDMA!

January 5, 2024 2 comments 1.8K views
1 FacebookTwitterLinkedinEmail
VMware vCenter

How To Upgrade to vSphere 8 Update 2

by Tommy Grot September 21, 2023
written by Tommy Grot 2 minutes read

Tonight’s blog post is about – VMware vSphere 8 Update 2 and its upgrade process! If you’re an avid virtualization enthusiast or a tech wizard looking to stay ahead of the game, you’ve come to the right place. VMware vSphere 8 Update 2 brings a plethora of new features, enhancements, and performance improvement!

What you will need, if you do not utilize vSphere Image Lifecycle then you will need to download these:

VMware-VCSA-all-8.0.2-22385739.iso
VMware-VMvisor-Installer-8.0U2-22380479.x86_64.iso

Below is some information from VMware’s website on vSphere 8 Update 2!

Reduced Downtime Upgrade

First, let’s talk about patching and updating. We’ve all patched vCenter instances and we know that task can often take a long time to complete, and during that time, vCenter services are offline. We introduced Reduced Downtime Upgrade as a new method to update vCenter instances with vSphere+. We’re bringing that same functionality to on-premises vCenter instances that are not connected to vSphere+.

vCenter reduced downtime upgrade is supported for single self-managed vCenter instances initially. It does not support vCenter instances enabled with vCenter HA or vCenter instances participating in Enhanced Linked Mode (ELM). vCenter reduced downtime upgrade is supported to update vCenter instances running version 8.0 or 8.0 U1 to 8.0 U2 and will support updating 8.0 U2 to future versions.

Non-disruptive Certificate Management

vSphere 8 Update 2 introduces non-disruptive certificate management. This means vSphere administrators can renew and replace the vCenter SSL/TLS certificate without requiring service restarts. External solutions, like VMware NSX, may require re-authentication to vCenter after a certificate is changed. With industry best practice encouraging the reduction in the maximum validity of TLS certificates, vSphere administrators can adhere to these best practices and perform annual certificate renewals without impacting vCenter productivity.

Let’s take a deeper look at each of the 5 steps during a reduced downtime upgrade.

Before you upgrade! Ensure you have backups configured have successful backups.

Login to VAMI – Update – Stage and Install

Lets Accept the EULA!

Good ole Prechecks prior to update!

Right here, make sure you have solid backups – For my deployment this is a lab so i can rebuild without any issues but for production. STOP and Go back to Backup page and ensure you have good backups if not, take one!

Backup Section

The upgrade process was very quick!

Now, that we have upgraded VCSA, lets login and lets stage our ESXi upgrade process. Utilizing the Image Managment

Select 8.0 U2 22380479 Image

Then hit Remediate all, if you have all pre-checks successfully staged and ready to upgrade lets upgrade our ESXi hosts!

There we go! One of the 3 hosts has upgraded!

September 21, 2023 0 comments 5K views
0 FacebookTwitterLinkedinEmail
Newer Posts
Older Posts


Recent Posts

  • Offline VMware Cloud Foundation 9 Depot: Your Path to Air-Gapped Deployments
  • VMware Cloud Foundation 9: Simplifying Identity with a Unified SSO Experience
  • What’s New In VMware Cloud Foundation 9.0
  • Deploying & Configuring the VMware LCM Bundle Utility on Photon OS: A Step-by-Step Guide
  • VMware Cloud Foundation: Don’t Forget About SSO Service Accounts

AI cloud Cloud Computing cloud director configure cyber security director dns domain controller ESXi How To las vegas llm llms multicloud NSx NSX-T 3.2.0 NVMe sddc security servers ssh storage tenant upgrade vcd vcda VCDX vcenter VCF vcf 9 VDC vexpert Virtual Machines VMs vmware vmware.com vmware aria VMware Cloud Foundation VMware cluster VMware Explore VMware NSX vrslcm vsan walkthrough

  • Twitter
  • Instagram
  • Linkedin
  • Youtube

@2023 - All Right Reserved. Designed and Developed by Virtual Bytes

Virtual Bytes
  • Home
  • Home Data Center 2025
  • VMware
    • Cloud
    • Datacenter & Cloud Infrastructure
      • VMware ESXi
      • VMware vCenter
      • VMware vSAN
    • Networking & Security
    • Desktop & App Virtualization
      • Omnissa Horizon
    • Troubleshooting
    • Ansible
  • Education
  • Hardware
    • Hardware Tips & Tricks
  • Events
  • About
    • About Me
    • Home Lab Archives
      • Home Lab 2020-2022
      • Home Lab 2016-2020