Top Posts
What’s New In VMware Cloud Foundation 9.0
Deploying & Configuring the VMware LCM Bundle Utility...
VMware Cloud Foundation: Don’t Forget About SSO Service...
VMware Explore Las Vegas 2025: Illuminating the Path...
Securing Software Updates for VMware Cloud Foundation: What...
VMware Cloud Foundation 5.2: A Guide to Simplified...
VMware Cloud Foundation 5.2: Unlocking Secure Hybrid Cloud...
VMware Cloud Foundation – Memory Tiering: Optimizing Memory...
Decoding VMware Cloud Foundation: Unveiling the numerous amount...
VMware Cloud Director 10.6.1: Taking Cloud Management to...
Virtual Bytes
  • Home
  • Home Data Center 2025
  • VMware
    • Cloud
    • Datacenter & Cloud Infrastructure
      • VMware ESXi
      • VMware vCenter
      • VMware vSAN
    • Networking & Security
    • Desktop & App Virtualization
      • Omnissa Horizon
    • Troubleshooting
    • Ansible
  • Education
  • Hardware
    • Hardware Tips & Tricks
  • Events
  • About
    • About Me
    • Home Lab Archives
      • Home Lab 2020-2022
      • Home Lab 2016-2020
Category:

VMware NSX

VMware Cloud FoundationVMware NSX

NSX Manager Repository High Disk Usage

by Tommy Grot March 25, 2024
written by Tommy Grot 1 minutes read

If you’ve recently upgraded your NSX environment and noticed a spike in disk usage for the repository partition, you’re not alone. In this blog post, we’ll dive into the reasons behind this increase and provide some tips on how to manage and optimize your disk space. We’ll discuss common causes for the surge in disk usage post-upgrade, and explore some best practices for keeping your NSX environment running smoothly.

VMware Cloud Foundation (SDDC Manager) Password Lookup Utility

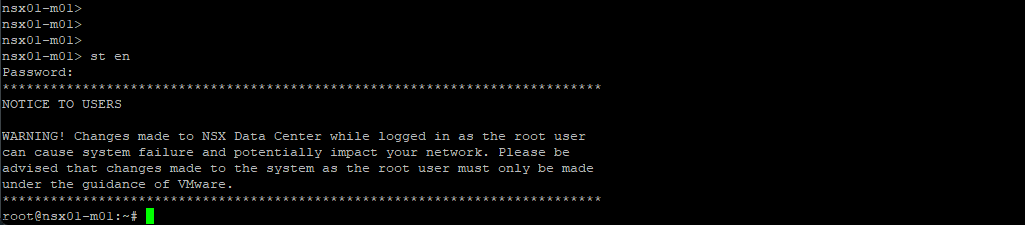
Next, we will need to SSH into the NSX Managers, if you are running NSX within VMware Cloud Foundation, you will need to run the VCF Lookup Password Utility within the SDDC Manager and login via remote console in vSphere to enable SSH services

To Start SSH Service on NSX Manager –

start service ssh

To Enable SSH Service on reboot –

set service start-on-boot

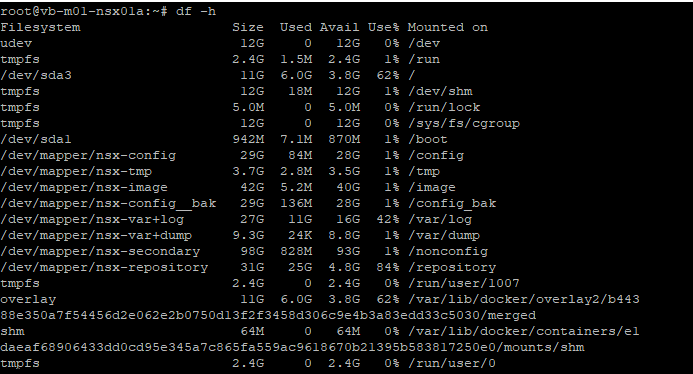
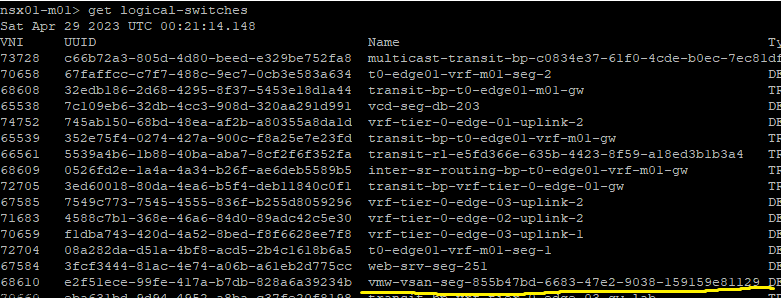
There is the 84% Usage of the repository partition, this partition holds all the previous patches and upgrades of NSX.

Now we delete the old folders, I also had old version of NSX Advanced Load Balancer which I cleaned up as well.

Example –

rm -rf 4.1.2.1.0.22667789/

There we go! No more alarms for high disk usage.

After a upgrade of your VMware NSX environment, it is always good to clean up the bundles and old binaries to prevent high disk usage and prevent and issue with your NSX Managers.

March 25, 2024 0 comments 942 views
0 FacebookTwitterLinkedinEmail
VMware NSX

NSX 4.x Certificate Replacement

by Tommy Grot August 31, 2023
written by Tommy Grot 2 minutes read

Tonight’s topic is on replacing NSX Certificate for each NSX Manager appliance and also the VIP. If you’re tired of battling with certificate issues and are looking for a straightforward solution, you’ve come to the right place! In this blog post, we will guide you through the process of replacing NSX certificates for each manager and the VIP in a hassle-free manner. We will break down the steps and provide you with expert tips to ensure a smooth transition. Let’s get started!

What you will need:

  • Postman client
  • Certificate CSR
  • Certificate Generated by your Enterprise CA (I use Microsoft CA)
  • Your Enterprise Root CA Cert
  • Your newly generated Private Key
  1. With your admin account, log in to NSX Manager.
  2. Select System > Certificates.

Import your Certificate and Private Key Into your NSX Manager via Web UI

Service Certificate – No

Certificate Contents

  • (Cert)
  • (Intermediate – if exists)
  • (Root Cert)

Once you have all pre-requisites ready lets open up postman client and what you will need to do is prepare the authentication portion of your postman to authenticate successfully to the NSX Managers. Once you will then you can start getting the API calls ready.

First lets validate the certificate we imported –

  • GET https://<nsx-mgr>/api/v1/trust-management/certificates/<cert-id>?action=validate
https://nsx01a.prd.virtualbytes.io/api/v1/trust-management/certificates/6d78f17d-f58c-4c27-99fd-31b572dfb1e8?action=validate

Once, you see Status OK then proceed to the next step below.

POST https://<FQDN>/api/v1/trust-management/certificates/<cert-id>?action=apply_certificate&service_type=API&node_id=<node-id>

https://nsx01a.prd.virtualbytes.io/api/v1/trust-management/certificates/6d78f17d-f58c-4c27-99fd-31b572dfb1e8?action=apply_certificate&service_type=API&node_id=7cbf2942-086e-9316-b277-95beed9d91b1

Repeat the follow for the additional NSX Managers – Below you can grab the UUID from System – Appliances – UUID (Copy to Clipboard)

https://nsx01.prd.virtualbytes.io/api/v1/trust-management/certificates/6d78f17d-f58c-4c27-99fd-31b572dfb1e8?action=apply_certificate&service_type=MGMT_CLUSTER

There we go, the VIP of my NSX cluster has a enterprise CA signed certificate!

August 31, 2023 2 comments 2K views
1 FacebookTwitterLinkedinEmail
CloudNetworkingVMware NSX

Deploying VMware NSX Advanced Load Balancer

by Tommy Grot May 3, 2023
written by Tommy Grot 2 minutes read

Today’s topic is on VMware NSX Advanced Load Balancer (AVI). We will walk through the steps of deploying a NSX ALB overlayed on top of your NSX Environment.

Features

  • Multi-Cloud Consistency – Simplify administration with centralized policies and operational consistency
  • Pervasive Analytics – Gain unprecedented insights with application performance monitoring and security
  • Full Lifecycle Automation – Free teams from manual tasks with application delivery automation
  • Future Proof – Extend application services seamlessly to cloud-native and containerized applications

More information at VMware’s site here

What You Will Need:

  • A Configured and running NSX Environment
  • NSX ALB Controller OVA (controller-22.1.3-9096.ova)
  • Supported Avi controller versions: 20.1.7, 21.1.2 or later versions
  • Obtain IP addresses needed to install an appliance:
    • Virtual IP of NSX Advanced Load Balancer appliance cluster
    • Management IP address
    • Management gateway IP address
    • DNS server IP address
  • Cluster VIP and all controllers management network must be in same subnet.

Lets start with deploying controller OVF

I like to keep neat and consistent names the following names I utilized:

Virtual Machine Names:
  • nsx-alb-01
  • nsx-alb-02
  • nsx-alb-03

You need total of 3 Controllers deployed to create a High Available NSX ALB.

Click the Ignore All, or you will get this error as show below

Select your datastore ->

Click Next ->

My DNS Records:

  • nsx-alb-01.virtualbytes.io
  • nsx-alb-02.virtualbytes.io
  • nsx-alb-03.virtualbytes.io

We are deploying!

Access your first appliance via its FQDN that you have set in the steps above.

Create your password for local admin account

Create your passphrase, and your DNS resolvers, and DNS Search Domains.

Skip SMTP if not needed, but if you need a mail server please fill out your required SMTP IP and Port

  • Service Engines are managed within the tenant context, not shared across tenants to enable the Tenant Context Mode.
  • Service Engines are managed within the provider context, shared across tenants to enable the Provider Context Mode.

That is it for the initial deployment, next we will add our other 2 additional NSX ALB nodes for HA setup.

Go to Administration -> Controller -> Nodes

Click Edit ->

For your 2 additional NSX ALB nodes you will need to provide an IP Address and hostname and password.

Sample of what it should look like for all 3 ALB appliances

A simple topology of what we have deployed.

That is it! from now on you can configure for what use case you will NSX-ALB for. A next blog post will go through how to step up a NSX-T Cloud.

Licensing Flavors – If you click on the little cog icon next to the Licensing. You will see different tiers.

Different License Tiers that are apart of NSX-ALB Licensing model.

May 3, 2023 0 comments 2.6K views
0 FacebookTwitterLinkedinEmail
VMware NSX

VMware NSX – Segment fails to delete from NSX Manager. Status is “Delete in Progress”

by Tommy Grot April 28, 2023
written by Tommy Grot 2 minutes read

Today’s troubleshooting tidbit – If you have issues removing a NSX Segment that got removed from NSX Policy UI but NSX Manager UI still shows that the segment is being used and active and cannot delete, well no problem at all. We will clean it up.

For More Reference VMware has a published KB for this here.

Below you will see that my vmw-vsan-segment that was stuck and said it was dependent on another configuration, but it was not. This segment was created from within VMware Cloud Director.

Confirm that there are no ports in use with the Logical Switch which was not deleted

Lets SSH into one of your NSX Managers, then we will execute the command below Run get logical-switches on the Local Manager CLI and confirm the stale Logical Switch is listed, and note its UUID

get logical-switches

 Elevate to root shell with command below

Engineering Mode

Use st en to enter engineering mode which is root privileged mode

st en

Confirm the Logical Switch info can be polled with API:
curl -k -v -H “Content-Type:application/json” -u admin -X GET “https://{mgr_IP}/api/v1/logical-switches/(LS_UUID)“

Example of my command below:

 curl -k -v -H "Content-Type:application/json" -u admin -X GET "https://172.16.2.201/api/v1/logical-switches/e2f51ece-99fe-417a-b7db-828a6a39234b"

Remove stale Logical Switch objects via API:
curl -k -v -H “Content-Type:application/json”  -H “X-Allow-Overwrite:true” -u admin -X DELETE “https://{mgr_IP}/api/v1/logical-switches/{LS_UUID}?cascade=true&detach=true“

Example of my command below:

curl -k -v -H "Content-Type:application/json"  -H "X-Allow-Overwrite:true" -u admin -X DELETE "https://172.16.2.201/api/v1/logical-switches/e2f51ece-99fe-417a-b7db-828a6a39234b?cascade=true&detach=true"

Now you should see a return ‘200’ response code if deletion is successful

That is all, we successfully cleaned up our NSX Segment that was stuck!

April 28, 2023 0 comments 1.4K views
0 FacebookTwitterLinkedinEmail
VMware NSX

Upgrading VMware NSX 4.0.1.1 to 4.1.0

by Tommy Grot March 1, 2023
written by Tommy Grot 4 minutes read

Topic of the day – How to upgrade VMware NSX 4.0.1.1 to 4.1.0, during this walkthrough, I will go through all the steps that are required, along with how the upgrade process is and any issues I encounter.

Lets Begin!

What Will You Need:

  • VMware-NSX-upgrade-bundle-4.1.0.0.0.21332672.mub
  • Successful NSX Configuration Backups on your SFTP Server
  • 1 hour!

Version I am Running:

  • VMware ESXi 8.0 Build 21203435
  • VMware vCenter Server – 8.0.0.10200

The supported upgrade paths for the NSX product versions. (More Info Here)

Adhere to the following upgrade paths for each NSX release version.

  • NSX 3.2.x > NSX 4.1.x.
  • NSX 4.0.x > NSX 4.1.x.

What’s New

Information below is from VMware’s NSX Release Notes – More Info Check out here!

NSX 4.1.0 provides a variety of new features to offer new functionalities for virtualized networking and security for private, public, and multi-clouds. Highlights include new features and enhancements in the following focus areas:

  • IPv6 support for NSX internal control and management planes communication – This release introduces support for Control-plane and Management-plane communication between Transport Nodes and NSX Managers over IPv6. In this release, the NSX manager cluster must still be deployed in dual-stack mode (IPv4 and IPv6) and will be able to communicate to Transport Nodes (ESXi hosts and Edge Nodes) either over IPv4 or IPv6. When the Transport Node is configured with dual-stack (IPv4 and IPv6), IPv6 communication will be always preferred.
  • Multi-tenancy available in UI, API and alarm framework – With this release we are extending the consumption  model of NSX by introducing multi-tenancy, hence allowing multiple users in NSX to consume their own objects, see their own alarms and monitor their VMs with traceflow.  This is made possible by the ability for the Enterprise Admin to segment the platform into Projects, giving different spaces to different users while keeping visibility and control.
  • Antrea to NSX Integration improvements – With NSX 4.1, you can create firewall rules with both K8s and NSX objects. Dynamic groups can also be created based on NSX tags and K8s labels. This improves usability and functionality of using NSX to manage Antrea clusters.
  • Online Diagnostic System provides predefined runbooks that contain debugging steps to troubleshoot a specific issue. These runbooks can be invoked by API and will trigger debugging steps using the CLI, API and Scripts. Recommended actions will be provided post debugging to fix the issue and the artifacts generated related to the debugging can be downloaded for further analysis. Online Diagnostic System helps to automate debugging and simplifies troubleshooting

Interoperability Check for VMware vSphere 8 and NSX 4.1

Before we start the upgrade, make sure that you have successfully backups of your current NSX Environment! For my implementation I used a SFTP Server running on Ubuntu Linux VM which is hosted on a secondary tier storage SAN,

Now, that we verified our backups are good. Lets begin uploading the MUB file.

Go To Upgrade ->

Click on UPGRADE

Find via Browse the VMware-NSX-upgrade-bundle-4.1.0.0.0.21332672.mub and upload it

Wait few min for the MUB to upload

Now, the MUB has been successfully uploaded to NSX Manager appliance, now we wait and let it extract all the files.

Verifying Stage

Now, we are ready to prepare for the Upgrade! (Accept the EULA at the pop up)

This portion of the upgrade will go through many stages within this little window, you will see once as an example: Restarting Upgrade Coordinator

Click – Run Pre-Check Before upgrading!

Now Let the NSX Edge Nodes upgrade, this is a pretty quick automated process!

NSX Edge Nodes successfully upgraded!

Now time to upgrade the Transport Nodes (also known as ESXi Hosts)

You will see the upgrade process going in vCenter Tasks. (Make sure that all VMs that are not on any kind of shared storage such as vSAN or a iSCSI LUN which is shared within the cluster, off.)

In Process upgrade for Hosts.

Successful Upgrade

The final part, we will upgrade the NSX Managers

Confirm to start the upgrade

Upgrade in process for NSX Managers, it does them 1 at a time.

Data Migration upgrade process

Unpin API

Unpin UI

There it is! Fully upgrade to NSX 4.1.0 – Now, next blog post we will get into the new features. But Check out that new Project Tab drop down for multi-tenancy!

March 1, 2023 0 comments 4.5K views
0 FacebookTwitterLinkedinEmail
VMware NSX

VMware NSX 4.0.0.1 Upgrade from NSX-T 3.2.1

by Tommy Grot August 7, 2022
written by Tommy Grot 2 minutes read

Want to upgrade to VMware NSX? Yes, thats the new name for VMware NSX-T Datacenter. It has been renamed. More information from VMware.

Product Name Change: With the release of 4.0.0.1 the product name changes from “VMware NSX-T Data Center” to “VMware NSX.” This new name better reflects the multi-faceted value that NSX brings to customers. This update is apparent in the product graphical user interface as well as documentation. This change has no impact to the functionality of the product or changes to the API that impacts compatibility with previous releases. Want More info? Check out VMware’s site

First things first! Lets log into your NSX-T primary node. Then go to System and Upgrade.

Upload the VMware-NSX-upgrade-bundle-4.0.0.1.0.20159689.mub file.

This will take few min to upload, depending on your connection speeds.

This will verify the matrix and other settings prior to upgrading.

Once, the compatibility has been checked. Next you will need to accept the EULA.

Now, lets fire up the upgrade! This will upload the required files to each of the NSX-T Managers.

Continuation of the Upgrade Preperation

Run a Pre-Check before you execute the upgrade!

After, everything has passed the pre-checks. You may start the upgrades, but make sure you have backups if something happens and you need to restore! If you need to know how to setup backups check out my other post.

This will take few minutes, you may step away and come back, you should see the progress go through, starting from the NSX Edge Nodes, then ESXi Hosts, then VMware NSX Managers.

This will start the upgrade of the NSX Managers. Make sure again, that you have backups configured!!

After 15-20 minutes, depending on the environment your upgrade should be done! And that is it! Very simple way to upgrade NSX without any downtime!

August 7, 2022 0 comments 5.4K views
0 FacebookTwitterLinkedinEmail
VMware NSX

VMware NSX-T Restore a Failed Manager

by Tommy Grot July 23, 2022
written by Tommy Grot 2 minutes read

Has your NSX-T Manager failed and wont start up or disk errors? Well, no worries. If you have backups setup from a SFTP server you can quickly restore your NSX-T Managers while your edge nodes are still up and running, there will be no disruption to your networking and routing it all stays up!

Lets begin!

First login into vCenter and Upload the OVA for NSX-T Manager

This is important, keep the same name as before, so if you have your old NSX-T Managers powered down, then rename them and just -old so you can go back to them if something went wrong during the restore.

Select the compute resource

Make sure you select the same size as before, it has to match for this restore process to work smoothly!

Fill in all the same information you have pre-polulated orginally when you build the NSX-T envrionment

Once OVA gets deployed then login into you first node of the NSX-T Manager

Go to System

Backup & Restore

Select the primary node for backup, once you select restore your session will get kicked out

Okay – it will take few minutes ~5-10 minutes, but once you see the NSX-T login screen, log back in and then go back to

System -> Backup & Restore

You will see an yellow back that the back up was suspended, that is okay it wants you to deploy the other 2 NSX-T Managers.

Okay, now you can see it sees one NSX-T Managers, well now click cancel and go deploy 2 more NSX-T Managers.

Fill in the information that you orginally have configured, and select the same Node Size as before.

Select the same compute, workload domain you had on before.

Repeat the same setups for deploying for the third NSX-T Manager, once both managers are up and the CPU has calmed down, you may now proceed with the Manual steps.

You will see the progress bar go through…

Now, that is is! You have restored your NSX-T environment and it is still operational from a networking perspective. All the Edge Nodes were still running and crunching away!

July 23, 2022 0 comments 2.1K views
0 FacebookTwitterLinkedinEmail
NetworkingVMware NSX

NSX-T 3.2 VRF Lite – Overview & Configuration

by Tommy Grot February 20, 2022
written by Tommy Grot 7 minutes read

Hello! Today’s blog post will be about doing a NSX-T Tier-0- VRF Tier-0 with VRF Lite Toplogy and how it will be setup! We will be doing a Active / Active Toplogy with VRF.

A little about what a VRF is – (Virtual Routing and Forwarding) this allows you to logically carve out a logical router into multiple routers, this allows you to have multiple identical networks but logically segmented off into their own routing instances. Each VRF has its own independent routing tables. this allows to have multiple networks be segmented away from each other and not overlap and still function!

Benefit of NSX-T VRF Lite – allows you to have multple virtual networks on on a same Tier-0 without needing to build a seperate nsx edge node and consuming more resources to just have the ability to segment and isolate a routing instance from another one.

Image from VMware

What is : Transport Zone (TZ) defines span of logical networks over the physical infrastructure. Types of Transport Zones – Overlay or VLAN

When a NSX-T Tier-0 VRF is attached to parent Tier-0, there are multiple parameters that will be inherited by design and cannot be changed:

  • Edge Cluster
  • High Availability mode (Active/Active – Active/Standby)
  • BGP Local AS Number
  • Internal Transit Subnet
  • Tier-0, Tier-1 Transit Subnet.

All other configuration parameters can be independently managed on the Tier-0:

  • External Interface IP addresses
  • BGP neighbors
  • Prefix list, route-map, Redistribution
  • Firewall rules
  • NAT rules

First things first – login into NSX-T Manager, once you are logged in you will have to prepare the network and tranport zones for this VRF lite topology to properly work, as it resides within the overlay network within NSX-T!

Go to Tier-0 Gateways -> Select one of your Tier-0 Routers that you have configured during initial setup. I will be using my two Tier-0’s, ec-edge-01-Tier0-gw and ec-edge-02-Tier0-gw for this tutorial along with a new Tier-0 VRF which will be attached to the second Tier-0 gateway.

So, first thing we will need to prepare two (2) segments for our VRF T0’s to ride the overlay network.

Go to – Segments -> Add a Segment, the two segments will ride the overlay transport zone, no vlan and no gateway attached. Add the segments and click on No for configuring the segment. Repeat for Second segment.

Below is the new segment that will be used for the Transit for the VRF Tier-0.

Just a reminder – this segment will not be connected to any gateway or subnets or vlans

Here are my 2 overlay backed segments, these will traverse the network backbone for the VRF Tier-0 to the ec-edge-01-Tier0-gw.

But, the VRF Tier 0 will be attached to the second Tier 0 (ec-edge-02-Tier0-gw) which is on two seperate Edge nodes (nsx-edge-03, nsx-edge-04) for a Active – Active toplogy.

Once the segment has been created then we can go and created a VRF T0. Go back to the Tier-0 Gateway window and click on Add Gateway – VRF ->

Name of VRF gateway ec-vrf-t0-gw and then attach it to the ec-edge-02-Tier0-gw, enable BGP and create a AS# which i used 65101, and as the second Tier-0-gateway it will act as a ghost router for those VRFs.

Once you finish you will want to click save, and continue configuring that VRF Tier-0, next we will configure the interfaces.

Now, we will need to create interfaces on the ec-edge-01-Tier0-gw. Expand Interfaces and click on the number in blue, for my deployment my NSX-T Tier 0 right now has 2 interfaces.

Once you create the 2 Interfaces on that Tier 0 the number of interfaces will change.

Click on Add Interfaces -> Create a unique name for that first uplink which will peer via BGP with the VRF T0.

Allocate couple IP addresses, I am using 172.16.233.5/29 for the first interface on the ec-vrf-t0-gw, which lives within the nsx-edge-01 for my deployment, the VRF T0 will have 172.16.233.6/29, and connect that interface on the overlay segment you created earlier.

Then the second interface, I created with the IP of 172.16.234.5/29, also the VRF Tier-0 will have 172.16.234.6/29 and each interface will be attaced to that second nsx-edge-node-02, so first IP 172.16.233.5/29 is attached to edge node 1 and second IP will be on Edge Node 02.

ec-t0-1-vrf-01-a – 172.16.233.5/29 – ec-t0-vrf-transport-1 172.16.233.6/29 (overlay segment)

ec-t0-1-vrf-01-b 172.16.234.5/29 – ec-t0-vrf-transport-2 172.16.234.6/29 (overlay segment)

Jumbo Frames 9000 MTU on both interfaces

Once you have created all required interfaces, below is an example of what i created, make sure you have everything setup correctly or the T0 and VRF T0 will not peer up!

Then go to BGP configuration for that nsx-edge-01 and nsx-edge-02 and prepare the peers from it to the VRF Tier-0 router.

Next, we will create another set of interfaces for the VRF T0 itself, these will live on nsx-edge-03 and nsx-edge-04. Same steps as what we created for nsx-edge-01 and nsx-edge-02, just flip it!

ec-t0-1-vrf-01-a – 172.16.233.6/29 – nsx-edge-03

ec-t0-1-vrf-01-b -172.16.234.6/29 – nsx-edge-04

Jumbo Frames 9000MTU

Once, both interfaces are configured for the Tier-0’s, you should have two interfaces with different subnets for the transit between the VRF T0 and the Edge 01 gateway Tier-0. After, interfaces are created on the specific nsx-edges.

Verify the interfaces and the correct segments and if everything is good, click save and proceed to next step.

Everything we just created rides the overlay segments, now we will configure BGP on each of the T0s.

Expand BGP – Click on the External and Service Interfaces (number) mine has 2.

Click Edit on the Tier 0, ec-edge-01-Tier0-gw and expand BGP and click on BGP Neigbors.

Create the BGP Peers on the VRF T0, you will see the interface IP we created earlier under the “Source Addresses” those are attached to each specific interface which is on those overlay segments we created for the VRF lite model.

172.16.233.5 – 172.16.233.6 – nsx-edge-03
172.16.234.5 – 172.16.234.6 – nsx-edge-04

Click Save and proceed to creating the second BGP interface which will be for nsx-edge-04 BGP

If everything went smooth, you should be able to verify your BGP peers between both Tier-0 and VRF Tier-0 as shown below.

After you have created the networks, you may create a T1 and attach it to that VRF T0! Which you can consume within VMware Cloud Director or just a standalone T1 which is attached to that VRF, But next we will attach a test segment to this VRF T0 we just created!

Once you create that segment with a subnet attached to the Tier-1 you will want to verify if you have any routes being advertised within your TOR Router, for my lab i am using a Arista DCS 7050QX-F-S which is running BGP.

I ran a command – show ip route on my Arista core switch.

You will see many different routes but the one we are intersted is 172.16.66.0/24 we just advertised.

If you do not see any routes coming up from the new VRF T0 we created you will want to create a Route-Redistrubition for that T0, click on the vrf t0 and edit and go to Route Re Distribution

For the walkthrough I redistributed everything for testing purposes, but for your use case you will only want to re-distribute the specific subnets, nats, forward IPs etc.

Overall toplogy of what we created is to the left with the two T0s, the T0 to the right is my current infrastructure.

That is it! For this walk through, we created a VRF T0 and attached it to the second edge t0 router and then we took the VRF T0 and peered up to the ec-edge01-t0-gw.

February 20, 2022 0 comments 2.5K views
1 FacebookTwitterLinkedinEmail


Recent Posts

  • What’s New In VMware Cloud Foundation 9.0
  • Deploying & Configuring the VMware LCM Bundle Utility on Photon OS: A Step-by-Step Guide
  • VMware Cloud Foundation: Don’t Forget About SSO Service Accounts
  • VMware Explore Las Vegas 2025: Illuminating the Path to Cloud Excellence!
  • Securing Software Updates for VMware Cloud Foundation: What You Need to Know

AI AVI Vantage cloud Cloud Computing cloud director computing configure cyber security director dns domain controller ESXi How To las vegas llm llms multi-cloud multicloud NSx NSX-T 3.2.0 private AI servers ssh storage tenant upgrade vcd vcda VCDX vcenter VCF VDC vexpert Virtual Machines VMs vmware vmware.com vmware aria VMware Cloud Foundation VMware cluster VMware Explore VMware NSX vrslcm vsan walkthrough

  • Twitter
  • Instagram
  • Linkedin
  • Youtube

@2023 - All Right Reserved. Designed and Developed by Virtual Bytes

Virtual Bytes
  • Home
  • Home Data Center 2025
  • VMware
    • Cloud
    • Datacenter & Cloud Infrastructure
      • VMware ESXi
      • VMware vCenter
      • VMware vSAN
    • Networking & Security
    • Desktop & App Virtualization
      • Omnissa Horizon
    • Troubleshooting
    • Ansible
  • Education
  • Hardware
    • Hardware Tips & Tricks
  • Events
  • About
    • About Me
    • Home Lab Archives
      • Home Lab 2020-2022
      • Home Lab 2016-2020