Top Posts
Offline VMware Cloud Foundation 9 Depot: Your Path...
VMware Cloud Foundation 9: Simplifying Identity with a...
What’s New In VMware Cloud Foundation 9.0
Deploying & Configuring the VMware LCM Bundle Utility...
VMware Cloud Foundation: Don’t Forget About SSO Service...
VMware Explore Las Vegas 2025: Illuminating the Path...
Securing Software Updates for VMware Cloud Foundation: What...
VMware Cloud Foundation 5.2: A Guide to Simplified...
VMware Cloud Foundation 5.2: Unlocking Secure Hybrid Cloud...
VMware Cloud Foundation – Memory Tiering: Optimizing Memory...
Virtual Bytes
  • Home
  • Home Data Center 2025
  • VMware
    • Cloud
    • Datacenter & Cloud Infrastructure
      • VMware ESXi
      • VMware vCenter
      • VMware vSAN
    • Networking & Security
    • Desktop & App Virtualization
      • Omnissa Horizon
    • Troubleshooting
    • Ansible
  • Education
  • Hardware
    • Hardware Tips & Tricks
  • Events
  • About
    • About Me
    • Home Lab Archives
      • Home Lab 2020-2022
      • Home Lab 2016-2020
Tag:

vmware

VMware Troubleshooting

vSphere ESXi Dump Collector

by Tommy Grot October 17, 2020
written by Tommy Grot 2 minutes read

If you have any issues or errors that occur within the ESXi Hypervisor, the ESXi Collector will send the current state of the VMkernel Memory. This will dump the core to the vCenter via network. So if a ESXi host fails or gets compromised there will be traces of sys log and other logs sent to the vCenter Serve which could be in the same organization datacenter or reside somewhere else in the cloud.

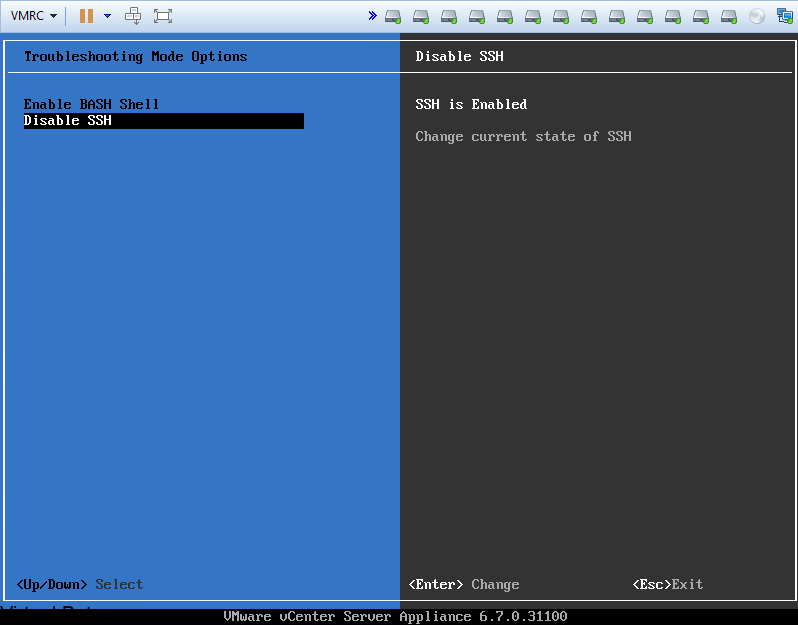
Cyber Security Tip! – DISABLE SSH after you are done working with it, this is strongly recommend to harden the ESXi host and prevent any cyber attacks against SSH (Port 22)

The ESXi Dump Collector traffic is not encrypted so best practice is to set it on a isolated VLAN that the internet or other networks do not communicate with it.

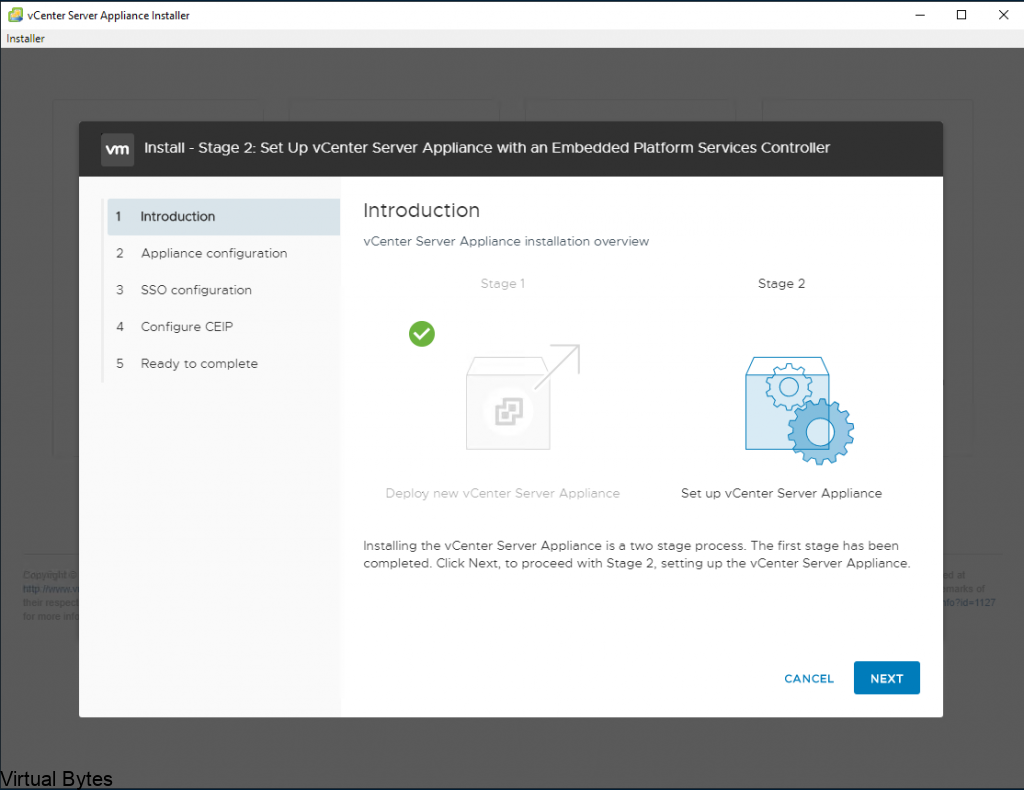
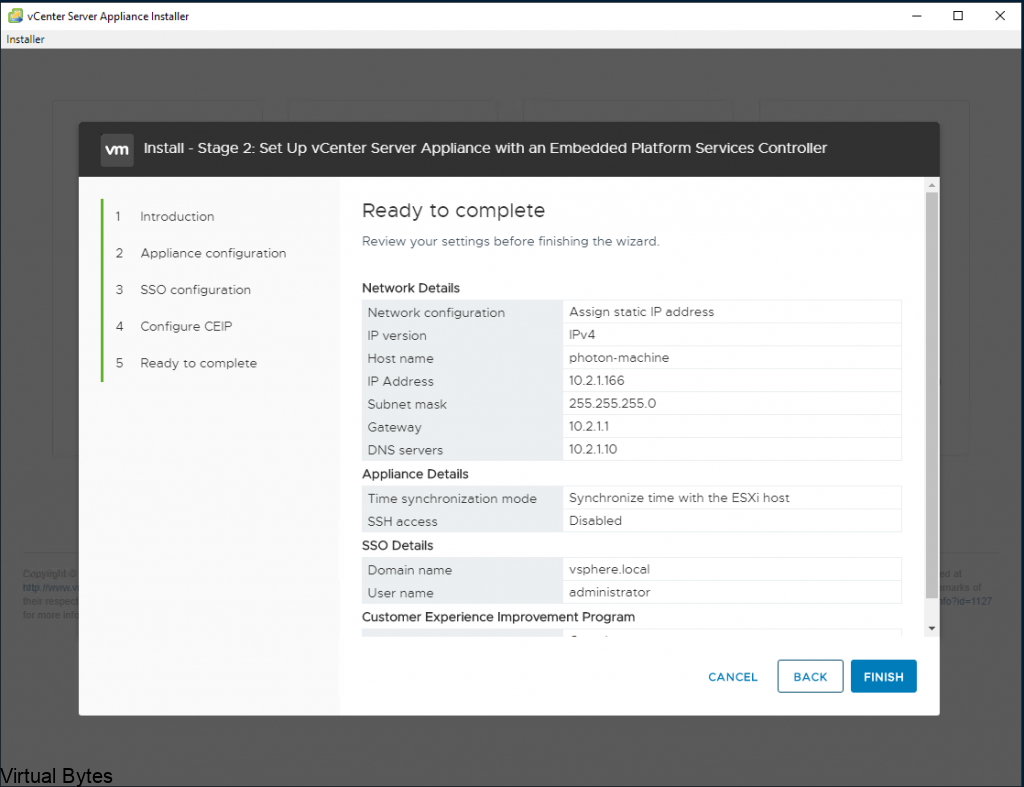
First step, is to log into VMware Server Management, also known as, VAMI.

https://YOUR_VCENTER_IP_OR_DNS:5480/

The login credentials to log into VAMI

Username : root

Password : The Password you setup during installation.

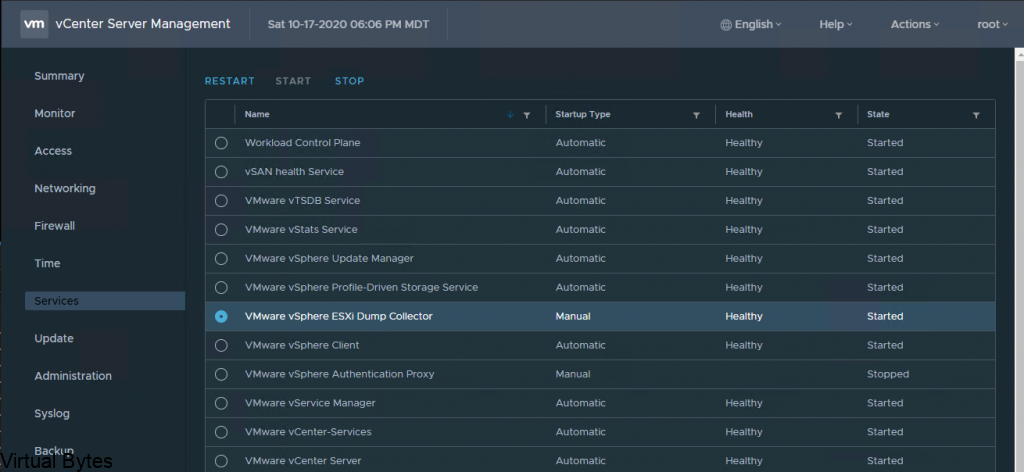
Once you are logged into VAMI, you will need to go to the Services section. Then look for VMware vSphere ESXI Dump Collector.

Select it, and click START

After the VMware vSphere ESXi Dump Collector is started and running, log into your ESXi host(s) via SSH.

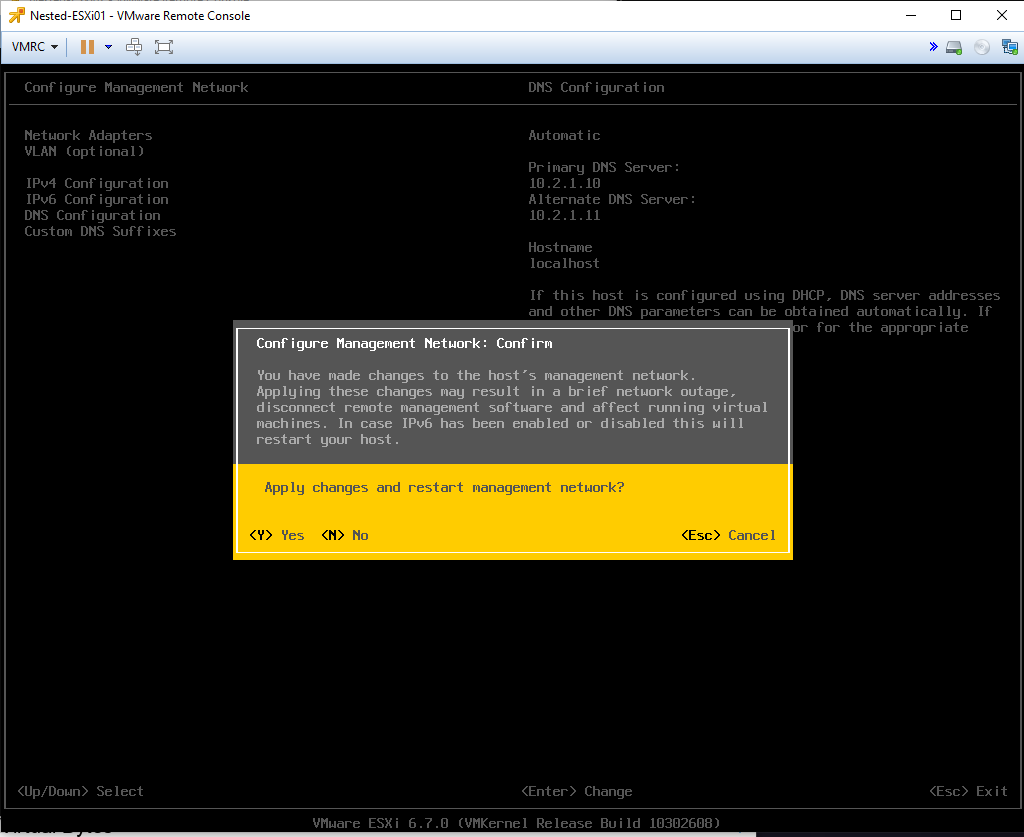
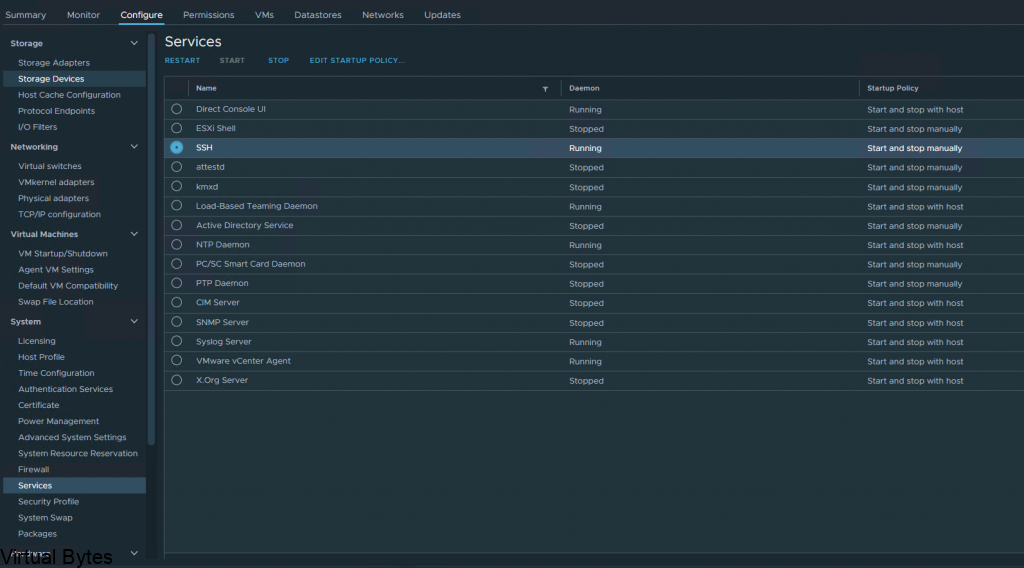
To enable SSH on the cluster, login your vCenter, then go to the ESXi host, Click on Configure -> System -> Services. You will see SSH, click on that and select START.

Once SSH has started, open up your favorite SSH tool, for this tutorial I am using Putty. You may download it here.

Then log into the ESXi host and you will execute few commands to enable the ESXi host to offload the VMkernel logs to the vCenter Dump Collector.

esxcli system coredump network set --interface-name vmk0 --server (YOUR vCENTER IP) --server-port 6500
esxcli system coredump network set --enable true
esxcli system coredump network get

After all those 3 commands are executed with your specific vCenter IP, you will see that the final command will get the coredump network configuration and display it in the SSH session. Once that is enabled you will see that the Alert for ESXi Core Dumps log go away and logs are offloaded.

October 17, 2020 0 comments 2.1K views
0 FacebookTwitterLinkedinThreadsBlueskyEmail
VMware vSAN

Reuse Ex-vSAN Host, Remove vSAN configuration with esxcli

by Tommy Grot October 17, 2020
written by Tommy Grot 1 minutes read

Trying to re-use a previous VMware ESXi host, but the vSAN Disks are still claimed. No worries – Below we will walk you through how to remove the drives and get your disks back to rebuild your vSAN Cluster!

First run this command to check if the disks are apart of the vSAN Cluster

esxcli vsan storage list | grep naa

Once you run the esxcli vsan storage list | grep naa, then you will need to run the command below, to prevent that the automatic disk claim is disabled for this procedure.

esxcli vsan storage automode set --enabled false

Once the vSAN automatic disk claim command is completed, then you may remove vSAN Disk Group Names with the command below. Replace the (VSAN Disk Group Name) with your corresponding naa. ID.

esxcli vsan storage remove -s (VSAN Disk Group Name)

After all vSAN Drives have been removed from each ESXi host. Then you will want to verify that all the vSAN Disks no longer show up and you will want to run the same command as you did in the beginning.

If nothing shows up then you successful removed all vSAN Disks.

esxcli vsan storage list | grep naa

To finalize the removal of vSAN you will want the host to leave the vSAN Cluster so you will need to run this command.

esxcli vsan cluster leave

You will see a vSAN Clustering is not enabled on this host message.

Once you have completed all those steps, you will successfully see that all the SAS SSDs below are no longer claimed by vSAN. Now the ESXi host is ready for a fresh installation!

October 17, 2020 5 comments 4.7K views
1 FacebookTwitterLinkedinThreadsBlueskyEmail
Ansible

Creating Multiple Virtual Machines with Ansible in VMware vSphere 7 Update 1

by Tommy Grot October 15, 2020
written by Tommy Grot 2 minutes read

In today’s blog post, we will be creating a Ansible Playbook to create multiple Virtual Machines within VMware vSphere 7 Update 1.

These tasks below are completed via Ubuntu 20.04, if you need to download Ubuntu do it here.

My personal recommendation is to have a Virtual Machine with Ubuntu server with Ansible installed to do all this work, if you are not comfortable with Command Line Interface (CLI) you may also use Ubuntu Desktop.

Step 1 – Update / Upgrade your Ubuntu 20.04 Virtual Machine

sudo apt update -y
 sudo apt upgrade -y

If need to reboot then run this command.

sudo reboot 

After rebooting the Virtual Machine, log back in and check to see if you have the latest python installed with this command below

python3 -v

Once Python3 is verified you will need to install python3-pyvmomi, this is a Python SDK for the VMware vSphere API.

apt install python3-pyvmomi

Below is a playbook to create multiple Virtual Machines, prior to running this playbook. You will need to have a template configured and ready!

Few things to do before running this playbook:

  • Create a “[email protected]” account to run all your playbooks, instead of using the [email protected] default account.
  • Have a virtual machine template already converted and ready to be deployed.
  • Fill out all required variables / information of your: vCenter Server IP Address or DNS, username, password, data center name, template name, datastore name.
  • Configure the naming convention you want your Virtual Machines to be named, by configuring the “with_items” below and how many clones you will want to be created.

---
 - hosts: localhost
  gather_facts: no
  vars:
    vcenter_server: "vCenter IP Address or DNS"
    vcenter_user: "[email protected]" 
    vcenter_pass: "Insert_vCenter Password"
    datacenter_name: "Datacenter"
    #cluster_name: "Cluster" uncomment this if you have a cluster
  tasks:
  name: Clone the template 
  vmware_guest:
  hostname: "{{ vcenter_server }}"
  username: "{{ vcenter_user }}"
  password: "{{ vcenter_pass }}"
  validate_certs: False
  name: "{{ item }}"
  template: template-esxi-0
  datacenter: "{{ datacenter_name }}"
  folder: /
  #cluster: "{{ cluster_name }}" uncomment this if you have a cluster
  datastore: "<Insert Datastore Name>" 
  state: poweredon 
 with_items:
  #Configure the amount of Clones you would like with the items below.
  - <your vm name01>
  - <your vm name02>
  - <your vm name03>

October 15, 2020 0 comments 3.9K views
0 FacebookTwitterLinkedinThreadsBlueskyEmail
VMware ESXi

Installing / Upgrading VMware vSphere ESXi 7 Update 1 via iDRAC 8

by Tommy Grot October 7, 2020
written by Tommy Grot 2 minutes read

This post is guiding you on how to install or upgrade VMware ESXi 7 Update 1. This walk through will be the same for installing or upgrading ESXi, the only difference would be during the install you would specify a root password along with installing it.

Disclaimer: This also works for iDRAC 8 and below. On Dell PowerEdge 13th, 12th Generation servers.

Information Regarding the VMware vSphere Update via VMware’s Website – Click Here to Download, You will need to login with your VMware credentials.

Name:VMware-VMvisor-Installer-7.0U1-16850804.x86_64
Release Date:2020-10-06
Build Number:16850804

First Step: Log into iDRAC via root. Once logged in, click on Launch virtual console as below in the screenshot.

Once the Virtual Console window has opened. You will need to mount your VMware-VMvisor-Installer-7.0U1-16850804.x86_64.iso to the Virtual Optical Drive. Then click Map Device.

During the reboot of the server you may have to press F11 to get into the Boot Menu and select the One Time Boot Menu and go down to Virtual Optical Drive.

Once you select Virtual Optical Drive you will see the Dell BIOS loading and running through its boot up processes.

Now loading the VMware-VMvisor-Installer-7.0U1-16850804.x86_64.iso and it loads into memory.

Once the VMware ESXi 7.0.1 installer has loaded you will be greeted with a menu to follow through which is pretty straightforward.

Accept EULA.

Install or Upgrade VMware ESXi 7.0.1 on the correct corresponding datastore. If it is on a SD Card or Flash it will show up. Ensure to not install it on a VMFS datastore!

During this step. You have the ability to install a fresh or upgrade an existing environment. This will depend on your scenario. Please follow through carefully and ensure you have all backups of your DATA!

This will be the Final Screen prior to proceeding with the Installation or Upgrade! Press F11 to upgrade or accept if it is a fresh install.

Please be patient and let install finish 🙂

Install / Upgrade is complete! Now you may un map the virtual optical drive and reboot the host! And Enjoy the new VMware vSphere Update 7.0.1

October 7, 2020 1 comment 9K views
1 FacebookTwitterLinkedinThreadsBlueskyEmail
VMware vCenter

VMware vCenter 7 Update 1 – Installation Walkthrough

by Tommy Grot October 6, 2020
written by Tommy Grot 3 minutes read


To Install vCenter 7.0 Update 1 with Embedded Platform Service Controller – Download the ISO from VMware (login will be required) Once downloaded, open the VMware VCSA.iso

  • Select vcsa-ui-installer folder
  • Then select choice of operating system (This tutorial is completed via Windows 10)
  • After going to win32
  • Then click on installer.exe

During this install we will be installing fresh new instance of VCSA.

  • Select Install

This installation now only offers Embedded Platform Services Controller. The External Platform Service Controller topology is depreciated model per VMware

Click Next

  • Accept EULA

Specify the VMware ESXi Host or vCenter IP Address – Example – 10.0.0.100 or DNS Name – esxi01.virtualbytes.io ; vcenter.virtualbytes.io

( VMware recommends to operate its platform with DNS names, this allows easier management and IP address modifications )

  • After all proper information is configured / documented – Click Next
  • Accept the Certificate Warning from the ESXi Host
  • Setup the appliance –
    • Specify a name for your vCenter Server (ex. vCenter, VCSA, etc)
    • Specify the VCSA root password ( If you do lose this password there is a step by step procedure to recover access)
  • During this Stage 1 – Here you can specify the VCSA installation to the specified datastore. Enabling Thin Disk Mode – will per-allocate the actual used storage of the virtual machine on the datastore (This saves storage from being filled)
  • VMware recommends to install vCenter under a FQDN (Fully Qualified Domain Name) with a FQDN – this allows you to change the IP address of a VCSA.
    Be cautious of filling the “Configure network settings” page – This will lead to a inoperable vCenter instance.
  • Recommendation – Setup an ‘A’ Record on your local network DNS server or Domain Controller to point to the fresh new vCenter Server Appliance

VERIFY! VERIFY! VERIFY! – If you do not verify your appliance deployment configuration and you mis-configure a setting – You will be reinstalling VCSA from scratch again. (BE CAREFUL!)

After you have verified all information – Click Next

  • This stage will take few minutes – Grab a coffee or water! 🙂
  • Once the Deploy vCenter Server Appliance is completed – You will see another window to “Continue” – Click Continue and this will lead you to the next window.
  • Stage 2 – This stage you will get to configure the Appliance configuration such as (SSH, SSO, CEIP)
  • SSH – is recommend to be turned off for security reasons, unless you are setting up more than one vCenter server and setting up vCenter High Availability
  • SSO – the single sign on, the default is vsphere.local, if you have a on premise domain controller, make sure you do not use the same domain name, this will prevent you from adding vCenter to the Active Directory domain forest.
  • Most recommended option is to synchronize the time with the ESXi Host – Also making sure that the NTP Service is running on the ESXi Host and is up to date with a relative time server.
  • During this option – SSO ( Single Sign On ) If you plan to join your vCenter to a Active Directory Domain – Make sure to specify a different domain or keep vsphere.local (You cannot use same AD domain as SSO domain on VCSA)

VERY IMPORTANT! Make sure the password you specify in this configuration window is accurate. If not you will be repeating the installation all over again – due to a password mis-configuration

  • Your choice to Join the CEIP Program ( This is recommend to join CEIP to get the Skyline Alerts and Health Updates)
  • Verify the finalization stage – this stage will configure your vCenter Server Appliance.

VERY IMPORTANT! Make sure the password you specify in this configuration window is accurate. If not you will be repeating the installation all over again due to a password mis-configuration

  • Once you confirm the final confirmation – There is no going back! Unless you took a snapshot of the vCenter Server Appliance prior to starting the vSphere SSO domain portion.
  • Enjoy your coffee or water – and wait patiently (This takes around 10-20 minutes, depending on the hardware)
  • You’ve installed vCenter Server Appliance! Now you may log into it URL to your server will be a – DNS A Record you configured in your local DNS Server.

https://your_vcenter_dns_name

October 6, 2020 0 comments 1.7K views
0 FacebookTwitterLinkedinThreadsBlueskyEmail
VMware Troubleshooting

VMware VAMI – Unable to login

by Tommy Grot July 19, 2019
written by Tommy Grot 1 minutes read

Do you have a issue with logging into VMware vCenter Appliance Management? If so there is a little work around to getting back into your VAMI! I wanted to upgrade my vCenter Server to 6.7U2 via webUI “https://<FQDN>:5480″ and I ran into this little issue.

First Enable SSH at the vCenter Level – from your Remote Console

Login into your vCenter via Console (VMRC)

Then Go into “Troubleshooting Mode Options”

Then Enable SSH

Login into vCenter via SSH – Once logged in, run this command

service-control --status

Once you run the first command, then run this command to start all vCenter Services to a running and operational state.

service-control --start --all

After all the processes have been started, you may login into your vCenter VAMI, but I prefer to reboot the vCenter Server to give it a fresh start after the service fix.

After this is all done, make sure to DISABLE SSH! Just a security precaution.

July 19, 2019 0 comments 1.5K views
0 FacebookTwitterLinkedinThreadsBlueskyEmail
VMware vSAN

Setting Up – Nested ESXi 6.7 on vSAN

by Tommy Grot April 12, 2019
written by Tommy Grot 1 minutes read

Today we will be installing Nested ESXi 6.7 on vSAN.

This is not a supported type of deployment for Production Environments. USE AT YOUR OWN RISK!

Before Installing ESXi 6.7 – There will be a requirement to add an ESXCLI command via SSH on each host that is apart of the vSAN Cluster

To Enable SSH on ESXi 6.7 – Go to desired host. Click on Configure -> System -> Services -> Click on SSH and click Start.

 esxcli system settings advanced set -o /VSAN/FakeSCSIReservations -i 1 

After the command is inputted. Continue Installation.

After installation – Setup ESXi to have Static IP Address
Once IP address is set, Apply the settings and Select Y – Yes ( This will not interrupt VM traffic only Management)
April 12, 2019 0 comments 2.1K views
0 FacebookTwitterLinkedinThreadsBlueskyEmail
VMware vCenter

VMware vCenter 6.7 – Installation Walk-through

by Tommy Grot February 27, 2019
written by Tommy Grot 3 minutes read

To Install vCenter 6.7 with Embedded Platform Service Controller – Download the ISO from VMware (login will be required) Once downloaded, open the VMware VCSA.iso

  • Select vcsa-ui-installer
  • Then select choice of operating system (This tutorial is completed via Windows 10)
  • After going to win32
  • Then click on installer.exe

During this install we will be installing fresh new instance of VCSA.

  • Select Install
  • Click Next
  • Accept EULA
  • During this installation – we will choose Embedded Platform Services Controller. The External Platform Service Controller topology is depreciated model.
  • Specify the VMware ESXi Host or vCenter IP Address – Example – 10.0.0.100 or DNS Name – esxi01.virtualbytes.io ; vcenter.virtualbytes.io
    ( VMware recommends to operate its platform with DNS names, this allows easier management and IP address modifications )
  • Accept the Certificate Warning from the ESXi Host
  • Setup the appliance –
    • Specify a name for your vCenter Server (ex. vCenter, VCSA, etc)
    • Specify the VCSA root password
  • During this Stage 1 – Here you can specify the VCSA installation to the specified datastore. Enabling Thin Disk Mode – will per-allocate the actual used storage of the virtual machine on the datastore (This saves storage from being filled)
  • VMware recommends to install vCenter under a FQDN (Fully Qualified Domain Name) with a FQDN – this allows you to change the IP address of a VCSA.
    Be cautious of filling the “Configure network settings” page – This will lead to a inoperable vCenter instance.
  • Recommendation – Setup an ‘A’ Record on your local DNS server or Domain Controller to point to the fresh new vCenter Server Appliance

VERIFY! VERIFY! VERIFY! – If you do not verify your appliance deployment configuration and you mis-configure a setting – You will be reinstalling VCSA from scratch again. (BE CAREFUL!)

  • This stage will take few minutes – Grab a coffee or water! 🙂
  • Once the Deploy vCenter Server Appliance is completed – You will see another window to “Continue” – Click Continue and this will lead you to the next window.
  • Stage 2 – This stage you will get to configure the Appliance configuration such as (SSH, SSO, CEIP)
  • SSH – is recommend to be turned off for security reasons, unless you are setting up more than one vCenter server and setting up vCenter High Availability
  • SSO – the single sign on, the default is vsphere.local, if you have a on premise domain controller, make sure you do not use the same domain name, this will prevent you from adding vCenter to the Active Directory domain forest.
  • Most recommended option is to synchronize the time with the ESXi Host – Also making sure that the NTP Service is running on the ESXi Host and is up to date with a relative time server.
  • During this option – SSO ( Single Sign On ) If you plan to join your vCenter to a Active Directory Domain – Make sure to specify a different domain or keep vsphere.local

VERY IMPORTANT! Make sure the password you specify in this configuration window is accurate. If not you will be repeating the installation all over again – due to a password mis-configuration

  • Your choice to Join the CEIP Program
  • Verify the finalization stage – this stage will configure your vCenter Server Appliance.

VERY IMPORTANT! Make sure the password you specify in this configuration window is accurate. If not you will be repeating the installation all over again due to a password mis-configuration

  • Once you confirm the final confirmation – There is no going back! Unless you took a snapshot of the vCenter Server Appliance!
  • Enjoy your coffee or water – and wait patiently (This takes around 10-20 minutes, depending on the hardware)
  • You’ve installed vCenter Server Appliance! Now you may log into it URL to your server will be a – DNS A Record you configured in your local DNS Server.

https://your_vcenter_dns_name

February 27, 2019 0 comments 1.8K views
0 FacebookTwitterLinkedinThreadsBlueskyEmail
Newer Posts
Older Posts


Recent Posts

  • Offline VMware Cloud Foundation 9 Depot: Your Path to Air-Gapped Deployments
  • VMware Cloud Foundation 9: Simplifying Identity with a Unified SSO Experience
  • What’s New In VMware Cloud Foundation 9.0
  • Deploying & Configuring the VMware LCM Bundle Utility on Photon OS: A Step-by-Step Guide
  • VMware Cloud Foundation: Don’t Forget About SSO Service Accounts

AI cloud Cloud Computing cloud director configure cyber security director dns domain controller ESXi How To las vegas llm llms multicloud NSx NSX-T 3.2.0 NVMe sddc security servers ssh storage tenant upgrade vcd vcda VCDX vcenter VCF vcf 9 VDC vexpert Virtual Machines VMs vmware vmware.com vmware aria VMware Cloud Foundation VMware cluster VMware Explore VMware NSX vrslcm vsan walkthrough

  • Twitter
  • Instagram
  • Linkedin
  • Youtube

@2023 - All Right Reserved. Designed and Developed by Virtual Bytes

Virtual Bytes
  • Home
  • Home Data Center 2025
  • VMware
    • Cloud
    • Datacenter & Cloud Infrastructure
      • VMware ESXi
      • VMware vCenter
      • VMware vSAN
    • Networking & Security
    • Desktop & App Virtualization
      • Omnissa Horizon
    • Troubleshooting
    • Ansible
  • Education
  • Hardware
    • Hardware Tips & Tricks
  • Events
  • About
    • About Me
    • Home Lab Archives
      • Home Lab 2020-2022
      • Home Lab 2016-2020