Top Posts
Deploying & Configuring the VMware LCM Bundle Utility...
VMware Cloud Foundation: Don’t Forget About SSO Service...
VMware Explore Las Vegas 2025: Illuminating the Path...
Securing Software Updates for VMware Cloud Foundation: What...
VMware Cloud Foundation 5.2: A Guide to Simplified...
VMware Cloud Foundation 5.2: Unlocking Secure Hybrid Cloud...
VMware Cloud Foundation – Memory Tiering: Optimizing Memory...
Decoding VMware Cloud Foundation: Unveiling the numerous amount...
VMware Cloud Director 10.6.1: Taking Cloud Management to...
Omnissa Horizon Upgrade 2406 to 2412
Virtual Bytes
  • Home
  • Home Data Center 2025
  • VMware
    • Cloud
    • Datacenter & Cloud Infrastructure
      • VMware ESXi
      • VMware vCenter
      • VMware vSAN
    • Networking & Security
    • Desktop & App Virtualization
      • Omnissa Horizon
    • Troubleshooting
    • Ansible
  • Education
  • Hardware
    • Hardware Tips & Tricks
  • Events
  • About
    • About Me
    • Home Lab Archives
      • Home Lab 2020-2022
      • Home Lab 2016-2020
Tag:

How To

CloudNetworking

Reverse Proxy & Load Balancing a Web Server with VMware NSX Advanced Load Balancer

by Tommy Grot December 16, 2022
written by Tommy Grot 3 minutes read

Want to setup a load balancer and reverse proxy with VMware NSX Advanced Load Balancer, and you want to replace your Nginx Reverse Proxy, well let’s get started!

First, we will make sure that you already have NSX ALB setup and configured within your environment, this walkthrough will only step you through on building a Virtual Service and Pools and VIPs for your multiple web servers. During this deployment you can set up many different FQDNs.

Requirements

  • Public FQDN
  • Lets Encrypt SSL Certificate (Wild Card or SAN or Single Cert)
  • NAT – Service Engine
  • Virtual IP
  • Service Pool
  • Web Server(s)

Product Versions:

  • VMware NSX ALB: 22.1.2
  • VMware NSX: 4.0.1.1.0.20598726

Steps

Login as an administrator account to NSX ALB ->

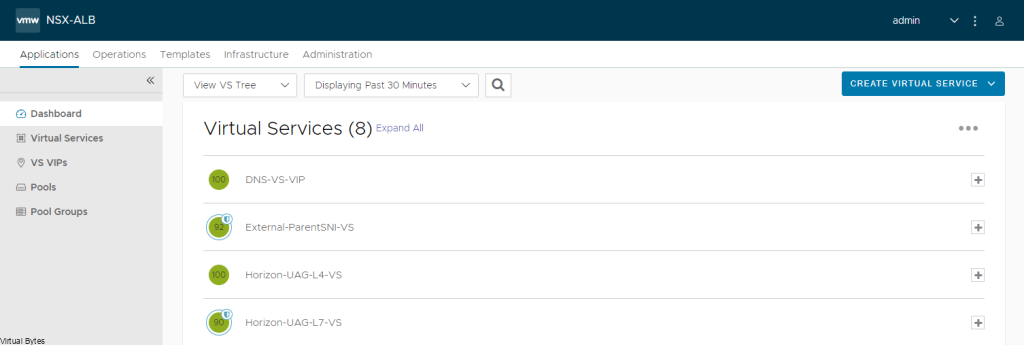
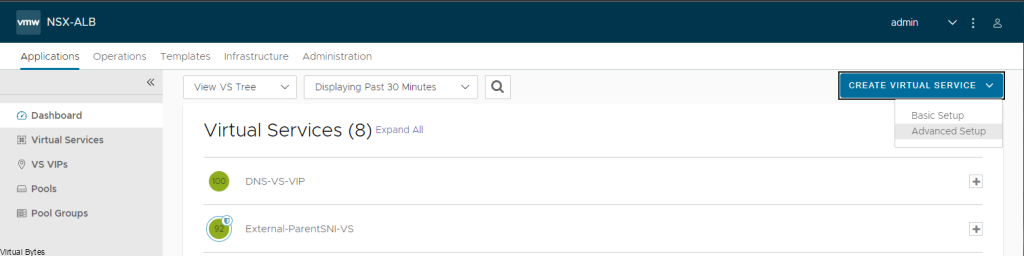
Go to Virtual Services -> Create Virtual Service

Select -> Advanced Setup

Next prompt -> Select your Cloud (For my setup I am doing everything NSX Overlay Backed)

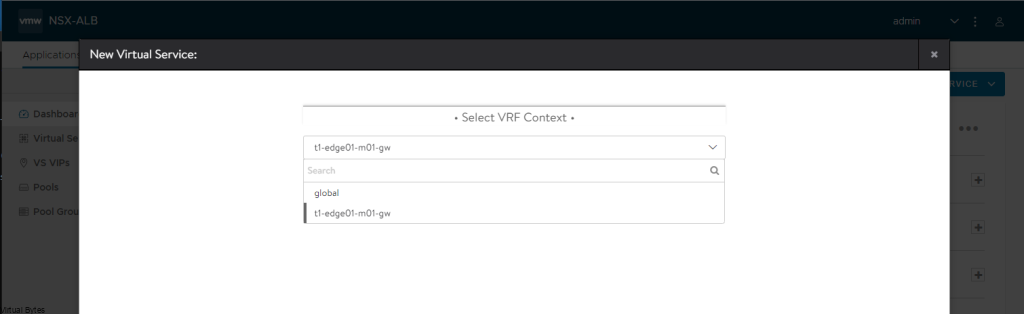
Click Next -> Select your VRF Context (I am using a Tier 1 Gateway)

So now at this point – you should see this screen below, we will create a New Virtual Service, this will be the main ingress and egress point of your network and the external world. I have a NAT from my firewall going to this Virtual Service (VIP) Virtual IP.

  • Name: External-ParentSNI-VS (This is my naming convention, but you can choose your own)
  • Select: Enable Virtual Hosting VS
  • Virtual Hosting Type: SNI
  • VS VIP – (Create the main VIP for Ingress/Egress NAT, that is routable)
  • Application Profile: System-Secure-HTTP
  • WAF ( You can enable if you would like too, this is optional)
  • Service Port ( 80,443 – For 443 you will want to select SSL)
  • Pool – (Create a Pool, I used one of my very first web servers to start the pool)
  • SSL Certificate – Select your Cert – by default ALB will put System-Default-Cert

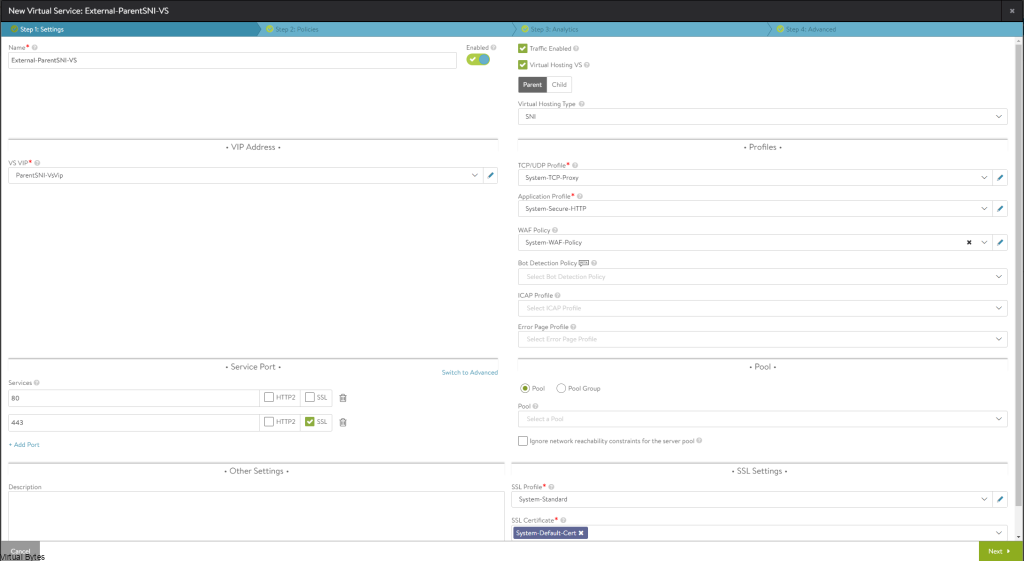
Click Save / Next – For this portion of the Virtual Service with Parent SNI we are done, next we will deploy the Child SNI which will be a parent to the main Ingress/Egress SNI Virtual Service.

As an example – I will use my Virtual Bytes SNI Child Virtual hosting.

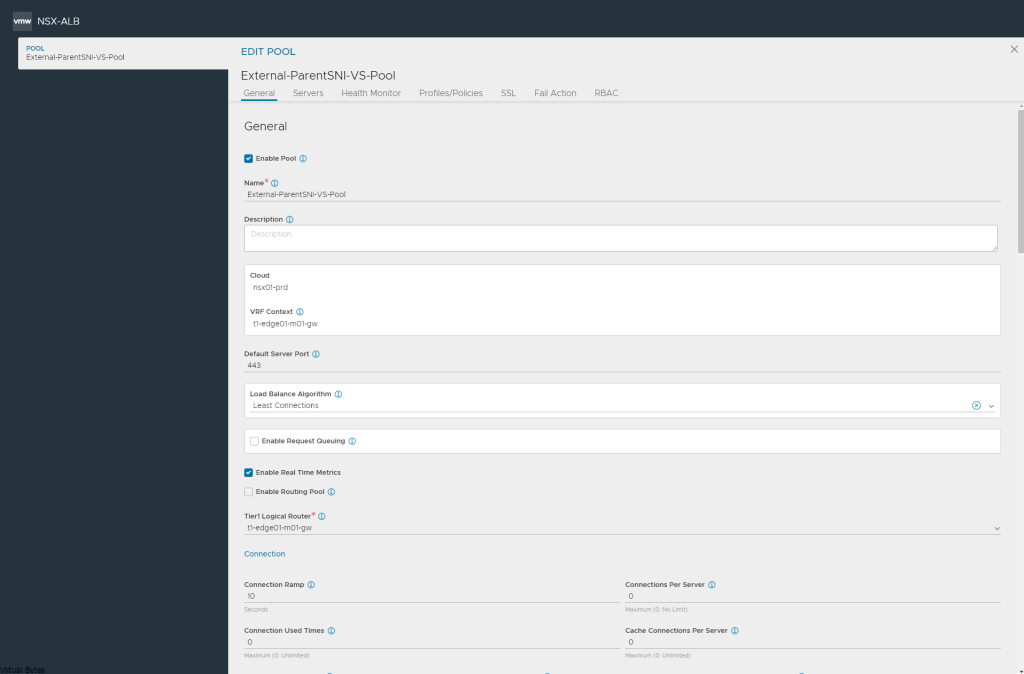
Click on drop down for Pool, if you have not created a pool we will do so now.

  • Name: External-Parent-SNI-VS-Pool
  • VRF Context – Your Tier 1 Gateway
  • Default Server Port: 443

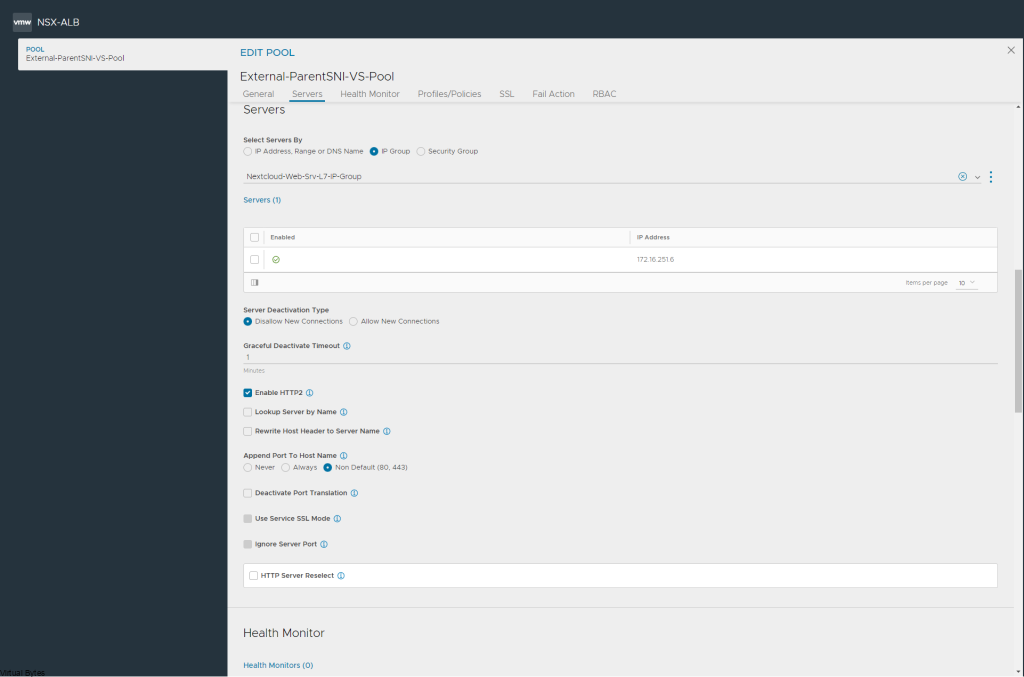
Select your first webserver, this will let you start the Virtual Service. You can do it via a IP Group or IP Address or DNS Name as well as have the capability to use a security group from NSX.

After you have created all the required services you should be able to access your web server from an internal or external (Internet) if you have NAT’d. But for the next steps we will repeat the steps for a Child SNI.

Child SNI Setup

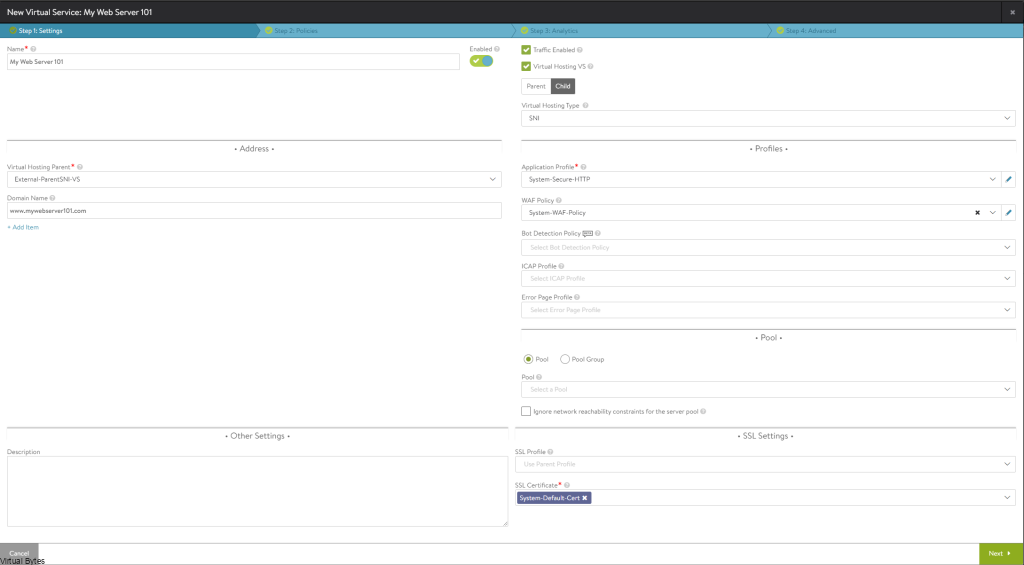
  • Go to Virtual Services – > Click on Create Virtual Service (Advanced)
  • Name: You Web Server
  • Check – Virtual Hosting VS
  • Virtual Hosting Type: SNI
  • Virtual Hosting Parent: External-ParentSNI-VS (or your own naming)
  • Domain Name: www.yourdomain.com
  • Application Mode: System Secure-HTTP
  • Pool: Create a pool for the Virtual Machine or service you want to load balance
  • SSL Certificate: Select your Certificate

Click Next all the way till the end, and now you have successfully setup a Child SNI which now you can replicate the same steps for multiple web servers, and you no longer need to NAT anymore IPs, since your main ingress/egress is already NAT’d and everything will flow through the main Parent service.

December 16, 2022 0 comments 3.1K views
1 FacebookTwitterLinkedinEmail
VMware vCenter

Upgrading vSphere 7.0.3 to vSphere 8.0

by Tommy Grot October 12, 2022
written by Tommy Grot 6 minutes read

vSphere 8 Update 1 – Released!! If you want to see how to upgrade go here to new blog post!

I will be going over on how to upgrade your vSphere 7 to vSphere 8! I will be doing step by step screenshots to walk anyone through, keep in mind that this is upgrading from vSphere 7.0.3 going to vSphere 8.0.

Exciting news! vSphere 8 is (IA) Yes, there is a new release model. Below I have some information below from VMware’s website but if you want to get more in-depth information go to the link below!

New IA/GA model (Information from VMware)

Our intent going forward is that all major and update vSphere releases will be delivered first with an IA designation. An IA release is a production-quality release that meets all GA quality gates and is fully partner certified. IA releases will be available during the IA phase to all customers for production deployments.

Changing to this IA/GA model is motivated by several factors. Most importantly, feedback from customers who want us to be more explicit when a release has achieved strong traction and usage without having to wait for the next update release, which they sometimes use as a proxy. By switching the designation from IA to GA, we’ll be making it clear when the release has gained wide adoption. We think this is a better model than waiting for a 6-month update, particularly as these updates now include feature enhancements as well as net new features.

DISCLAIMER:

– Everything I document here is on my lab, do not try this on a production system if you do not have backups or a way to restore if something goes wrong.

– This Walkthrough is only for a vSphere Cluster upgrade

Before you start the upgrde ensure you have a backup of your vCenter Server Appliance.

We will be upgrading a vSphere 7.0.3 Cluster to vSphere 8.0! Below is the vSphere 7 snippet

Download you ISO from VMware’s website and copy the iso to your local workstation

Once you get your ISO ready mount it to your local computer and drill down into the

vcsa-ui-installer -> win32 -> then execute installer.exe

Go to Upgrade ->

Once you are ready to upgrade your environment you will go Next

Once you get to this window, you will want to fill in your Source Appliance which is the vSphere 7 Cluster you want to upgrade. For Example: lab-vcsa-m01.virtualbytes.io

Then -> Click Connect to Source

Once it connects to the source server, you will get this detail specific page during the deployment asking to fill in the vCenter Server Appliance SSO Username and Password along with the Appliance (OS) root password along with the ESXi Host or vCenter Server that manages the source appliance

Accept the Certificate Warning which you will have your Source and Destination servers where the appliance will get deployed

Input your vCenter Server deployment target, where the new vCenter Server Appliance will get deployed

If you are installing this select your current datacenter object where the vCSA appliance will be stored in

This is creating the new vCSA on the target server, you will want to make sure that the two vCenter Server Appliances do not collide with the same naming convention or you will get any error saying this name for the VM exists.

Fill in your network information for the upgraded preparation

After ~15 minutes, you will get to the Phase 2 of the Upgrade Process, Click -> Next

I purposly did not enable SSH on my source vCenter Server, this way if anyone encounters the same issue, this will guide you to make sure you have SSH enabled on the Source vCenter Server Applaince or you will get this error below 🙂

After you enabled SSH and re-try the task you will go into the Pre-Upgrade Checks state

Below is a Pre-Upgrade check result which has some Warnings to let you know

Here at this step we are about to upgrade the data for our vCSA! Select your requirment, i only did the Configuration and Inventory.

Select – > I have backed up the source vCenter Server and all the required data from the database.

WARNING!! – Make sure you have your source vCenter backed up and/or snapshot to revert too if something does not upgrade properly.

This process will take ~ 15 – 20 minutes max, but this also depends on how large your environment is, the more objects in the data base the longer it will take.

Next snippet, will show you that we have copied the data from the source vCenter Server to the Targer vCenter Server

Now, that we have finalized the migration and the import to the target vCenter Server is done, we will log into the new vCSA appliance.

Login with your ” [email protected]”

Now, you shall see that our vCenter Server is at vSphere 8. Next we will be creating a Baseline within vSphere Life Cycle Manager to upgrade our Hosts.

Click on the top right hamburger menu -> Life Cycle Manager

Go to Imported ISOs ->

Now we will upload our vSphere 8 ISO – > VMware-VMvisor-Installer-8.0-20513097.x86_64.iso

Once it is uploaded, we will go and create a Baseline for our new Image to upgrade the ESXi hosts from ESXi 7 to 8

Then go “Baselines” -> New -> Baseline

Now we will create a name for our baseline -> vSphere 8 Upgrade

Attach the vSphere 8.0 iso we just uploaded earlier to this baseline.

Finalize the Creation of the vSphere 8 Upgrade baseline

Then go back to the ESXi host object, and go to Updates tab

Here we will attach the vSphere 8 Upgrade Baseline we created

Once the ESXi host has the new vSphere 8 baseline attached, you can now Remediate the host, and then repeat the vLCM (vSphere Life Cycle Manager) Baseline attach to the rest of your hosts and then follow the traditional Remediation process that way your ESXi hosts properly migrate workloads off to other ESXi hosts during this process to ensure that you won’t have any downtime.

Web console view of our ESXi host that just got upgraded!!

Our first ESXi host has been upgraded to vSphere 8!

Next, after all our ESXi hosts are on vSphere 8, we will want to make sure that our vSAN version is upgraded so you will want to upgrade it.

Go to your vSAN Cluster -> Configure -> Services

Once you get to vSAN Services, you will see Pre-Check vSAN upgrade and Upgrade vSAN. A proper best practice is to do a pre-check of your vSAN cluster to ensure that all the objects are healthy and synchronized and there are not disk issues before doing a vSAN upgrade.

After vSAN upgrade – Your vSphere Cluster is now officially upgraded to vSphere 8! with vSAN 8! This walkthrough was able to walk you through any issues that you may encounter. Next blog post will be on how to convert a vSAN (OSA) Datastore to vSAN (ESA) – Express Storage Architecture

October 12, 2022 0 comments 28.8K views
6 FacebookTwitterLinkedinEmail
VMware ESXi

TrueNAS Scale – iSCSI & VMware vSphere 7.x

by Tommy Grot September 27, 2022
written by Tommy Grot 3 minutes read

Tonight’s topic is about TrueNAS Scale and VMware vSphere 7.x integration and setup for iSCSI. I have been reading lots of topics and support forums where not many posts have the correct tuning / settings.

The issue: When you try to mount a iSCSI LUN to vSphere 7, it will try to format that new iSCSI LUN and it will error out – ATP, error – check VMkernel logs, the interesting thing is that VMFS 5 was able to format the new LUN i created, so i did that as a test to know that I have network connectivtity along with being able to ping the iSCSI Server on the dedicated network. After that I started doing troubleshooting to pin point the issue, after some trial and error I found the issue! Below I will walk you through configuration from TrueNAS Scale side.

Disclaimer! – All tweaks and steps here I have done on a fresh TrueNAS Unit, do not try if you don’t have anything backed up. This is solely under your own risk!

So, first things first! Let’s create our zVol and create an allocated space for your iSCSI LUN.

Versions

  • TrueNAS-SCALE-22.02.3
  • VMware ESXi, 7.0.3, 20036589

Then change the Record Size to 16K, under the whole pool. This is required for VMFS 6!

Then we will go to Sharing page – Click Add for Block (iSCSI) Shares Target

Setup the settings for Base Name (usually this come by default, buti if you need to change you can)

I have dedicated 2 x 40Gb Bonded (LACP) Mellanox Connect X3 and my backbone is a Arista DCS-7050QX-32S-F, so for the iSCSI Portal I have a dedicated isolated subnet that is Layer 2 only no routing and Jumbo Frames (9214)

Add your multiple hosts and their IQNs from your software iSCSI adapter or hardware iSCSI adapter if you have one.

Since I have an isolated subnet I skipped Authorized Access.

Now, we will setup the iSCSI Target, you will need to add name and the iSCSI group make sure you have your Portal setup and all the IQNs populated in a group

Next we will add an extent and map the device after you have created the previous pre-reqs

Name: (your Extent Name)

Extent Type: Device

Device: (zvol/yournasname)

Logical Block Size 512 – this is important your VMFS 6 wont like it along with the other sector and record sizes

Check Disable Physical Block Size Reporting

Then associate your target to your LUN ID, by default it will use the next available one. Then map that to your extent name

After you finshed, your creation of the iSCSI portion on TrueNAS, then go back to you vCenter Server or ESXi and re-scan HBA and Storage and you should see TrueNAS iSCSI pop up!

Then right click on the Data Center object- Storage – New Datastore

VMFS

Select the Storage Pool that is presented in the window, once you do, click next and select all storage capacity for the next window and then hit finish! Below you should see your new iSCSI LUN! 🙂

September 27, 2022 4 comments 6.2K views
2 FacebookTwitterLinkedinEmail


Recent Posts

  • Deploying & Configuring the VMware LCM Bundle Utility on Photon OS: A Step-by-Step Guide
  • VMware Cloud Foundation: Don’t Forget About SSO Service Accounts
  • VMware Explore Las Vegas 2025: Illuminating the Path to Cloud Excellence!
  • Securing Software Updates for VMware Cloud Foundation: What You Need to Know
  • VMware Cloud Foundation 5.2: A Guide to Simplified Upgrade with Flexible BOM

AI AVI Vantage cloud Cloud Computing cloud director computing configure cyber security director dns domain controller ESXi las vegas llm llms multi-cloud multicloud NSx NSX-T 3.2.0 NVMe private AI servers ssh storage tenant upgrade vcd vcda VCDX vcenter VCF VDC vexpert Virtual Machines VMs vmware vmware.com vmware aria VMware Cloud Foundation VMware cluster VMware Explore VMware NSX vrslcm vsan walkthrough

  • Twitter
  • Instagram
  • Linkedin
  • Youtube

@2023 - All Right Reserved. Designed and Developed by Virtual Bytes

Virtual Bytes
  • Home
  • Home Data Center 2025
  • VMware
    • Cloud
    • Datacenter & Cloud Infrastructure
      • VMware ESXi
      • VMware vCenter
      • VMware vSAN
    • Networking & Security
    • Desktop & App Virtualization
      • Omnissa Horizon
    • Troubleshooting
    • Ansible
  • Education
  • Hardware
    • Hardware Tips & Tricks
  • Events
  • About
    • About Me
    • Home Lab Archives
      • Home Lab 2020-2022
      • Home Lab 2016-2020