Top Posts
Offline VMware Cloud Foundation 9 Depot: Your Path...
VMware Cloud Foundation 9: Simplifying Identity with a...
What’s New In VMware Cloud Foundation 9.0
Deploying & Configuring the VMware LCM Bundle Utility...
VMware Cloud Foundation: Don’t Forget About SSO Service...
VMware Explore Las Vegas 2025: Illuminating the Path...
Securing Software Updates for VMware Cloud Foundation: What...
VMware Cloud Foundation 5.2: A Guide to Simplified...
VMware Cloud Foundation 5.2: Unlocking Secure Hybrid Cloud...
VMware Cloud Foundation – Memory Tiering: Optimizing Memory...
Virtual Bytes
  • Home
  • Home Data Center 2025
  • VMware
    • Cloud
    • Datacenter & Cloud Infrastructure
      • VMware ESXi
      • VMware vCenter
      • VMware vSAN
    • Networking & Security
    • Desktop & App Virtualization
      • Omnissa Horizon
    • Troubleshooting
    • Ansible
  • Education
  • Hardware
    • Hardware Tips & Tricks
  • Events
  • About
    • About Me
    • Home Lab Archives
      • Home Lab 2020-2022
      • Home Lab 2016-2020
Category:

VMware Cloud Foundation

VMware Cloud Foundation

VMware Cloud Director 10.6.1: Taking Cloud Management to New Heights

by Tommy Grot February 5, 2025
written by Tommy Grot 7 minutes read

VMware has just released an exciting update Cloud Director 10.6.1—to revolutionize how we manage our cloud infrastructure. This new version is packed with powerful features designed to make IT professionals’ lives easier and their cloud services more efficient.

Cloud Director 10.6.1 offers a range of improvements, from simplifying complex tasks to providing advanced analytics. It’s all about making cloud management more accessible and effective. With this release, VMware aims to help organizations handle their hybrid cloud environments like never before.

In the following blog post, we’ll break down the exciting new features and explain how they can benefit you. Get ready to discover a streamlined approach to cloud infrastructure management!


Information from VMware’s Site Below:

Cloud computing is constantly evolving, and VMware Cloud Director (VCD) keeps advancing with new updates that strengthen security, streamline resource management, and give users greater control. VMware by Broadcom is thrilled to announce that VMware Cloud Director 10.6.1 is now available as part of the VCF (VMware Cloud Foundation) offering, starting January 31st, 2025. 

Smarter VM Placement with Guest OS Awareness

Now, you can easily place virtual machines (VMs) on specific hosts or clusters based on their guest operating system. With this feature, system administrators can define VM Groups for specific OS types ensuring proper placement and compliance across all tenants. This also helps organizations stay aligned with Microsoft and other vendor licensing requirements, simplifying compliance while optimizing resource management.

Use case:

  • Automatic enforcement ensures that VMs are always placed in their designated groups.
  • Seamless reconfiguration means existing VMs will adopt this placement rule the next time they undergo a reconfiguration, such as a power cycle or VM edit.

This feature enhances workload distribution and simplifies multi-tenant management, giving you greater control over VM performance and security.

Take Control of API Token Security

Security is crucial and VCD now includes the ability to force API token expiration. If a token needs to be revoked immediately—whether due to security concerns or administrative changes—administrators can now invalidate it instantly. This provides a proactive approach to managing API access and securing cloud environments.

Use case:

  • Instant access revocation for better security governance.
  • More control for administrators over authentication and access management.

Flexible IP Retention for Sub-Providers & Managed Organizations

Managing IP addresses has never been easier! VMware Cloud Director now allows custom IP retention periods at both the sub-provider and managed organization levels. This means IP addresses can be retained even when VMs are deleted or NICs are removed—regardless of whether they were assigned via Static Pool, Static Manual, or DHCP.

Use case:

  • Customizable IP retention ensures continuity and minimizes reallocation efforts.
  • Metadata-based configuration allows admins to define retention periods tailored to organizational needs.
  • Leverages the Manual Reservation API to preserve IPs for seamless redeployment.

No more lost IPs or unnecessary reconfigurations—just streamlined network management.

Gateway Firewall Enforcement

This update introduces the ability to explicitly activate or deactivate gateway firewall enforcement which is natively integrated within the VCF stack, with full visibility of enforcement status across T1 and T0 firewalls. Tenant and Sub-Tenant administrators both can view and override default settings, ensuring security configurations align with organizational policies.

Use case:

  • Full transparency into firewall enforcement status.
  • Administrative control to enable or disable enforcement as needed.

Stateful Firewall Access & Edge Cluster Configuration

Provider administrators now have improved control over the stateful firewall service, which is natively integrated within the VCF stack. With this update, they can restrict tenants from adding stateful firewall rules on T1, T0, and vApps unless the ANS security stack is entitled. Additionally, a new configuration option on edge clusters allows providers to enable or disable stateful firewalls as needed.

Use case:

  • Granular control over firewall rules ensures security compliance.
  • Edge cluster configuration adds another layer of flexibility in managing network security.

Custom Segment Profiles – Now Shareable!

Service providers can now share custom segment profiles with tenant organizations, making it easier to standardize networking policies across multiple tenants.

Use case:

  • Improved collaboration between providers and tenants.
  • Consistent networking configurations across multiple organizations.

IPv6 Transparent Load Balancing – It’s Back!

Support for IPv6 and VMware Avi Load Balancer Transparent Load Balancing is back! Pool members can now view the client’s source IP, enhancing visibility and network efficiency. To enable this feature, VMware Avi Load Balancer must be integrated with VMware Cloud Director.

Use case:

  • Seamless IPv6 support for modern networking needs.
  • Enhanced load balancing with transparent traffic routing.

This VMware Cloud Director update is all about greater control, improved security, and enhanced networking capabilities. Whether you’re optimizing VM placement, tightening API security, or refining firewall enforcement, these changes empower cloud providers and tenants alike.

Other Enhancements

  • Fixed Update Custom Task API – No more double execution issues. The API now works correctly on the first attempt.
  • Resolved All Virtual Data Centers View Issues – Admins can now seamlessly navigate the view without encountering errors.
  • Removed NSX MP API References – Say goodbye to outdated NSX MP API references for a more streamlined experience.

This VMware Cloud Director update is all about better control, improved security, and enhanced networking capabilities. Whether you’re optimizing VM placement, tightening API security, or refining firewall enforcement, these changes give more control to both cloud providers and tenants.

Reference for info above: https://blogs.vmware.com/cloudprovider/2025/02/vmware-cloud-director-10-6-1-is-here-whats-new.html

Upgrade Procedure

Before we start the upgrade, lets ensure we have the following:

  • Take Disk Level Snapshots of all VCD Appliances
  • Take Backup of VCD via VAMI
  • Downloaded Bits from Broadcom’s Support Portal

My Current Version:

3. Upload the VMware_Cloud_Director_10.6.1.11753-24532678_update.tar.gz into the VCD appliance.
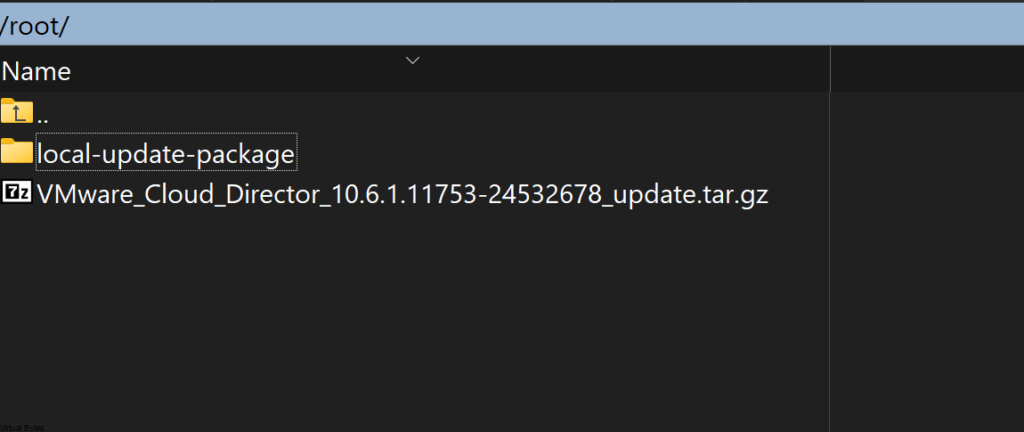
Once the update file is uploaded, SSH into the first VCD Cell appliance.
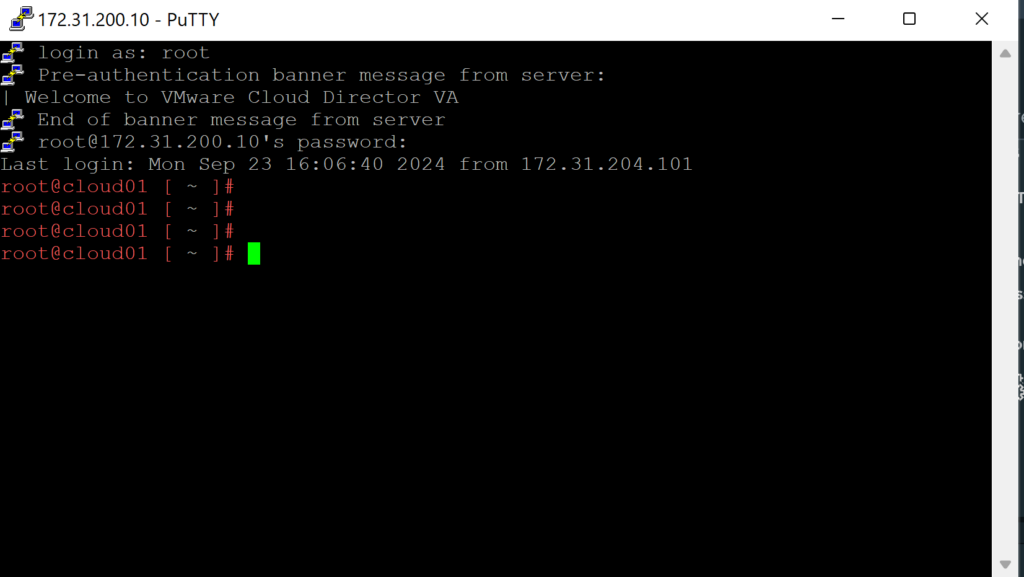
After you will need to SSH into all appliances – and you will shutdown VMware Cloud Director by running the command below:

/opt/vmware/vcloud-director/bin/cell-management-tool -u administrator cell --shutdown
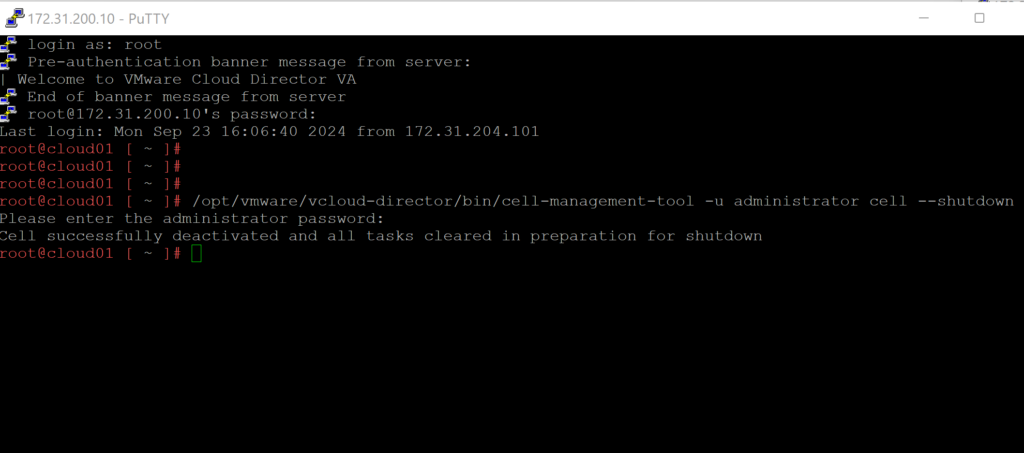
Note: It is required to upgrade the primary VCD appliance first!

4. Lets start upgrading VCD 10.6.1 on the first appliance. Below we will un tar the Update package into the /tmp/local-update-package directory.
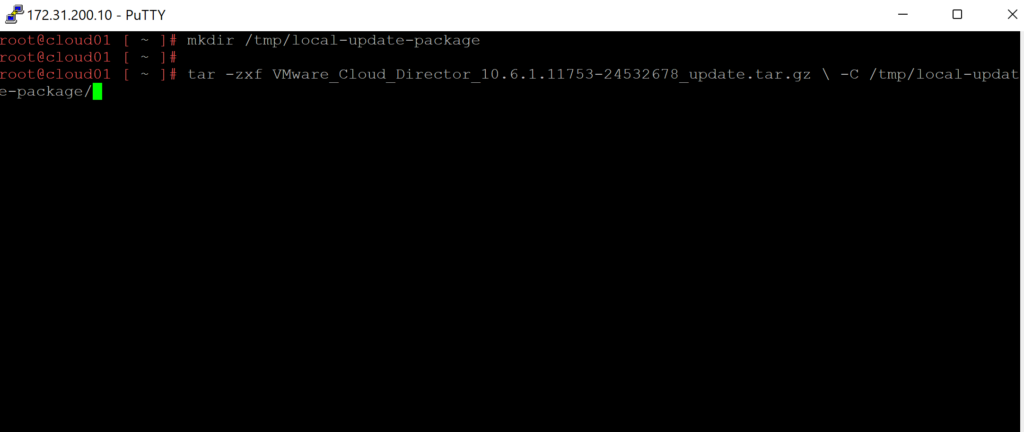
5. Let Extract the update files into the directory we created above.

tar -zxf VMware_Cloud_Director_10.6.1.11753-24532678_update.tar.gz \-C /tmp/local-update-package/

6. Now that the update package has been unzipped we will set the local-update-package be the update directory.

vamicli	update --repo file:///tmp/local-update-package

7. Using the vamicli update –check we will check the repo for the newest upgrade of VCD.

vamicli update --check

Before we start the upgrade, it is important to take a backup of the VCD Appliances, log into each VCD Node via VAMI https://IP_Address:5480 and go to Backup and take a backup.
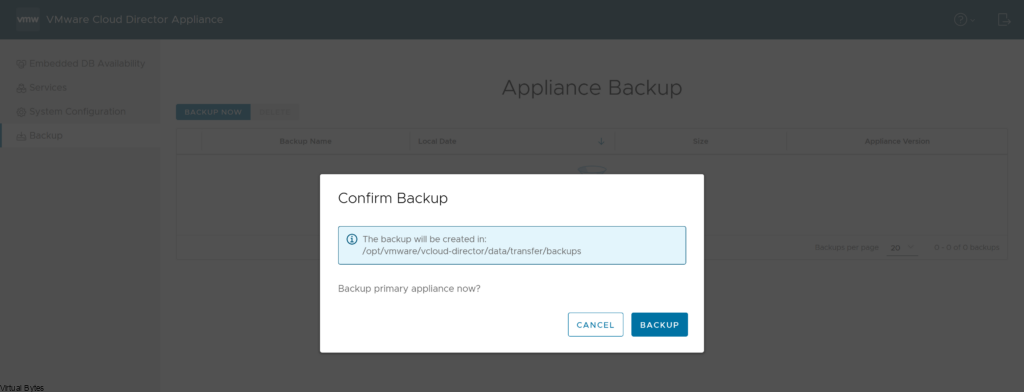
vamicli update --install latest

Now that the primary appliance is upgrade, repeat the steps above to the other appliances that need, steps 3 through 7.

After the other VCD appliances have the upgrade staged and updated now go back to the primary appliance and execute the upgrade utility.

/opt/vmware/vcloud-director/bin/upgrade

Follow the prompts from the upgrade utility, it will ask if you are ready for the upgrade and if you have taken a backup.

Once the first appliance is upgraded, then repeat the upgrade process above for the additional VCD appliances.

After the upgrade is complete, lets reboot the full appliance so for this option do No (N)

We have successfully upgraded VMware Cloud Director to 10.6.1!
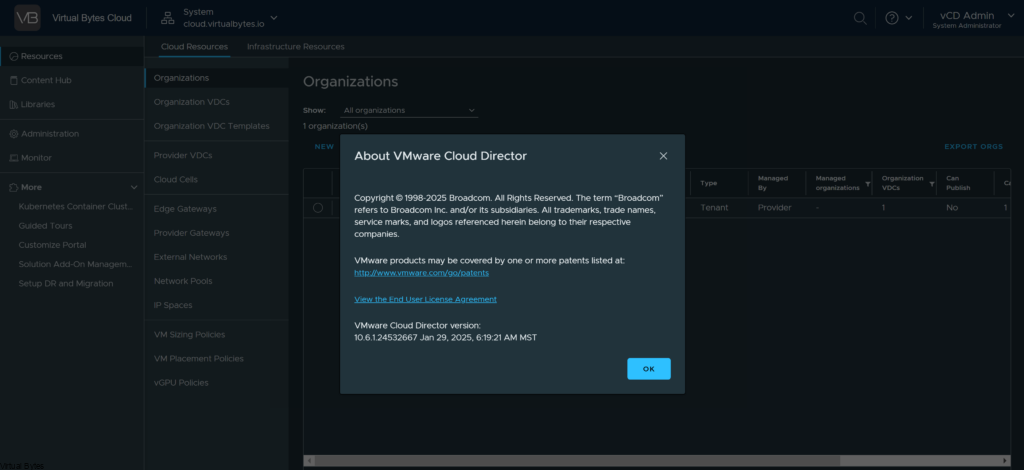

Troubleshooting After Upgrade

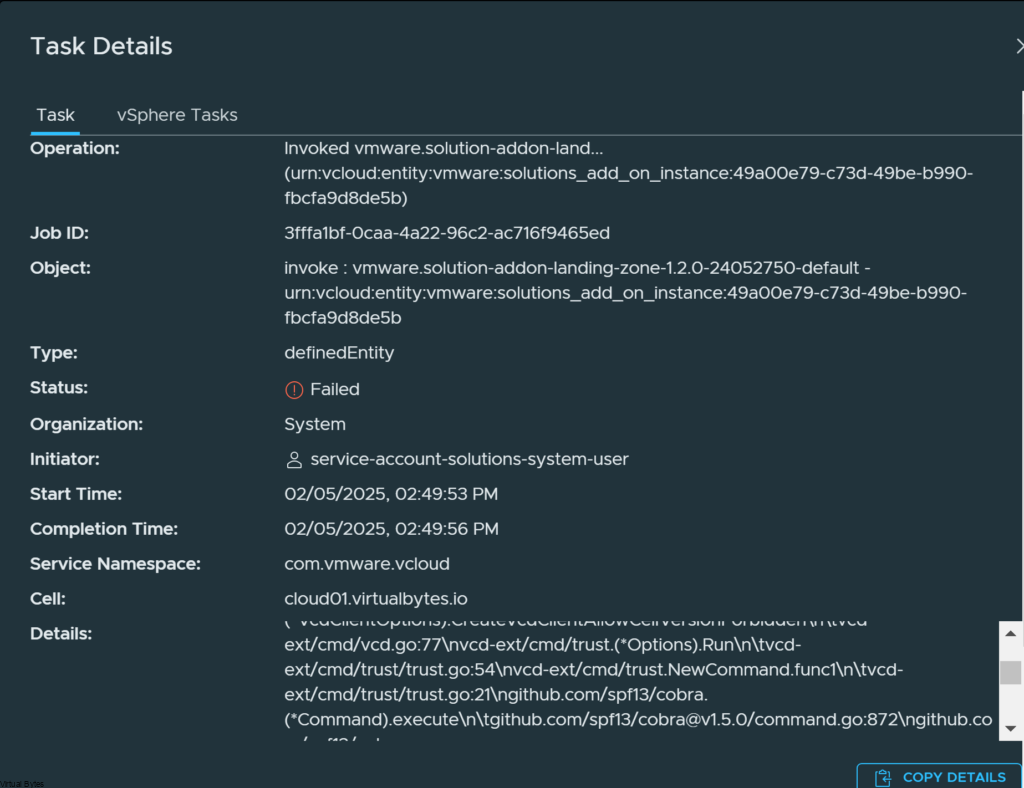
I logged into my VCD, first thing I noticed is that I kept getting this error:
invoke : vmware.solution-addon-landing-zone-1.2.0-24052750-default – urn:vcloud:entity:vmware:solutions_add_on_instance:49a00e79-c73d-49be-b990-fbcfa9d8de5b.

Then i started looking into the issue and it was related to certificates that were expired or needed to be reapplied. After I added the new certificate the issue went away.
Go to Certificates Library and remove any expired certs and replace them with up-to-date ones.
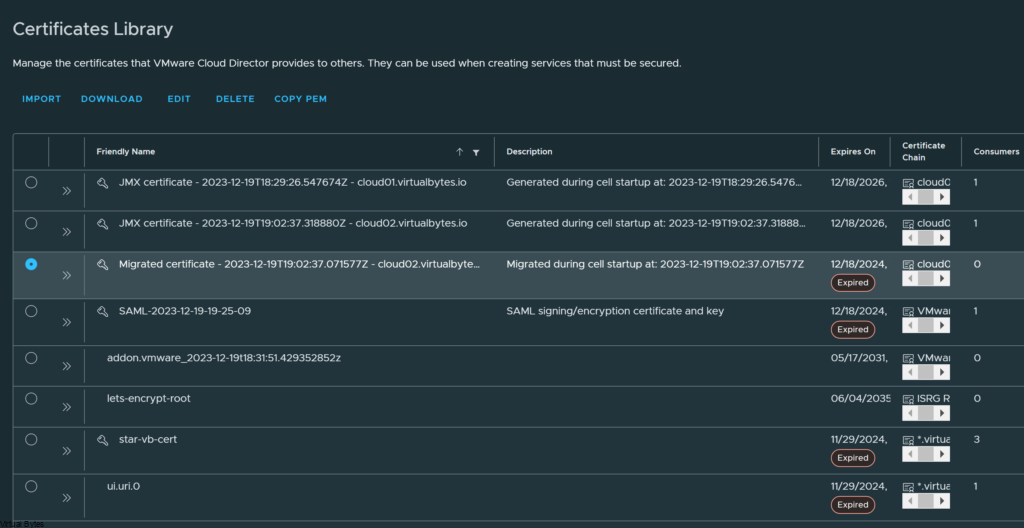
Also update the Public Addresses Certificate with the same one you uploaded into the Certificates Library if you are using a Wildcard Cert or Multiple SANs within the certificate.

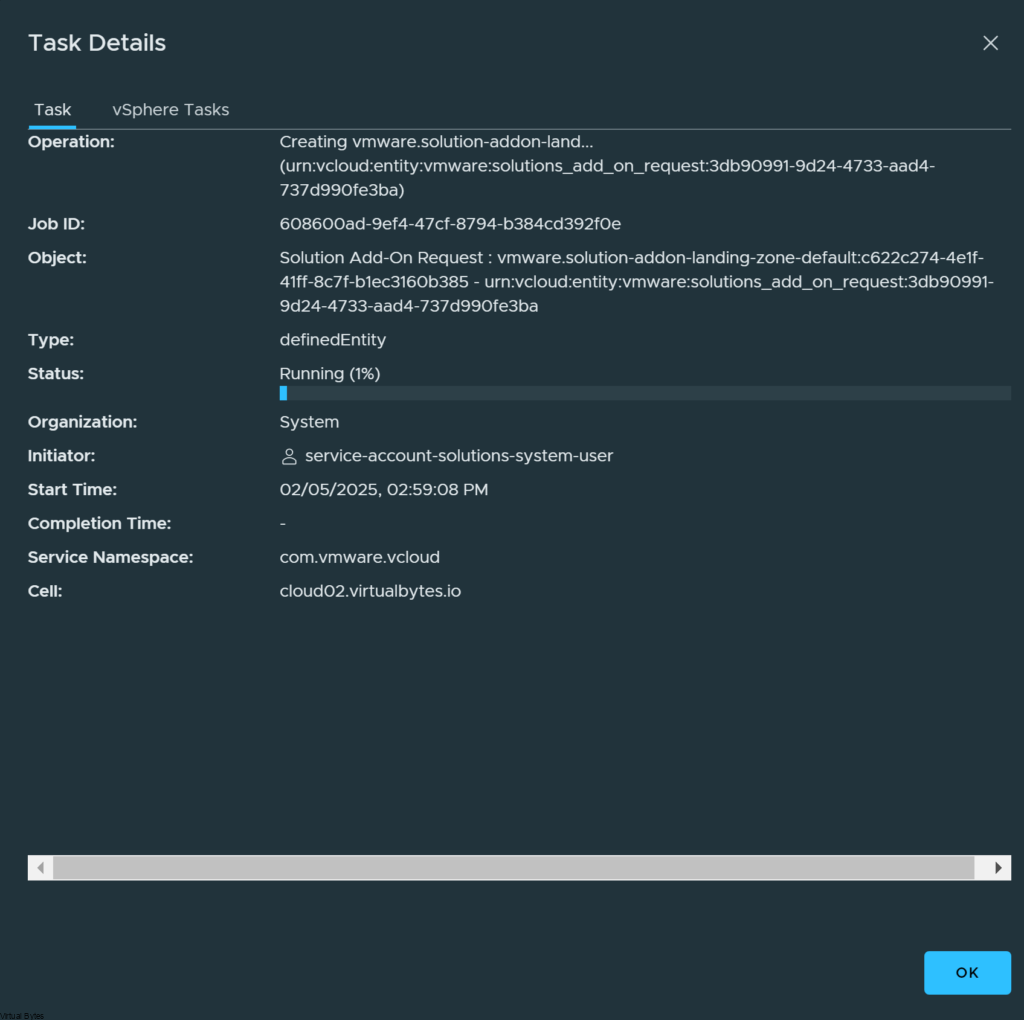
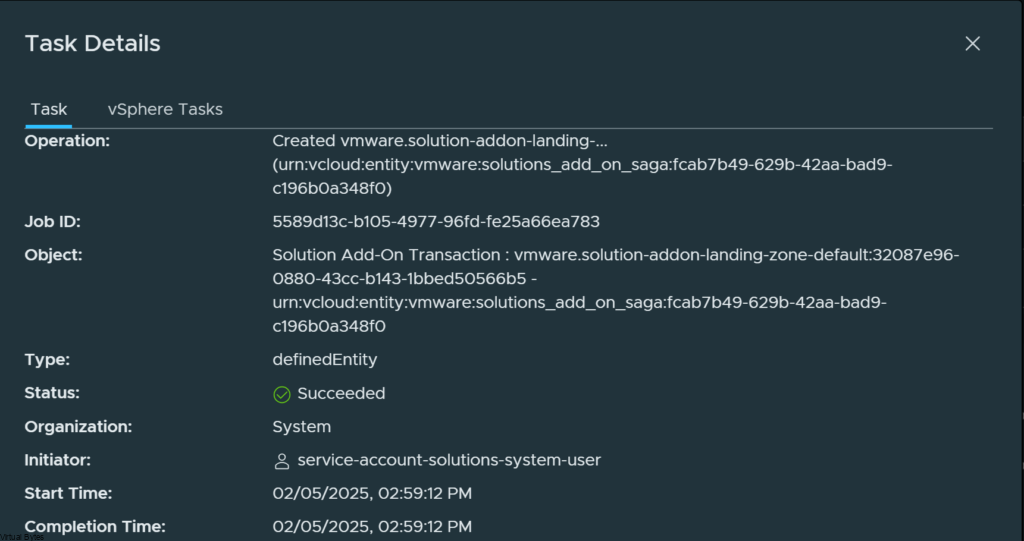
Once you have all the certificates updated and cleaned up, the Task will be running automatically and here it will look like this below:
Issue Fixed!
February 5, 2025 0 comments 722 views
0 FacebookTwitterLinkedinThreadsBlueskyEmail
VMware Cloud Foundation

Couldn’t establish a connection to the VM web console from vSphere Client

by Tommy Grot December 19, 2024
written by Tommy Grot 2 minutes read

You’ve launched the vSphere Client, but can’t access your virtual machine’s web console? Don’t worry, you’re not alone! This new problem can be frustrating, but it often has simple solution to fix the problem. After the recent upgrade of vSphere 8.0.3.00400 this issue occurred to me as I was trying to connect to a virtual machine web console. So below I go through steps to fix it.

This is what I saw: Couldn’t establish a connection to the VM web console from vSphere Client. So first thing was I connected to my SDDC Manager, retrieved my vCenter Root Password.

VMware’s KB – Here

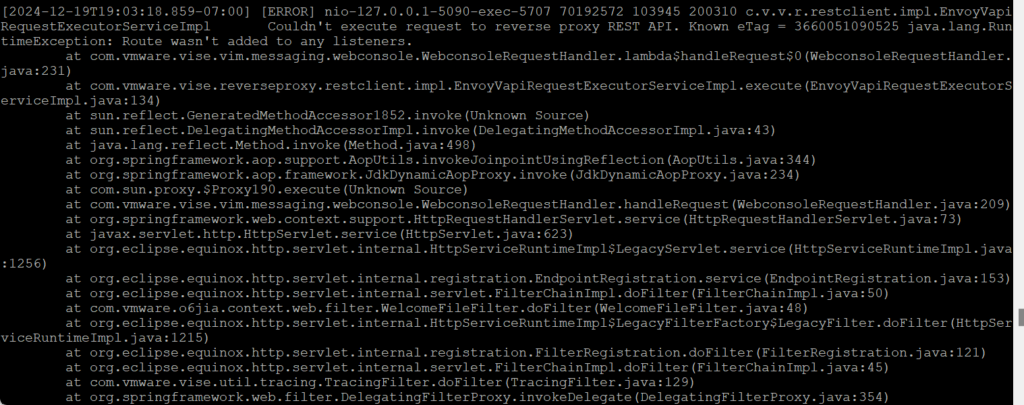
Then I started digging into the logs where I saw that the Reverse HTTP Proxy was putting out Errors on JWT verification failed.

2024-12-19T19:03:18.572-07:00 error rhttpproxy[02851] [Originator@6876 sub=RhttpProxy] [Rhttpproxy REST Handler] Missing JWT
2024-12-19T19:03:18.572-07:00 error rhttpproxy[02851] [Originator@6876 sub=RhttpProxy] [Rhttpproxy REST PUT Handler] JWT verification failed
2024-12-19T19:03:18.778-07:00 error rhttpproxy[02891] [Originator@6876 sub=RhttpProxy] [Rhttpproxy REST Handler] Missing JWT
2024-12-19T19:03:18.778-07:00 error rhttpproxy[02891] [Originator@6876 sub=RhttpProxy] [Rhttpproxy REST PUT Handler] JWT veri
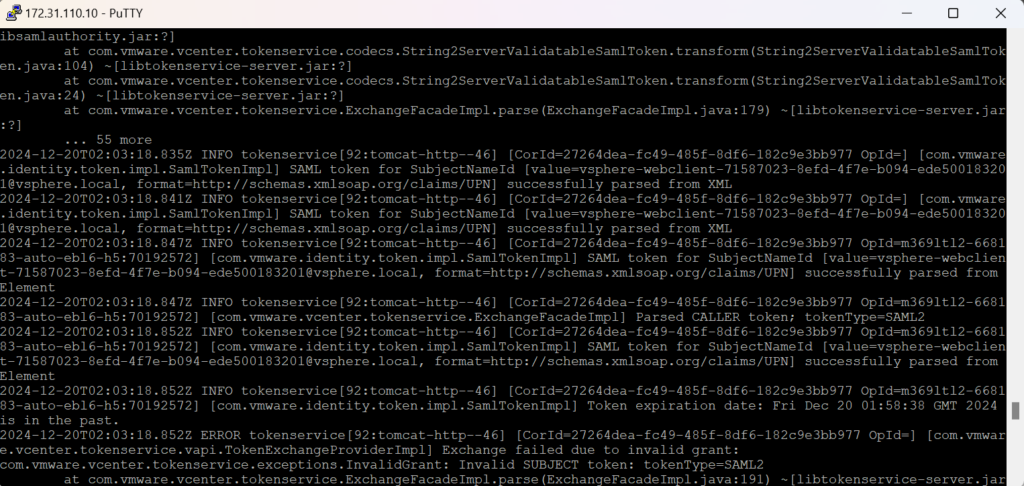
2024-12-20T02:03:18.852Z INFO tokenservice[92:tomcat-http--46] [CorId=27264dea-fc49-485f-8df6-182c9e3bb977 OpId=m369ltl2-668183-auto-ebl6-h5:70192572] [com.vmware.identity.token.impl.SamlTokenImpl] Token expiration date: Fri Dec 20 01:58:38 GMT 2024 is in the past.
2024-12-20T02:03:18.852Z ERROR tokenservice[92:tomcat-http--46] [CorId=27264dea-fc49-485f-8df6-182c9e3bb977 OpId=] [com.vmware.vcenter.tokenservice.vapi.TokenExchangeProviderImpl] Exchange failed due to invalid grant:
com.vmware.vcenter.tokenservice.exceptions.InvalidGrant: Invalid SUBJECT token: tokenType=SAML2

So what I ended up doing is going to:

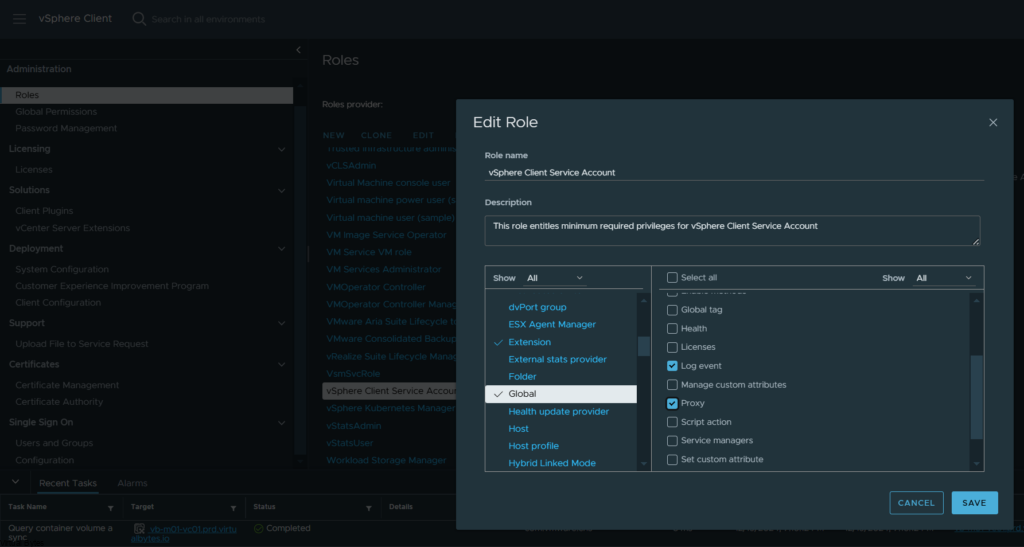
  • Go to Administration ->Access Control -> Roles
  • Select the vSphere Client Service Account and click edit
  • Scroll down to Global section and de-select the Proxy setting as you see in the screenshot below, and then click Save, but go back into the same Proxy setting and re-select it and hit Save.

A working Web Console!

December 19, 2024 0 comments 2.4K views
0 FacebookTwitterLinkedinThreadsBlueskyEmail
VMware Cloud Foundation

VMware Cloud Foundation 5.2.1.1

by Tommy Grot December 18, 2024
written by Tommy Grot 2 minutes read

VMware Cloud Foundation 5.2.1.1 Release Information

VMware Cloud Foundation 5.2.1.1 includes bug fixes and a new version of SDDC Manager.

You can upgrade to VMware Cloud Foundation 5.2.1.1 from VMware Cloud Foundation 5.2 or later.

Upgrading from 5.2.1:

SDDC Manager is the only component that requires an upgrade. See Independent SDDC Manager Upgrade using the SDDC Manager UI.

Upgrading from 5.2:

See Flexible BOM Upgrade in VMware Cloud Foundation. When selecting the target version for SDDC Manager choose the version listed in the BOM update table below.

Known issues:

  • In order to upgrade from 5.2 to 5.2.1.1, you must download the bundles for both SDDC Manager 5.2.1.0 and SDDC Manager 5.2.1.1.
  • The Bundle Management window in the SDDC Manager UI displays “VMware Cloud Foundation Update 5.2.1.0” instead of “VMware Cloud Foundation Update 5.2.1.1” for the 5.2.1.1 bundle. The description of the bundle correctly describes it as the upgrade bundle for 5.2.1.1. This is a cosmetic issue only and does not impact the upgrade.

VMware Cloud Foundation 5.2.1.1 contains the following BOM updates:

Software ComponentVersionDateBuild Number
SDDC Manager5.2.1.105 DEC 202424397777

Resolved Issues

The following issues are resolved in this release:

  • VMware Cloud Foundation 5.2 does not support the “License Now” option for vSAN add-on licenses based on capacity per tebibyte (TiB).
  • Remove unresponsive ESXi Host fails when SDDC Manager certificate does not have subject alternative name.

Upgrade Process

Take a snapshot or have a backup of SDDC Manager if anything goes wrong.

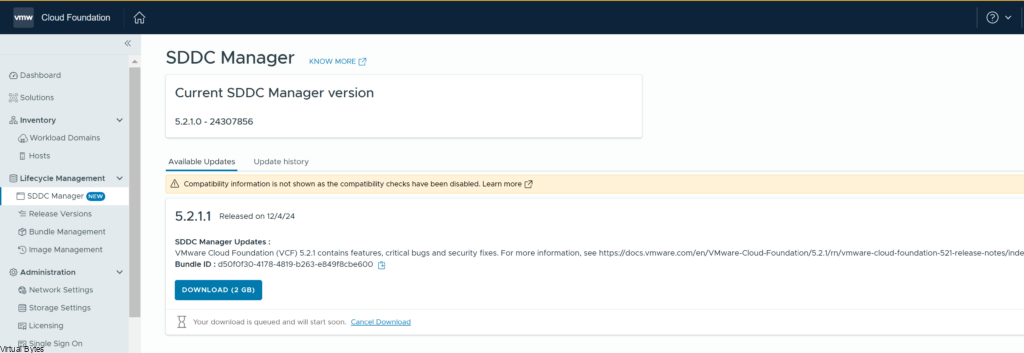
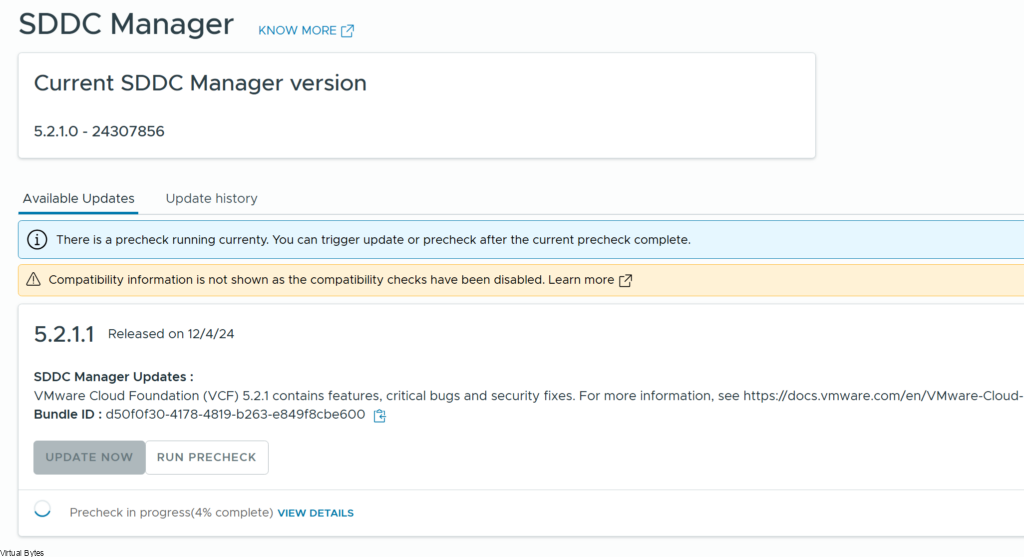
Update is downloading, should be ready within 10 minutes

Now that the upgrade is staged and the bundle has been automatically ingested you can start the upgrade!

The whole upgrade took – 20 minutes 22 seconds

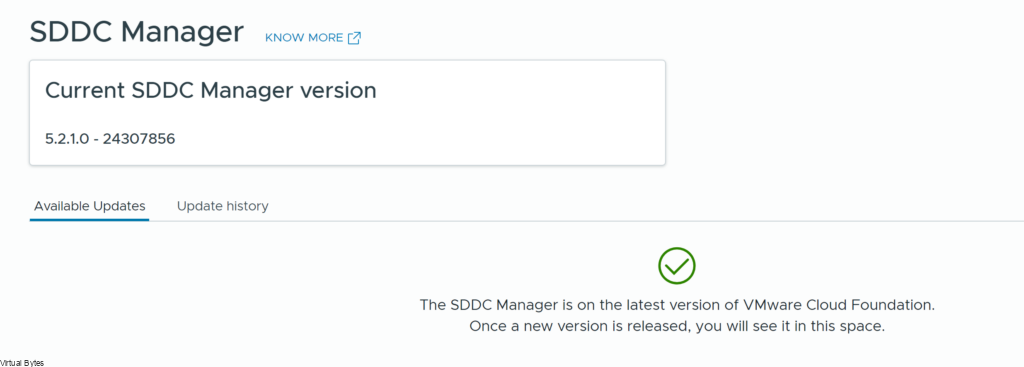
Once your SDDC Manager is upgrade you may proceed to NSX and ESXi upgrades for this release, which the same upgrade process exists in my other blog posts.

December 18, 2024 0 comments 1.3K views
0 FacebookTwitterLinkedinThreadsBlueskyEmail
VMware Cloud Foundation

VMware Cloud Foundation 5.2.1 – Upgrade Process & Troubleshooting Tips

by Tommy Grot October 9, 2024
written by Tommy Grot 6 minutes read

VMware has released a new version of its flagship product, VMware Cloud Foundation (VCF), with version 5.2.1. This upgrade brings exciting new features and enhancements to the table, offering improved functionality and performance for VMware users. In this blog post, we’ll discuss the key features of VCF 5.2.1 and provide some quick tips and tricks to get your upgrade process started.

What’s New

The VMware Cloud Foundation (VCF) 5.2.1 release includes the following:
  • Manage all SDDC certificates and passwords from a single UI: SDDC Manager certificate and password management functionality is now integrated in the vSphere Client to simplify and speed-up day-to-day operations. VCF users can now manage the certificates, integrated certificate authorities, and system user passwords from the Administration section in the vSphere Client. 
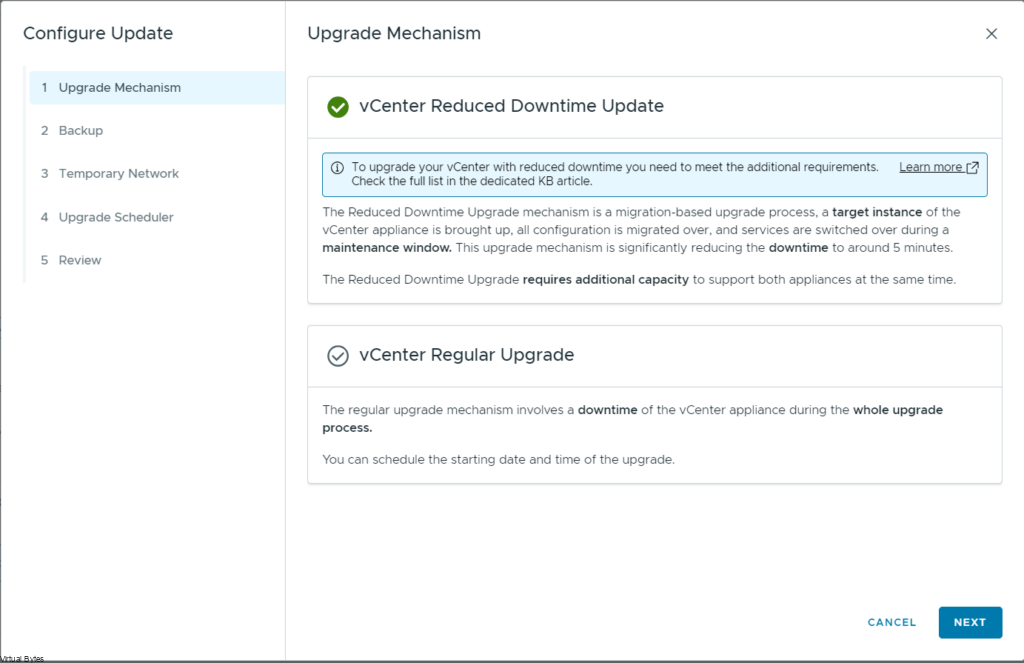
  • Reduced Downtime Upgrade (RDU) support for vCenter: VCF users can now leverage vCenter Reduced Downtime Upgrade (RDU) to execute a vCenter upgrade. vCenter RDU is a migration-based approach to upgrading vCenter and reduces the vCenter downtime to less than 5 minutes. 
  • NSX in-place upgrades for clusters that use vSphere Lifecycle Manager baselines: VCF users now have the choice to perform NSX in-place upgrade for clusters that use vSphere Lifecycle Manager baselines. In-place upgrades eliminate the need to place hosts into maintenance mode during the upgrade.
  • Support for vSphere Lifecycle Manager baseline and vSphere Lifecycle Manager image-based clusters in same workload domain: VCF users now have the flexibility to deploy and upgrade vLCM baseline and vLCM image-based clusters within the same workload domain. 
  • Support for the “License Now” option for vSAN add-on licenses based on capacity per tebibyte (TiB): VCF users can now apply the vSAN TiB capacity license within the SDDC Manager UI to expand storage capacity for their workload domains and clusters. You can also use the “License Later” option to assign the per-TiB vSAN license key using the vSphere Client.
  • Set up VMware Private AI Foundation infrastructure from the vSphere Client: VCF users can leverage a new guided workflow in the vSphere Client to set up infrastructure for VMware Private AI Foundation and maximize the potential of NVIDIA GPU-enabled ESXi hosts. The workflow streamlines the set up process by centralizing configuration steps from SDDC Manager and vCenter into a single workflow.

Read More at VMware’s site – VCF 5.2.1


Upgrade Process & Troubleshooting Tips

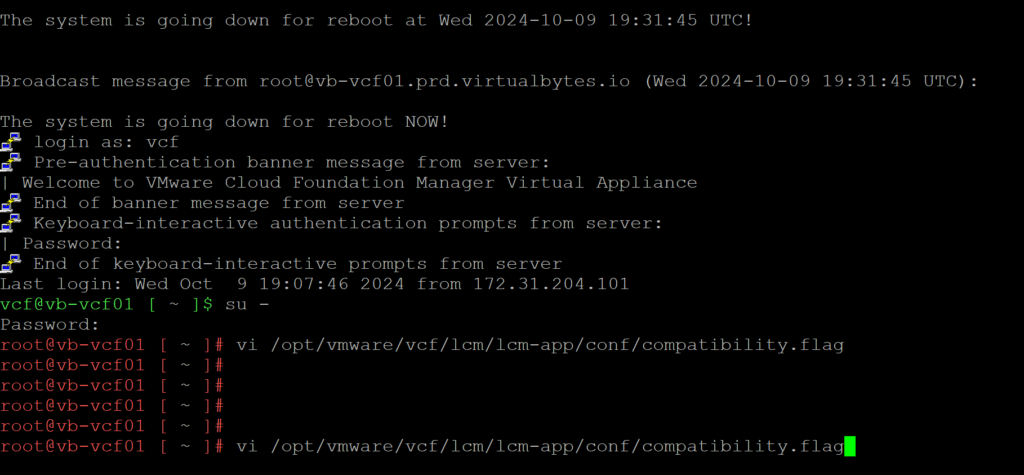
To disable the upgrade compatibility checks, follow the steps below:

  1. SSH into SDDC Manager appliance with the vcf user and su to root.
  2. Edit the file: /opt/vmware/vcf/lcm/lcm-app/conf/compatibility.flag
  3. Update the property vcf.compatibility.controllers.compatibilityCheckEnabled to false
  4. Save and close the file.
  5. Restart Lifecycle Management by running the command: systemctl restart lcm
Edit the file: /opt/vmware/vcf/lcm/lcm-app/conf/compatibility.flag (Example Below)

After you have updated the flag to false from true, reboot LCM service.

systemctl restart lcm

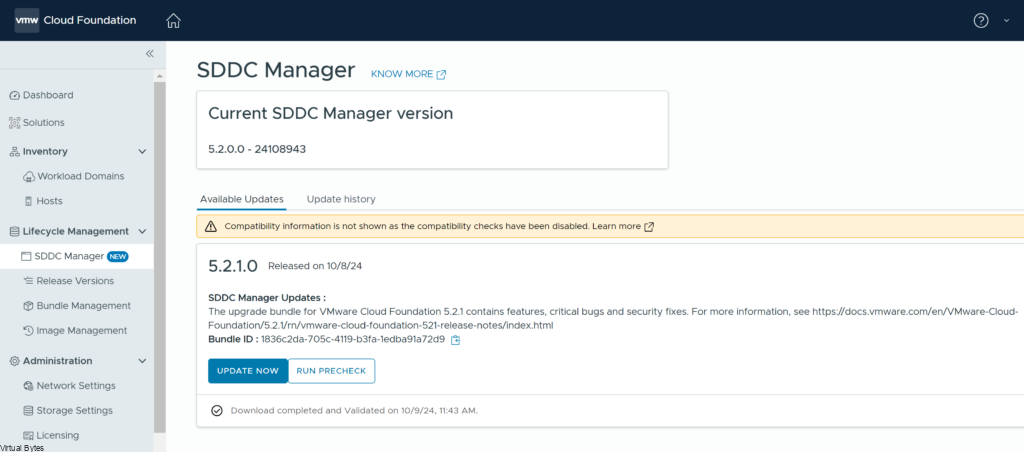
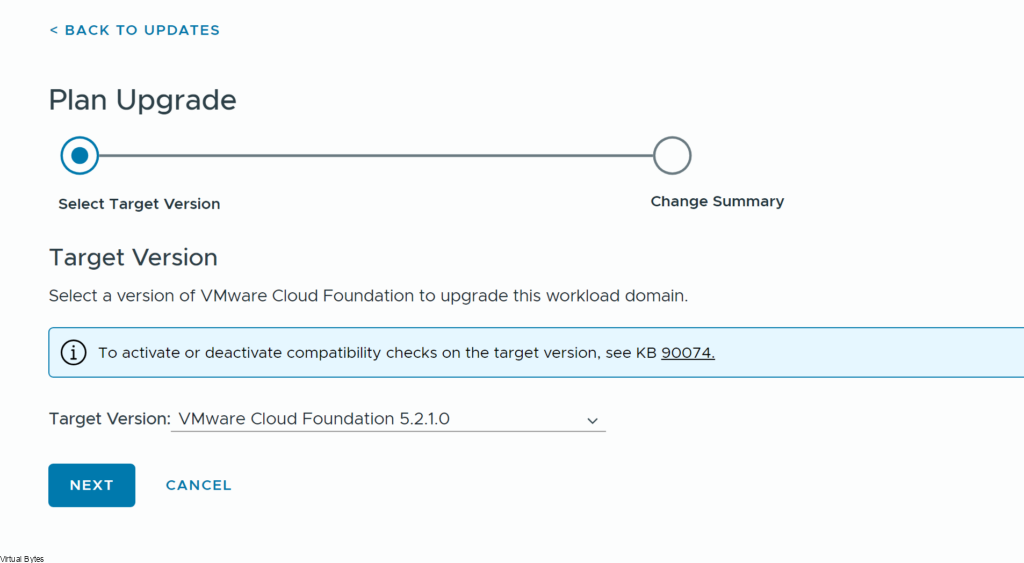
Once you have executed the syntax above, go back to SDDC Web UI and refresh the page, you should see “Update Now” enabled an no more errors.

I ran a pre-check, its a preferred practice to verify pre-checks of any upgrade of VCF, to ensure that everything will upgrade smoothly.

Pre-check is success with no errors or warnings! Lets Upgrade!

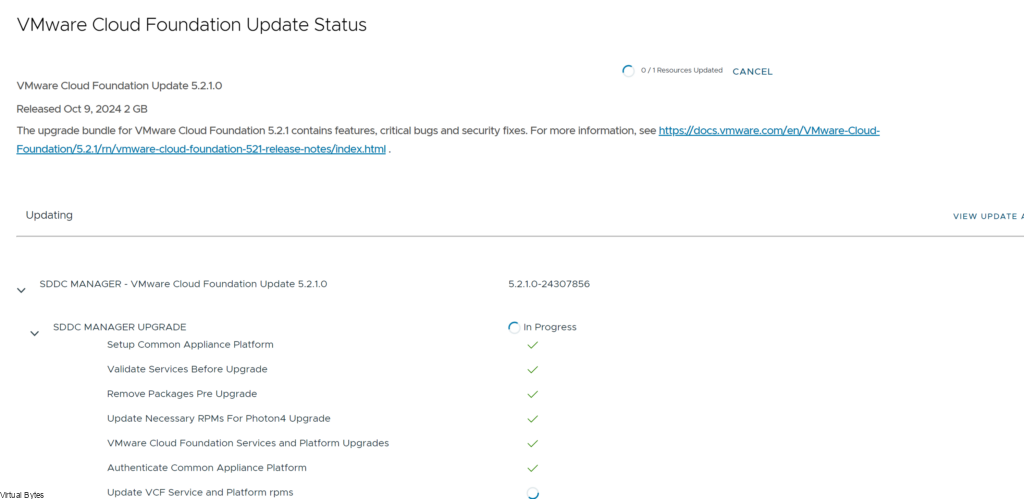
Update Now – will start the SDDC Upgrade to the latest version: Example below

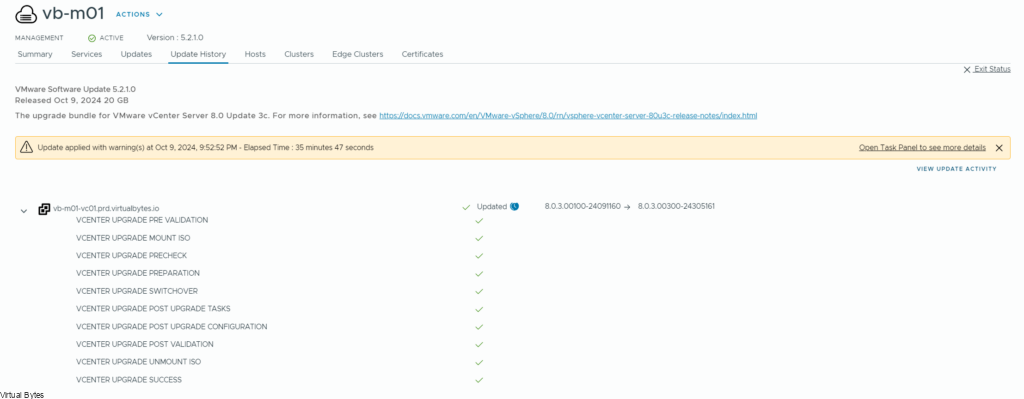
Now that SDDC Manager has upgraded successfully, – Elapsed Time : 19 minutes 28 second

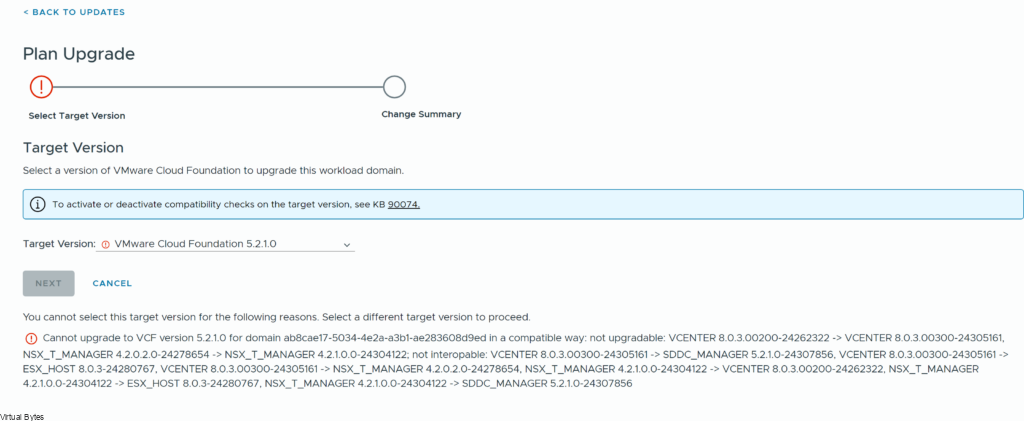
Now, for the next portion of the upgrade – I ended up having a issue where the SDDC BOM was erroring out, that I have a compatibility issue, this is due to a previous async patch upgrade that was required to fix CVE’s so what you will need to do is go back to the same configuration file and switch it back to false, and reboot lcm service. The configurations file reverts back to true after the SDDC upgrade.

Error Message:

You cannot select this target version for the following reasons. Select a different target version to proceed.

Cannot upgrade to VCF version 5.2.1.0 for domain ab8cae17-5034-4e2a-a3b1-ae283608d9ed in a compatible way: not upgradable: VCENTER 8.0.3.00200-24262322 -> VCENTER 8.0.3.00300-24305161, NSX_T_MANAGER 4.2.0.2.0-24278654 -> NSX_T_MANAGER 4.2.1.0.0-24304122; not interopable: VCENTER 8.0.3.00300-24305161 -> SDDC_MANAGER 5.2.1.0-24307856, VCENTER 8.0.3.00300-24305161 -> ESX_HOST 8.0.3-24280767, VCENTER 8.0.3.00300-24305161 -> NSX_T_MANAGER 4.2.0.2.0-24278654, NSX_T_MANAGER 4.2.1.0.0-24304122 -> VCENTER 8.0.3.00200-24262322, NSX_T_MANAGER 4.2.1.0.0-24304122 -> ESX_HOST 8.0.3-24280767, NSX_T_MANAGER 4.2.1.0.0-24304122 -> SDDC_MANAGER 5.2.1.0-24307856

Now after you have updated the configuration and restarted LCM service, go back to the SDDC UI and you should see it allow you to proceed with upgrade.

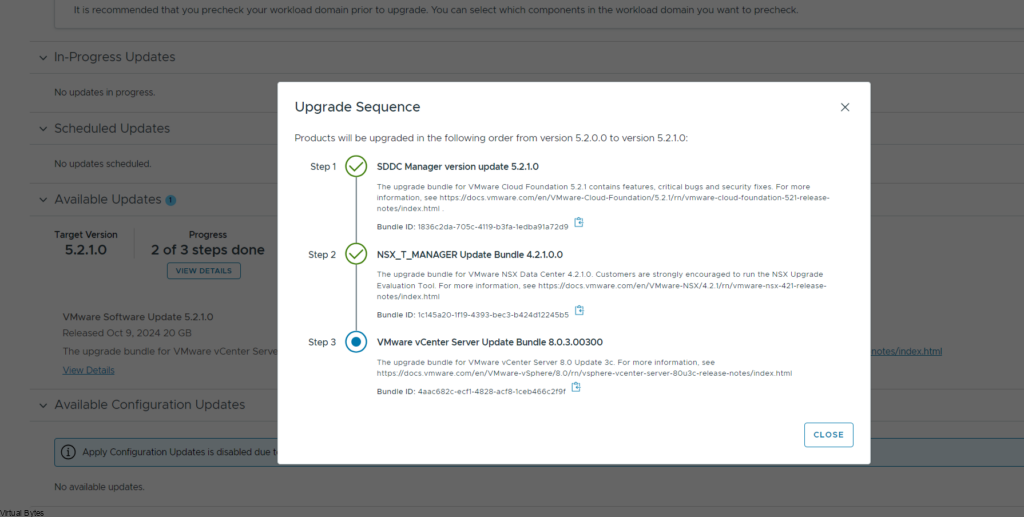
Now once the upgrade is staged and ready you can execute the NSX upgrade, which is the first part of the upgrade. Lets start!

NSX Precheck –

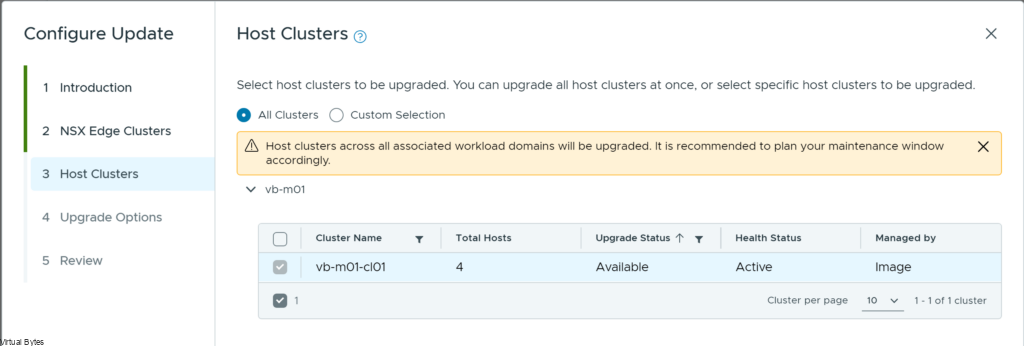
Selection if you would like to upgrade only NSX edge clusters, for my deployment I upgrade all of NSX.

Cluster Selection –

Upgrade options –

Preferred practice – to run the pre-check of any upgrade to ensure compatibility and prevent upgrade issues.

Lets Upgrade!

After NSX has upgraded, you will be able to proceed to vCenter Server upgrade process. If you want to watch the detailed upgrade of NSX you will need to login to the NSX manager web UI and go to System -> Upgrade (here you will be able to watch what is happening during the upgrade of NSX)

Finally to the exciting portion of the upgrade, the Reduced Downtime Upgrade (RDU) is outstanding and flawless and smooth process. Lets begin!

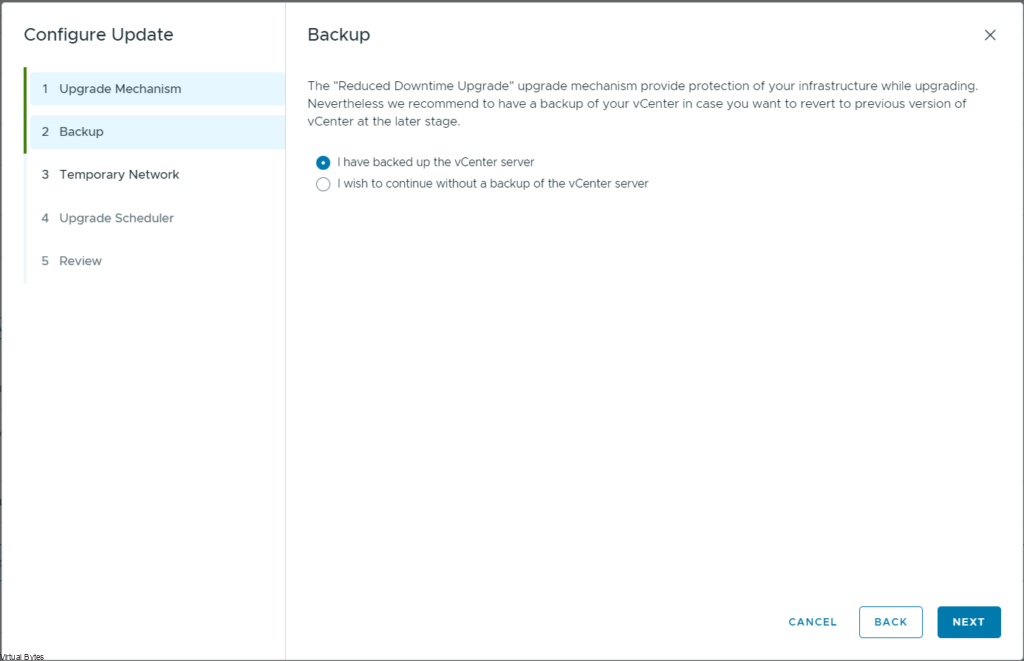
Ensure you have backups and everything you will need incase of any emergency that you need to roll back if the upgrade has an issue.

Here we will setup a temporary static IP, if you have a DHCP that works also.

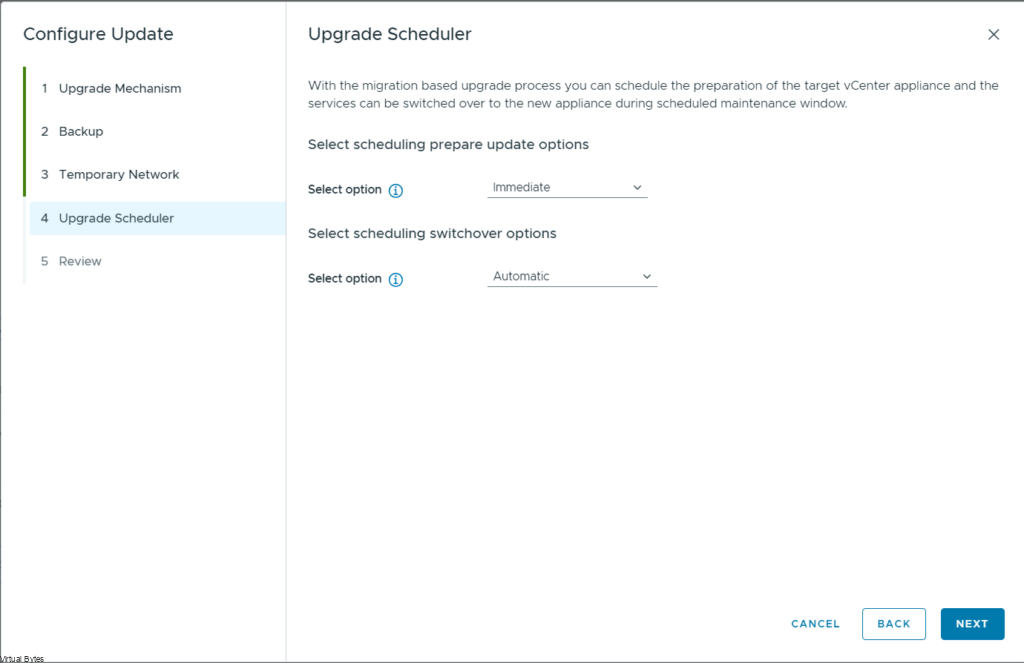
At this part of the the upgrade, the scheduler we can tell the vCenter to do a immediate or scheduled switch over of the new vCenter that has been built / upgraded.

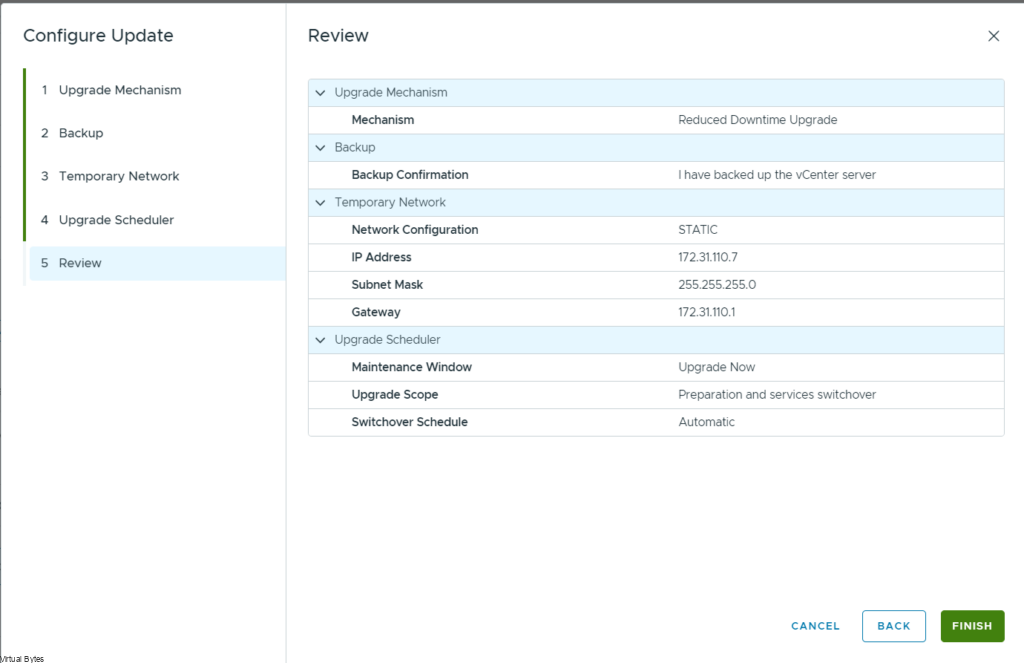
Verify everything you configured is correct to your needs before hitting Finish!

Now we watch the upgrade!

Elapsed Time : 35 minutes 39 seconds

That is all! We have upgraded VCF 5.2 to 5.2.1 and this process was super smooth and ran into few snags which we talked about here in this blog post from the async patch throwing off the BOM and then repeating the steps for SDDC Upgrade and also vCenter / NSX upgrade. Stay tuned for more VCF 5.2.1 posts!

October 9, 2024 0 comments 2.5K views
1 FacebookTwitterLinkedinThreadsBlueskyEmail
EventsVMware Cloud Foundation

VMware Explore 2024 – General Session – Shaping The Future Of Cloud And AI Innovation

by Tommy Grot August 28, 2024
written by Tommy Grot 3 minutes read

Las Vegas, the city that never sleeps, is about to shine even brighter as we step into a new era of technology. VMware Explore 2024 has arrived, and with it, a gathering of some of the most brilliant minds from around the globe, ready to shape the future of infrastructure and innovation.

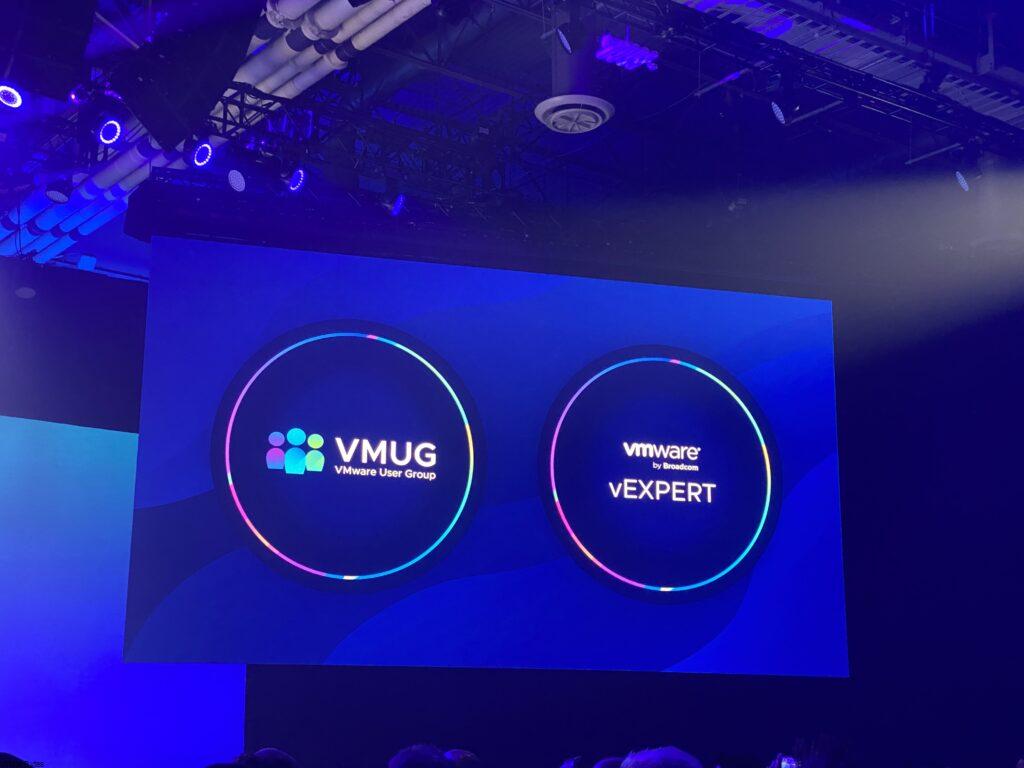
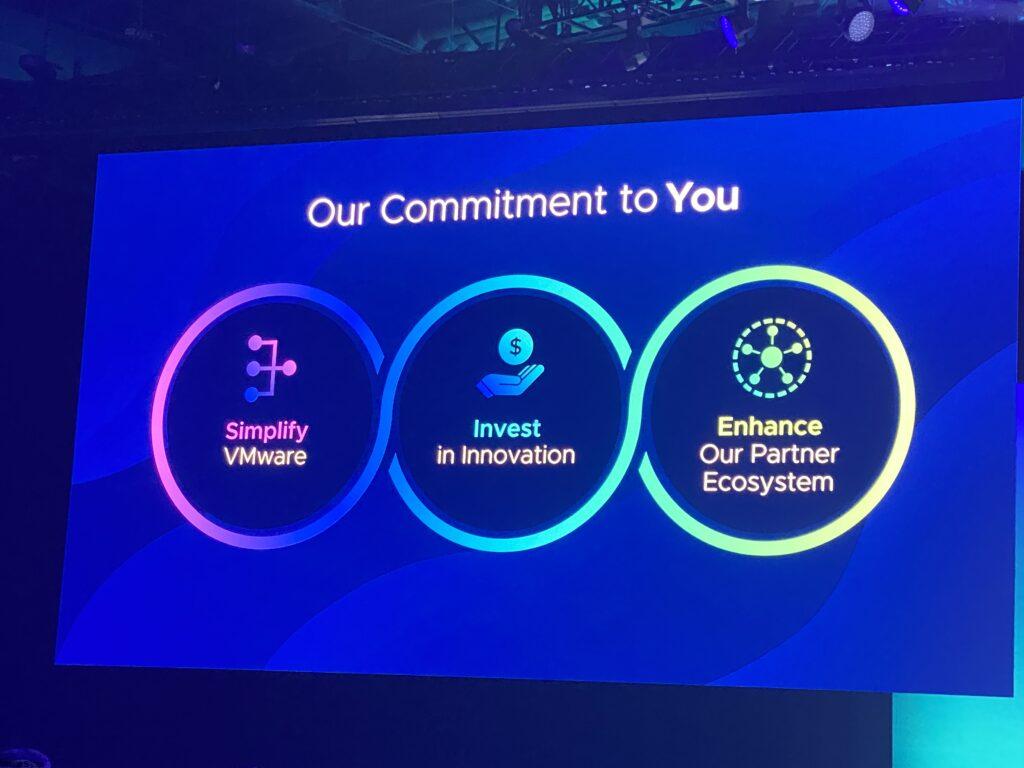
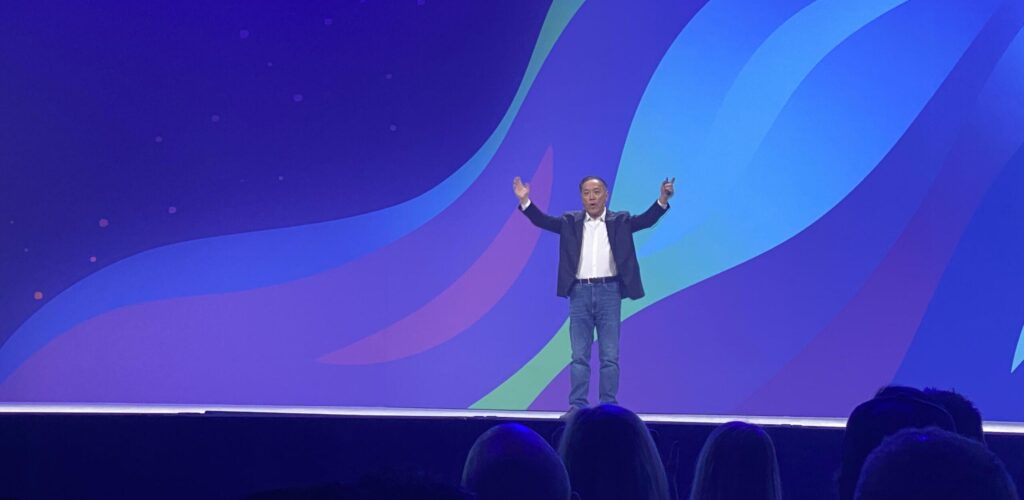
At VMware Explore 2024, the company’s CEO, Hock Tan, took the stage to present a vision for the future of the company and reassure customers about its commitment to innovation and their success. In this blog post, we’ll recap Tan’s key messages from the general session and explore how VMware is positioning itself for the future while maintaining a strong focus on its customers’ needs. Along with announcing the large community that backs VMware – VMUG and VMware vExperts.

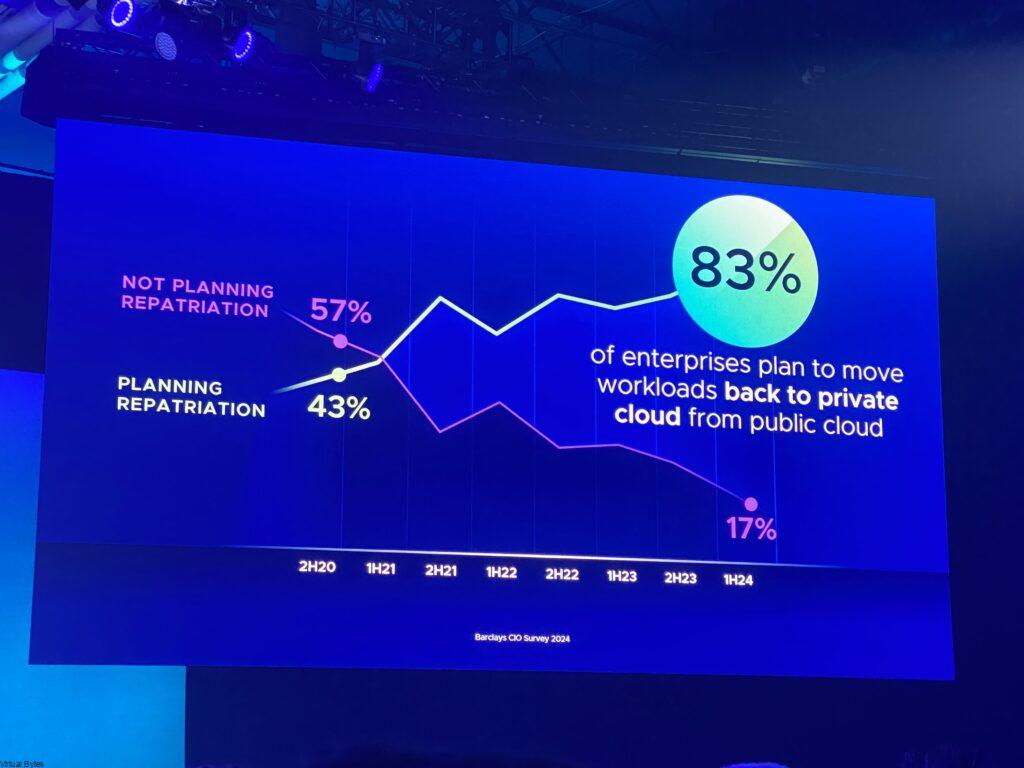
Hock Tan said that the CEOs’ decisions to push their companies into public clouds have left their IT departments with post-traumatic stress disorder, while silos of datacenter tech have left tech teams “screwed”. Which is 100% true, organizations are not ready for the cloud and the insane costs, cloud should be utilized to provide on-demand resources when an organization requires them.

The Future of VMware:
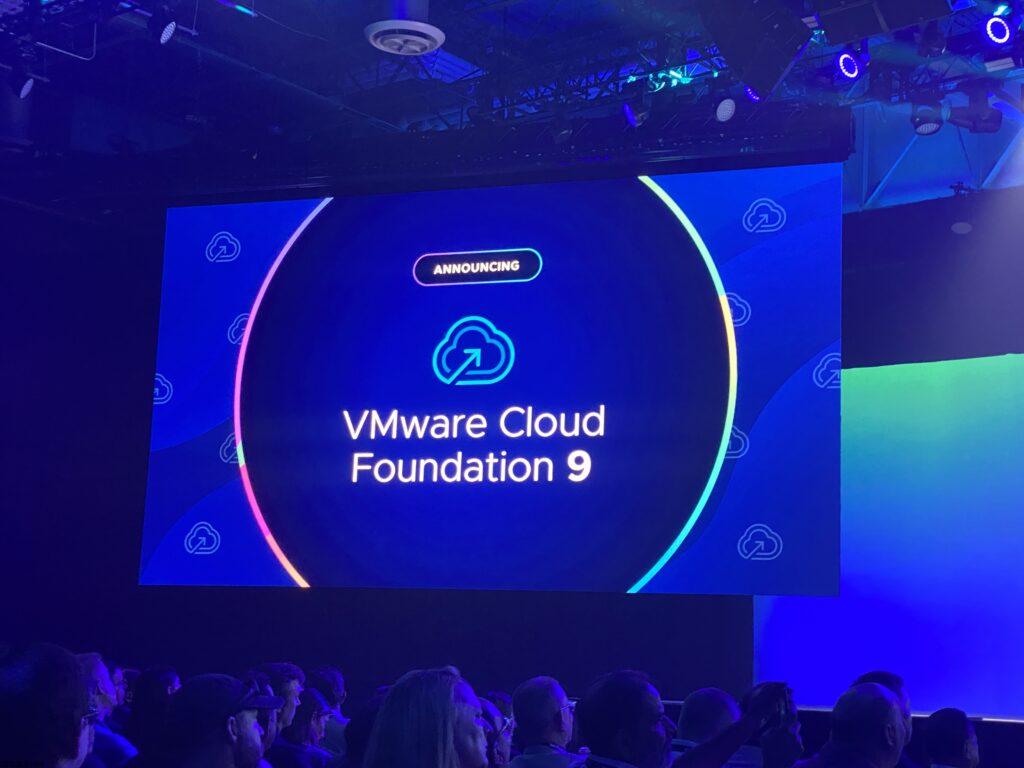
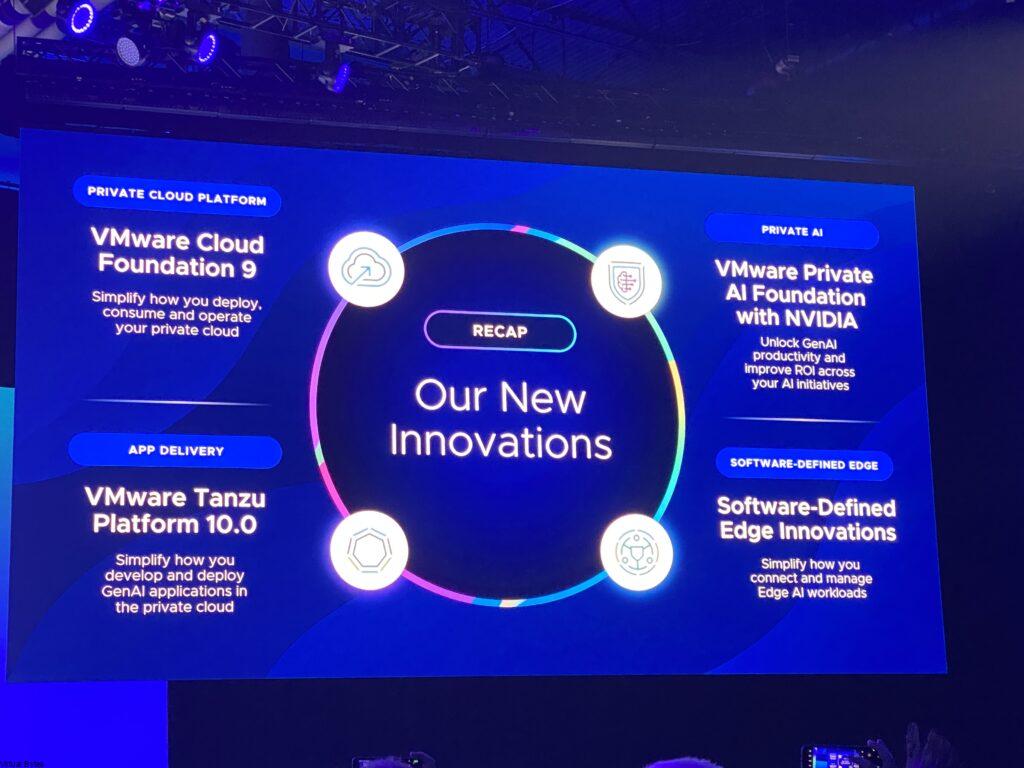
Tan began by highlighting VMware’s rich history and its role in revolutionizing virtualization and cloud computing. He acknowledged the company’s impressive track record of innovation, including recent innovations like VCF 9 and many other updates within Private AI and business operations, which have expanded VMware’s capabilities in areas like cloud management and multi-cloud.

He then set the tone for the rest of his presentation by emphasizing that while VMware has come a long way, there is still much to be done. Hock Tan said, “We’re just getting started,” hinting at a bold and ambitious future ahead for the company. He went on to describe VMware’s strategy as one that focuses on three key pillars: cloud, modern applications, and digital infrastructure.

Cloud and Virtualization:
Tan discussed how VMware has been at the forefront of cloud computing since its early days with virtualization. He highlighted the ongoing evolution of cloud technologies and how VMware is adapting to meet the changing needs of businesses. This includes investing in hybrid cloud solutions and expanding its presence in public, private, and edge clouds. Tan also mentioned VMware’s commitment to open standards and interoperability, ensuring that their products can seamlessly integrate with various cloud environments.


In his presentation at VMware Explore 2024, Hock Tan offered a compelling vision for the future of VMware, highlighting its commitment to innovation and customer success. By focusing on cloud, modern applications, and digital infrastructure, VMware is positioning itself to meet the evolving needs of businesses. Tan’s reassurance to customers that Broadcom wants to help and continue investing in their success are likely to alleviate any concerns about the company’s future direction. As VMware continues to execute on its strategy, it will be fascinating to see how the company evolves and adapts to the ever-changing landscape of technology.

August 28, 2024 1 comment 504 views
0 FacebookTwitterLinkedinThreadsBlueskyEmail
Tips & TricksVMware Cloud Foundation

VMware Cloud Foundation 5.2 – Tips & Troubleshooting

by Tommy Grot August 8, 2024
written by Tommy Grot 3 minutes read

Today’s blog post is about VCF and how it is a comprehensive cloud management platform that enables organizations to build, deploy, and manage private clouds. With the release of VCF 5.2, VMware has further enhanced the platform’s capabilities, making it an even more attractive choice for businesses looking to modernize their infrastructure. In this blog post, we’ll delve into the process of upgrading specific components in VCF 5.2, including ESXi and Image Management.


This will be a living blog post – Any Issues I encounter will be documented here!


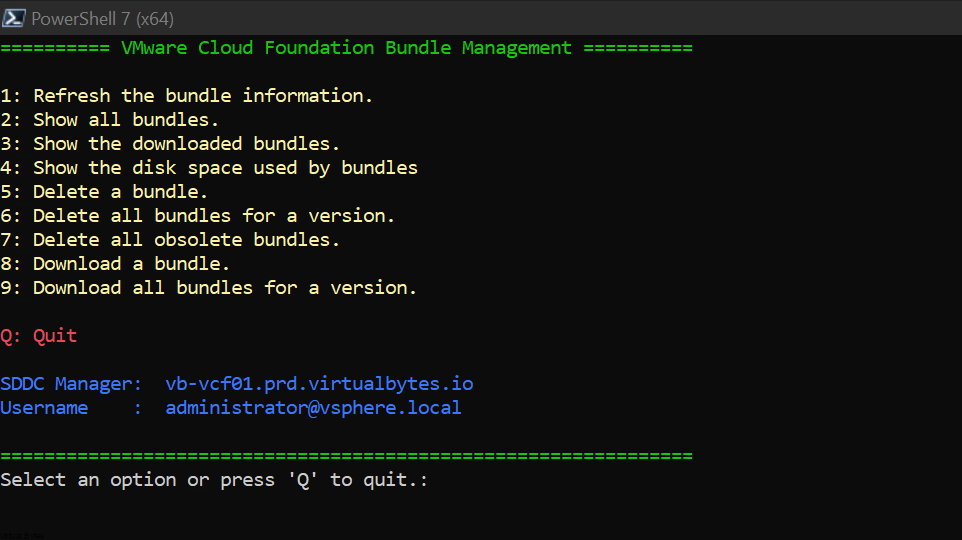
PowerShell Script for VMware Cloud Foundation Bundle Management

Below I will walk you through on using the PowerShell Script which is provided for end-users to be able to safely and easily clean up bundles within their SDDC Manager.

  1. Prepare System Requirements:
    • Windows, Linux, or MacOS running PowerShell Core 7.3.0 or later.
    • VMware PowerCLI 13.1 or later
    • PowerVCF 2.3.0 or later
  2. Download attached script.
  3. Extract script, change to its directory.
  4. Run script
    • with parameters:
      • .\VcfBundleManagement.ps1 -user <SDDC_Manager_user> -server <SDDC_Manager_FQDN> -pass <password> -rootPass <root_password>
      • Where:
        • <SDDC_Manager_user>      is the username to authenticate with SDDC Manager.
        • <password>                          is the password to authenticate with SDDC Manager
        • <SDDC_Manafer_FQDN>    is the fully qualified domain name of the SDDC Manager
        • <root_password>                  is the password for the root user on the SDDC Manager appliance
    • without parameters (script will ask for input parameters):
      • .\VcfBundleManagement.ps1
  5. Select options from the displayed menu and press enter to run it.

Specify your SDDC Manager ->

Once connected with your SSO Account ( I used [email protected], but any administrative privilege account shall work as well)

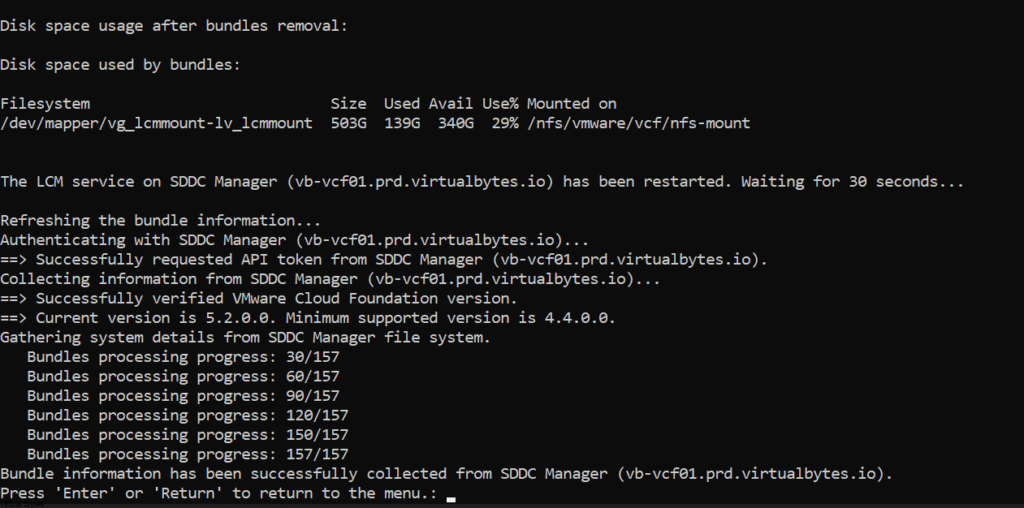
Selecting #7 Will Delete all obsolete bundles which I had for VCF 5.1.1 and no longer needed them.

Detailed Storage usage of the SDDC Manager is provided by option #4


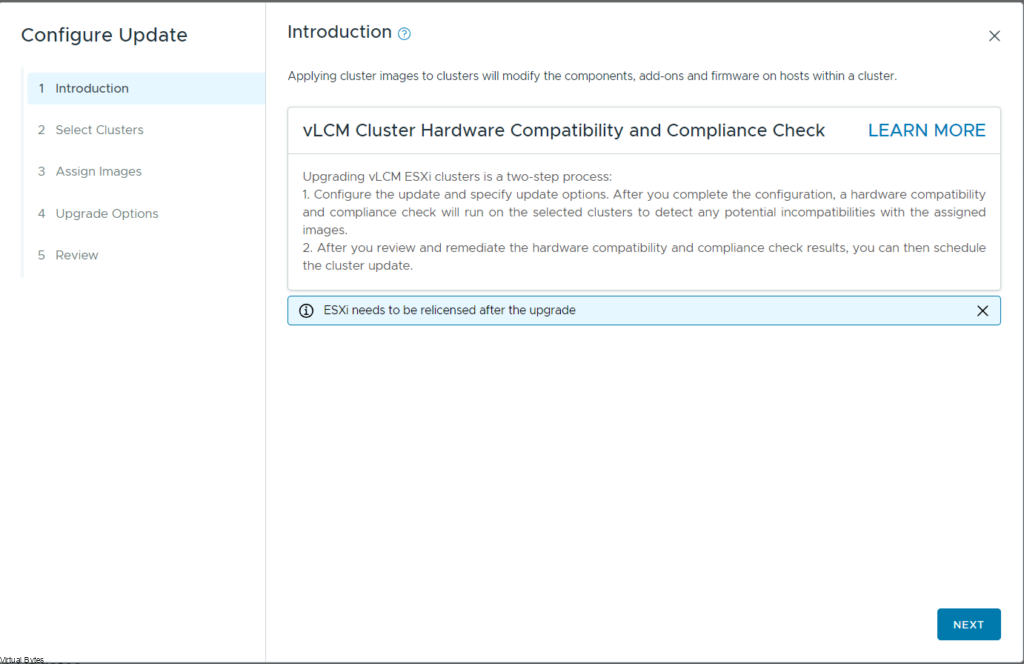
vLCM Upgrade Preparation

For the vLCM Portion of the upgrade, I encountered a issue where I could not proceed till I built a custom image with all the dell firmware’s and drives addon, due to the reason my previous version of ESXi had the Dell OEM drivers embedded.

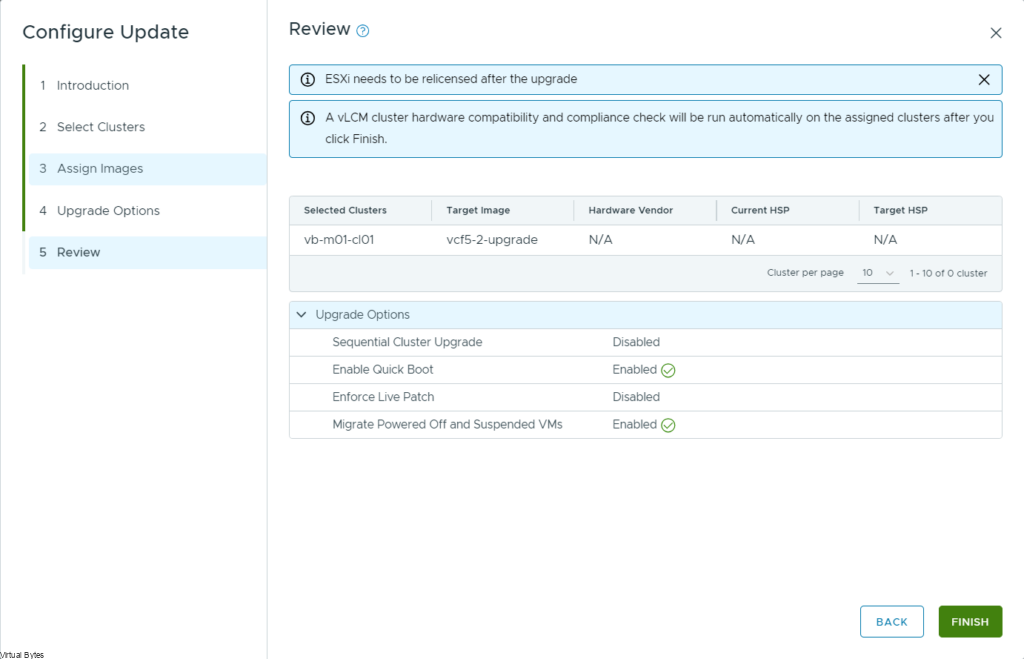
Configure Update ->

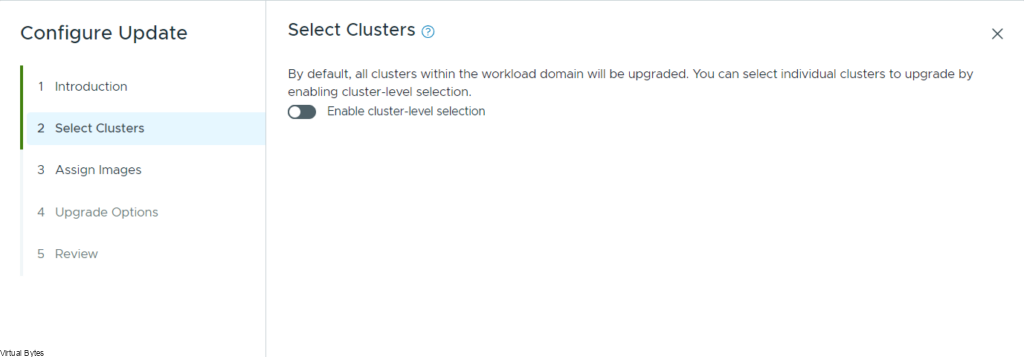
Select your cluster(s) ->

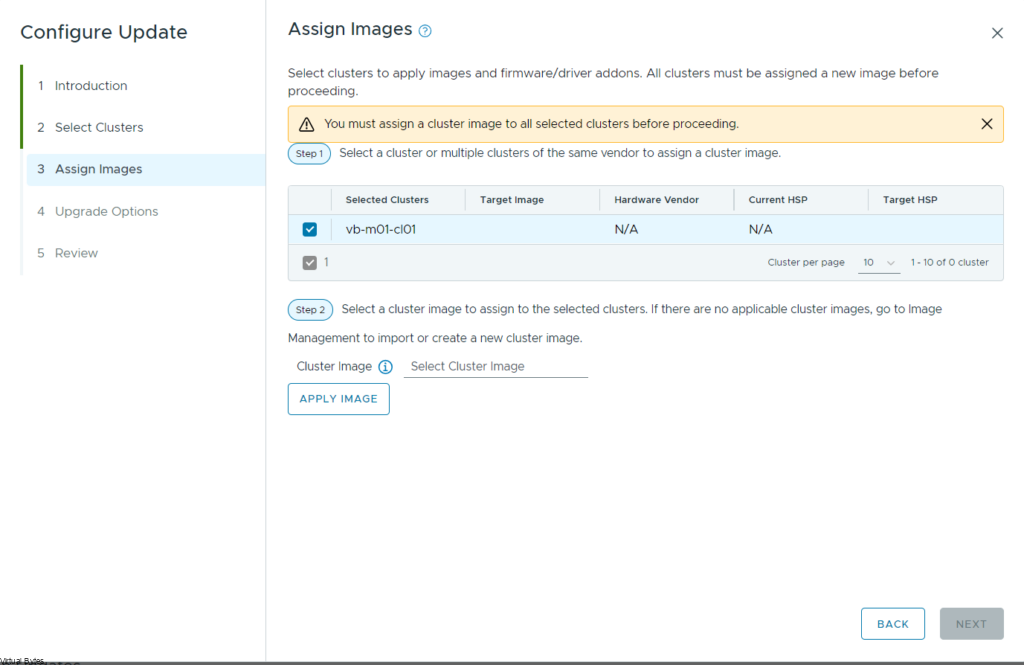
Select your image, so for this part you will need to go into vCSA and prepare a image that is latest version, and ensure that all OEM drivers are updated.

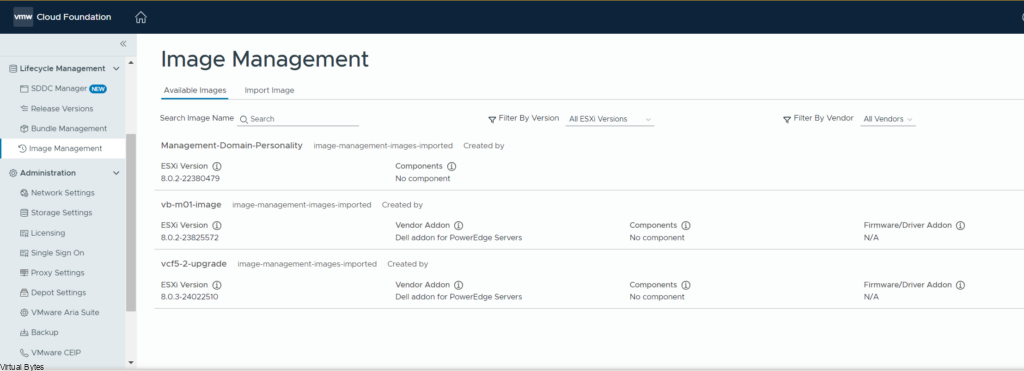
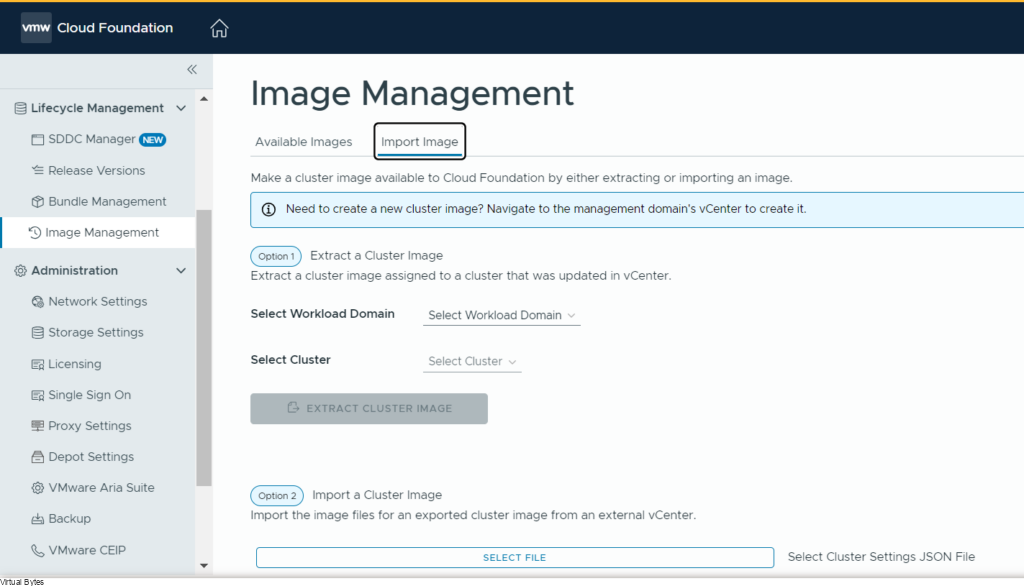
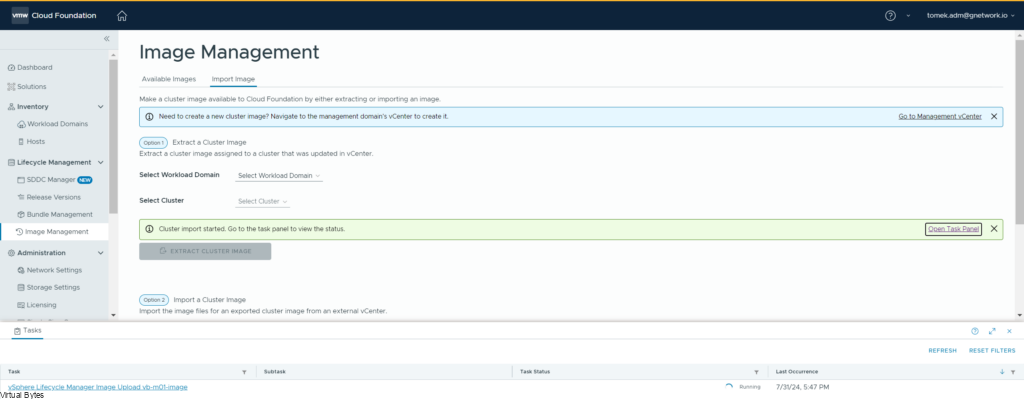
Once image is created go to Image Management -> Import Image from your Management Workload Domain vCenter

It will take few minutes but once the import is complete for the vSphere 8.0 U3 version, then you will see it appear in the vLCM upgrade window.

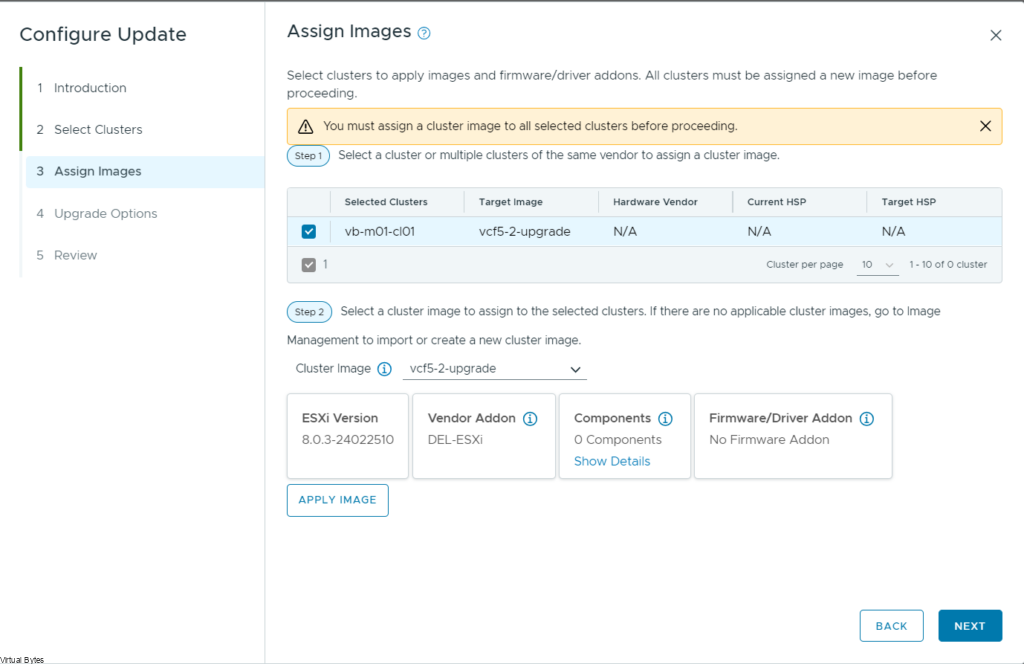
Back at the vLCM upgrade window, assign the image(s) that you created earlier and click next.

Upgrading VMware Cloud Foundation 5.2 involves updating specific components like ESXi and Image Management. By following the step-by-step guides outlined above, you can ensure a smooth and successful upgrade process that takes advantage of the latest features and capabilities in VCF 5.2. Remember to always back up your configuration and data before upgrading, and plan for downtime accordingly. With these best practices in mind, you’ll be well on your way to modernizing your private cloud infrastructure with VMware Cloud Foundation.

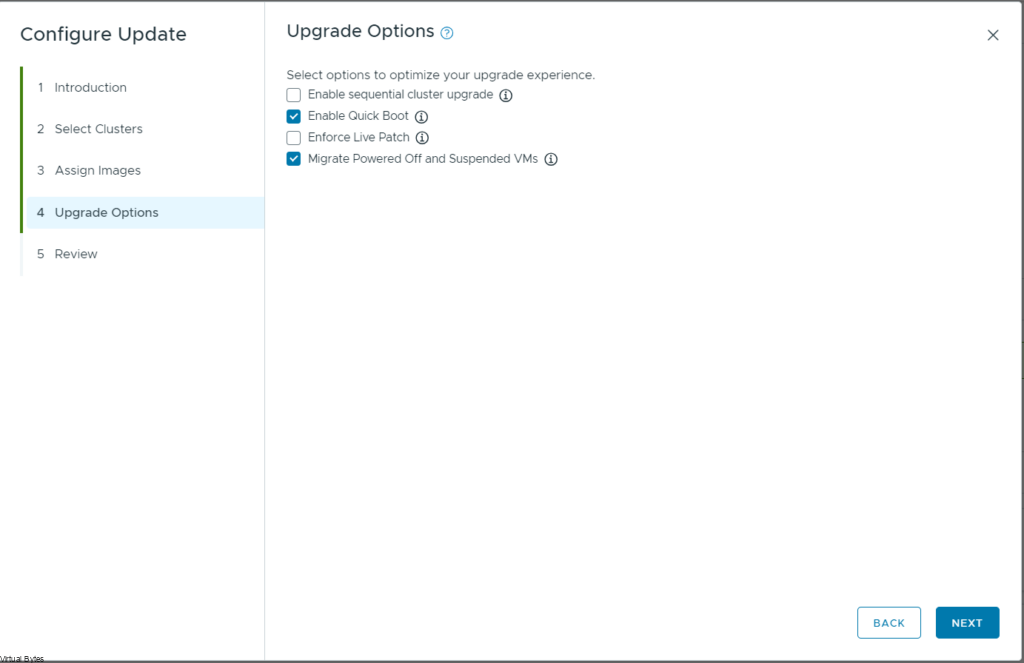
Click Next -> After you have applied your custom image for vLCM Upgrade. Once the vLCM is complete then ESXi will upgrade and below you can specify the deployment orientation. If your servers support Quick Boot keep it enabled or even Live Patch.

Upgrade process is about to begin…

Upgrade in process!

August 8, 2024 0 comments 870 views
0 FacebookTwitterLinkedinThreadsBlueskyEmail
VMware Cloud Foundation

VMware Cloud Foundation 5.2!

by Tommy Grot June 25, 2024
written by Tommy Grot 5 minutes read

The ever-evolving landscape of cloud infrastructure demands constant innovation and adaptability from technology solutions. VMware Cloud Foundation (VCF) 5.2 arrives with a plethora of groundbreaking features and add-ons, empowering you to build, deploy, and manage modern infrastructure with unmatched efficiency and agility.

This release is a significant milestone in the journey of VCF, introducing cutting-edge advancements across AI-powered automation, data processing, and storage management. From intelligent workload placement to dynamic performance optimization and automated data handling, VCF 5.2 empowers you to:

  • Maximize resource utilization: Leverage AI-powered insights to allocate workloads optimally across the cluster, ensuring efficient resource allocation and improved performance.
  • Boost data agility: Embrace intelligent data management with automated data processing units (DPUs), enabling high-performance data analytics and persistent data storage.
  • Simplify storage management: Introduce new vSAN Extended Storage Architecture (ESA) policies for automated data tiering and disaster recovery, ensuring optimal storage utilization and enhanced resilience.
  • And that’s just the tip of the iceberg!
VCF 5.2 comes packed with numerous other exciting features and enhancements, including:
  • Enhanced networking capabilities: Improved routing performance and stability with support for BGP routing in private networks.
  • Expanded automation: Streamline workflows with additional self-service capabilities for users and automated infrastructure provisioning.
  • Improved security: Strengthen data protection with advanced encryption options and role-based access controls. Utilizing Identity Federation Support with Microsoft Entra ID and also 3rd party authentication services or well known AD/LDAP or okta and ADFS.
  • Import an existing vSphere Infrastructure into your VMware Cloud Foundation infrastructure.

Here in this blog post we will go over many different topics but we will go in depth in future blog posts on other areas of VCF 5.2!

With the new VCF 5.2 you can import a standalone vSphere environment which it can be a new or existing one and let you manage its lifecycle through one single pane window through the SDDC Manager.

Flexible Deployments

Now you can deploy VCF in many different use cases, from a data center in the edge or even a air-gapped environment. Now in VCF 5.2 you have the flexibility to deploy as your heart desires!

Lifecycle Management

Now this is an exciting addition to VCF 5.2! We can upgrade SDDC Manager independently where before it was apart of the management workload domain, this provides a lot of flexibility where before some customers needed to stay on a specific version before it could get upgraded, it had to go through thorough tests.

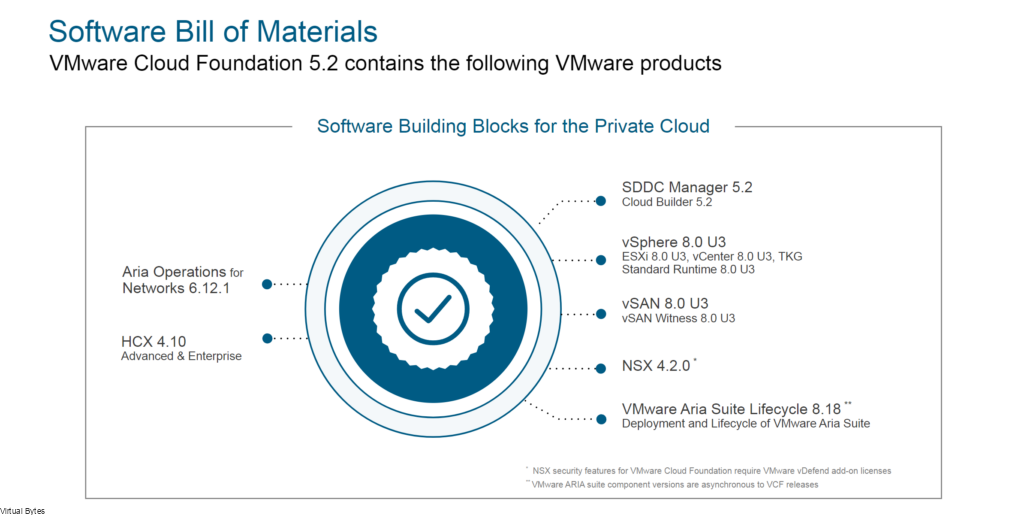
Software Bill of Materials

Patch Individual Components using SDDC Manager

I made a great blog post on how to utilize the SDDC Manager Async Patch tool, well before it was a CLI driven automation utility where you would have to stage your commands and prepare for upgrading the indiviual products outside the Software Bill of Materials

The VMware SDDC Manager async patch tool allows you to upgrade individual products outside of the standard VMware Cloud Foundation (VCF) baseline. This tool can be used to upgrade products such as vCenter, NSX, and ESXi to newer versions without affecting the overall VCF deployment.

From My Blog Post Here

Offline Bundle Repo

Now, this is a improvement for Air-Gapped environments or secured environments where there is no internet connection, with hosting your own repo for all the upgrades for VCF this will be a game-changer where it will save time and re-downloading each bundle or all the bundles.

vSphere 8 u3 Update

Key highlights of this release include:

  • Ability to manage Kubernetes clusters independent of vSphere, offering greater flexibility and autonomy for hybrid and multi-cloud deployments.
  • Simplified management of TKG clusters through the vSphere web client, streamlining workflows and reducing administrative overhead.
  • Automated scaling of virtual machines (VMs) based on workload demands, ensuring optimal resource utilization and cost efficiency.
  • Support for scale-up and scale-down of CPU, memory, and vCPUs simultaneously, enabling efficient adaptation to dynamic workloads.

vSAN Stretched Cluster Support:

  • Expansion of vSAN to support stretched clusters across geographically dispersed locations.
  • Continuous data consistency and disaster recovery across sites, ensuring high availability and business continuity.
  • VM Backup and Restore:
  • Comprehensive snapshot-based backup of TKGs, enabling easy restoration and disaster recovery.

Keeping your vSphere Updated

This ensures the following:

  • Optimal infrastructure performance and efficiency.
  • Enhanced security and compliance.
  • Improved management and automation capabilities.
  • Support for modern workloads.
  • Access to continuous innovation and support.

But also, now we can patch vSphere environment much faster and without taking too many services down and causing unhappy customers. So, now with the new upgrade process the host enters a partial maintained mode where the host has existing workloads operating on it but no new workloads will migrate nor any new VMs or containers will get deployed on it till it gets upgraded.

Hardware Support

Protecting crucial workloads utilizing DPUs, (Data Processing Units) this provides high availability with active and standby states for workloads where if there is any outage that could occur the operations switch over to the standby DPU. Which this is a really neat addon for mission critical workloads that rely on DPUs!

Also even taking off the load from the primary DPU and being able to provide additional bandwidth by utilizing DPUs to provide double the networking throughput and keeping workloads always on.

Also, with Intel’s AI/ML Workloads, the Intel CPU Max Series is an whole new type of CPU where they have high bandwidth memory on the chip to accelerate AI/ML workloads by ensuring advanced security and reducing bottlenecks during high demands.

vSphere with Different Types of GPU Workloads

Now with this release, customers have the opportunity now to use different types of workloads on a single GPU, where it could be Artificial Intelligence or Machine Learning or even like utilizing graphics or VDI. This will help the GPU resources be shared among different deployments as well allowing customers to have the flexibility as they choose.

Security & Compliance

  • More Choices in Identity Management

TLS Ciphers allowing quicker implementation

STIG and PCI Compliance with easy to use hardening guides

VMware Cloud Foundation 5.2 is a groundbreaking advancement in your own private or hybrid cloud infrastructure management, offering a comprehensive suite of features and enhancements to empower you to build, deploy, and manage modern infrastructure with unparalleled efficiency and agility.

With intelligent automation, enhanced security, and innovative storage capabilities, VCF 5.2 provides a foundation for building resilient, adaptable, and efficient cloud-native environments.

Stay tuned for further blog posts where we’ll delve deeper into each of these features and explore how they can transform your infrastructure management practices!

June 25, 2024 0 comments 1.2K views
1 FacebookTwitterLinkedinThreadsBlueskyEmail
AIVMware Cloud Foundation

How To Setup Ollama + OpenWebUI on VCF

by Tommy Grot June 7, 2024
written by Tommy Grot 4 minutes read

In this blog post, we will explore how to host your very own ChatGPT using the powerful combination of Ollama and OpenWebUI, all powered by VMware Cloud Foundation. By leveraging these cutting-edge technologies, you’ll be able to create a seamless and interactive chatbot experience that will impress your users. Get ready to dive into the world of AI and virtualization as we walk you through the steps to set up your own ChatGPT. Exciting times are ahead, so let’s get started on this journey together!

This walkthrough will only guide you through how to setup Ollama and Open WebUI – you will need to provide your own Linux VM, for my deployment I used Ubuntu 22.04.

Next blog post we will go into customizing and adding onto Ollama and OpenWebUI with for example Automatic1111 and Diffusion and Image Generation LLMs.

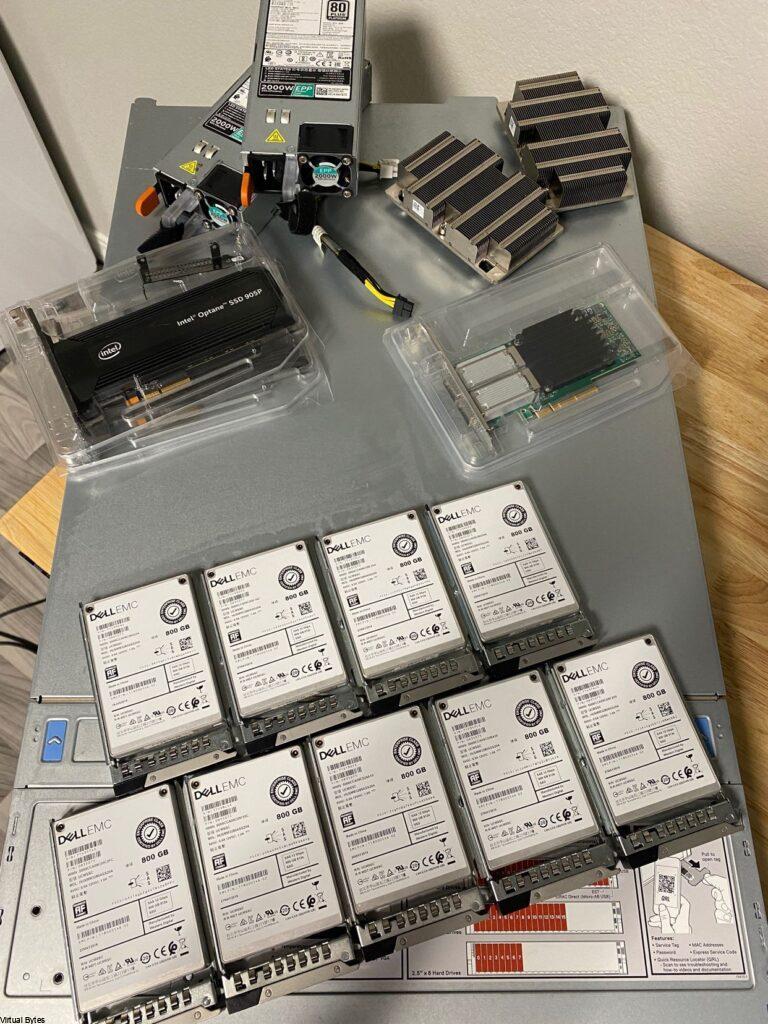
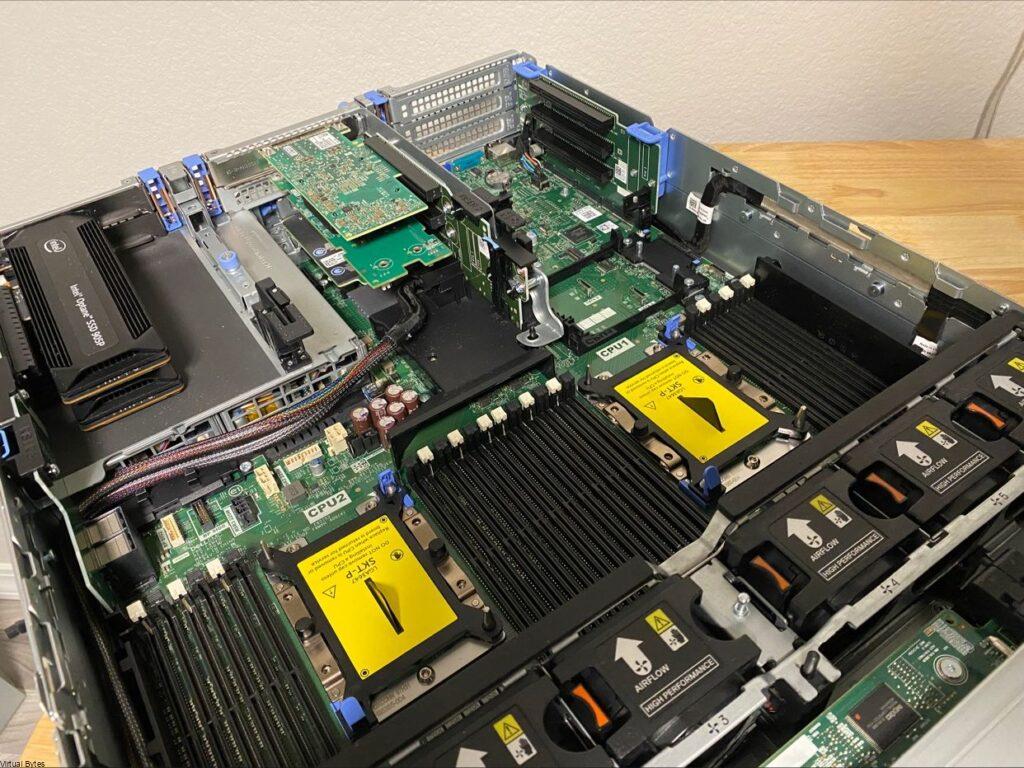
The Hardware:

  • 2 x Intel Platinum 8158 3.0GHz 12 Cores
  • 1 x Nvidia Tesla P40 24GB DDR5
  • 1 x Dell PERC H740P RAID Card
  • 4 x 32GB Samsung DDR4 2666MHz (128GB)
  • 2 x 50Gb/s Mellanox Connectx-4 Data Traffic
  • 4 x 10Gb/s X710 NDC for NSX Overlay
  • 1 x Boss S1 w/ M.2 SSD for ESXi Boot
  • 2 x 2000 watt PSUs
  • 8 x 800GB SAS SSD – Capacity Storage
  • 2 x 280GB Intel Optane Storage – Fast Storage

The Virtual Machine:

  • Deploy a Ubuntu or any choice of Debian distro if you want to utilize the commands I have apart of this walkthrough.
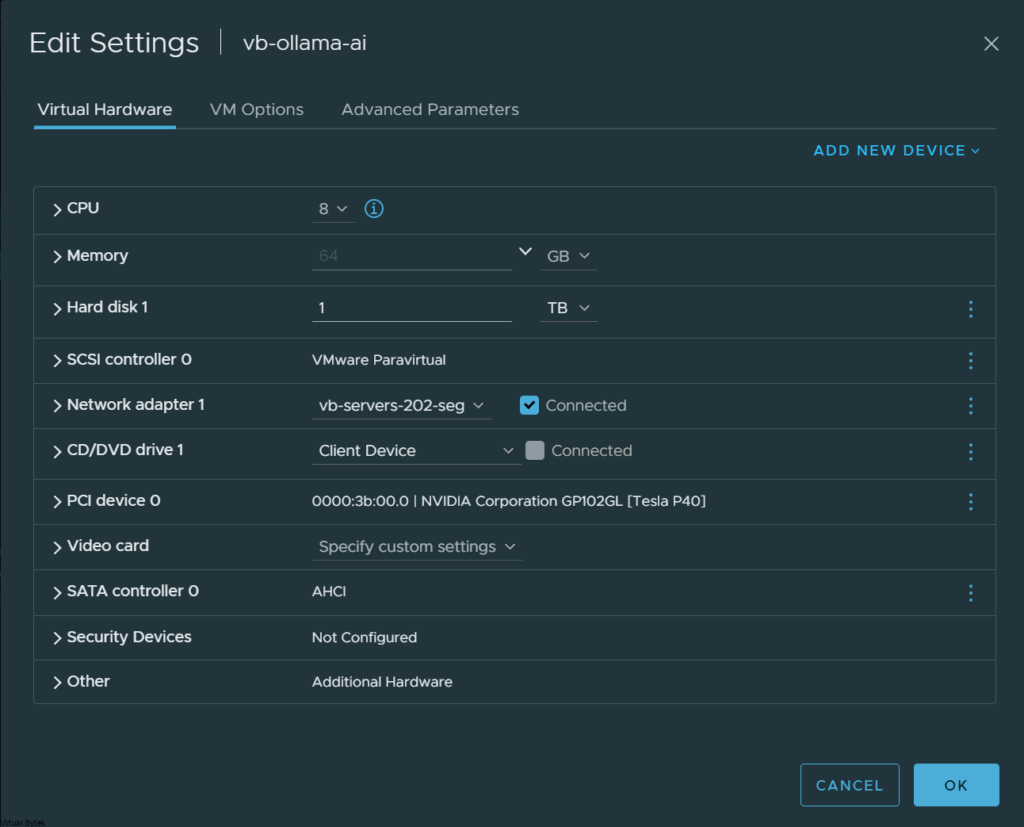
  • Enabling Hardware Device Passthrough for the GPU also apart of your VMX add the following in:
pciPassthru.use64bitMMIO=”TRUE”
pciPassthru.64bitMMIOSizeGB=”128″

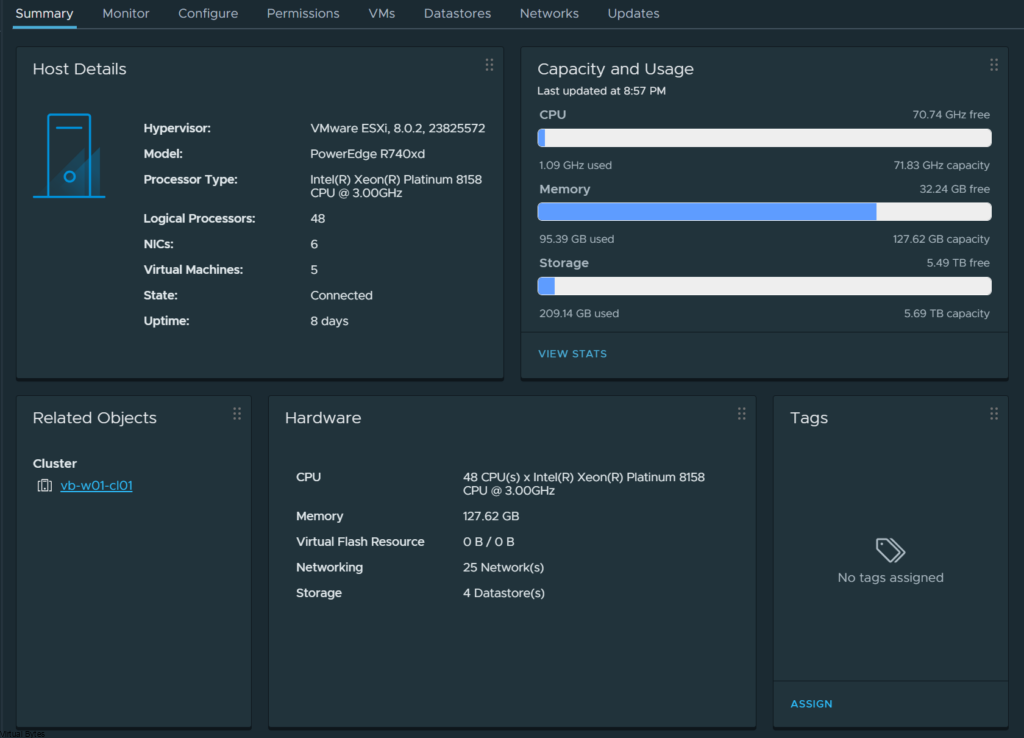
Once the Virtual Machine is deployed, you will want to ensure that your Server or Desktop Hardware is prepared to have a GPU, in my Dell PowerEdge R740XD I have a NVIDIA Tesla P40.

The Specifications:

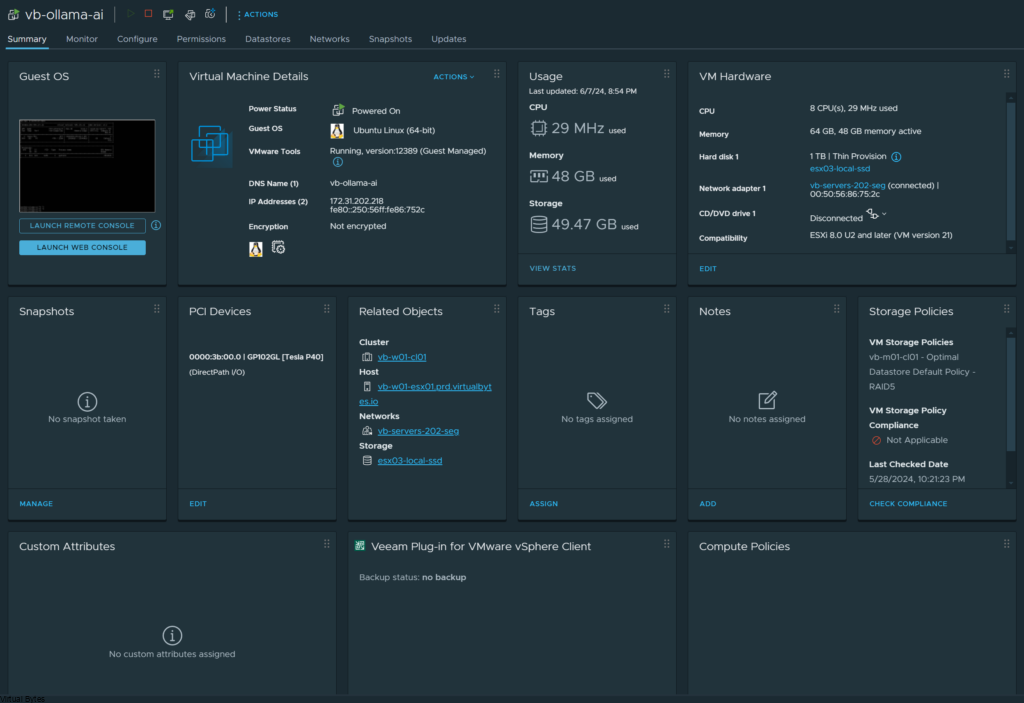
This will vary, for my initial deployment I setup 8 vCPUs with the Automatic CPU Topology enabled, but this will all depend on your use case, since I have powerful CPUs and lots of memory I can increase the resource allocation later on.

The Software:

Download & Install Ollama:

curl -fsSL https://ollama.com/install.sh | sh

Time to Shutdown The Virtual Machine and Pass Through the NVIDIA Tesla P40

  • With the above requirements satisfied, two entries must be added to the VM’s VMX file, either by modifying the file directly or by using the vSphere client to add these capabilities. The first entry is:
pciPassthru.use64bitMMIO=”TRUE”
  • Specifying the second entry requires a simple calculation. Sum the GPU memory sizes of all GPU devices(*) you intend to pass into the VM and then round up to the next power of two. For example, to use passthrough with 4 16 GB A2 devices, the value would be: 32 + 32 = 64, rounded up to the next power of two to yield 128. Use this value in the second entry:
pciPassthru.64bitMMIOSizeGB=”128″

Add Docker’s official GPG key:

sudo apt-get update
sudo apt-get install ca-certificates curl
sudo install -m 0755 -d /etc/apt/keyrings
sudo curl -fsSL https://download.docker.com/linux/ubuntu/gpg -o /etc/apt/keyrings/docker.asc
sudo chmod a+r /etc/apt/keyrings/docker.asc

Add the repository to Apt sources:

echo \
"deb [arch=$(dpkg --print-architecture) signed-by=/etc/apt/keyrings/docker.asc] https://download.docker.com/linux/ubuntu \
$(. /etc/os-release && echo "$VERSION_CODENAME") stable" | \
sudo tee /etc/apt/sources.list.d/docker.list > /dev/null
sudo apt-get update

Next, we will install docker and all its dependencies:

sudo apt-get install docker-ce docker-ce-cli containerd.io docker-buildx-plugin docker-compose-plugin

Now we will setup the docker container for Open WebUI to run, on port 11434 – Yeah the port number looks like (LLAMA haha)

docker run -d --network=host -v open-webui:/app/backend/data -e OLLAMA_BASE_URL=http://127.0.0.1:11434 --name open-webui --restart always ghcr.io/open-webui/open-webui:main

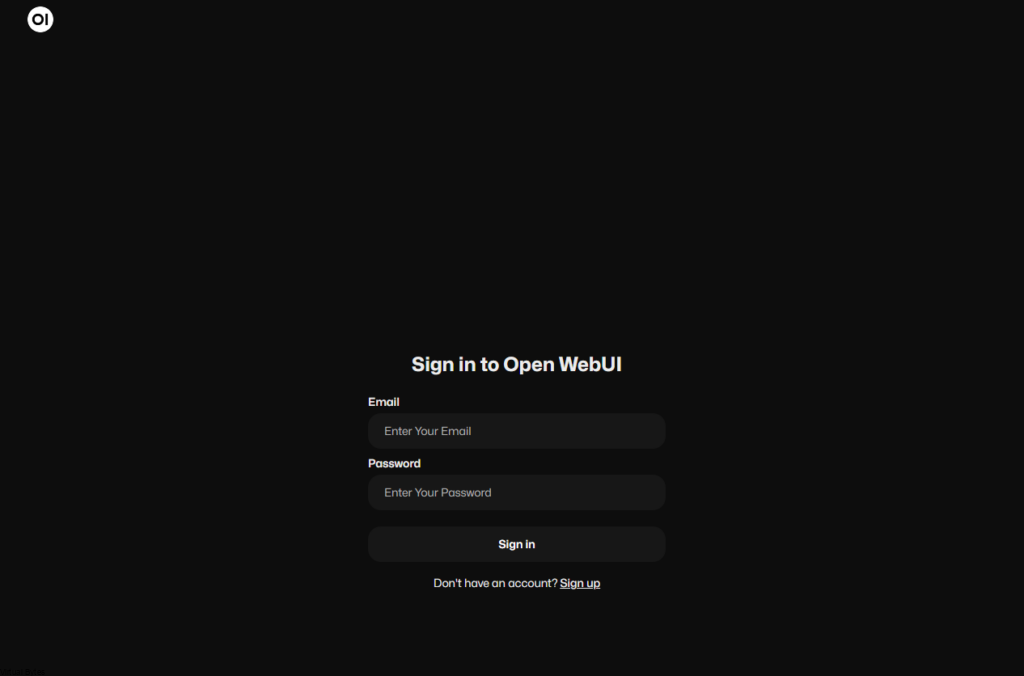
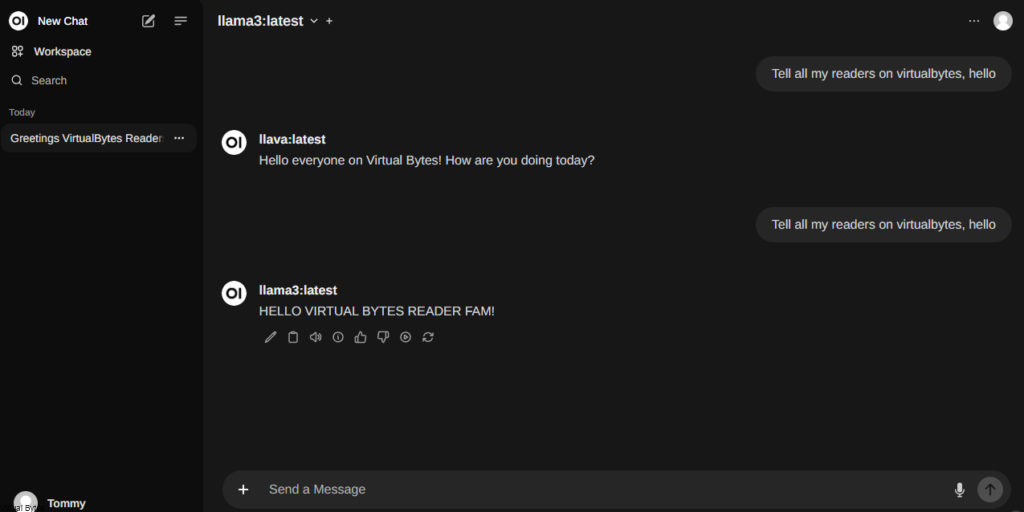
After you run the command above, then your webserver should start running – Open up your browser and login! You will be directed to setup a username / email. Once that is done, have fun and enjoy your own private AI!

Now, you will be presented the dashboard for your very own ChatGPT Privately Hosted!
Enjoy! 🙂
Depending on what LLMs you want to pull here is a example of how to do it via CLI

ollama pull aya

There we pulled aya LLM!

June 7, 2024 0 comments 911 views
0 FacebookTwitterLinkedinThreadsBlueskyEmail
VMware Cloud FoundationVMware Troubleshooting

vCenter 8.0u2 Upgrade Issue vCHA – postInstallHook

by Tommy Grot April 11, 2024
written by Tommy Grot 2 minutes read

Have you recently attempted to upgrade your vCenter to version 8.0.2.00300 from 8.0.2.00100, only to be met with an unexpected roadblock in the form of VMware vCenter High Availability (vCHA)? Well, you’re not alone! In this blog post, we’ll dive into the common pitfalls and challenges that users face when trying to upgrade vCenter with vCHA enabled. We’ll discuss the potential causes of the failure, troubleshooting tips, and possible solutions to get your upgrade back on track.

What is vCHA?

vCenter High Availability (vCenter HA) protects vCenter Server against host and hardware failures. The active-passive architecture of the solution can also help you reduce downtime significantly when you patch vCenter Server

For this vCenter Release, there has been many other issues that end-users have seen from issues where time zone, or local host dns. But, for my issue it was vCHA!

  • Time zone not being set to ETC/UTC within VAMI or CLI
  • Local Host and DNS Resolution within /etc/hosts file
  • vCenter Server High Availability Service enabled but not configured – This was my issue!

Performing start operation on profile: ALL Service-control failed. Error: Failed to start services in profile ALL. RC=2, stderr=Failed to start vcha services. Error: Service crashed while starting.

The Cause – vCHA was set to Automatic Start Up and Not Configured

The Fix –

Either GUI or CLI can be utilized to fix.

  • Take a fresh snapshot
  • SSH into vCenter, if you are running VCF, then you will need to lookup your password with VCF Lookup_password Service:
  • Execute Command to see if the vCHA service is running –

Command Line

vmon-cli -s vcha
vmon-cli -S DISABLED -U vcha

After service is stopped, try to resume patch or revert snapshot and redo the steps above to ensure that the vCHA service is disabled.

GUI –

  • Log into VAMI, Go to Services ->
  • Select – VMware vCenter High Availability -> Set Start Up Type Manual ( still to verify execute the command above to disable and ensure it is disabled)

Once, rebooted or re-verted snapshot and all previous steps are completed, you should have a successful upgrade of your vCSA!

April 11, 2024 0 comments 1.9K views
1 FacebookTwitterLinkedinThreadsBlueskyEmail
VMware Cloud Foundation

VMware Cloud Foundation 5.x Posters

by Tommy Grot April 5, 2024
written by Tommy Grot 1 minutes read

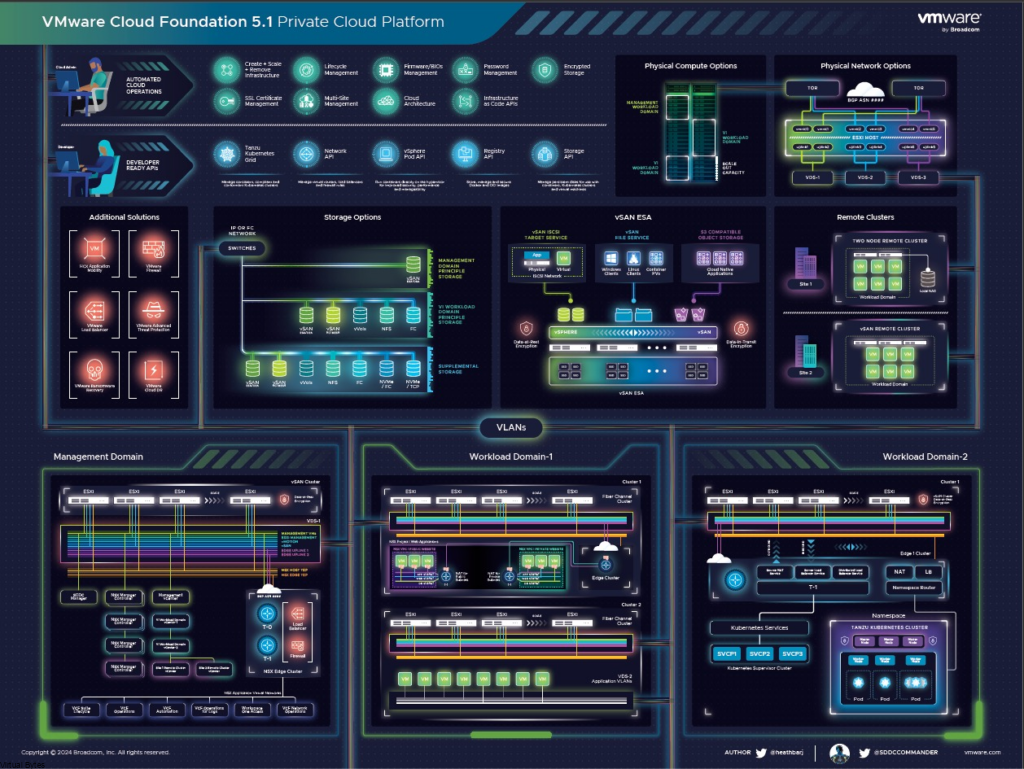
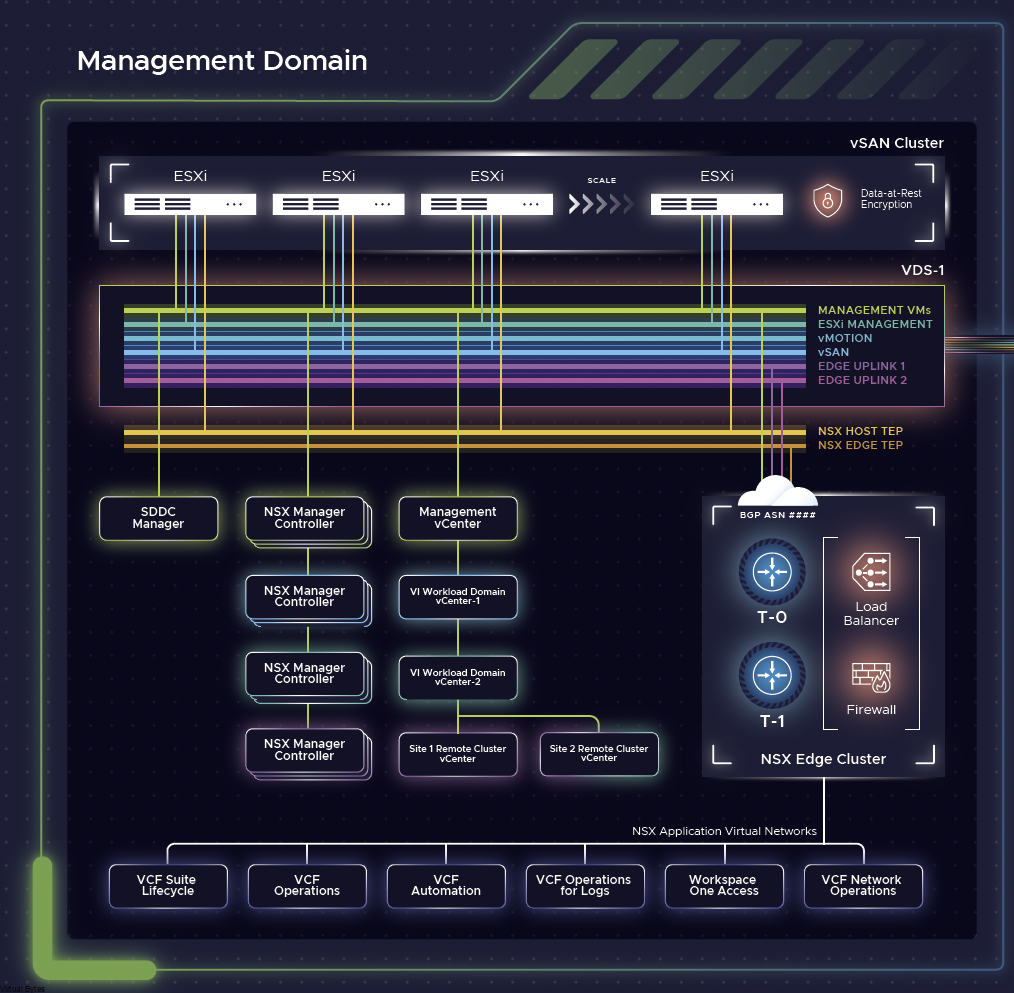
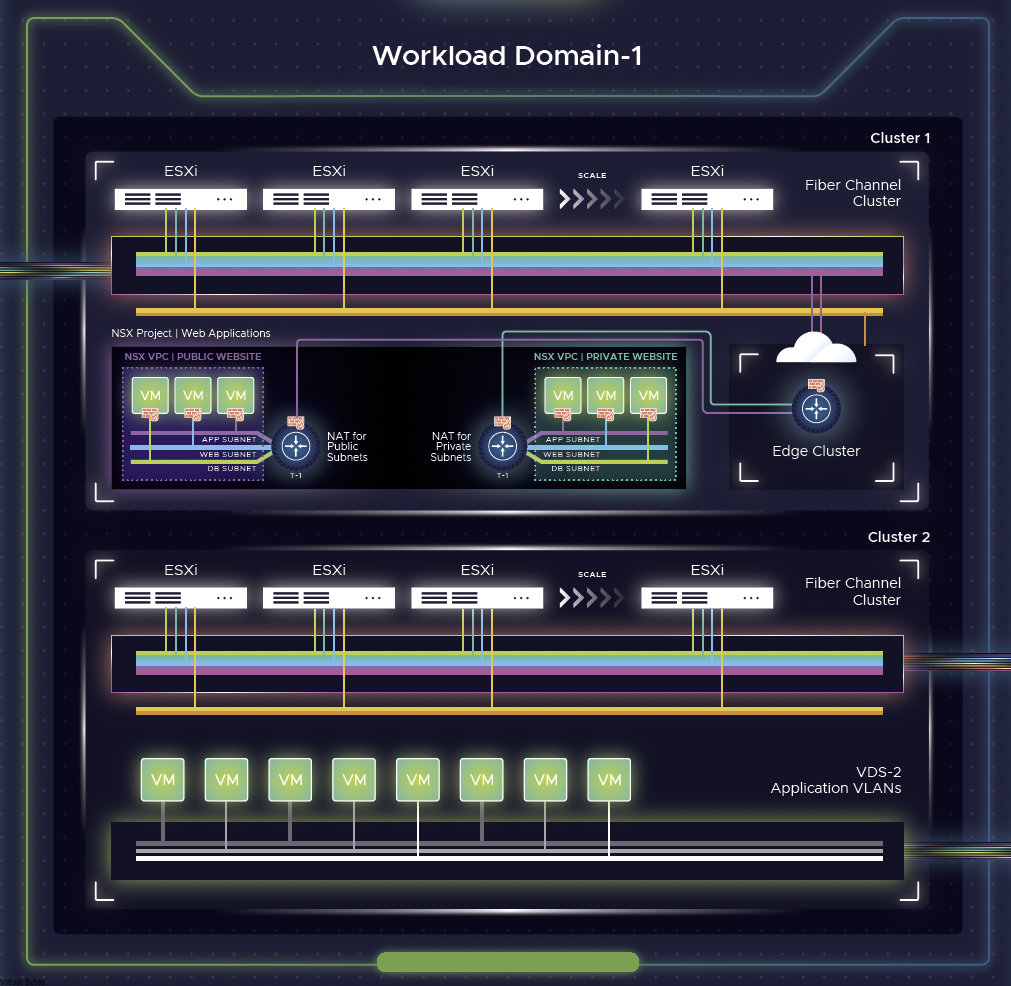
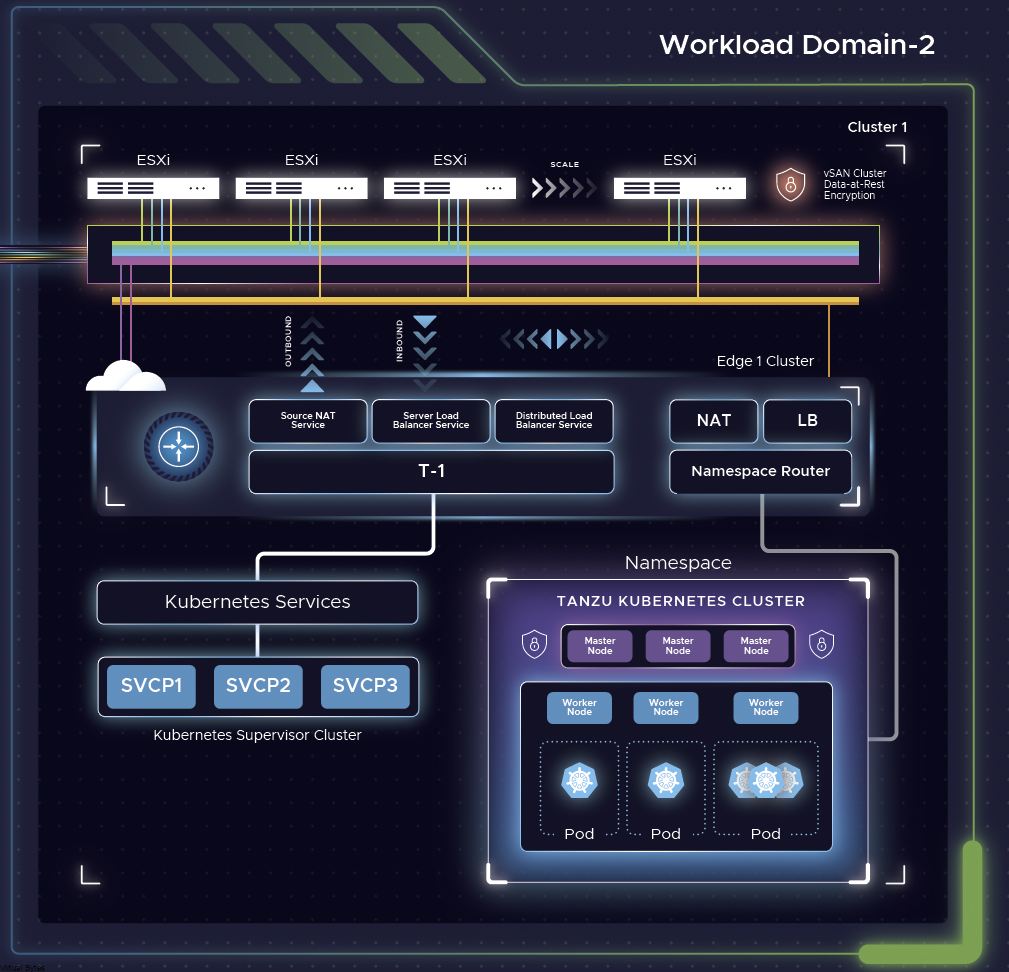
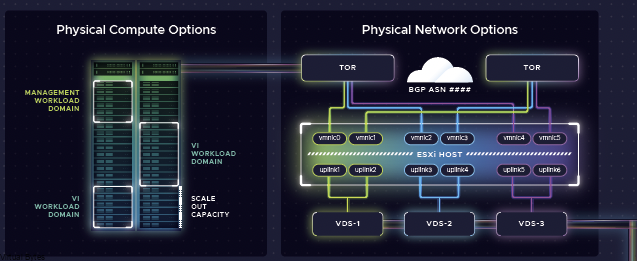
Get ready to dive into the world of a private cloud platform, with the new and exciting poster that showcases the intricate topology and architecture of VMware Cloud Foundation 5.x. This comprehensive visual guide will take you on a journey through the innovative features and capabilities of VMware’s cutting-edge cloud platform. Whether you’re a seasoned IT professional looking to enhance your knowledge or a newcomer eager to explore the possibilities of VCF, this poster is sure to spark your curiosity and ignite your passion for cloud technology. Join us as we unravel the complexities of VCF and unlock the potential of cloud computing like never before!

Download your copy today and get it printed at your favorite print shop!

Overview

Two Persona – Cloud Admin & Developer

Management Workload Domain

Workload Domain

Workload Domain with Tanzu

Workload Domain Physical Networking

April 5, 2024 0 comments 1.1K views
1 FacebookTwitterLinkedinThreadsBlueskyEmail
Newer Posts
Older Posts


Recent Posts

  • Offline VMware Cloud Foundation 9 Depot: Your Path to Air-Gapped Deployments
  • VMware Cloud Foundation 9: Simplifying Identity with a Unified SSO Experience
  • What’s New In VMware Cloud Foundation 9.0
  • Deploying & Configuring the VMware LCM Bundle Utility on Photon OS: A Step-by-Step Guide
  • VMware Cloud Foundation: Don’t Forget About SSO Service Accounts

AI cloud Cloud Computing cloud director configure cyber security director dns domain controller ESXi How To las vegas llm llms multicloud NSx NSX-T 3.2.0 NVMe sddc security servers ssh storage tenant upgrade vcd vcda VCDX vcenter VCF vcf 9 VDC vexpert Virtual Machines VMs vmware vmware.com vmware aria VMware Cloud Foundation VMware cluster VMware Explore VMware NSX vrslcm vsan walkthrough

  • Twitter
  • Instagram
  • Linkedin
  • Youtube

@2023 - All Right Reserved. Designed and Developed by Virtual Bytes

Virtual Bytes
  • Home
  • Home Data Center 2025
  • VMware
    • Cloud
    • Datacenter & Cloud Infrastructure
      • VMware ESXi
      • VMware vCenter
      • VMware vSAN
    • Networking & Security
    • Desktop & App Virtualization
      • Omnissa Horizon
    • Troubleshooting
    • Ansible
  • Education
  • Hardware
    • Hardware Tips & Tricks
  • Events
  • About
    • About Me
    • Home Lab Archives
      • Home Lab 2020-2022
      • Home Lab 2016-2020