Top Posts
Offline VMware Cloud Foundation 9 Depot: Your Path...
VMware Cloud Foundation 9: Simplifying Identity with a...
What’s New In VMware Cloud Foundation 9.0
Deploying & Configuring the VMware LCM Bundle Utility...
VMware Cloud Foundation: Don’t Forget About SSO Service...
VMware Explore Las Vegas 2025: Illuminating the Path...
Securing Software Updates for VMware Cloud Foundation: What...
VMware Cloud Foundation 5.2: A Guide to Simplified...
VMware Cloud Foundation 5.2: Unlocking Secure Hybrid Cloud...
VMware Cloud Foundation – Memory Tiering: Optimizing Memory...
Virtual Bytes
  • Home
  • Home Data Center 2025
  • VMware
    • Cloud
    • Datacenter & Cloud Infrastructure
      • VMware ESXi
      • VMware vCenter
      • VMware vSAN
    • Networking & Security
    • Desktop & App Virtualization
      • Omnissa Horizon
    • Troubleshooting
    • Ansible
  • Education
  • Hardware
    • Hardware Tips & Tricks
  • Events
  • About
    • About Me
    • Home Lab Archives
      • Home Lab 2020-2022
      • Home Lab 2016-2020
Tag:

Cloud Computing

EducationNetworking

VMware NSX Ninja Program

by Tommy Grot May 13, 2022
written by Tommy Grot 1 minutes read

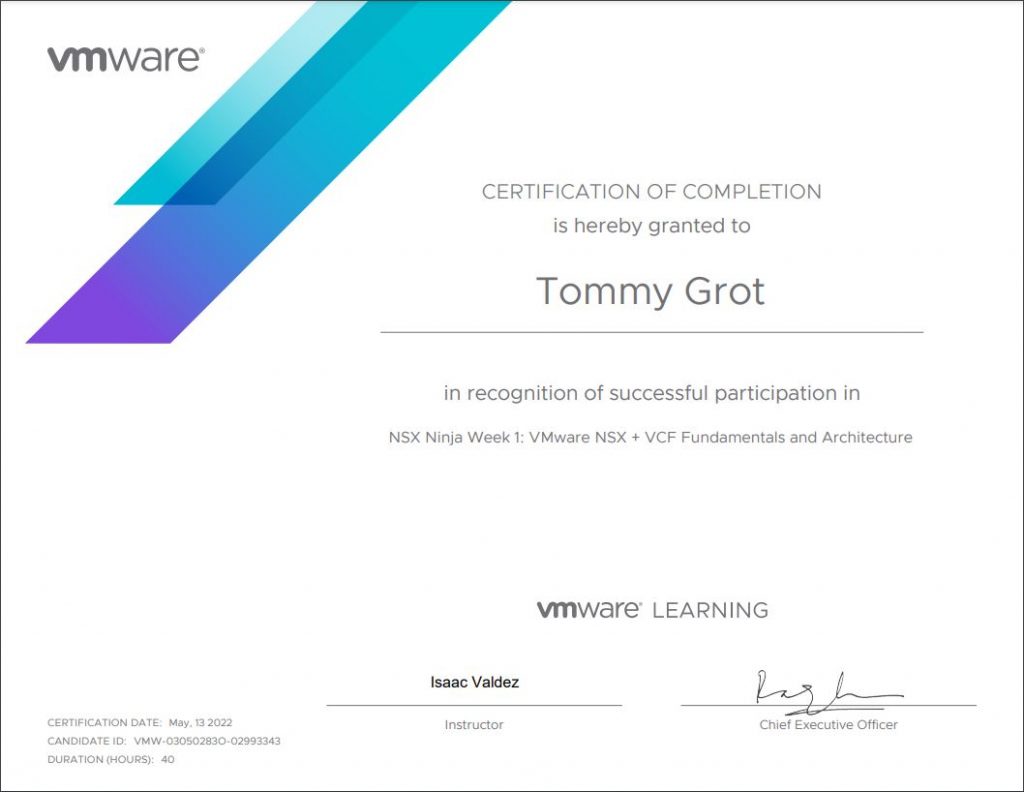
So where to begin? My goal I have is to become a VCIX within DCV and NV, but it will come soon! I have been passionate about learning and progressing my skill sets within VMware Solutions and creating complex environments, but with coming along with few folks at VMware which invited me into VMware NSX Ninja Program for NSX-T and VCF Architecture. As this Program is geared toward the Intermediate / Expert level it does challenge you but I have managed to succeed! I have finished Week 1 of 3, the VMware Certified Instructors are amazing they teach and walk-through real-world solutions which let you get a good understanding of the many bells and whistles that NSX-T and VCF can offer! As i go through the journey of the NSX Ninja, I will be adding more great content to this post! Stay Tuned 🙂

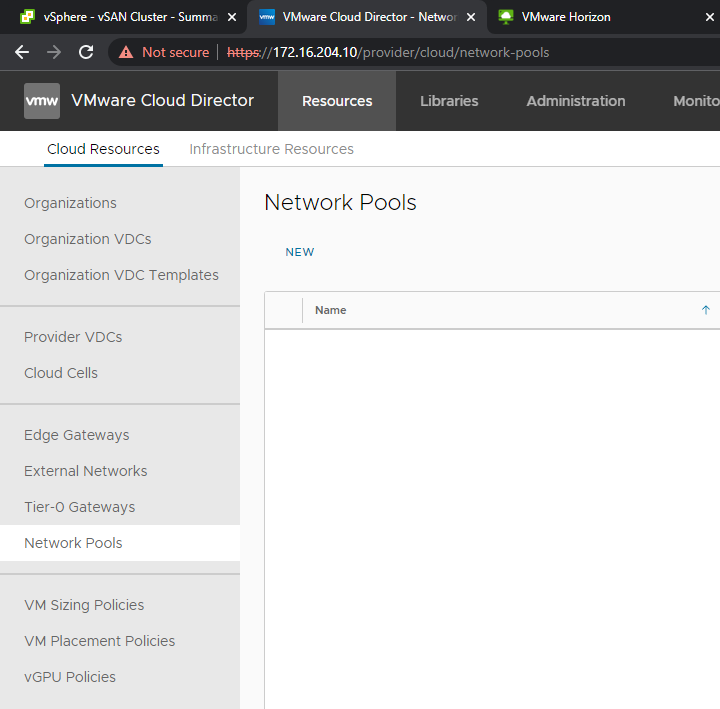
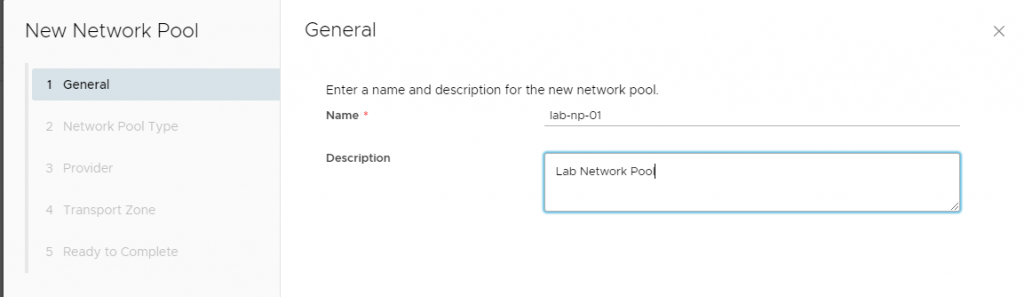
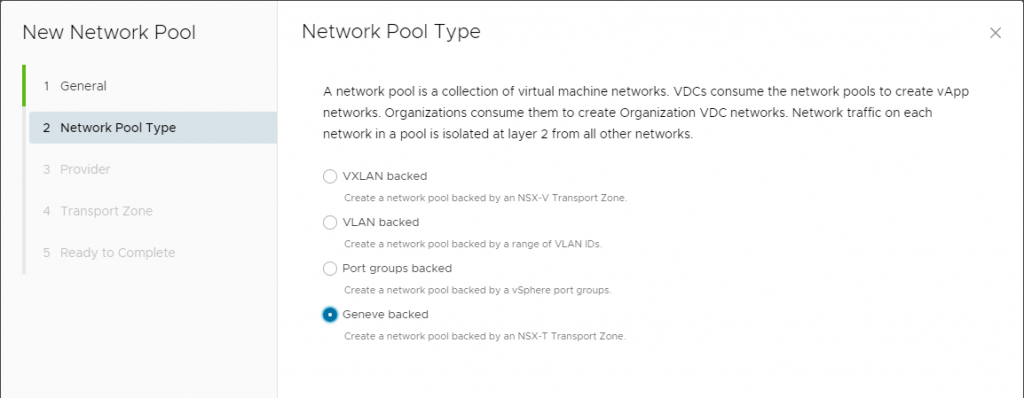
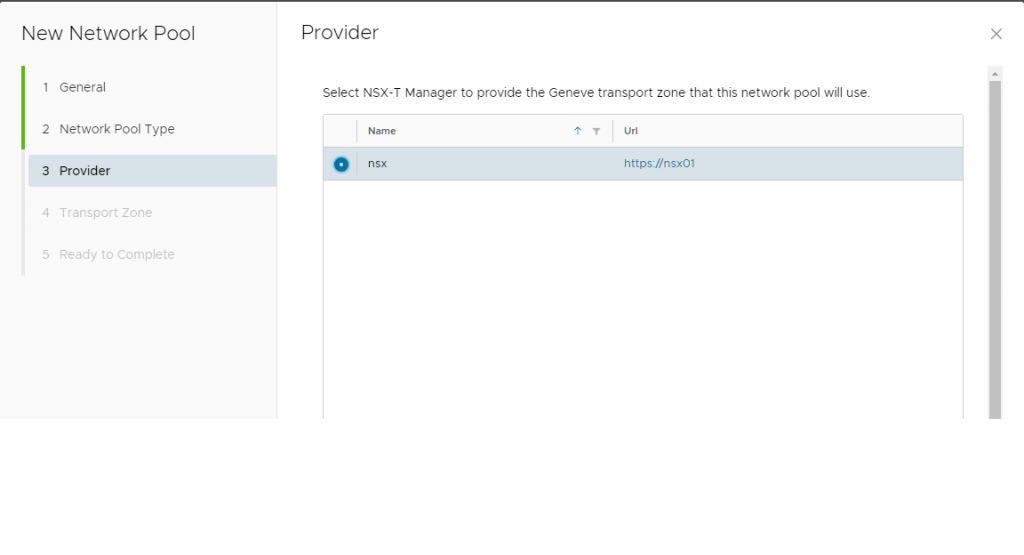
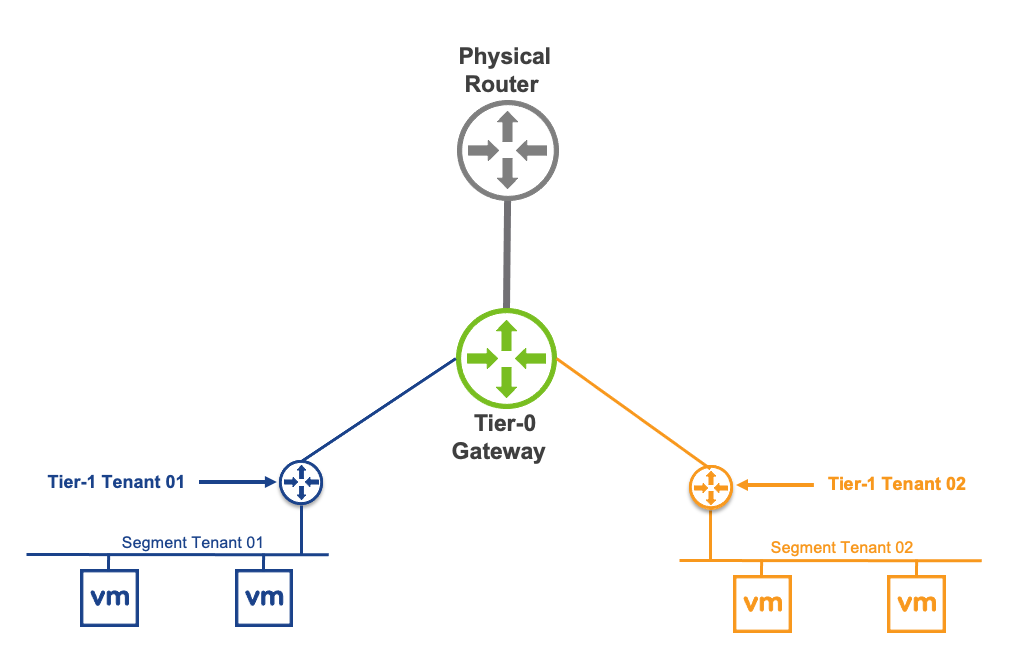
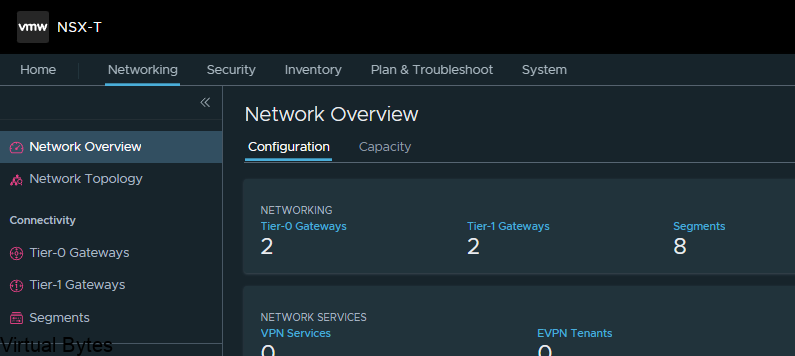
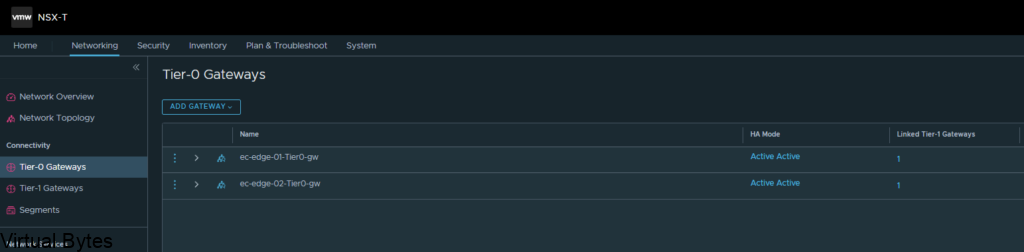
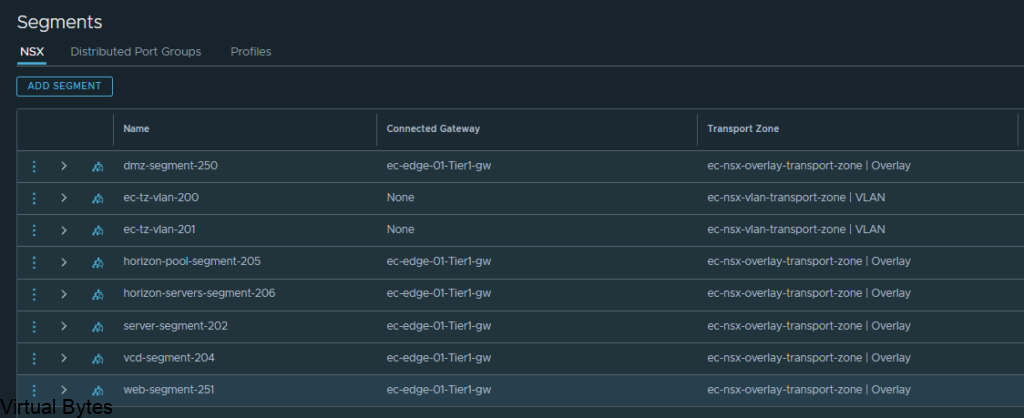
NSX Ninja Week 1 – Overview

May 13, 2022 0 comments 1.5K views
1 FacebookTwitterLinkedinEmail
Cloud

VMware Cloud Director 10.3.3: Creating a Tenant

by Tommy Grot April 15, 2022
written by Tommy Grot 3 minutes read

A little about what VMware Cloud Director is – it is a CMP or also known as a cloud managment plane which supports, pools and abstracts the VMware virtualization infrastructure as (VDC) Virtual Data Centers. A provider can offer many different flavors and specifcations of a Tenant to a customer, it could be a Gold, Silver or Bronze types of capacity and tiering which allows a good allocation model depending on a customer that needs a higher guarenteed resource usage or allocation where as a lower tier customer wants to test few software solutions they could use a bronze tier and be able to save costs.

Once you are logged in, then you will want to create few things first! But my previous blog post already explains on how to add a vCenter Server and NSX-T integration here at this post.

Well lets begin! First we will want to create a Network pool which is a VXLAN that will reside within the tenant environment will run ontop of Geneve on the overlay!

  • Login into the Provider portal of VCD with the administrator account
  • https://<vcd-ip>/provider/

Go to Network Pools

The network will be Geneve backed to ride the NSX-T overlay

Select the NSX-T Manager

The network pool which is backed by NSX-T Transport Zone we will want to select the transport zone that you have created for your edge nodes during the NSX-T setup.

Once you have your Network Pool setup and followed the steps you should see something like this!

Network Pool has been successfully created as shown below

After a network pool has been created, next we will create the Provider VDC ( Virtual Data Center)

Select the Provider vCenter you have configured within the Infrastructure portion

Select the Cluster, for me – I have a vSAN Cluster

Once you select the vSAN or Cluster you have in your envirnonemnt, you may proceed but the Hardware Version should be left as default since this is the maximum hardware version VCD can run and accept.

Select vSAN Storage Policy if you have vSAN if not then select the proper storage policy your storage platform is using
The network pool we created earlier, this is where we get to consume it and we let NSX-T manager and Geneve network pool run out VCD environment
  • Next, we will create an organization for us to be able to attach a VDC to
    it, which for this walk through my org is Lab-01. That will be the same name
    you use when you login as a tenant into VCD.
  • An organization is just a logical group of resources that are presented to customers, where each organization has its own isolation/security boundaries and their own Web UI which they can use an identity manager to integrate such as LDAP for seamless user management.

Once a New Organization has been created, next we will create a Organization VDC (Virtual Data Center)

Click on Organizations VDCs and Create “NEW” Organization

Type a name of the organization you wish to create

Attach that organization to the provider virtual datacenter we created earlier

Select the allocaiton model, I have seen the Flex model be the most flexible to have the ability to have better control over the resources even at the VM level. More information is here on VMware’s website

For this demonstration, I am not allocating and resource I am giving my Tenant unlimited resources from my vSAN Cluster, but for a production environment you will want to use the proper allocation model and resources.

Select the Storage policy along with i like to enable Thin provision to save storage space!

Each organization will have its own Network Pool but it will run ontop of the Geneve overlay

About to finish up the setup of a VDC!

We have logged into the new Tenant space we have created! 🙂

April 15, 2022 0 comments 1.4K views
0 FacebookTwitterLinkedinEmail
Cloud

Upgrading VMware Cloud Director to 10.3.3

by Tommy Grot April 14, 2022
written by Tommy Grot 4 minutes read

Upgrading VMware Cloud Director from 10.3.2.1 to 10.3.3, primarily to fix a Security Vulnerability.

Also, there are some enhancements which follow:

What is New?!

The VMware Cloud Director 10.3.3 release provides bug fixes, API enhancements, and enhancements of the VMware Cloud Director appliance management user interface:

  • Backup and restore of VMware Cloud Director appliance certificates. VMware Cloud Director appliance management interface UI and API backup and restore now includes VMware Cloud Director certificates. See Backup and Restore of VMware Cloud Director Appliance in the VMware Cloud Director Installation, Configuration, and Upgrade Guide.
  • New /admin/user/{id}/action/takeOwnership API to reassign the owner of media.
  • Improved support for routed vApp network configuration of the MoveVApp API.

This release resolves resolves CVE-2022-22966. For information, see https://www.vmware.com/security/advisories.

There are also lots of fixes, if your VCD is having issues there is a possibility this upgrade could fix lots of issues!

All the Fixes are listed on this site : https://docs.vmware.com/en/VMware-Cloud-Director/10.3.3/rn/vmware-cloud-director-1033-release-notes/index.html

First things first, lets download the newest release for VMware Cloud Director 10.3.3 – File Name: VMware_Cloud_Director_10.3.3.7659-19610875_update.tar.gz

Then shutdown your VCD Cells if you have multiple of them. Once they are turned off take a snapshot of all of them, along with the NFS Transfer Service Server usually it is a VM, take a snapshot of it too just in case you want to roll back if any issues occur.

Next we will want to upload the tar.gz file via WINSCP to the primary VCD Cell if you have a HA VCD topology, then the secondary get upgraded after the primary is finished.

I have logged into the VCD appliance with root account

Then open up a Putty session to the VCD appliance login as root,

Then change directory to /tmp/

Once in the directory:

Make Directory with the command below:

mkdir local-update-package

Start to upload the tar.gz file for the upgrade into /tmp/local-update-package via WINSCP

File has been successfully uploaded to the VCD appliance.

Then next steps we will need to prepare the appliance for the upgrade:

We will need to extract the update package in the new directory we created in /tmp/

tar -zxf VMware_Cloud_Director_v.v.v.v–nnnnnnnn_update.tar.gz \ -C /tmp/local-update-package

You can run the “ls” command and you shall see the tar.gz file along with manifest and package-pool

After you have verified the local update directory then we will need to set the update repository.

vamicli update – -repo file:///tmp/local-update-package

Check for update with this command after you have set the update package into the repository address

vamicli update – -check

Now, we see that we have a upgrade that is staged and almost ready to be ran! But, we will need to shutdown the cell(s) with this command

/opt/vmware/vcloud-director/bin/cell-management-tool -u <admin username> cell –shutdown

Next is to take a backup of the database, so if your cloud director appliance was orginally version 10.2.x initially and you have upgraded it throughout its life span, then your next command will be little different which is /opt/vmware/appliance/bin/create-backup.sh – (which i have noticed it gets renamed during a upgrade process from 10.2.x to 10.3.1)

But if your appliance is 10.3.x and newer then /opt/vmware/appliance/bin/create-db-backup will be your backup to run.

I changed directory and went all the way down to the “bin” of the backup file and now i executed the script.

Backup was successful! Now, time for the install 🙂

Apply the upgrade for VCD, the command below will run will install the update

vamicli update – -install latest

Now, the next step is important, if you have any more VCD Cell appliances you will want to repeat first few steps and then just run the command below to upgrade the other appliances:

/opt/vmware/vcloud-director/bin/upgrade

Select Y to Proceed with the upgrade

After successful upgrade, you may reboot VCD appliance and test!

April 14, 2022 0 comments 2.8K views
1 FacebookTwitterLinkedinEmail
Cloud

Deploying VMware Cloud Director Availability 4.3

by Tommy Grot March 24, 2022
written by Tommy Grot 4 minutes read

Todays topic is deploying VMware Cloud Director Availability for VMware Cloud Director! Todays topic is deploying VMware Cloud Director Availability for VMware Cloud Director! This walkthrough will guide you on how to deploy VCDA from a OVA to an working appliance. All this is created within my home lab. A different guide will be on how to setup VCDA and multi VCDs to create a Peer between and show some Migrations and so on! 🙂

A little about VCDA! – From VMware’s site

VMware Cloud Director Availabilityâ„¢ is a Disaster Recovery-as-a-Service (DRaaS) solution. Between multi-tenant clouds and on-premises, with asynchronous replications, VMware Cloud Director Availability migrates, protects, fails over, and reverses failover of vApps and virtual machines. VMware Cloud Director Availability is available through the VMware Cloud Provider Program.VMware Cloud Director Availability introduces a unified architecture for the disaster recovery and migration of VMware vSphere Â® workloads. With VMware Cloud Director Availability, the service providers and their tenants can migrate and protect vApps and virtual machines:

  • From an on-premises vCenter Server site to a VMware Cloud Directorâ„¢ site
  • From a VMware Cloud Director site to an on-premises vCenter Server site
  • From one VMware Cloud Director site to another VMware Cloud Director site

Cloud SiteIn a single cloud site, one VMware Cloud Director Availability instance consists of:

  • One Cloud Replication Management Appliance
  • One or more Cloud Replicator Appliance instances
  • One Cloud Tunnel Appliance

Links!

Replication Flow – Link to VMware

  • Multiple Availability cloud sites can coexist in one VMware Cloud Director instance. In a site, all the cloud appliances operate together to support managing replications for virtual machines, secure SSL communication, and storage of the replicated data. The service providers can support recovery for multiple tenant environments that can scale to handle the increasing workloads.

Upload the OVA for VCDA

Create a friendly name within this deployment, i like to create a name that is meaningful and corellates to a service.

Proceed to step 4

Accept this lovely EULA 😛

Since in my lab for this deployment i did a combined appliance. I will also do a seperate applaince for each service configuration.

Choose the network segment you will have your VCDA appliance live on, i put my appiliance on a NSX-T backed segment on the overlay network.

Fill in the required information, also create an A record for the VCDA appliance so that when it does its recersive DNS it will succesffuly generate a self signed certificate and allow the appliance to keep building, successfuly.

After you hit submit and watch the deployment you can open the vmware web / remote console and just watch for any issues or errors that may cause the deployment to fail.

I ran into a snag! What happened was the network configuration did not accept all the information i filled in for the network adapter on the VCDA appliance OVA deployment. So here, I had to login as root into the VCDA appliance, it did force me to reset the password that I orginally set on the OVA deployment.

Connect to the VMware Cloud Director Availability by using a Secure Shell (SSH) client.

Open an SSH connection to Appliance-IP-Address.
Log in as the root user.

To retrieve all available network adapters, run: /opt/vmware/h4/bin/net.py nics-status

/opt/vmware/h4/bin/net.py nic-status ens160

/opt/vmware/h4/bin/net.py configure-nic ens160 — static –address 172.16.204.100/24 –gateway 172.16.204.1

After you have updated all the network configuration you can check the config by :

To retrieve the status of a specific network adapter,

/opt/vmware/h4/bin/net.py nic-status ens160

After the networking is all good, then you may go back to your web browser and go to the UI of the VCDA. Here we will configure next few steps.

Add the license you have recived for VCDA – this license is different than what VMware Cloud Director utilizes.

Configure the Site Details for your VCDA. I did Classic data engines since I do not have VMware on AWS.

Add your first VMware Cloud Director to this next step

Once you have added the first VCD, then you will be asked for the next few steps. Here we will add the look up service which is the vCenter Server lookup service along with the Replicator 1 which for my setup i did a combined appliance so the IP is the same as my deployment of VCDA but my port will be different.

Then I created a basic password for this lab simulation. Use a secure password!! 🙂

Once All is completed you shall see a dashboard like this below. We have successfully deployed VMware Cloud Director Availability! Next blog post we will get into the nitty gritty of the the migration and RPOs, and SLAs as we explore this new service which is a addon to VMware Cloud Director!

March 24, 2022 0 comments 3.4K views
0 FacebookTwitterLinkedinEmail
Cloud

Photon OS Emergency Mode – Fix Corrupt Disk

by Tommy Grot March 15, 2022
written by Tommy Grot 0 minutes read

For this little walk through, we will be using my VMware Cloud Director 10.3.2a applaince i have in my lab, it did not shut down safely so we will repair it! 🙂

Reboot the VMware Cloud Director appliance – then press ‘e’ immediatly to load into the GRUB, and at the end ot $systemd_cmdline add the following

” systemd.unit=emergency.target ”

Then hit F10 to boot

Run this following command to repaire the disk.

e2fsck -y /dev/sda3

Once Repaired – Shutdown VMware Cloud Director appliance and then power backon

VCD is now loading!

Successfully repaired a corrupted disk on Photon OS!

March 15, 2022 0 comments 3.2K views
0 FacebookTwitterLinkedinEmail
NetworkingVMware NSX

NSX-T 3.2 VRF Lite – Overview & Configuration

by Tommy Grot February 20, 2022
written by Tommy Grot 7 minutes read

Hello! Today’s blog post will be about doing a NSX-T Tier-0- VRF Tier-0 with VRF Lite Toplogy and how it will be setup! We will be doing a Active / Active Toplogy with VRF.

A little about what a VRF is – (Virtual Routing and Forwarding) this allows you to logically carve out a logical router into multiple routers, this allows you to have multiple identical networks but logically segmented off into their own routing instances. Each VRF has its own independent routing tables. this allows to have multiple networks be segmented away from each other and not overlap and still function!

Benefit of NSX-T VRF Lite – allows you to have multple virtual networks on on a same Tier-0 without needing to build a seperate nsx edge node and consuming more resources to just have the ability to segment and isolate a routing instance from another one.

Image from VMware

What is : Transport Zone (TZ) defines span of logical networks over the physical infrastructure. Types of Transport Zones – Overlay or VLAN

When a NSX-T Tier-0 VRF is attached to parent Tier-0, there are multiple parameters that will be inherited by design and cannot be changed:

  • Edge Cluster
  • High Availability mode (Active/Active – Active/Standby)
  • BGP Local AS Number
  • Internal Transit Subnet
  • Tier-0, Tier-1 Transit Subnet.

All other configuration parameters can be independently managed on the Tier-0:

  • External Interface IP addresses
  • BGP neighbors
  • Prefix list, route-map, Redistribution
  • Firewall rules
  • NAT rules

First things first – login into NSX-T Manager, once you are logged in you will have to prepare the network and tranport zones for this VRF lite topology to properly work, as it resides within the overlay network within NSX-T!

Go to Tier-0 Gateways -> Select one of your Tier-0 Routers that you have configured during initial setup. I will be using my two Tier-0’s, ec-edge-01-Tier0-gw and ec-edge-02-Tier0-gw for this tutorial along with a new Tier-0 VRF which will be attached to the second Tier-0 gateway.

So, first thing we will need to prepare two (2) segments for our VRF T0’s to ride the overlay network.

Go to – Segments -> Add a Segment, the two segments will ride the overlay transport zone, no vlan and no gateway attached. Add the segments and click on No for configuring the segment. Repeat for Second segment.

Below is the new segment that will be used for the Transit for the VRF Tier-0.

Just a reminder – this segment will not be connected to any gateway or subnets or vlans

Here are my 2 overlay backed segments, these will traverse the network backbone for the VRF Tier-0 to the ec-edge-01-Tier0-gw.

But, the VRF Tier 0 will be attached to the second Tier 0 (ec-edge-02-Tier0-gw) which is on two seperate Edge nodes (nsx-edge-03, nsx-edge-04) for a Active – Active toplogy.

Once the segment has been created then we can go and created a VRF T0. Go back to the Tier-0 Gateway window and click on Add Gateway – VRF ->

Name of VRF gateway ec-vrf-t0-gw and then attach it to the ec-edge-02-Tier0-gw, enable BGP and create a AS# which i used 65101, and as the second Tier-0-gateway it will act as a ghost router for those VRFs.

Once you finish you will want to click save, and continue configuring that VRF Tier-0, next we will configure the interfaces.

Now, we will need to create interfaces on the ec-edge-01-Tier0-gw. Expand Interfaces and click on the number in blue, for my deployment my NSX-T Tier 0 right now has 2 interfaces.

Once you create the 2 Interfaces on that Tier 0 the number of interfaces will change.

Click on Add Interfaces -> Create a unique name for that first uplink which will peer via BGP with the VRF T0.

Allocate couple IP addresses, I am using 172.16.233.5/29 for the first interface on the ec-vrf-t0-gw, which lives within the nsx-edge-01 for my deployment, the VRF T0 will have 172.16.233.6/29, and connect that interface on the overlay segment you created earlier.

Then the second interface, I created with the IP of 172.16.234.5/29, also the VRF Tier-0 will have 172.16.234.6/29 and each interface will be attaced to that second nsx-edge-node-02, so first IP 172.16.233.5/29 is attached to edge node 1 and second IP will be on Edge Node 02.

ec-t0-1-vrf-01-a – 172.16.233.5/29 – ec-t0-vrf-transport-1 172.16.233.6/29 (overlay segment)

ec-t0-1-vrf-01-b 172.16.234.5/29 – ec-t0-vrf-transport-2 172.16.234.6/29 (overlay segment)

Jumbo Frames 9000 MTU on both interfaces

Once you have created all required interfaces, below is an example of what i created, make sure you have everything setup correctly or the T0 and VRF T0 will not peer up!

Then go to BGP configuration for that nsx-edge-01 and nsx-edge-02 and prepare the peers from it to the VRF Tier-0 router.

Next, we will create another set of interfaces for the VRF T0 itself, these will live on nsx-edge-03 and nsx-edge-04. Same steps as what we created for nsx-edge-01 and nsx-edge-02, just flip it!

ec-t0-1-vrf-01-a – 172.16.233.6/29 – nsx-edge-03

ec-t0-1-vrf-01-b -172.16.234.6/29 – nsx-edge-04

Jumbo Frames 9000MTU

Once, both interfaces are configured for the Tier-0’s, you should have two interfaces with different subnets for the transit between the VRF T0 and the Edge 01 gateway Tier-0. After, interfaces are created on the specific nsx-edges.

Verify the interfaces and the correct segments and if everything is good, click save and proceed to next step.

Everything we just created rides the overlay segments, now we will configure BGP on each of the T0s.

Expand BGP – Click on the External and Service Interfaces (number) mine has 2.

Click Edit on the Tier 0, ec-edge-01-Tier0-gw and expand BGP and click on BGP Neigbors.

Create the BGP Peers on the VRF T0, you will see the interface IP we created earlier under the “Source Addresses” those are attached to each specific interface which is on those overlay segments we created for the VRF lite model.

172.16.233.5 – 172.16.233.6 – nsx-edge-03
172.16.234.5 – 172.16.234.6 – nsx-edge-04

Click Save and proceed to creating the second BGP interface which will be for nsx-edge-04 BGP

If everything went smooth, you should be able to verify your BGP peers between both Tier-0 and VRF Tier-0 as shown below.

After you have created the networks, you may create a T1 and attach it to that VRF T0! Which you can consume within VMware Cloud Director or just a standalone T1 which is attached to that VRF, But next we will attach a test segment to this VRF T0 we just created!

Once you create that segment with a subnet attached to the Tier-1 you will want to verify if you have any routes being advertised within your TOR Router, for my lab i am using a Arista DCS 7050QX-F-S which is running BGP.

I ran a command – show ip route on my Arista core switch.

You will see many different routes but the one we are intersted is 172.16.66.0/24 we just advertised.

If you do not see any routes coming up from the new VRF T0 we created you will want to create a Route-Redistrubition for that T0, click on the vrf t0 and edit and go to Route Re Distribution

For the walkthrough I redistributed everything for testing purposes, but for your use case you will only want to re-distribute the specific subnets, nats, forward IPs etc.

Overall toplogy of what we created is to the left with the two T0s, the T0 to the right is my current infrastructure.

That is it! For this walk through, we created a VRF T0 and attached it to the second edge t0 router and then we took the VRF T0 and peered up to the ec-edge01-t0-gw.

February 20, 2022 0 comments 2.6K views
1 FacebookTwitterLinkedinEmail
Networking

Upgrading NSX-T 3.1.3.3 to NSX-T 3.2.0

by Tommy Grot December 17, 2021
written by Tommy Grot 3 minutes read

Little about NSX-T 3.2 – There are lots of improvements within this release, from Strong Multi-Cloud Security to Gateway Firewalls and overall better Networking and Policy Enchantments. If you want to read more about those check out the original blog post from VMware.

Download your bytes off VMware’s NSX-T website. Once you have downloaded all required packages depending on your implementation. You will want to have a backup of your NSX-T environment prior to upgrading your NSX-T environment.

Below is a step by step walk through on how to upload the VMware-NSX-upgrade-bundle-3.2.0.0.0.19067070.mub upgrade file and proceed with the NSX-T Upgrade

Once you login, go to the System Tab

Go to Lifecycle Management -> Upgrade

Well, for my NSX-T environment – I have already upgraded it before from 3.1.3.0 to 3.1.3.3 and that is why you will see a (Green) Complete at the top right of the NSX Appliances. But – Proceed with the UPGRADE NSX Button

Here you will find the VMware-NSX-upgrade-bundle-3.2.0.0.0.19067070.mub file

Continuation of Uploading file

Now you will start uploading it. This will take some time so grab a snack! 🙂

Once it has uploaded you will see a “Upgrade Bundle retrieved successfully” now you can proceed by doing the upgrade – Click on the UPGRADE button below.

This lovely EULA! 🙂 Well you gotta accept it if you want to upgrade…

This will prompt you one more time, before you execute the full upgrade process of NSX-T

Once the Upgrade has been Extracted and the Upgrade Coordinator has been restarted your upgrade path is now ready to start upgrading the Edges.

For my NSX-T, I ran the Upgrade Pre Checks – to ensure that there are no issues before I did any major upgrades.

Results of the Pre Checks, had few Issues but nothing alarming for my situation.

Here below, I am upgrading the Edges serially, that way I can keep my services up and running with minimal to no downtime. When I upgraded NSX-T Edges I only saw 1 ping drop from a whole consistent ping to one of my web servers.

More progress on the Edge Upgrades

Lets check up on the NSX Edges, here below is a snip of one of the Edges that got upgraded to NSX-T 3.2.0

Now, that the Edges have upgraded Successfully we can proceed to the Hosts

Time to upgrade the Hosts! Make sure your hosts are not in production and in maintenance mode, this upgrade process will put the hosts into Maintenance Mode so just make sure you have enough resources.

Now that the host is free of VMs – Now the upgrading is Installing NSX bits on the host, this process will need to be repeated as many times there are hosts within your cluster.

All the hosts got upgraded successfully no issues encountered – Next Step is to upgrade the NSX Managers

On the next screenshot below, you will see that the Node OS upgrade process is next, Click Start and you will initiate the NSX Manager upgrade. If you want to see all the NSX Managers status click on the 1.Node OS Upgrade.

After you click start, you will see a dialog window pop open warning you to not create any objects within the NSX Manager, Also later in the upgrade if the web interface is down, you may log into the NSX Managers via Web Console through vCenter and run this command – ‘ get upgrade progress-status ‘

This is how the Node Upgrade Status Looks like, now you see that there are some upgrades happening for the second and third NSX Managers.

Below is a sample screen snip of the NSX01 console and I executed the command to see its status.

Now, that NSX Managers have upgraded the OS, there are still many services that need to get upgraded. Below is a screenshot of the current progress it is at

All NSX Managers have been upgraded to NSX-T 3.2.0 – Click Done

Upgrade has now been complete! 🙂

December 17, 2021 0 comments 6.1K views
3 FacebookTwitterLinkedinEmail
VMware vSAN

Reuse Ex-vSAN Host, Remove vSAN configuration with esxcli

by Tommy Grot October 17, 2020
written by Tommy Grot 1 minutes read

Trying to re-use a previous VMware ESXi host, but the vSAN Disks are still claimed. No worries – Below we will walk you through how to remove the drives and get your disks back to rebuild your vSAN Cluster!

First run this command to check if the disks are apart of the vSAN Cluster

esxcli vsan storage list | grep naa

Once you run the esxcli vsan storage list | grep naa, then you will need to run the command below, to prevent that the automatic disk claim is disabled for this procedure.

esxcli vsan storage automode set --enabled false

Once the vSAN automatic disk claim command is completed, then you may remove vSAN Disk Group Names with the command below. Replace the (VSAN Disk Group Name) with your corresponding naa. ID.

esxcli vsan storage remove -s (VSAN Disk Group Name)

After all vSAN Drives have been removed from each ESXi host. Then you will want to verify that all the vSAN Disks no longer show up and you will want to run the same command as you did in the beginning.

If nothing shows up then you successful removed all vSAN Disks.

esxcli vsan storage list | grep naa

To finalize the removal of vSAN you will want the host to leave the vSAN Cluster so you will need to run this command.

esxcli vsan cluster leave

You will see a vSAN Clustering is not enabled on this host message.

Once you have completed all those steps, you will successfully see that all the SAS SSDs below are no longer claimed by vSAN. Now the ESXi host is ready for a fresh installation!

October 17, 2020 5 comments 4.7K views
1 FacebookTwitterLinkedinEmail
Newer Posts
Older Posts


Recent Posts

  • Offline VMware Cloud Foundation 9 Depot: Your Path to Air-Gapped Deployments
  • VMware Cloud Foundation 9: Simplifying Identity with a Unified SSO Experience
  • What’s New In VMware Cloud Foundation 9.0
  • Deploying & Configuring the VMware LCM Bundle Utility on Photon OS: A Step-by-Step Guide
  • VMware Cloud Foundation: Don’t Forget About SSO Service Accounts

AI cloud Cloud Computing cloud director configure cyber security director dns domain controller ESXi How To las vegas llm llms multicloud NSx NSX-T 3.2.0 NVMe sddc security servers ssh storage tenant upgrade vcd vcda VCDX vcenter VCF vcf 9 VDC vexpert Virtual Machines VMs vmware vmware.com vmware aria VMware Cloud Foundation VMware cluster VMware Explore VMware NSX vrslcm vsan walkthrough

  • Twitter
  • Instagram
  • Linkedin
  • Youtube

@2023 - All Right Reserved. Designed and Developed by Virtual Bytes

Virtual Bytes
  • Home
  • Home Data Center 2025
  • VMware
    • Cloud
    • Datacenter & Cloud Infrastructure
      • VMware ESXi
      • VMware vCenter
      • VMware vSAN
    • Networking & Security
    • Desktop & App Virtualization
      • Omnissa Horizon
    • Troubleshooting
    • Ansible
  • Education
  • Hardware
    • Hardware Tips & Tricks
  • Events
  • About
    • About Me
    • Home Lab Archives
      • Home Lab 2020-2022
      • Home Lab 2016-2020