Top Posts
Deploying & Configuring the VMware LCM Bundle Utility...
VMware Cloud Foundation: Don’t Forget About SSO Service...
VMware Explore Las Vegas 2025: Illuminating the Path...
Securing Software Updates for VMware Cloud Foundation: What...
VMware Cloud Foundation 5.2: A Guide to Simplified...
VMware Cloud Foundation 5.2: Unlocking Secure Hybrid Cloud...
VMware Cloud Foundation – Memory Tiering: Optimizing Memory...
Decoding VMware Cloud Foundation: Unveiling the numerous amount...
VMware Cloud Director 10.6.1: Taking Cloud Management to...
Omnissa Horizon Upgrade 2406 to 2412
Virtual Bytes
  • Home
  • Home Data Center 2025
  • VMware
    • Cloud
    • Datacenter & Cloud Infrastructure
      • VMware ESXi
      • VMware vCenter
      • VMware vSAN
    • Networking & Security
    • Desktop & App Virtualization
      • Omnissa Horizon
    • Troubleshooting
    • Ansible
  • Education
  • Hardware
    • Hardware Tips & Tricks
  • Events
  • About
    • About Me
    • Home Lab Archives
      • Home Lab 2020-2022
      • Home Lab 2016-2020
Tag:

AVI Vantage

CloudNetworkingVMware NSX

Deploying VMware NSX Advanced Load Balancer

by Tommy Grot May 3, 2023
written by Tommy Grot 2 minutes read

Today’s topic is on VMware NSX Advanced Load Balancer (AVI). We will walk through the steps of deploying a NSX ALB overlayed on top of your NSX Environment.

Features

  • Multi-Cloud Consistency – Simplify administration with centralized policies and operational consistency
  • Pervasive Analytics – Gain unprecedented insights with application performance monitoring and security
  • Full Lifecycle Automation – Free teams from manual tasks with application delivery automation
  • Future Proof – Extend application services seamlessly to cloud-native and containerized applications

More information at VMware’s site here

What You Will Need:

  • A Configured and running NSX Environment
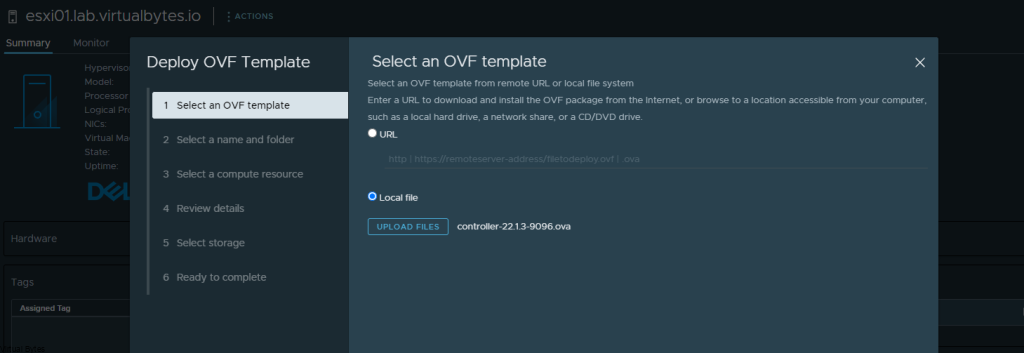
  • NSX ALB Controller OVA (controller-22.1.3-9096.ova)
  • Supported Avi controller versions: 20.1.7, 21.1.2 or later versions
  • Obtain IP addresses needed to install an appliance:
    • Virtual IP of NSX Advanced Load Balancer appliance cluster
    • Management IP address
    • Management gateway IP address
    • DNS server IP address
  • Cluster VIP and all controllers management network must be in same subnet.

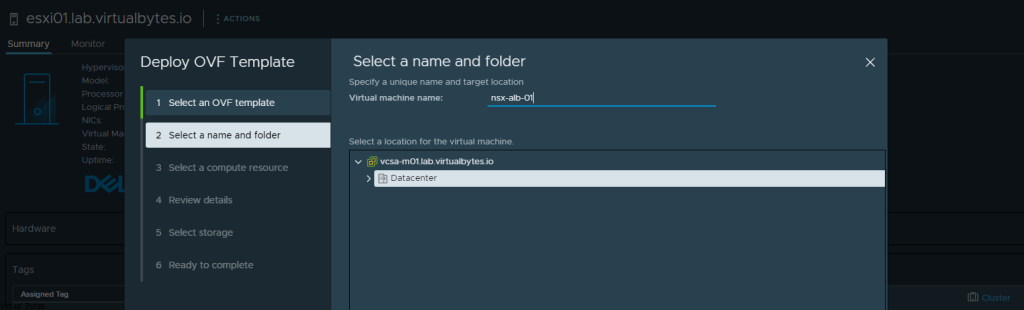
Lets start with deploying controller OVF

I like to keep neat and consistent names the following names I utilized:

Virtual Machine Names:
  • nsx-alb-01
  • nsx-alb-02
  • nsx-alb-03

You need total of 3 Controllers deployed to create a High Available NSX ALB.

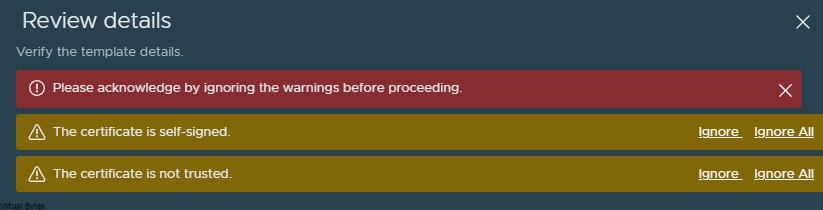
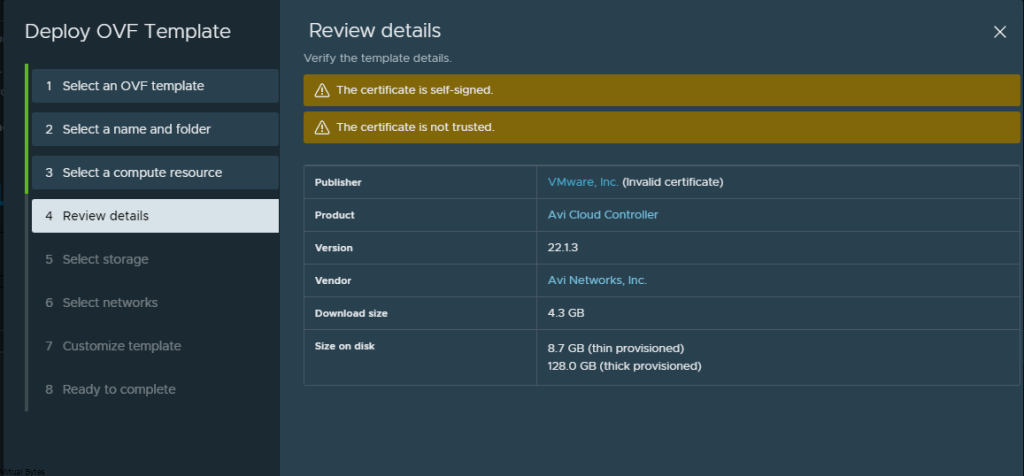
Click the Ignore All, or you will get this error as show below

Select your datastore ->
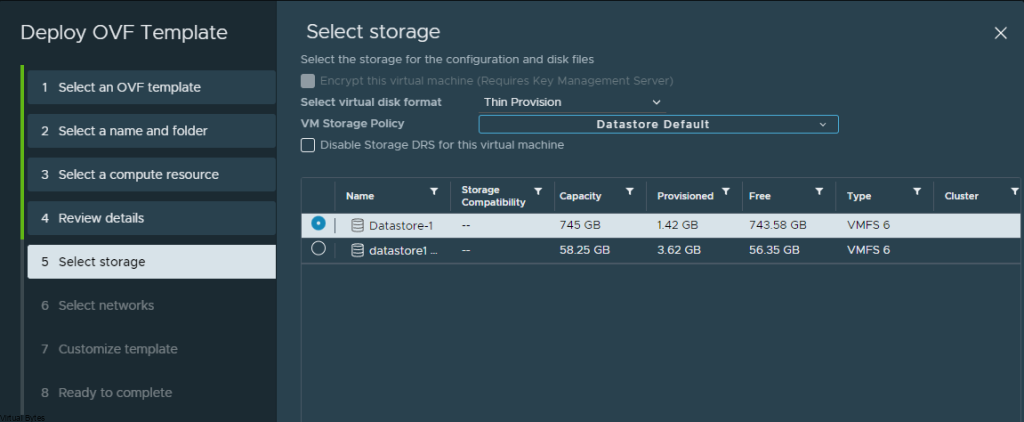
Click Next ->

My DNS Records:

  • nsx-alb-01.virtualbytes.io
  • nsx-alb-02.virtualbytes.io
  • nsx-alb-03.virtualbytes.io
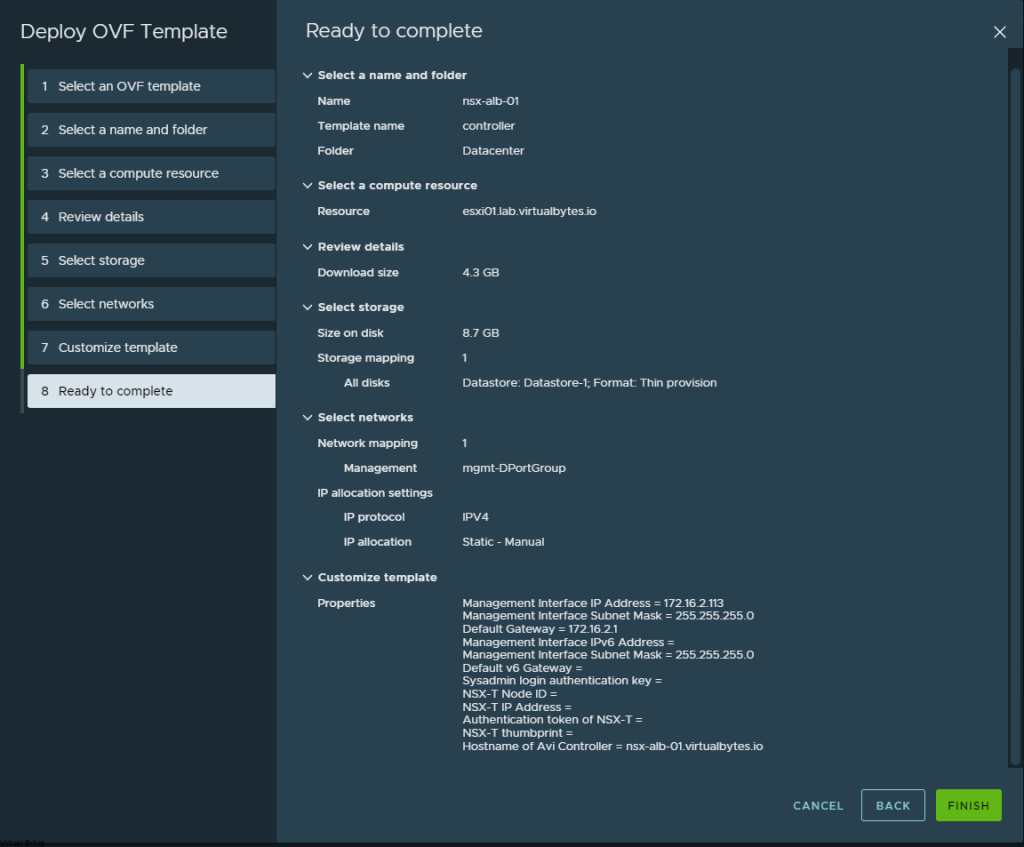
We are deploying!

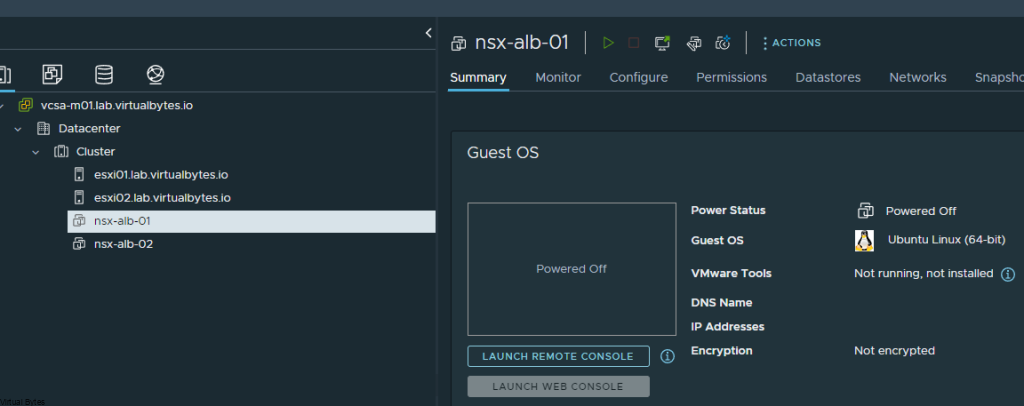
Access your first appliance via its FQDN that you have set in the steps above.

Create your password for local admin account

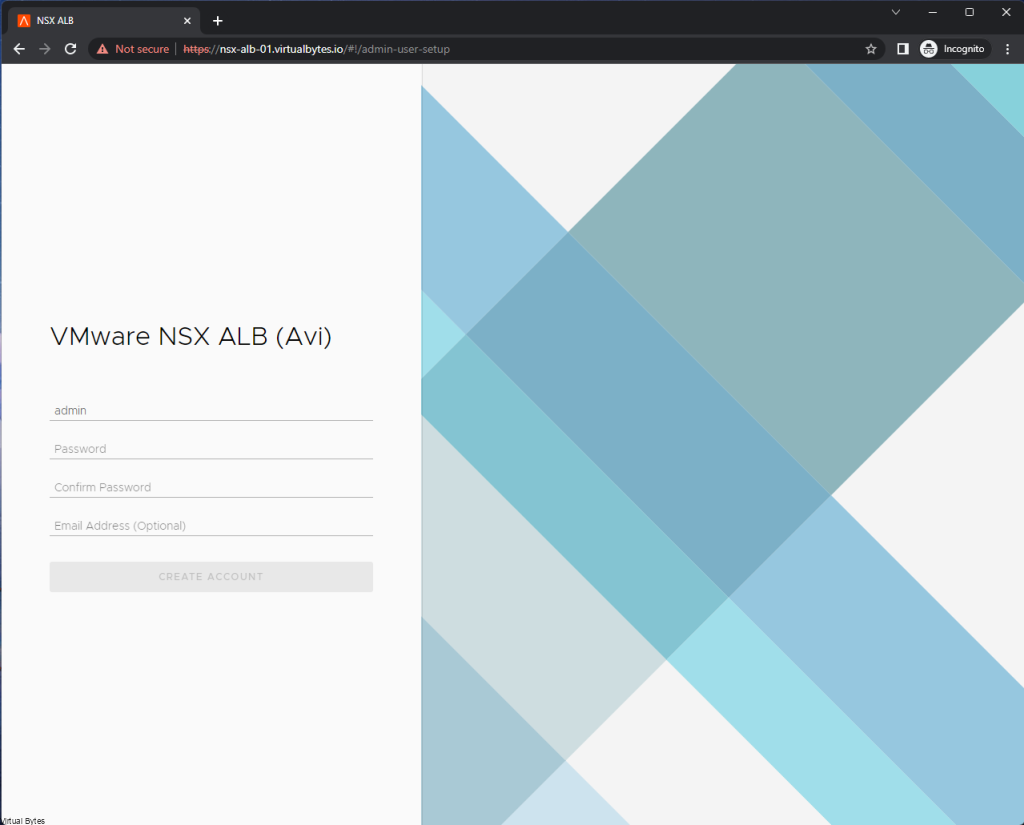
Create your passphrase, and your DNS resolvers, and DNS Search Domains.

Skip SMTP if not needed, but if you need a mail server please fill out your required SMTP IP and Port

  • Service Engines are managed within the tenant context, not shared across tenants to enable the Tenant Context Mode.
  • Service Engines are managed within the provider context, shared across tenants to enable the Provider Context Mode.

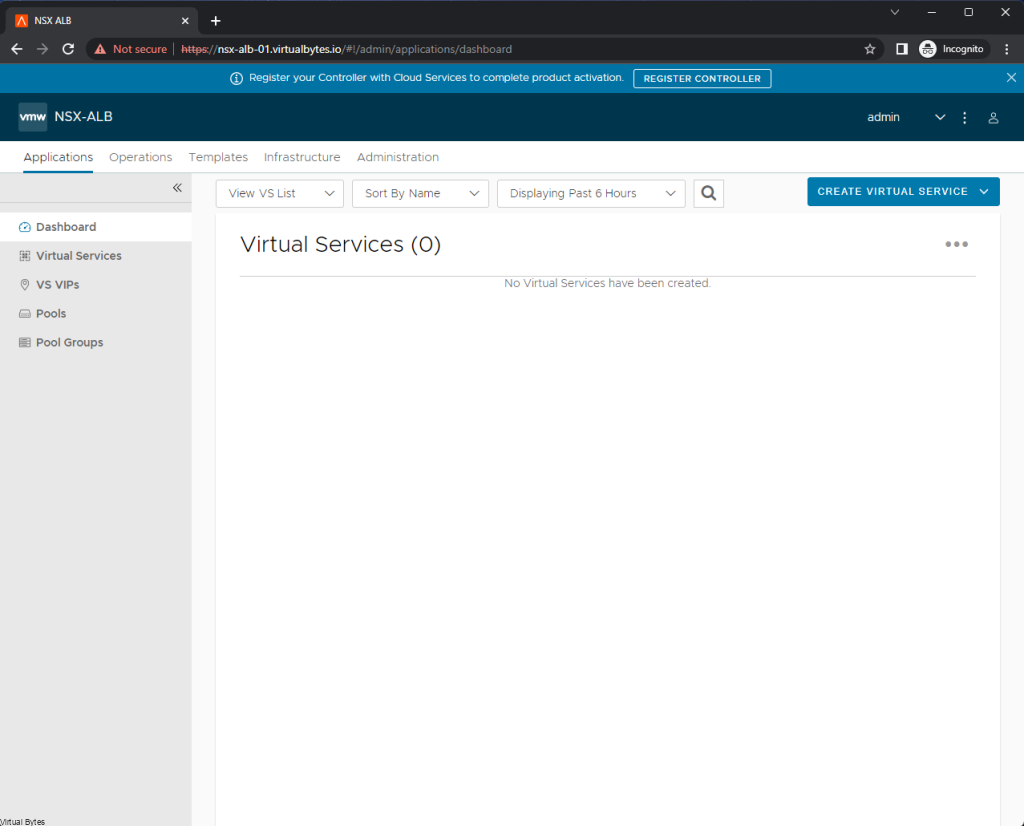
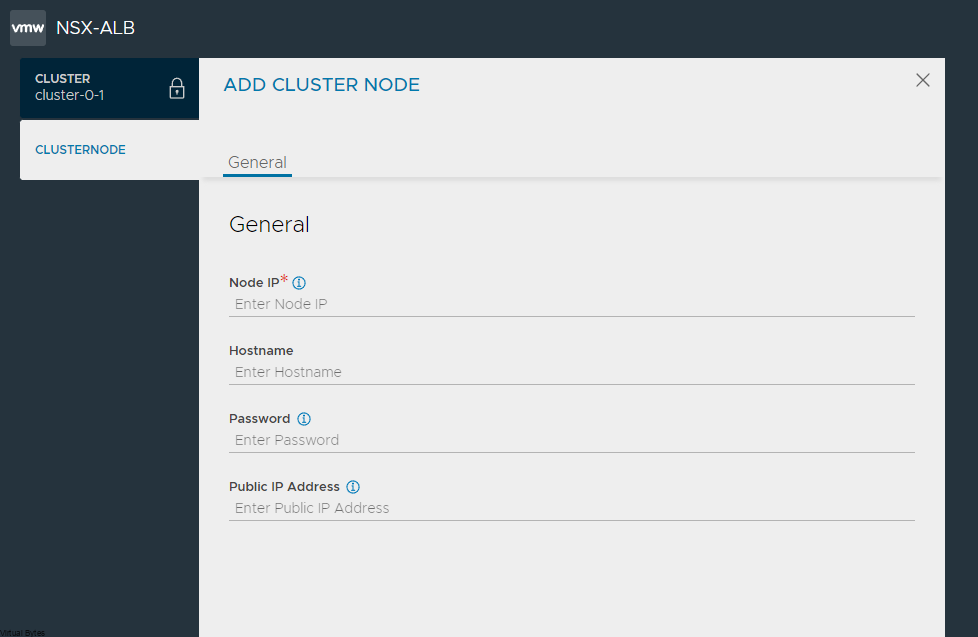
That is it for the initial deployment, next we will add our other 2 additional NSX ALB nodes for HA setup.

Go to Administration -> Controller -> Nodes
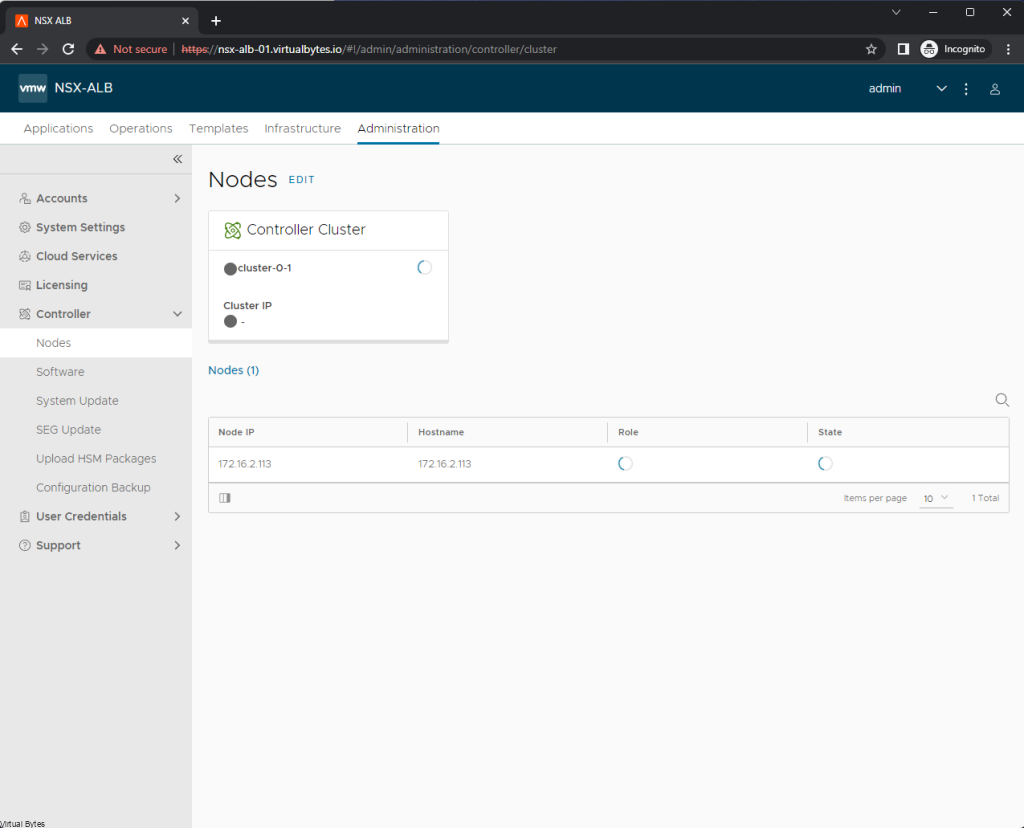
Click Edit ->

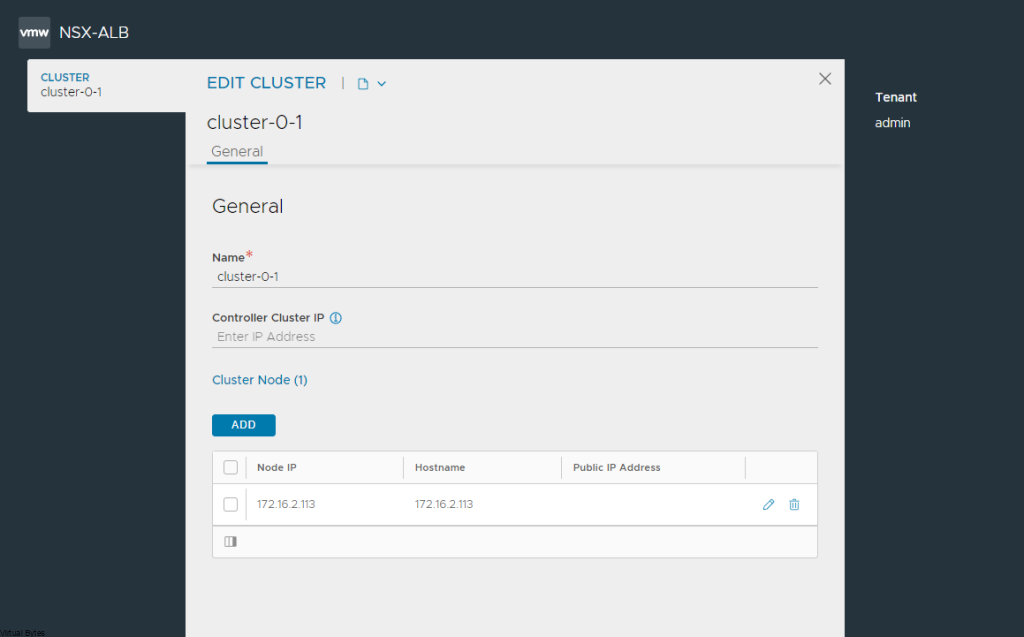
For your 2 additional NSX ALB nodes you will need to provide an IP Address and hostname and password.

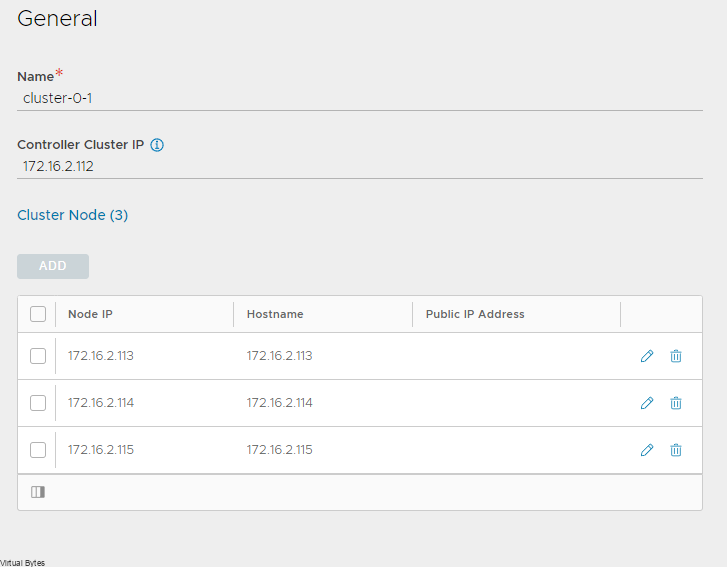
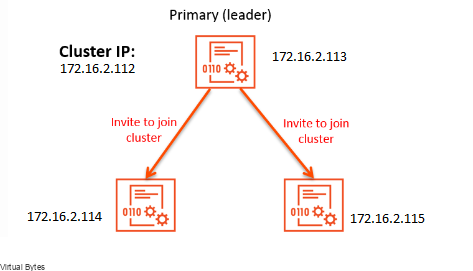
Sample of what it should look like for all 3 ALB appliances

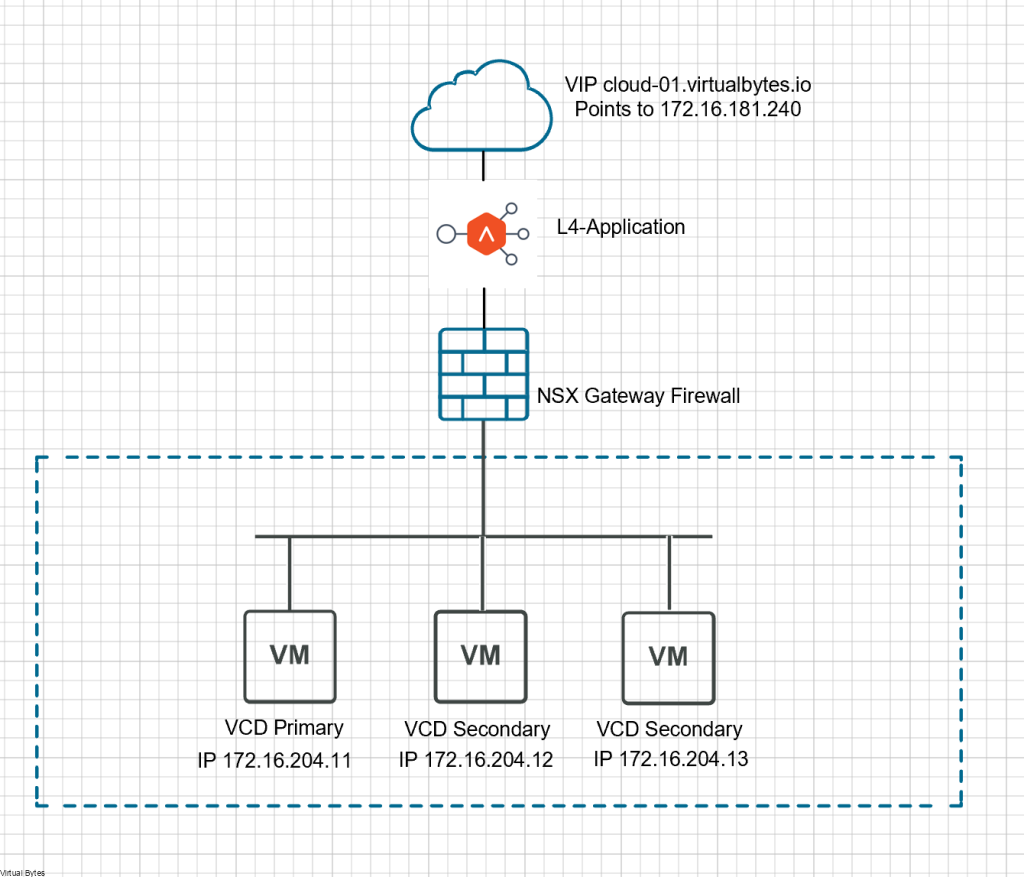
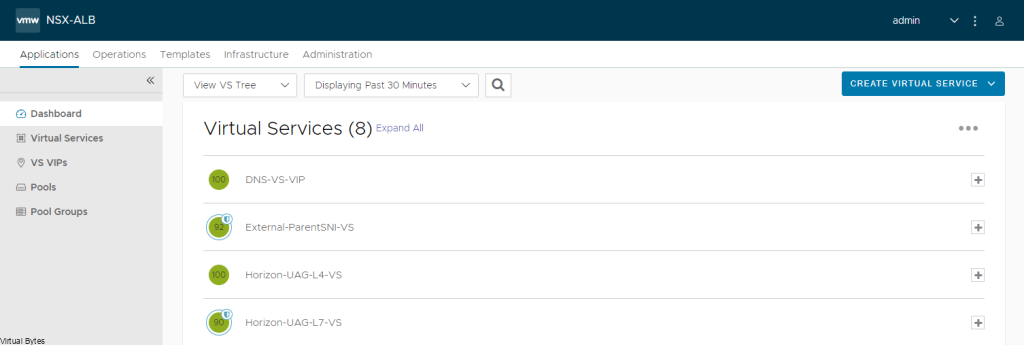
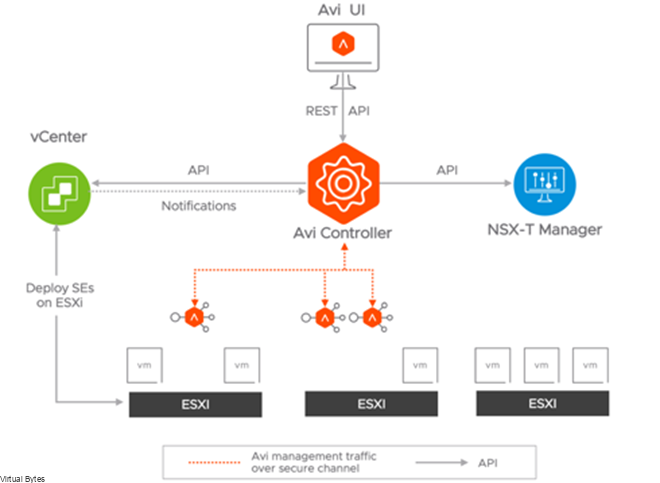
A simple topology of what we have deployed.

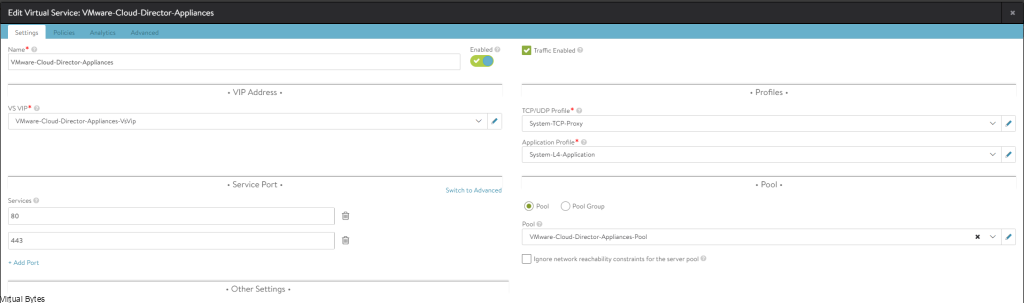
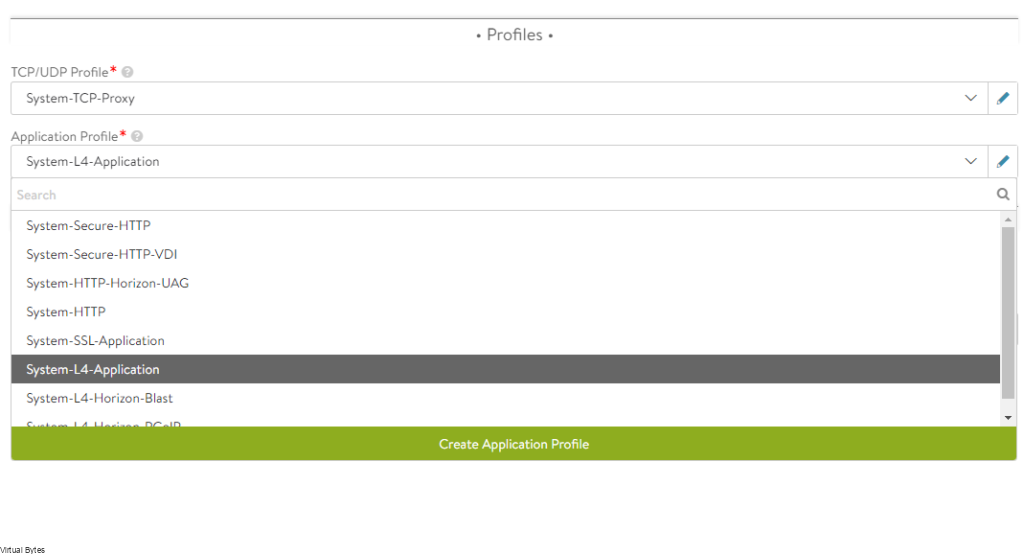
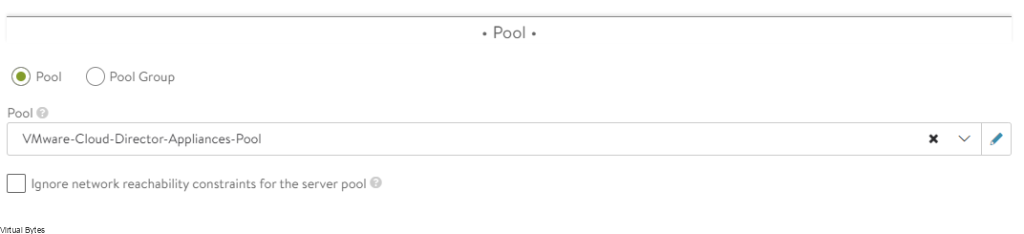
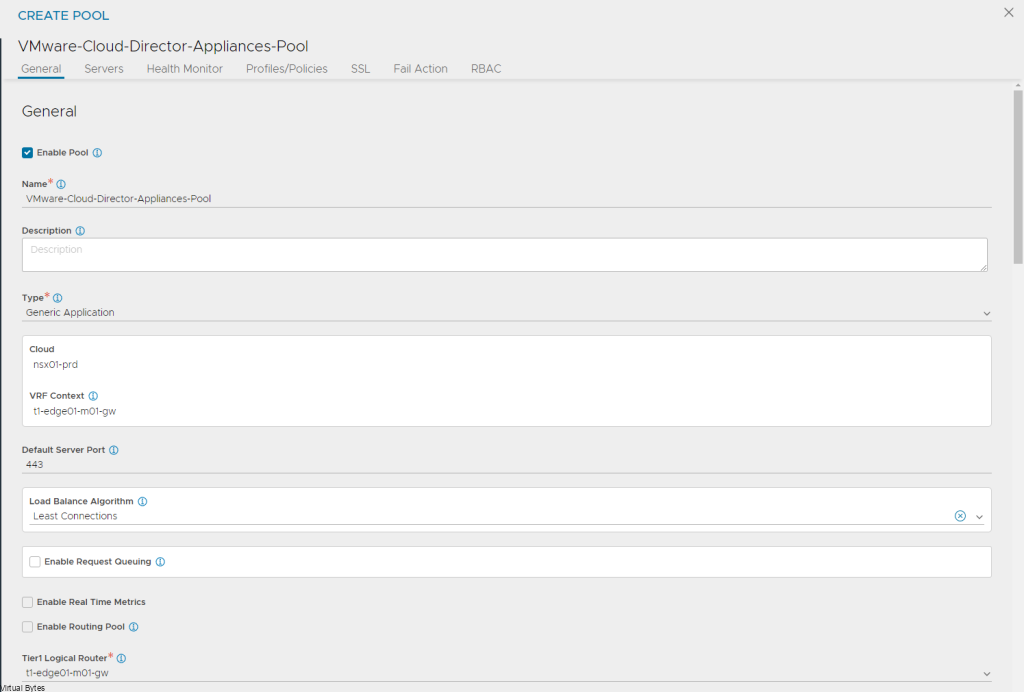
That is it! from now on you can configure for what use case you will NSX-ALB for. A next blog post will go through how to step up a NSX-T Cloud.

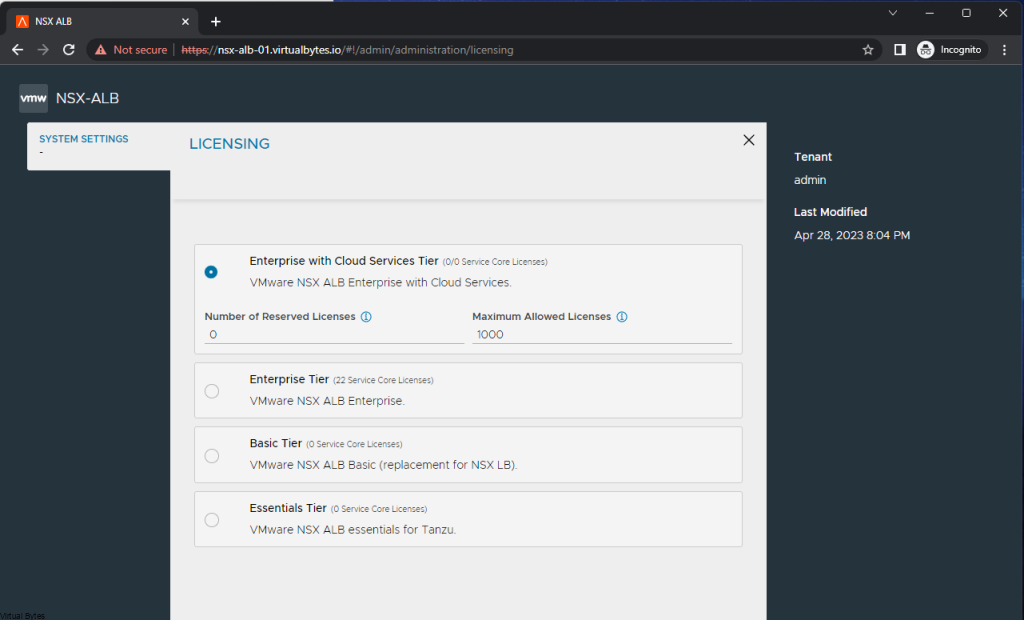
Licensing Flavors – If you click on the little cog icon next to the Licensing. You will see different tiers.

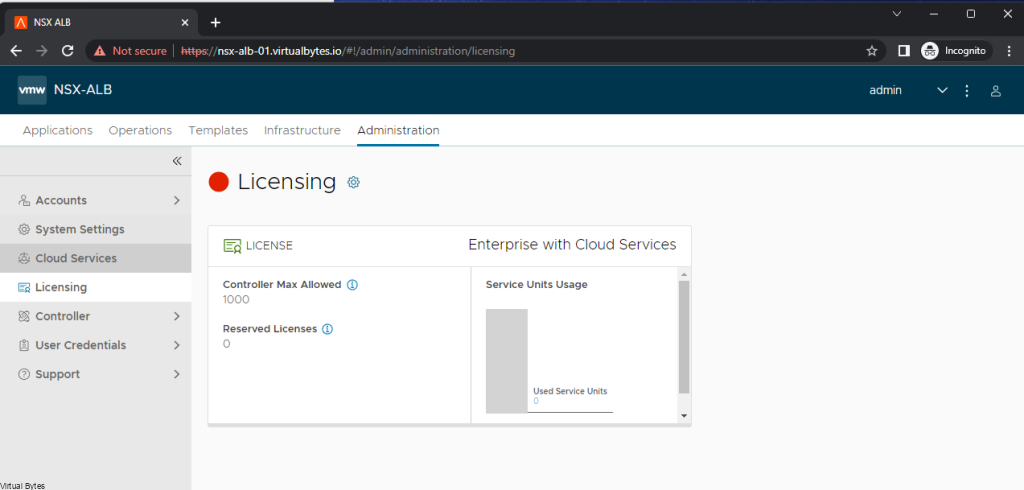
Different License Tiers that are apart of NSX-ALB Licensing model.

May 3, 2023 0 comments 2.6K views
0 FacebookTwitterLinkedinEmail
Cloud

Load Balancing VMware Cloud Director 10.4.x Cells with NSX ALB (AVI)

by Tommy Grot April 11, 2023
written by Tommy Grot 2 minutes read

Topic of the Day – Load Balancing VMware Cloud Director 10.4.x multi cell deployment. For this deployment I am using 3 VCD Cells, they consist of Small Size ( 2vCPU and 12GB, these are not recommended specifications for a production appliance – Per VMware.)

This walkthrough will show you how to load balancer the appliances only, we are not integrating NSX ALB into VMware Cloud Director for Tenants to consume, stay tuned for a future walkthrough for VCD and NSX ALB Integration!

What you will need:

  • Multiple VCD Appliances
  • Certificate with multiple SANs ( I used my wildcard cert)
  • Certificates and Public Addresses configured already on all VCD Appliances
  • 4 DNS A Records, 1 A Record Pointing to VIP IP address of ALB VS Pool, 3 A Records for individual appliances

More information on VMware Cloud Director 10.4.1 Certificate Implementation here

Lets login to NSX ALB, Go to Virtual Services and top right click on “Create Virtual Service”

-> Advanced Setup

Select your NSX Cloud which we will deploy the VIP pool

Select VRF Context, which for my deployment I am used my t1-edge-01-m01-gw, which is my Tier 1 Router attached to my primary Tier-0.

Next we will configured Virtual Service VIP for our Service Engine for ALB.

Attach the VsVIP to your Tier 1 Logical Router

Add a Virtual IP that is free from within your VIP Pool that is pre-allocated manually or can be via IPAM Dynamically. For my implementation I am setting the IP address statically.

Click Save -> Then it will take us back to the main page where we are deploying the Virtual Service

Next step we will set the Profile of our Virtual Service to the following

  • System-TCP-Proxy
  • System-L4-Application


(Side topic, VMware Cloud Director works better with a Layer 4 Load Balancer, there are issues that occur if a Layer 7 HTTP load balancer is utilized)

Now that our Profile is set, next we will create our Pool. I named my “VMware-Cloud-Director-Appliances-Pool”

The Following Settings that should be set are:

  • Default Server Port: 443
  • Least Connections (can use other Algorithms based on your needs)
  • Tier1 Logical Router – t1-edge01-m01-gw (this is my Tier1)
  • Servers – Created IP Address Group
  • Health Monitor
  • SSL – System-Standard, (Service Edge Client Certificate)

  1. Any other settings will depend on your implementation

Once all settings have been configured, now we will hit save and proceed to the last page “Advanced”

Ensure to select your Service Engine Group, or ALB will deploy it on the default group and might cause issues.

After you have the AVI Service Engine deploying, now you can go to VCD, and setup Public Addresses – Pre reqs are that you need to have VCD SSL CA Signed or Self Signed already configured and just need to enabled Public Addresses for the Web Portal and API.

That’s it! Very simple implementation to utilize VMware NSX Advanced Load Balancer and Load Balance VMware Cloud Director Appliances!

April 11, 2023 0 comments 2.5K views
1 FacebookTwitterLinkedinEmail
CloudNetworking

Reverse Proxy & Load Balancing a Web Server with VMware NSX Advanced Load Balancer

by Tommy Grot December 16, 2022
written by Tommy Grot 3 minutes read

Want to setup a load balancer and reverse proxy with VMware NSX Advanced Load Balancer, and you want to replace your Nginx Reverse Proxy, well let’s get started!

First, we will make sure that you already have NSX ALB setup and configured within your environment, this walkthrough will only step you through on building a Virtual Service and Pools and VIPs for your multiple web servers. During this deployment you can set up many different FQDNs.

Requirements

  • Public FQDN
  • Lets Encrypt SSL Certificate (Wild Card or SAN or Single Cert)
  • NAT – Service Engine
  • Virtual IP
  • Service Pool
  • Web Server(s)

Product Versions:

  • VMware NSX ALB: 22.1.2
  • VMware NSX: 4.0.1.1.0.20598726

Steps

Login as an administrator account to NSX ALB ->

Go to Virtual Services -> Create Virtual Service

Select -> Advanced Setup

Next prompt -> Select your Cloud (For my setup I am doing everything NSX Overlay Backed)

Click Next -> Select your VRF Context (I am using a Tier 1 Gateway)

So now at this point – you should see this screen below, we will create a New Virtual Service, this will be the main ingress and egress point of your network and the external world. I have a NAT from my firewall going to this Virtual Service (VIP) Virtual IP.

  • Name: External-ParentSNI-VS (This is my naming convention, but you can choose your own)
  • Select: Enable Virtual Hosting VS
  • Virtual Hosting Type: SNI
  • VS VIP – (Create the main VIP for Ingress/Egress NAT, that is routable)
  • Application Profile: System-Secure-HTTP
  • WAF ( You can enable if you would like too, this is optional)
  • Service Port ( 80,443 – For 443 you will want to select SSL)
  • Pool – (Create a Pool, I used one of my very first web servers to start the pool)
  • SSL Certificate – Select your Cert – by default ALB will put System-Default-Cert

Click Save / Next – For this portion of the Virtual Service with Parent SNI we are done, next we will deploy the Child SNI which will be a parent to the main Ingress/Egress SNI Virtual Service.

As an example – I will use my Virtual Bytes SNI Child Virtual hosting.

Click on drop down for Pool, if you have not created a pool we will do so now.

  • Name: External-Parent-SNI-VS-Pool
  • VRF Context – Your Tier 1 Gateway
  • Default Server Port: 443

Select your first webserver, this will let you start the Virtual Service. You can do it via a IP Group or IP Address or DNS Name as well as have the capability to use a security group from NSX.

After you have created all the required services you should be able to access your web server from an internal or external (Internet) if you have NAT’d. But for the next steps we will repeat the steps for a Child SNI.

Child SNI Setup

  • Go to Virtual Services – > Click on Create Virtual Service (Advanced)
  • Name: You Web Server
  • Check – Virtual Hosting VS
  • Virtual Hosting Type: SNI
  • Virtual Hosting Parent: External-ParentSNI-VS (or your own naming)
  • Domain Name: www.yourdomain.com
  • Application Mode: System Secure-HTTP
  • Pool: Create a pool for the Virtual Machine or service you want to load balance
  • SSL Certificate: Select your Certificate

Click Next all the way till the end, and now you have successfully setup a Child SNI which now you can replicate the same steps for multiple web servers, and you no longer need to NAT anymore IPs, since your main ingress/egress is already NAT’d and everything will flow through the main Parent service.

December 16, 2022 0 comments 3.1K views
1 FacebookTwitterLinkedinEmail


Recent Posts

  • Deploying & Configuring the VMware LCM Bundle Utility on Photon OS: A Step-by-Step Guide
  • VMware Cloud Foundation: Don’t Forget About SSO Service Accounts
  • VMware Explore Las Vegas 2025: Illuminating the Path to Cloud Excellence!
  • Securing Software Updates for VMware Cloud Foundation: What You Need to Know
  • VMware Cloud Foundation 5.2: A Guide to Simplified Upgrade with Flexible BOM

AI AVI Vantage cloud Cloud Computing cloud director computing configure cyber security director dns domain controller ESXi las vegas llm llms multi-cloud multicloud NSx NSX-T 3.2.0 NVMe private AI servers ssh storage tenant upgrade vcd vcda VCDX vcenter VCF VDC vexpert Virtual Machines VMs vmware vmware.com vmware aria VMware Cloud Foundation VMware cluster VMware Explore VMware NSX vrslcm vsan walkthrough

  • Twitter
  • Instagram
  • Linkedin
  • Youtube

@2023 - All Right Reserved. Designed and Developed by Virtual Bytes

Virtual Bytes
  • Home
  • Home Data Center 2025
  • VMware
    • Cloud
    • Datacenter & Cloud Infrastructure
      • VMware ESXi
      • VMware vCenter
      • VMware vSAN
    • Networking & Security
    • Desktop & App Virtualization
      • Omnissa Horizon
    • Troubleshooting
    • Ansible
  • Education
  • Hardware
    • Hardware Tips & Tricks
  • Events
  • About
    • About Me
    • Home Lab Archives
      • Home Lab 2020-2022
      • Home Lab 2016-2020