Top Posts
Deploying & Configuring the VMware LCM Bundle Utility...
VMware Cloud Foundation: Don’t Forget About SSO Service...
VMware Explore Las Vegas 2025: Illuminating the Path...
Securing Software Updates for VMware Cloud Foundation: What...
VMware Cloud Foundation 5.2: A Guide to Simplified...
VMware Cloud Foundation 5.2: Unlocking Secure Hybrid Cloud...
VMware Cloud Foundation – Memory Tiering: Optimizing Memory...
Decoding VMware Cloud Foundation: Unveiling the numerous amount...
VMware Cloud Director 10.6.1: Taking Cloud Management to...
Omnissa Horizon Upgrade 2406 to 2412
Virtual Bytes
  • Home
  • Home Data Center 2025
  • VMware
    • Cloud
    • Datacenter & Cloud Infrastructure
      • VMware ESXi
      • VMware vCenter
      • VMware vSAN
    • Networking & Security
    • Desktop & App Virtualization
      • Omnissa Horizon
    • Troubleshooting
    • Ansible
  • Education
  • Hardware
    • Hardware Tips & Tricks
  • Events
  • About
    • About Me
    • Home Lab Archives
      • Home Lab 2020-2022
      • Home Lab 2016-2020
Category:

VMware Troubleshooting

VMware Cloud FoundationVMware Troubleshooting

vCenter 8.0u2 Upgrade Issue vCHA – postInstallHook

by Tommy Grot April 11, 2024
written by Tommy Grot 2 minutes read

Have you recently attempted to upgrade your vCenter to version 8.0.2.00300 from 8.0.2.00100, only to be met with an unexpected roadblock in the form of VMware vCenter High Availability (vCHA)? Well, you’re not alone! In this blog post, we’ll dive into the common pitfalls and challenges that users face when trying to upgrade vCenter with vCHA enabled. We’ll discuss the potential causes of the failure, troubleshooting tips, and possible solutions to get your upgrade back on track.

What is vCHA?

vCenter High Availability (vCenter HA) protects vCenter Server against host and hardware failures. The active-passive architecture of the solution can also help you reduce downtime significantly when you patch vCenter Server

For this vCenter Release, there has been many other issues that end-users have seen from issues where time zone, or local host dns. But, for my issue it was vCHA!

  • Time zone not being set to ETC/UTC within VAMI or CLI
  • Local Host and DNS Resolution within /etc/hosts file
  • vCenter Server High Availability Service enabled but not configured – This was my issue!

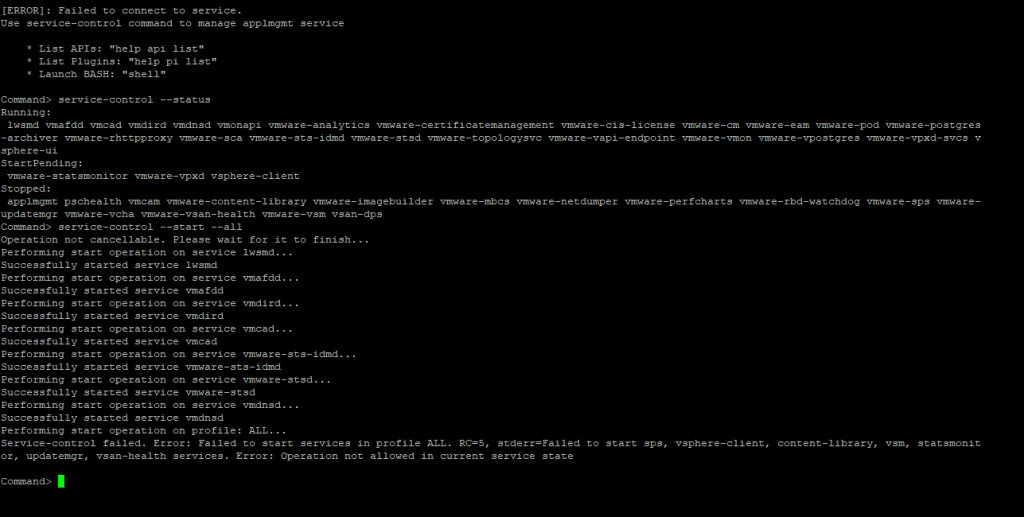
Performing start operation on profile: ALL Service-control failed. Error: Failed to start services in profile ALL. RC=2, stderr=Failed to start vcha services. Error: Service crashed while starting.

The Cause – vCHA was set to Automatic Start Up and Not Configured

The Fix –

Either GUI or CLI can be utilized to fix.

  • Take a fresh snapshot
  • SSH into vCenter, if you are running VCF, then you will need to lookup your password with VCF Lookup_password Service:
  • Execute Command to see if the vCHA service is running –

Command Line

vmon-cli -s vcha
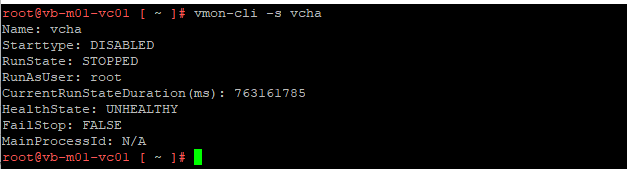
vmon-cli -S DISABLED -U vcha

After service is stopped, try to resume patch or revert snapshot and redo the steps above to ensure that the vCHA service is disabled.
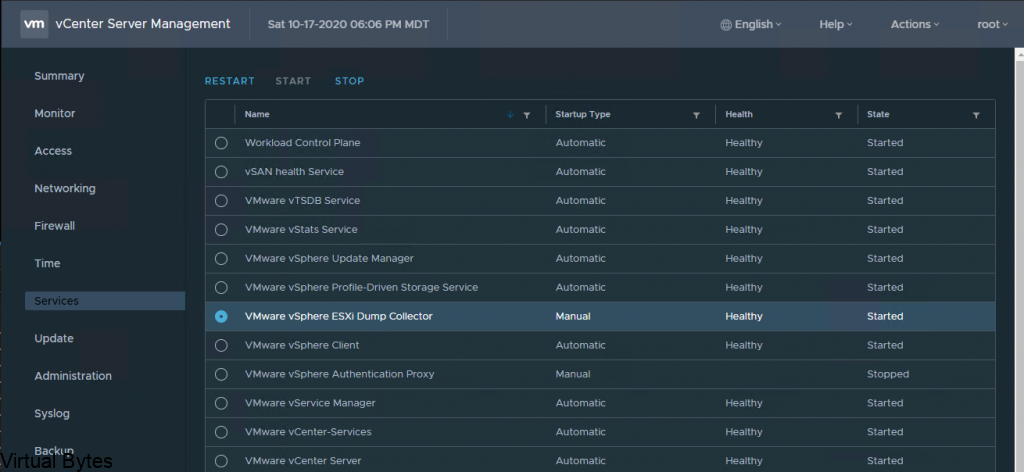
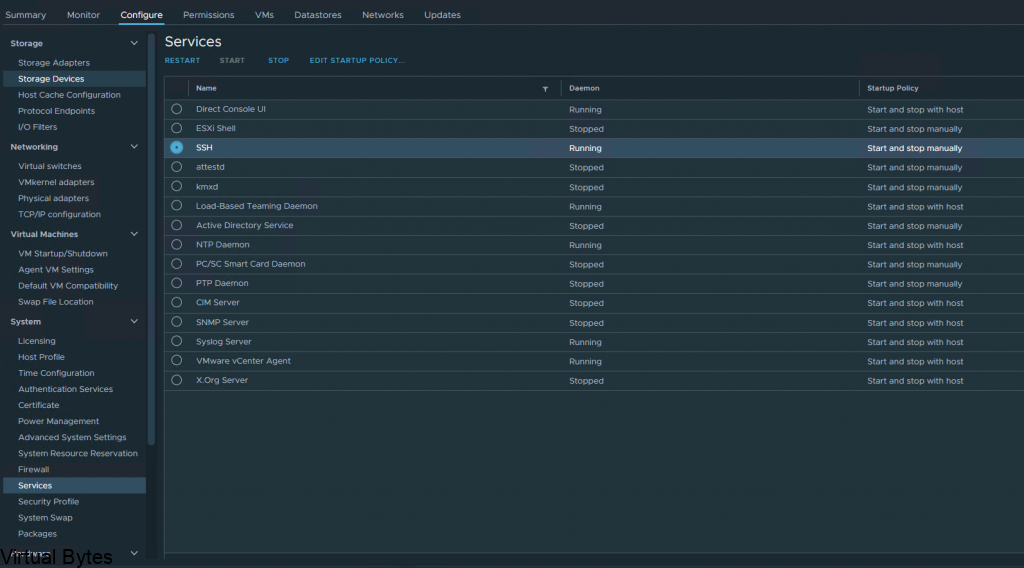
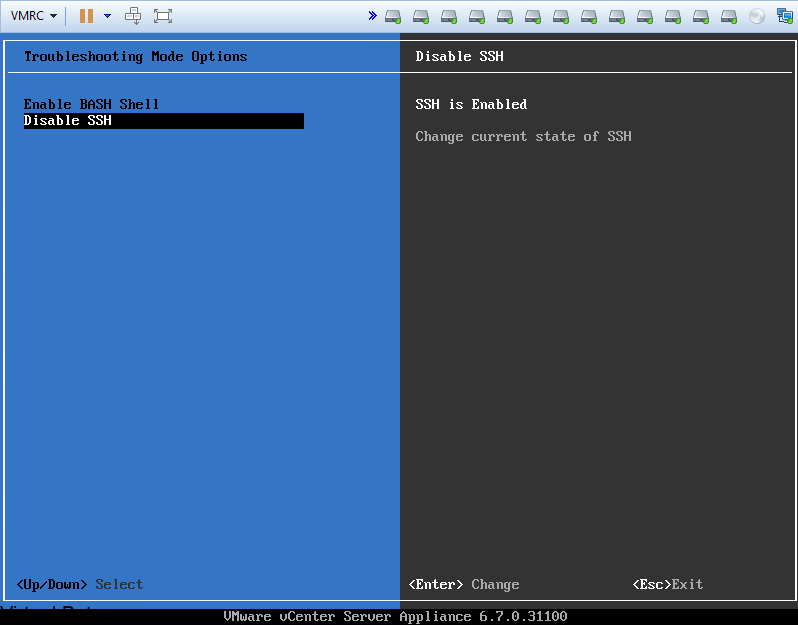
GUI –

  • Log into VAMI, Go to Services ->
  • Select – VMware vCenter High Availability -> Set Start Up Type Manual ( still to verify execute the command above to disable and ensure it is disabled)

Once, rebooted or re-verted snapshot and all previous steps are completed, you should have a successful upgrade of your vCSA!

April 11, 2024 0 comments 1.9K views
1 FacebookTwitterLinkedinEmail
VMware Cloud FoundationVMware Troubleshooting

Decoupling or Redeploying VMware Aria Suite Lifecycle

by Tommy Grot March 31, 2024
written by Tommy Grot 1 minutes read

Are you looking to know how to decouple or need to re-deploy the Aria Suite Lifecycle Manager from VMware Cloud Foundation? Well, you’ve come to the right place!

  • Take a Snapshot of your SDDC Manager (Offline) and a snapshot your vCenter Server appliance.
  • Then SSH to your SDDC Manager and elevate to root
su  

Below are the psql commands you will need to execute to remove the old vRSLCM entries.

psql -h localhost -U postgres -d platform -c "truncate vrslcm;"
psql -h localhost -U postgres -d platform -c "delete from vm_and_vm_type_and_domain where vm_type ='VRSLCM';"

As well as cleaning up the old Passwords, this will also remove the Life Cycle Suite from the Password UI.

psql -h localhost -U postgres -d platform -c "delete from credentialhistory where credential_id in (select id from credential where entitytype ='VRSLCM');"
psql -h localhost -U postgres -d platform -c "delete from credential where entitytype ='VRSLCM';"

Lets re-deploy through SDDC Manager!

After all is removed, you may restart the deployment, for the deployment you will be asked few questions on DNS, IP , and as well a Tier 1 Load Balancer, I used the next available IP address where i knew that the previous one was locked in and couldn’t clean it up, but after the deployment the old load balancer IP was cleaned up!

That’s it! Once you vRSLCM gets re-deployed re-run your Certificate generations from CSR and re-install the cert! Don’t forget to rotate your vRSLCM password but also enable password rotation to prevent any issues in the future.

March 31, 2024 0 comments 1.4K views
0 FacebookTwitterLinkedinEmail
VMware TroubleshootingVMware vCenter

vCenter 8.0 U2 Storage Policies Go Missing – Due to Service Account (SPS) VMware vSphere Profile-Driven Storage Service

by Tommy Grot February 29, 2024
written by Tommy Grot 2 minutes read

Tonight’s blog post goes in-depth on Service Accounts especially the SPS account which the VMware vSphere Profile-Driven Storage Service relies on that lives within the Administrators group. Well, imagine the panic when the SPS service account goes missing, leaving your vSAN and storage policies in limbo.

In this blog post, we’ll dive into the nightmare scenario of losing these vital components and explore how to troubleshoot and recover from such a disaster. So grab a cup of coffee and get ready to learn how to tackle this challenging situation head-on. Let’s get started!

So Below – I logged into my vCenter Server 8 today, and I was like why are my policies missing and my vSAN Performance complaining ?? Well I started to dig in and found some evidence of the SPS service account gone.

Storage Providers are missing ?! What is happening?!

vSAN Performance complaining about its policy not being there, and your can see that the Storage Policy drop down is broken / not loading the vSAN policies I have for vSAN Performance

So – First thing is take a snapshot of what your current vCenter is, yeah we know its broken and SPS is missing but safety first!

First, what I did – is, I checked the logs where the VMware vSphere Profile-Driven Storage Service

/var/log/vmware/vmware-sps/sps.log

You will see lots of different spring frame work events and processes, but what you are really looking for is your specific SPS Service Account, for me, mine was

sps-71587023-8efd-4f7e-b094-ede500183201

Once you have your account copied – open your favorite text editor. You will want to structure your command below in the same way. As an example you may copy i provided mine from the screen shot – But replace my SPS account with yours.

/usr/lib/vmware-vmafd/bin/dir-cli group modify --name Administrators --add sps-71587023-8efd-4f7e-b094-ede500183201

After you hit enter, you will see that it will ask you for the [email protected] password, if you are running VCF, you will need to pull your password from the SDDC Manager if you have Auto Rotate passwords enabled.

Once Password has been entered you shall see the same following prompt where the SPS account has been added to the Administrators group.

Enter password for [email protected]:
Account [sps-71587023-8efd-4f7e-b094-ede500183201] added to group [Administrators]
Group member [sps-71587023-8efd-4f7e-b094-ede500183201] added successfully

Woohoo! vSAN and vCenter are all up and running with working VM Storage Policies

And Finally – We see our SPS account back in the Administrators Group!

February 29, 2024 0 comments 2.2K views
1 FacebookTwitterLinkedinEmail
VMware Troubleshooting

How PCIe NVMe Disks affect VMware ESXi vmnic order assignment

by Tommy Grot April 18, 2023
written by Tommy Grot 3 minutes read

Today’s topic is about VMware Cloud Foundation and homogenous network mapping with additional PCIe interfaces within a server.

Physical PortDevice Alias
Onboard port 1vmnic0
Onboard port 2vmnic1
Onboard port 3vmnic2
Onboard port 4vmnic3
Slot #2 port 1vmnic4
Slot #2 port 2vmnic5
Slot #4 port 1vmnic6
Slot #4 port 2vmnic7

VMware KB – How VMware ESXi determines the order in which names are assigned to devices (2091560) this KB talks about vmnic ordering and assignment, but the post below will explain when a NVMe PCIe disk is apart of a host.

What kind of environment? – VMware Cloud Foundation 4.x

If a system has:

  • Four onboard network ports
  • One dual-port NIC in slot #2
  • One dual-port NIC in slot#4

Then devices names should be assigned as:

The problem:

If a physical server has additional PCIe interfaces that are greater in quantity over another server that you want to bring into an existing or new cluster.

An example – Dell PowerEdge R740, with 24 NVMe PCIe SSD Drives, and 2 – QSFP Mellanox 40Gig PCIe, and 1 – NDC LOM Intel X710 Quad 10Gb SFP+, and Boss Card, but another server that has few drives less than 24 as example above but the same network cards as following (2 – QSFP Mellanox 40Gig PCIe, 1 – NDC LOM Intel X710 Quad 10Gb SFP+, and Boss Card)

This will cause the physical server to have its PCIe Hardware IDs shift by (N) and cause the vmnic mapping to be out of order where certain vmnics will show up out of order, which causes the homogeneous network misconfiguration layout for VMware Cloud Foundation ESXi Hosts that are apart of a workload domain. It is important to have identical hardware for a VCF implementation to have successful VCF deployment of a workload domain.

This type of issue would cause problems for any future deployments of VMware Cloud Foundation 4.x. If they have an existing cluster with either type of configurations: high density compute node, or a vGPU node, or a high-density storage node it would throw off the PCIe mapping to and prevent all esxi hosts to have a homogeneous vmnic mapping to the physical nic.

The Fix:

Before you start doing any configurations with your ESXi host within VCF, please make sure to Decommission that host from your cluster within that workload domain.

Once the host is removed from that cluster within the workload domain:

Go to – > Workload Domains -> (Your Domain) ->

Clusters -> Hosts (Tab) -> Select the host you want to remove

Then Go back to Main SDDC Page – > Hosts -> and Decommission that select ESXi Host

Once, host is decommissioned, wipe all your NVMe Disks first, and then make sure to shutdown the ESXi host and unplug the NVMe disks just slightly to ensure that they do not get powered on, so then the next re-image of your ESXi host there will only be 1 disk which should be your boot drive or a Boss SSD M.2.

After server is up login back into your ESXi host and it should match to your liking where all the vmnics are aligned and correctly showing up in a homogenous layout

The Results:

Before

After

April 18, 2023 0 comments 659 views
0 FacebookTwitterLinkedinEmail
VMware Troubleshooting

VMware vRealize Lifecycle Suite & VMware Cloud Foundation 4.5 Rollback

by Tommy Grot March 20, 2023
written by Tommy Grot 1 minutes read

Today’s topic is on VMware Aria Life Cycle Manager formerly (vRSLCM) – Have you encountered an issue with vRSLCM or uploaded a PSPACK that you didn’t want to upload? Here we will walk through on how to roll back if you encounter any issues!

Tasks:

  • Create a snapshot of our SDDC VCF VM
  • Update vRSLCM Postgres
  • Delete via Developer Center
  • Re-Deploy

After the snapshot has been crated, lets now ssh into the VCF SDDC Manager appliance, then elevate to root

su root

Run Postgres SQL Command to remove it from VCF Database

psql -h localhost -U postgres -d platform -c "update vrslcm set status = 'DISABLED'"

Now – when should see that vRSLCM has been disabled and is letting know VCF that there is something wrong with it, so now it will let you Roll Back

Then Go back to VCF UI, Developer Center – > Scroll all the way down to APIs for managing vRealize Life Cycle Manager -> Select Delete – > Execute

After vRSLCM is Delete, you will see Roll Back under vRealize Suite and then you can deploy vRSLCM again!

March 20, 2023 0 comments 1.1K views
0 FacebookTwitterLinkedinEmail
VMware Troubleshooting

Unregister vCSA Plugin or Extension via vCenter MOB

by Tommy Grot October 11, 2022
written by Tommy Grot 1 minutes read

Have you had an issue with vCenter Server Appliance? Well there is a way to fix and remove a plugin or extension. Open up your browser to https://<your-vcenter-ip>/mob and login with your credentials, if you do not have any other identity source you will need to login with your [email protected] SSO account.

Go to Content ->

Go to Exetension Manager ->

Go to More -> look for your extension that has been registered.

Copy the file name from “com.xxx.xxxx.xxxxxx.xxxx”

Go to Unregister -> and paste in the value and execute Invoke Method

October 11, 2022 0 comments 1.6K views
1 FacebookTwitterLinkedinEmail
VMware Troubleshooting

vSphere ESXi Dump Collector

by Tommy Grot October 17, 2020
written by Tommy Grot 2 minutes read

If you have any issues or errors that occur within the ESXi Hypervisor, the ESXi Collector will send the current state of the VMkernel Memory. This will dump the core to the vCenter via network. So if a ESXi host fails or gets compromised there will be traces of sys log and other logs sent to the vCenter Serve which could be in the same organization datacenter or reside somewhere else in the cloud.

Cyber Security Tip! – DISABLE SSH after you are done working with it, this is strongly recommend to harden the ESXi host and prevent any cyber attacks against SSH (Port 22)

The ESXi Dump Collector traffic is not encrypted so best practice is to set it on a isolated VLAN that the internet or other networks do not communicate with it.

First step, is to log into VMware Server Management, also known as, VAMI.

https://YOUR_VCENTER_IP_OR_DNS:5480/

The login credentials to log into VAMI

Username : root

Password : The Password you setup during installation.

Once you are logged into VAMI, you will need to go to the Services section. Then look for VMware vSphere ESXI Dump Collector.

Select it, and click START

After the VMware vSphere ESXi Dump Collector is started and running, log into your ESXi host(s) via SSH.

To enable SSH on the cluster, login your vCenter, then go to the ESXi host, Click on Configure -> System -> Services. You will see SSH, click on that and select START.

Once SSH has started, open up your favorite SSH tool, for this tutorial I am using Putty. You may download it here.

Then log into the ESXi host and you will execute few commands to enable the ESXi host to offload the VMkernel logs to the vCenter Dump Collector.

esxcli system coredump network set --interface-name vmk0 --server (YOUR vCENTER IP) --server-port 6500
esxcli system coredump network set --enable true
esxcli system coredump network get

After all those 3 commands are executed with your specific vCenter IP, you will see that the final command will get the coredump network configuration and display it in the SSH session. Once that is enabled you will see that the Alert for ESXi Core Dumps log go away and logs are offloaded.

October 17, 2020 0 comments 2K views
0 FacebookTwitterLinkedinEmail
VMware Troubleshooting

VMware VAMI – Unable to login

by Tommy Grot July 19, 2019
written by Tommy Grot 1 minutes read

Do you have a issue with logging into VMware vCenter Appliance Management? If so there is a little work around to getting back into your VAMI! I wanted to upgrade my vCenter Server to 6.7U2 via webUI “https://<FQDN>:5480″ and I ran into this little issue.

First Enable SSH at the vCenter Level – from your Remote Console

Login into your vCenter via Console (VMRC)

Then Go into “Troubleshooting Mode Options”

Then Enable SSH

Login into vCenter via SSH – Once logged in, run this command

service-control --status

Once you run the first command, then run this command to start all vCenter Services to a running and operational state.

service-control --start --all

After all the processes have been started, you may login into your vCenter VAMI, but I prefer to reboot the vCenter Server to give it a fresh start after the service fix.

After this is all done, make sure to DISABLE SSH! Just a security precaution.

July 19, 2019 0 comments 1.5K views
0 FacebookTwitterLinkedinEmail


Recent Posts

  • Deploying & Configuring the VMware LCM Bundle Utility on Photon OS: A Step-by-Step Guide
  • VMware Cloud Foundation: Don’t Forget About SSO Service Accounts
  • VMware Explore Las Vegas 2025: Illuminating the Path to Cloud Excellence!
  • Securing Software Updates for VMware Cloud Foundation: What You Need to Know
  • VMware Cloud Foundation 5.2: A Guide to Simplified Upgrade with Flexible BOM

AI AVI Vantage cloud Cloud Computing cloud director computing configure cyber security director dns domain controller ESXi las vegas llm llms multi-cloud multicloud NSx NSX-T 3.2.0 NVMe private AI servers ssh storage tenant upgrade vcd vcda VCDX vcenter VCF VDC vexpert Virtual Machines VMs vmware vmware.com vmware aria VMware Cloud Foundation VMware cluster VMware Explore VMware NSX vrslcm vsan walkthrough

  • Twitter
  • Instagram
  • Linkedin
  • Youtube

@2023 - All Right Reserved. Designed and Developed by Virtual Bytes

Virtual Bytes
  • Home
  • Home Data Center 2025
  • VMware
    • Cloud
    • Datacenter & Cloud Infrastructure
      • VMware ESXi
      • VMware vCenter
      • VMware vSAN
    • Networking & Security
    • Desktop & App Virtualization
      • Omnissa Horizon
    • Troubleshooting
    • Ansible
  • Education
  • Hardware
    • Hardware Tips & Tricks
  • Events
  • About
    • About Me
    • Home Lab Archives
      • Home Lab 2020-2022
      • Home Lab 2016-2020