Top Posts
Offline VMware Cloud Foundation 9 Depot: Your Path...
VMware Cloud Foundation 9: Simplifying Identity with a...
What’s New In VMware Cloud Foundation 9.0
Deploying & Configuring the VMware LCM Bundle Utility...
VMware Cloud Foundation: Don’t Forget About SSO Service...
VMware Explore Las Vegas 2025: Illuminating the Path...
Securing Software Updates for VMware Cloud Foundation: What...
VMware Cloud Foundation 5.2: A Guide to Simplified...
VMware Cloud Foundation 5.2: Unlocking Secure Hybrid Cloud...
VMware Cloud Foundation – Memory Tiering: Optimizing Memory...
Virtual Bytes
  • Home
  • Home Data Center 2025
  • VMware
    • Cloud
    • Datacenter & Cloud Infrastructure
      • VMware ESXi
      • VMware vCenter
      • VMware vSAN
    • Networking & Security
    • Desktop & App Virtualization
      • Omnissa Horizon
    • Troubleshooting
    • Ansible
  • Education
  • Hardware
    • Hardware Tips & Tricks
  • Events
  • About
    • About Me
    • Home Lab Archives
      • Home Lab 2020-2022
      • Home Lab 2016-2020
Category:

Hardware Tips & Tricks

Hardware Tips & Tricks

Palo Alto PPPoE VLAN Tagging w/ Century Link Gigabit Fiber

by Tommy Grot February 22, 2023
written by Tommy Grot 1 minutes read

Today’s topic is about Palo Alto and PPPoE interface and VLAN tagging. Currently Palo Alto does not support VLAN Tagging on an Interface with PPPoE authentication for your ISP. So, our workaround that works well but definitely need to have a Managed switch so you can Trunk and Tag an interface to make the Century Link FTTH ADTRAN know that VLAN 201 is Tagged.

Info –

Century Link Fiber Internet – Utilizes VLAN tagging to segregate out their Internet traffic, and their TV service.

What You Need:

  • PPPoE Username & Password
  • VLAN ID = 201
  • Managed Switch / Router that supports VLAN Tagging

First we will setup two ports on a managed switch, for my implementation I am using a Cisco Catalyst WS-C3750X-24P-S.

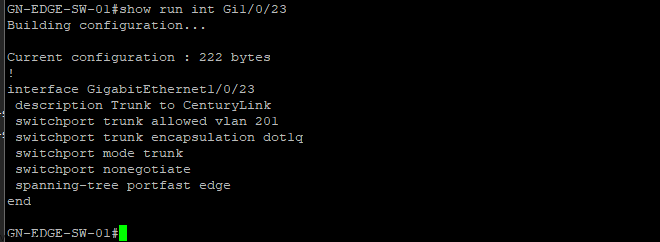
Interface Gi1/0/23 – Syntax below to copy (Just FYI, this is for Cisco)

description Trunk to CenturyLink
switchport trunk allowed vlan 201
switchport trunk encapsulation dot1q
switchport mode trunk
switchport nonegotiate
spanning-tree portfast edge

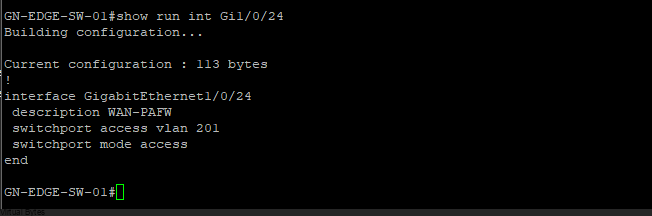
Interface Gi1/0/24 – Syntax below to copy (Just FYI, this is for Cisco)

description WAN-PAFW
switchport access vlan 201
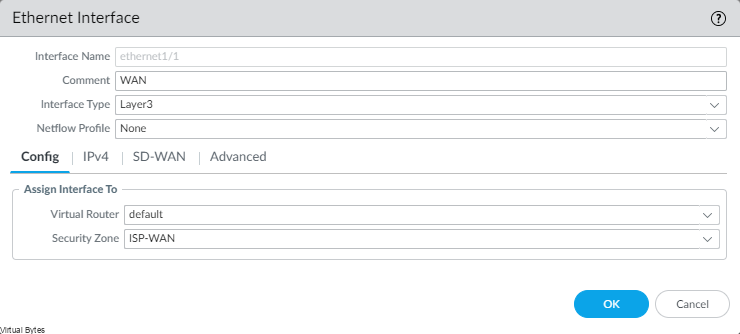
switchport mode access

Go to Network -> Click on Ethernet1/1

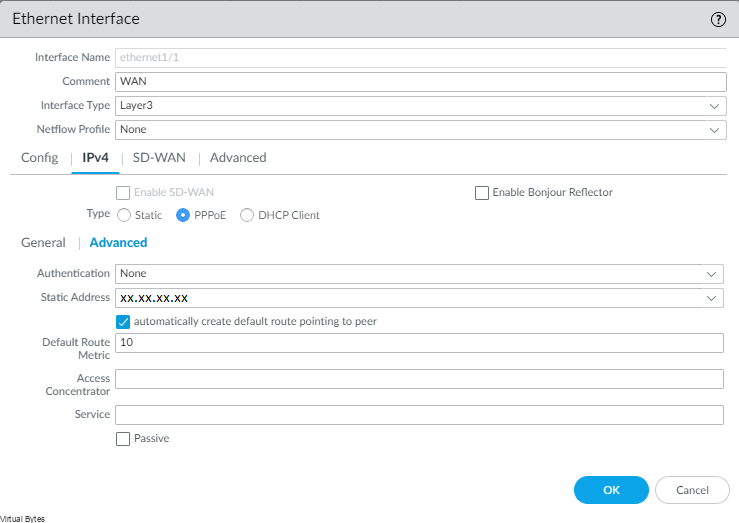
Once Interface is opened up, make sure your Virtual Router and all configured, but then Go to IPv4

Click on General -> Select PPPoE -> Fill in your Username and Password for Century Link PPPoE Authentication -> Click OK

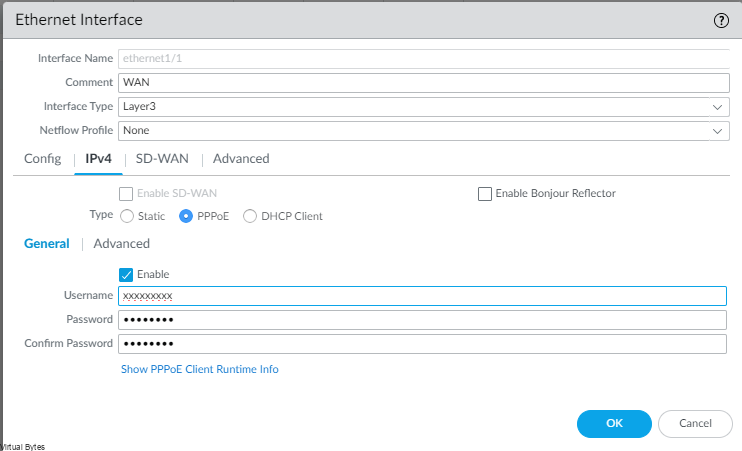
Now that your Century Link PPPoE user name and info is filled out, under advanced, you may set your Static IP address here for your WAN Interface.

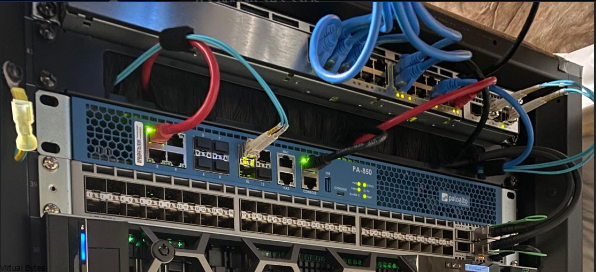
Red Ethernet cable Et1/1 going to Gi1/0/24 which is the one that is Tagged as an access port on vlan 201

February 22, 2023 0 comments 1K views
0 FacebookTwitterLinkedinThreadsBlueskyEmail
Hardware Tips & Tricks

Upgrading Processors in a Dell PowerEdge R740

by Tommy Grot April 30, 2022
written by Tommy Grot 1 minutes read

Tonight’s blog post is just a hardware upgrade, I was able to get ahold of 2 Intel Gold Xeon 5118 for a really good price on ebay. They arrived a day ago and got a chance to swap the Intel Xeon Silver 4110 to these Gold’s and they are beefy and great performance and power consumption!

Links:

  • Intel® Xeon® Gold 5118 Processor
  • Artic Clean

Power Consumption with 2 Intel Gold’s

Internal View of the Dell PowerEdge R740 ( this is a 16 bay version)

Air shroud cover is off, currently the Intel Xeon Silvers are still in the server!
CPU’s are out!
Cleaning up with Arctic Clean Thermal compound remover

Cleaning up any dust! 🙂

That is it! Server powered up and have seen zero issues, really nice CPU upgrade – it went smooth and really quick took 15 minutes.

April 30, 2022 0 comments 1.5K views
0 FacebookTwitterLinkedinThreadsBlueskyEmail
Hardware Tips & Tricks

Dell PowerEdge IPMI Fan Control

by Tommy Grot December 31, 2021
written by Tommy Grot 2 minutes read

Controlling Dell PowerEdge Fans for 12th/13th Generation Servers is possible by communicating with the BMC using IPMI commands. In this walk through we will walk through on the steps to granually control the speed you want.

Requirements:

Opensource IPMI Tool or Dell Open Manage BMC Utility Tool installed on your desktop

DISCLAIMER! – Do this at your own RISK. Be aware of what Hexadecimal values you input for the Fan Speed, This walkthrough will keep them at 45%

Be careful of what you do if you overheat and damage your server at your own fault!!

Website Link for : Hexadecimal Calculator

IPMI Syntax:

  • Senors read out: ipmitool -I lanplus -H [IP Address] -U [username] -P [password] sdr list full
  • Enable manual/static fan control: ipmitool -I lanplus -H [IP Address] -U [username] -P [password] raw 0x30 0x30 0x01 0x00
  • Disable manual/static fan control: ipmitool -I lanplus -H [IP Address] -U [username] -P [password] raw 0x30 0x30 0x01 0x01
  • Enable static fan control: ipmitool -I lanplus -H [interface] -U [username] -P [password] raw 0x30 0x30 0x02 0xff 0x2D

Note:

Enable IMPI over LAN within iDRAC7 Web Interface
Replace with your iDRAC IP address
Replace with iDRAC admin user
Replace with iDRAC admin password

This Enables Static Fan Control

ipmitool -I lanplus -H [iDRAC IP ADDRESS] -U [username] -P [Password] raw 0x30 0x30 0x01 0x00

This sets the Fans to a Static Speed to 45%

ipmitool -I lanplus [iDRAC IP ADDRESS] -U [username] -P [Password] raw 0x30 0x30 0x02 0xff 0x2D

This will verify Servers SDR

ipmitool -I lanplus -H [iDRAC IP ADDRESS] -U [username] -P [Password] sdr list full

Login into iDRAC web interface, Go to iDRAC Settings – > Network -> IMPI over LAN (Enable it)

Open Command Prompt and Change Directory to C:\Program Files (x86)\Dell\SysMgt\bmc

If you want to verify the directory type in ” dir “.

Below is an example: ipmitool.exe -l lanplus 0.0.0.0 -U root -P Password raw 0x30 0x30 0x01 0x00 – Replace all required fields with your own information.

This next step below, will enable the static fan control for the server with IPMI.

Next command you can control the fan speeds with the proper hexadecimal value for the ending, as you see 0x2D =45% so you will need to figure out your speed you want the server to be statically at.

Lets go verify the static fan controls in the iDRAC Web UI or also you can run the SDR command via IPMI.

December 31, 2021 0 comments 6.2K views
0 FacebookTwitterLinkedinThreadsBlueskyEmail


Recent Posts

  • Offline VMware Cloud Foundation 9 Depot: Your Path to Air-Gapped Deployments
  • VMware Cloud Foundation 9: Simplifying Identity with a Unified SSO Experience
  • What’s New In VMware Cloud Foundation 9.0
  • Deploying & Configuring the VMware LCM Bundle Utility on Photon OS: A Step-by-Step Guide
  • VMware Cloud Foundation: Don’t Forget About SSO Service Accounts

AI cloud Cloud Computing cloud director configure cyber security director dns domain controller ESXi How To las vegas llm llms multicloud NSx NSX-T 3.2.0 NVMe sddc security servers ssh storage tenant upgrade vcd vcda VCDX vcenter VCF vcf 9 VDC vexpert Virtual Machines VMs vmware vmware.com vmware aria VMware Cloud Foundation VMware cluster VMware Explore VMware NSX vrslcm vsan walkthrough

  • Twitter
  • Instagram
  • Linkedin
  • Youtube

@2023 - All Right Reserved. Designed and Developed by Virtual Bytes

Virtual Bytes
  • Home
  • Home Data Center 2025
  • VMware
    • Cloud
    • Datacenter & Cloud Infrastructure
      • VMware ESXi
      • VMware vCenter
      • VMware vSAN
    • Networking & Security
    • Desktop & App Virtualization
      • Omnissa Horizon
    • Troubleshooting
    • Ansible
  • Education
  • Hardware
    • Hardware Tips & Tricks
  • Events
  • About
    • About Me
    • Home Lab Archives
      • Home Lab 2020-2022
      • Home Lab 2016-2020