Top Posts
Offline VMware Cloud Foundation 9 Depot: Your Path...
VMware Cloud Foundation 9: Simplifying Identity with a...
What’s New In VMware Cloud Foundation 9.0
Deploying & Configuring the VMware LCM Bundle Utility...
VMware Cloud Foundation: Don’t Forget About SSO Service...
VMware Explore Las Vegas 2025: Illuminating the Path...
Securing Software Updates for VMware Cloud Foundation: What...
VMware Cloud Foundation 5.2: A Guide to Simplified...
VMware Cloud Foundation 5.2: Unlocking Secure Hybrid Cloud...
VMware Cloud Foundation – Memory Tiering: Optimizing Memory...
Virtual Bytes
  • Home
  • Home Data Center 2025
  • VMware
    • Cloud
    • Datacenter & Cloud Infrastructure
      • VMware ESXi
      • VMware vCenter
      • VMware vSAN
    • Networking & Security
    • Desktop & App Virtualization
      • Omnissa Horizon
    • Troubleshooting
    • Ansible
  • Education
  • Hardware
    • Hardware Tips & Tricks
  • Events
  • About
    • About Me
    • Home Lab Archives
      • Home Lab 2020-2022
      • Home Lab 2016-2020
Tag:

cyber security

VMware vSAN

Reuse Ex-vSAN Host, Remove vSAN configuration with esxcli

by Tommy Grot October 17, 2020
written by Tommy Grot 1 minutes read

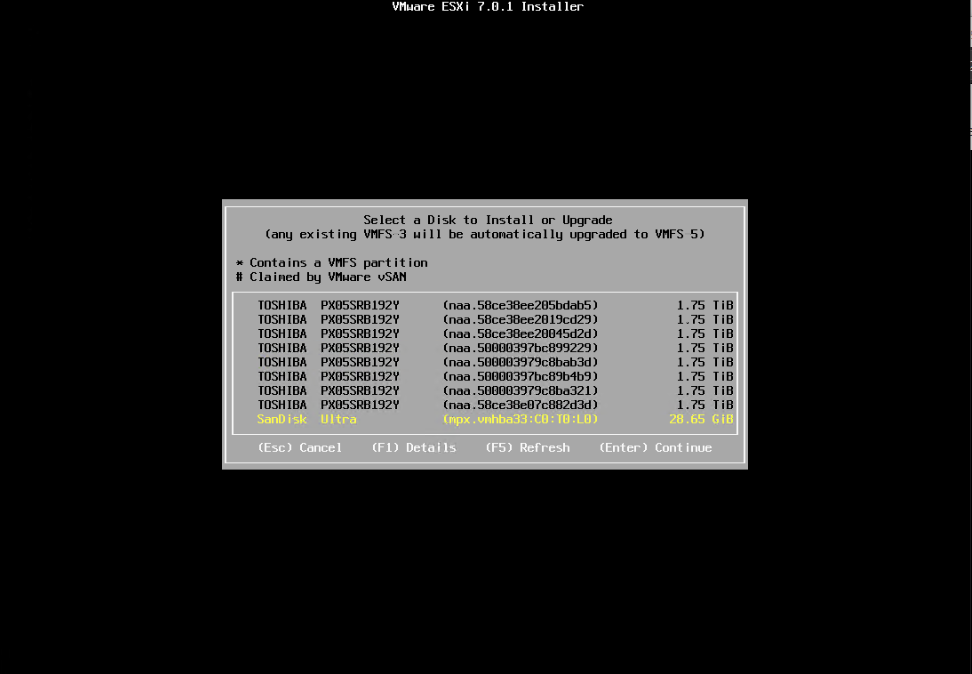
Trying to re-use a previous VMware ESXi host, but the vSAN Disks are still claimed. No worries – Below we will walk you through how to remove the drives and get your disks back to rebuild your vSAN Cluster!

First run this command to check if the disks are apart of the vSAN Cluster

esxcli vsan storage list | grep naa

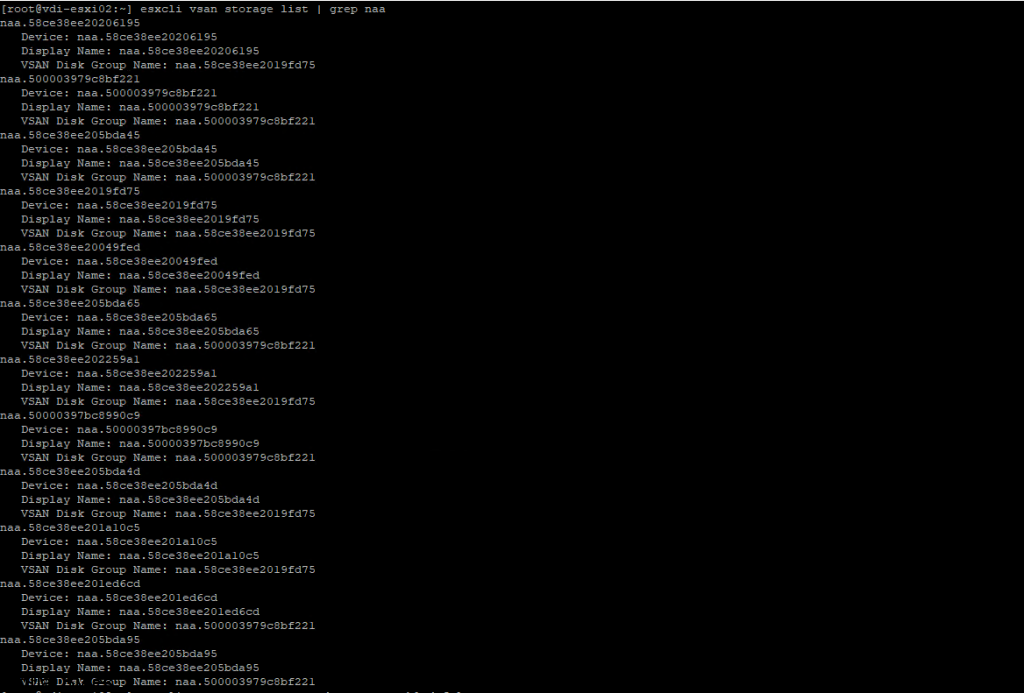
Once you run the esxcli vsan storage list | grep naa, then you will need to run the command below, to prevent that the automatic disk claim is disabled for this procedure.

esxcli vsan storage automode set --enabled false

Once the vSAN automatic disk claim command is completed, then you may remove vSAN Disk Group Names with the command below. Replace the (VSAN Disk Group Name) with your corresponding naa. ID.

esxcli vsan storage remove -s (VSAN Disk Group Name)

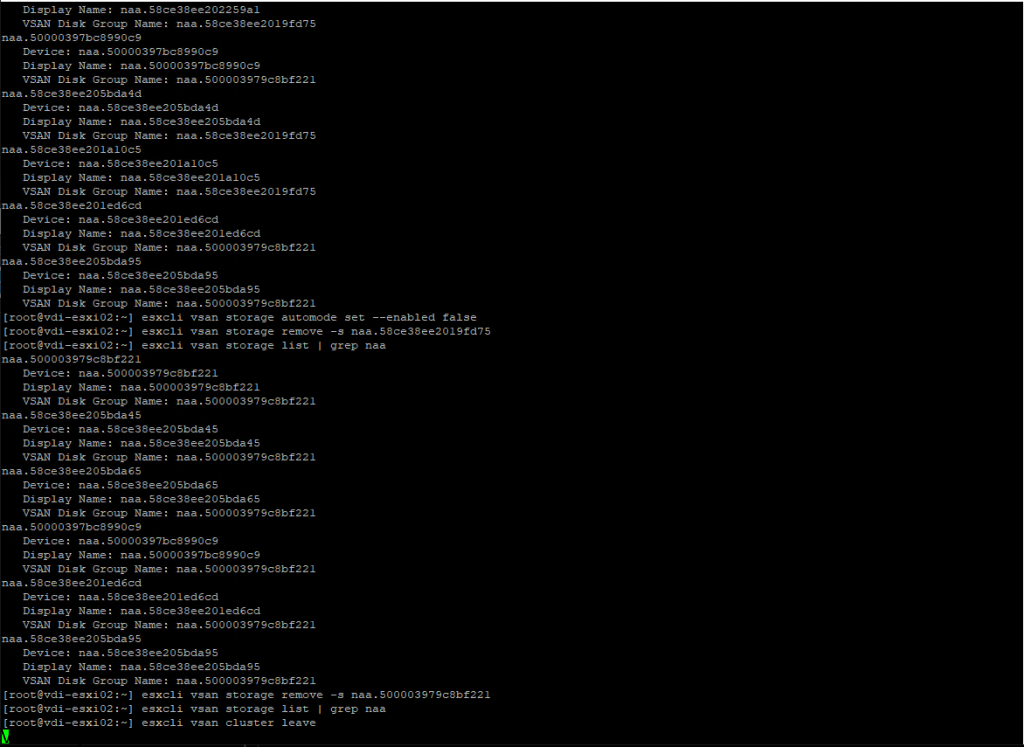
After all vSAN Drives have been removed from each ESXi host. Then you will want to verify that all the vSAN Disks no longer show up and you will want to run the same command as you did in the beginning.

If nothing shows up then you successful removed all vSAN Disks.

esxcli vsan storage list | grep naa

To finalize the removal of vSAN you will want the host to leave the vSAN Cluster so you will need to run this command.

esxcli vsan cluster leave

You will see a vSAN Clustering is not enabled on this host message.

Once you have completed all those steps, you will successfully see that all the SAS SSDs below are no longer claimed by vSAN. Now the ESXi host is ready for a fresh installation!

October 17, 2020 5 comments 4.7K views
1 FacebookTwitterLinkedinThreadsBlueskyEmail
Newer Posts
Older Posts


Recent Posts

  • Offline VMware Cloud Foundation 9 Depot: Your Path to Air-Gapped Deployments
  • VMware Cloud Foundation 9: Simplifying Identity with a Unified SSO Experience
  • What’s New In VMware Cloud Foundation 9.0
  • Deploying & Configuring the VMware LCM Bundle Utility on Photon OS: A Step-by-Step Guide
  • VMware Cloud Foundation: Don’t Forget About SSO Service Accounts

AI cloud Cloud Computing cloud director configure cyber security director dns domain controller ESXi How To las vegas llm llms multicloud NSx NSX-T 3.2.0 NVMe sddc security servers ssh storage tenant upgrade vcd vcda VCDX vcenter VCF vcf 9 VDC vexpert Virtual Machines VMs vmware vmware.com vmware aria VMware Cloud Foundation VMware cluster VMware Explore VMware NSX vrslcm vsan walkthrough

  • Twitter
  • Instagram
  • Linkedin
  • Youtube

@2023 - All Right Reserved. Designed and Developed by Virtual Bytes

Virtual Bytes
  • Home
  • Home Data Center 2025
  • VMware
    • Cloud
    • Datacenter & Cloud Infrastructure
      • VMware ESXi
      • VMware vCenter
      • VMware vSAN
    • Networking & Security
    • Desktop & App Virtualization
      • Omnissa Horizon
    • Troubleshooting
    • Ansible
  • Education
  • Hardware
    • Hardware Tips & Tricks
  • Events
  • About
    • About Me
    • Home Lab Archives
      • Home Lab 2020-2022
      • Home Lab 2016-2020